Jenkins Distributed Builds with Agents and Labels
Connect two Vagrant VMs to Jenkins as SSH agents, use labels to choose where each stage runs, and ship a Java app and a Node.js app across separate nodes.

ON THIS PAGE
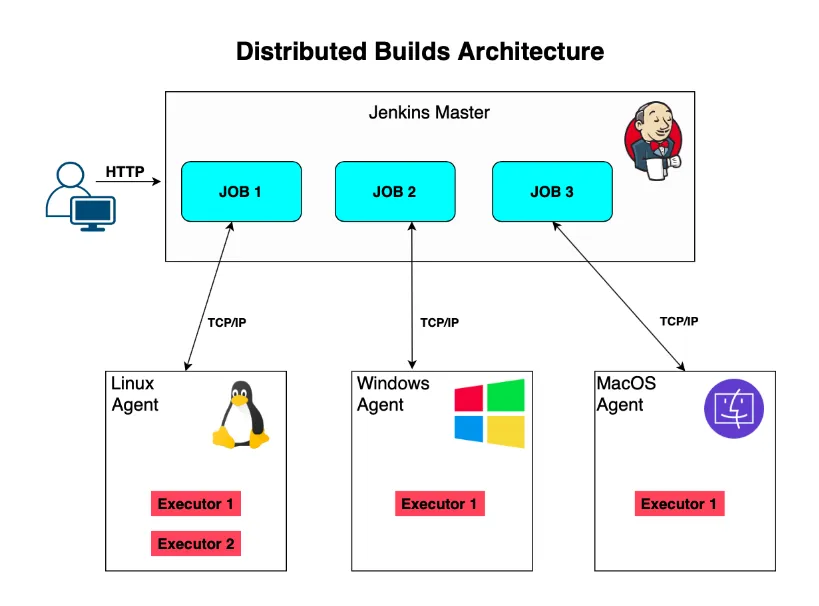
Running every build on the Jenkins controller limits capacity and lets build scripts read Jenkins' own files. This guide adds two Vagrant VMs as SSH agents, labels them, and splits pipelines so that one agent builds and scans Docker images while the other runs the containers.
Prerequisites
- A Jenkins controller installed as described in Jenkins Basics.
- Vagrant and VirtualBox on the host machine.
- The Docker Hub credential and SMTP settings from Jenkins Pipelines.
How distributed builds work
| Term | Meaning |
|---|---|
| Controller | The machine that runs the Jenkins server and web UI. It schedules jobs. Older docs call it the "master". |
| Agent (node) | A machine that runs jobs for the controller. Older docs call it a "slave". |
| Executor | A slot on a node that runs one build at a time. Two executors means two builds can run at once on that node. |
| Label | A name you give a node. A pipeline asks for a label, and Jenkins picks a node that has it. |
Splitting work this way keeps heavy builds off the controller, and lets each machine carry only the tools its job needs.
Lab setup: three Vagrant VMs
The lab uses the existing Jenkins VM plus two agent VMs created with Vagrant:
| VM hostname | IP | Role |
|---|---|---|
jenkins | 192.168.56.150 | Jenkins controller |
jenkinsslave1 | 192.168.56.151 | Agent 1 |
jenkinsslave2 | 192.168.56.152 | Agent 2 |
The Vagrantfile below is for the controller. For each agent, change hostname, vb.name and the IP.
Vagrant.configure("2") do |config|
  config.vm.box = "bento/ubuntu-24.04"
  config.vm.box_version = "202502.21.0"

  config.vm.hostname = "jenkins"
  config.vm.network "private_network", ip: "192.168.56.150"

  config.vm.provider "virtualbox" do |vb|
    vb.name = "jenkin_vm"
    vb.memory = 4024
    vb.cpus = 4
  end

  config.vm.provision "shell", inline: <<-SHELL
    apt-get update
  SHELL
endPasswordless SSH from the controller
The controller logs in to each agent over SSH. Password login works, but key-based login is the standard for automation. On the controller, generate a key and copy the public key to each agent:
$ ssh-keygen -t rsa
$ ssh-copy-id vagrant@192.168.56.151
$ ssh-copy-id vagrant@192.168.56.152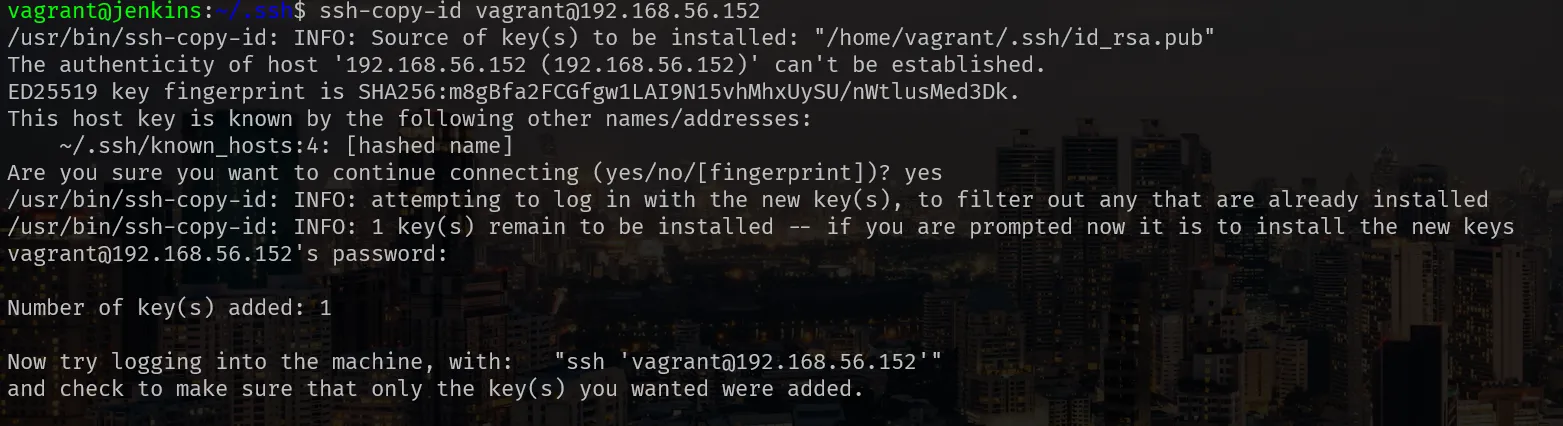
After that, ssh vagrant@192.168.56.152 works without a password. Next, confirm that the machines can reach each other:
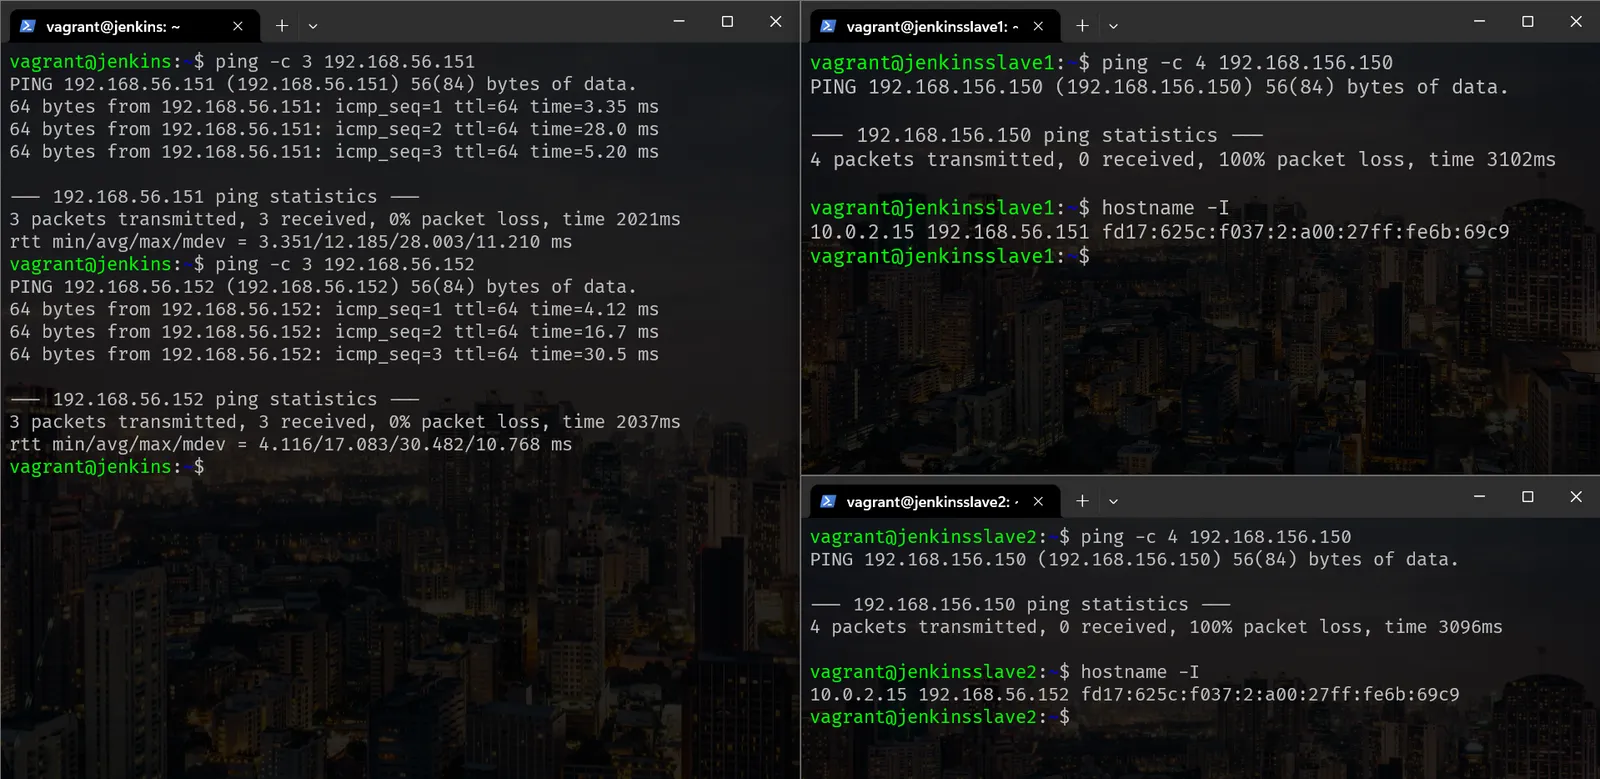
The controller reaches both agents. The pings from the agents failed only because I typed 192.168.156.150 instead of 192.168.56.150. Agents do not need to reach the controller for an SSH agent, because the controller opens the connection.
Install Java on every agent
Jenkins starts its agent program (a Java process) on the remote machine, so each agent needs Java. Follow the Java steps in the Jenkins Linux install guide. Use the same major Java version as the controller.
Add an SSH agent in Jenkins
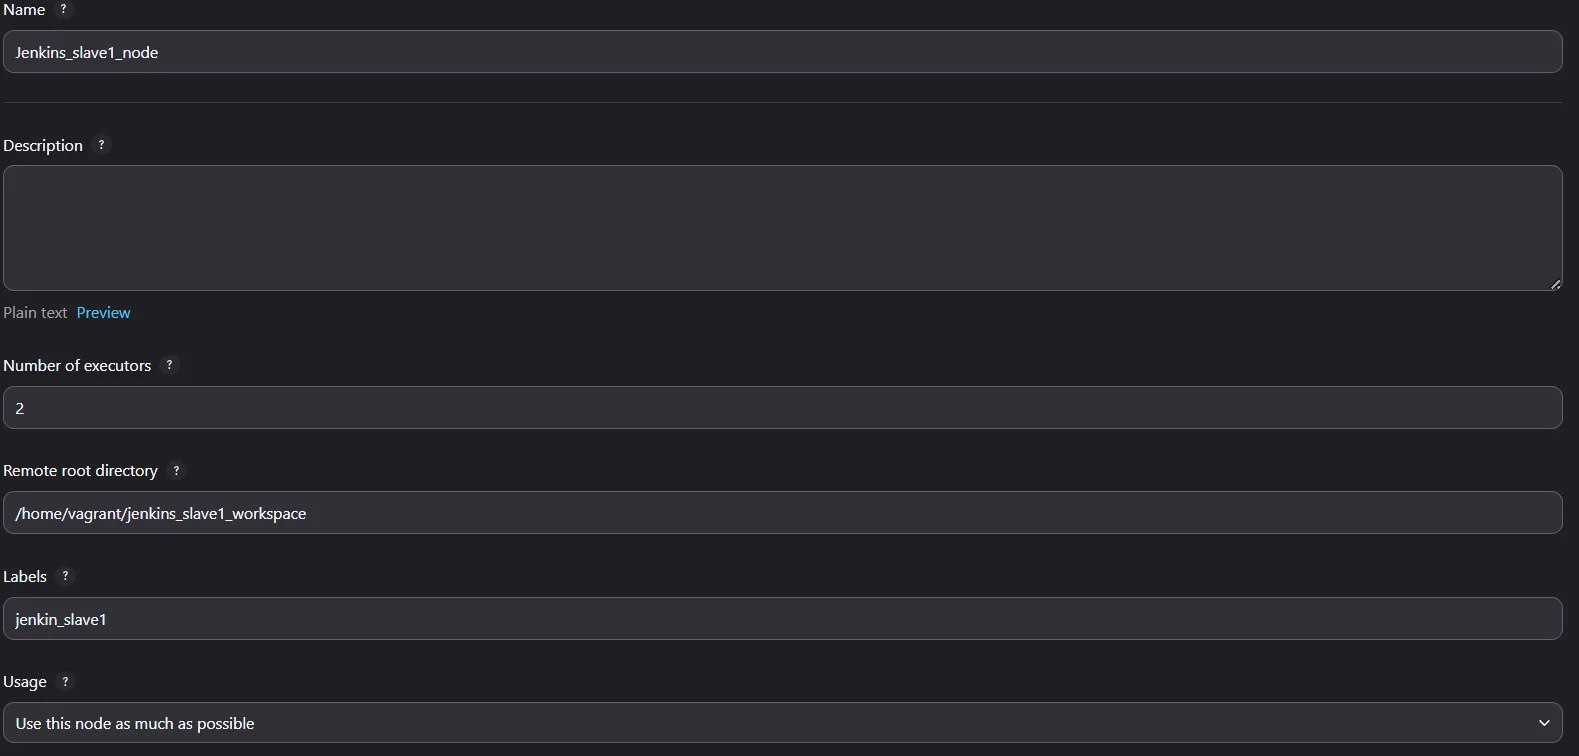
In Jenkins go to Manage Jenkins → Nodes → New Node, enter a name, choose Permanent Agent and click Create.
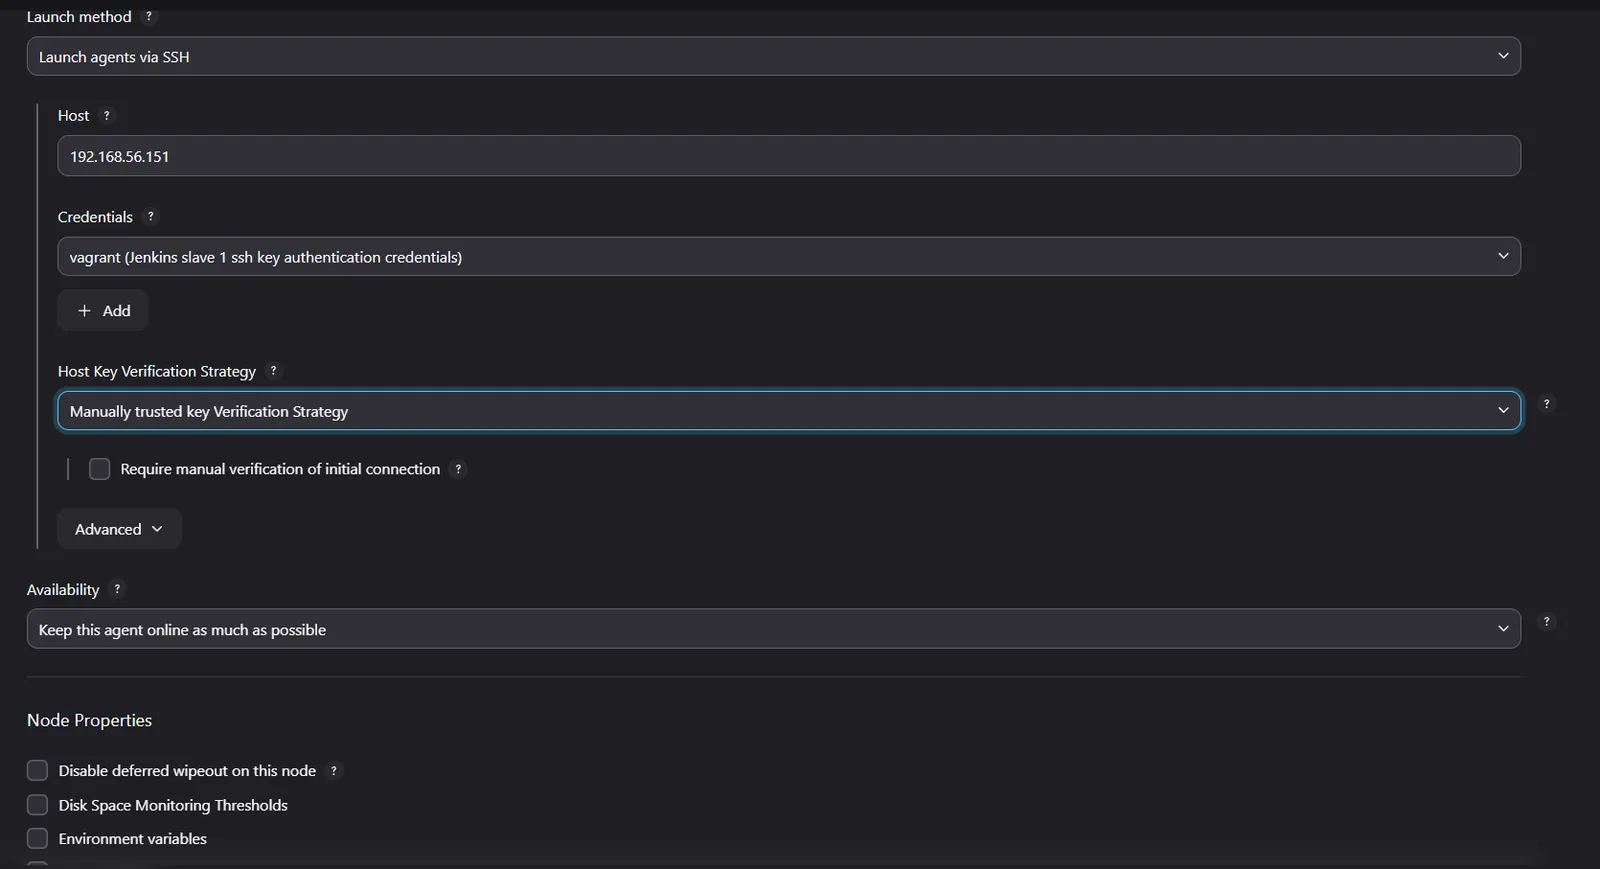
| Field | Value | Notes |
|---|---|---|
| Name | Jenkins_slave1_node | Shown in the Nodes list. |
| Number of executors | 2 | How many builds run at once on this node. A common starting point is one per CPU core. |
| Remote root directory | /home/vagrant/jenkins_slave1_workspace | Create this folder on the agent first. Jobs run inside it. |
| Labels | jenkin_slave1 | The name pipelines use to pick this node. |
| Usage | Use this node as much as possible | |
| Launch method | Launch agents via SSH | |
| Host | 192.168.56.151 | Agent IP or DNS name. |
| Credentials | SSH key for user vagrant | See below. |
| Host Key Verification Strategy | Manually trusted key Verification Strategy | |
| Availability | Keep this agent online as much as possible |
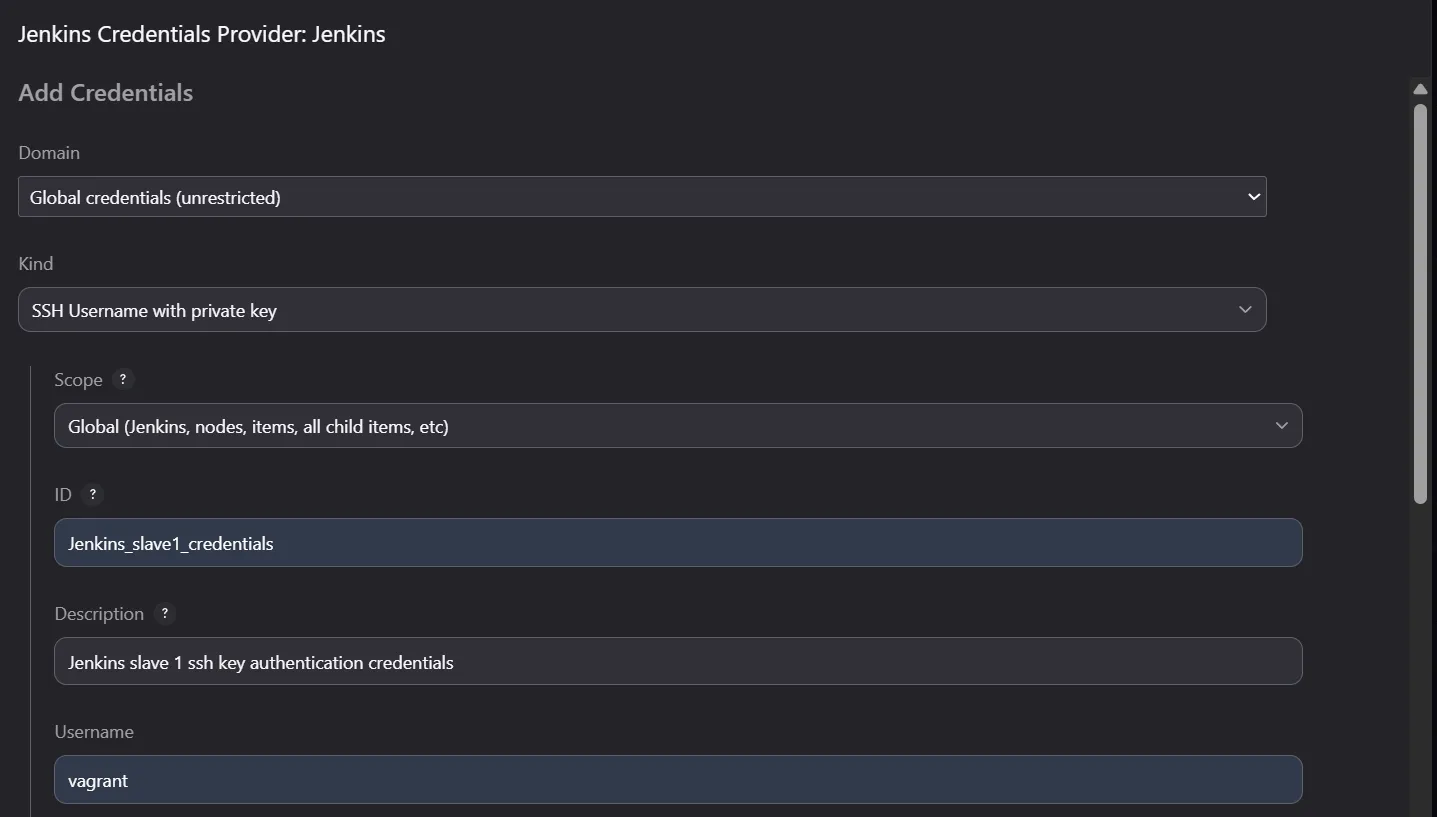
For Credentials, click Add and create an SSH Username with private key credential:
- ID:
Jenkins_slave1_credentials - Username: the user on the agent (
vagrant; check withwhoami) - Private Key → Enter directly: paste the controller's private key (
~/.ssh/id_rsa), the pair of the public key copied withssh-copy-id
After saving, open the node's Log. It shows the SSH connection and the agent coming online:
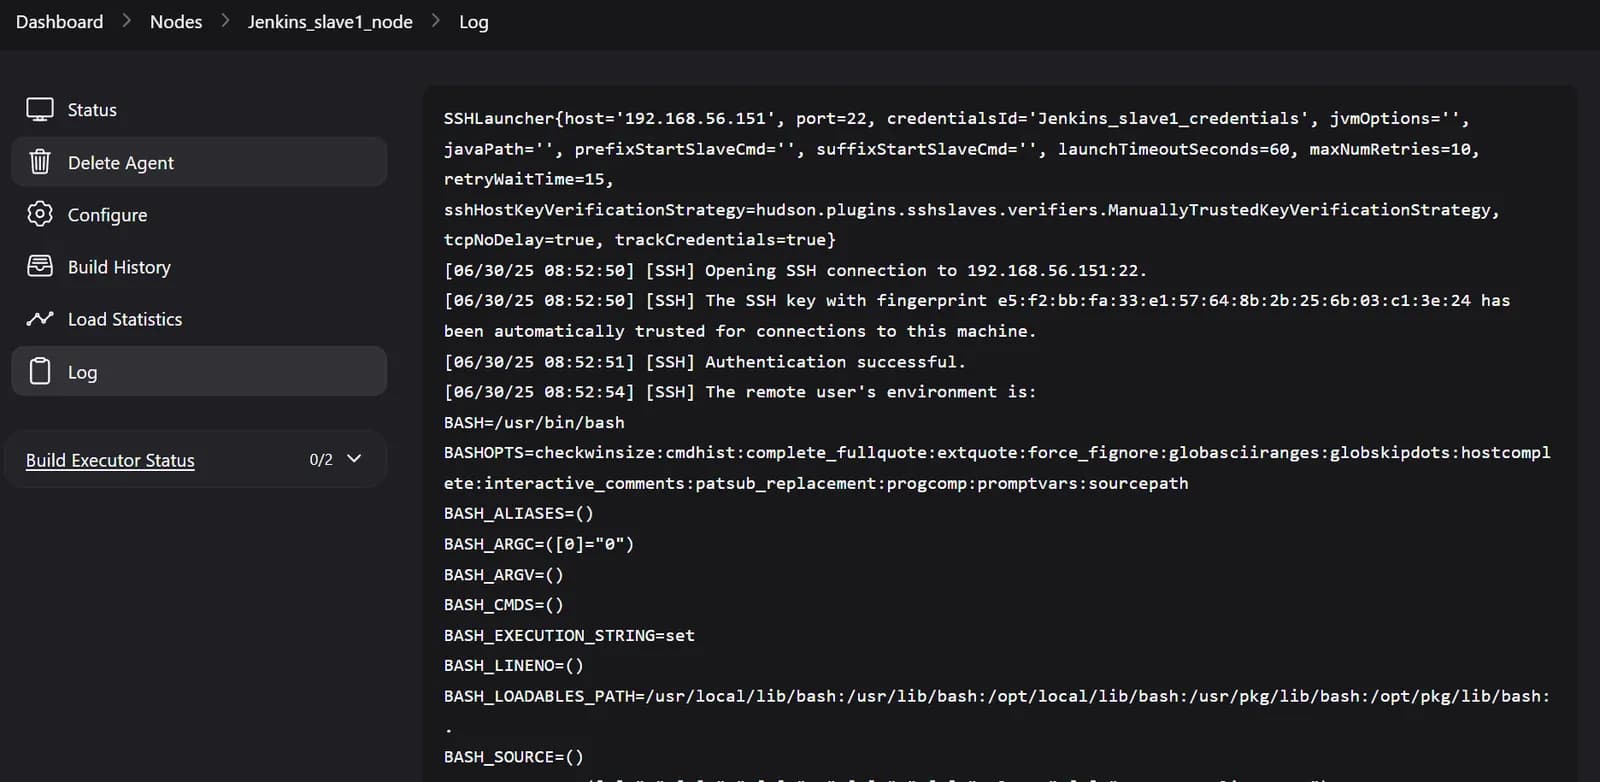
<===[JENKINS REMOTING CAPACITY]===>channel started
Remoting version: 3301.v4363ddcca_4e7
Launcher: SSHLauncher
Communication Protocol: Standard in/out
This is a Unix agent
Agent successfully connected and onlineRun a freestyle job on a label
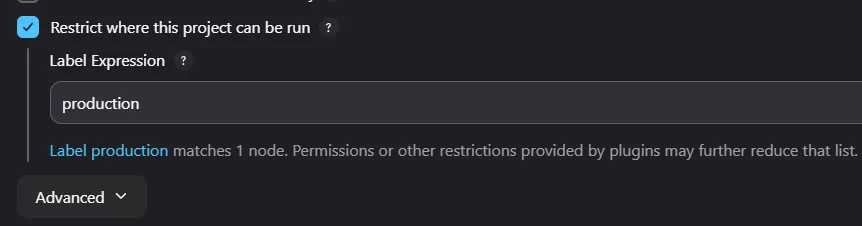
To test the agent, create a freestyle project (New Item → Freestyle project). Under General, tick Restrict where this project can be run and enter a label. Here the label is production, which matches one node:
Then add an Execute shell build step. The output shows the agent's hostname and user, not the controller's.
#!/bin/bash
echo "Hello DevOps"
echo "$HOSTNAME"
echo "$SHELL"
whoami
date
who
df -h *Label the built-in node
The controller itself is also a node, called Built-In Node. You can give it a label in Manage Jenkins → Nodes → Built-In Node → Configure → Labels. A job with agent any can then run on any node that has a free executor, including the controller.
Example 1: a simple pipeline on one agent
A first pipeline that runs every stage on the agent labeled jenkin_slave1:
pipeline {
    agent { label 'jenkin_slave1' }

    stages {
        stage('Hello') {
            steps {
                echo 'Hello World'
            }
        }
        stage('Some commands') {
            steps {
                sh '''
                date
                whoami
                hostname
                touch hello.txt
                df -h *
                '''
            }
        }
    }
}agent at the top of the pipeline applies to all stages. hello.txt is created in the job's folder under the agent's remote root directory.
Example 2: Java app, build on one agent and deploy on another
The next pipeline uses two agents with different labels:
| Label | Job | Tools installed |
|---|---|---|
production | Package, build the image, scan, push | Java, Maven, Docker, Trivy |
deployment | Run the container | Java, Docker |
This is the same Java pipeline from Jenkins Pipelines, but each stage now has its own agent block. That part also shows how to add the Docker Hub credential (jenkinsdockercred) and Gmail settings for the mail step.
pipeline {
    agent any

    environment {
        mydockerimage = "deependrabhatta/jenkins_data"
    }

    stages {
        stage('Compile the code') {
            agent { label "production" }
            steps {
                echo 'packaging the code'
                sh 'mvn clean package'
            }
            post {
                success {
                    echo "Archiving the Artifacts...."
                    archiveArtifacts artifacts: '**/*.war'
                }
            }
        }
        stage('Build docker image') {
            agent { label "production" }
            steps {
                echo "Building docker image"
                sh 'docker image build -t ${mydockerimage}:${BUILD_NUMBER} .'
            }
        }
        stage('Image scanning with trivy') {
            agent { label "production" }
            steps {
                echo "Scanning image for vulnerabilities"
                sh 'trivy image ${mydockerimage}:${BUILD_NUMBER}'
            }
        }
        stage('Pushing docker image to dockerhub') {
            agent { label "production" }
            steps {
                echo "pushing image"
                withDockerRegistry([credentialsId: 'jenkinsdockercred', url: '']) {
                    sh 'docker push $mydockerimage:$BUILD_NUMBER'
                }
            }
        }
        stage('Deploy to devenv') {
            agent { label "deployment" }
            steps {
                echo 'Running a Development environment'
                sh '''
                docker container stop myapp || true
                docker container rm myapp || true
                docker run -d --name myapp -p 8089:8080 ${mydockerimage}:${BUILD_NUMBER}
                '''
            }
        }
        stage('Deploy Production Environment') {
            steps {
                timeout(time: 5, unit: 'DAYS') {
                    input message: 'Approve PRODUCTION Deployment?'
                }
                echo "Running app on Prod env"
                sh '''
                docker stop mymanualdeployapp || true
                docker rm mymanualdeployapp || true
                docker run -itd --name mymanualdeployapp -p 8083:8080 $mydockerimage:$BUILD_NUMBER
                '''
            }
        }
    }
    post {
        always {
            mail to: 'team@example.com',
                subject: "Job '${JOB_NAME}' (${BUILD_NUMBER}) is waiting for input",
                body: "Please go to ${BUILD_URL} and verify the build"
            cleanWs()
        }
        success {
            mail to: 'devops@example.com',
                cc: 'team@example.com',
                from: 'jenkins@example.com',
                subject: 'BUILD SUCCESS NOTIFICATION',
                body: """Hi Team,
                Build #$BUILD_NUMBER is successful, please go through the url
                $BUILD_URL
                and verify the details.
                Regards,
                DevOps Team"""
        }
        failure {
            mail to: 'devops@example.com',
                cc: 'team@example.com',
                from: 'jenkins@example.com',
                replyTo: 'devops@example.com',
                subject: 'BUILD FAILED NOTIFICATION',
                body: """Hi Team,
                Build #$BUILD_NUMBER is unsuccessful, please go through the url
                $BUILD_URL
                and verify the details.
                Regards,
                DevOps Team"""
        }
    }
}What each stage does:
- Compile the code (production):
mvn clean packagebuilds the.warfile, andarchiveArtifactskeeps it with the build. - Build docker image (production): tags the image with the build number, so every build gets a new tag.
- Image scanning with trivy (production): lists known vulnerabilities in the image.
- Pushing docker image (production): logs in with the stored credential and pushes.
url: ''means Docker Hub. - Deploy to devenv (deployment): replaces the old
myappcontainer with the new image. The deployment agent pulls the image from Docker Hub, because it did not build the image locally. - Deploy Production Environment: waits up to five days for someone to click approve. It has no
agentblock, so it runs on any free node (agent any). - post: sends mail and cleans the workspace after every run.
Example 3: Node.js app with Docker Compose
The app is a React frontend, a Node.js backend and MongoDB, in the Node-JS repository. The main branch has the app; the jenkins branch has the full pipeline. The agent setup is the same as above: SSH keys, a connectivity check, Java on both agents, then Docker and Trivy where needed.
The app needs two settings files that are not in Git. They point at the deployment agent (192.168.56.152), where the containers run:
REACT_APP_API_URL=http://192.168.56.152:5000FRONTEND_DOMAIN=http://192.168.56.152:3000Because .env is not in the repository, the pipeline writes it with writeFile. React reads REACT_APP_ variables while the image is built, so the file must exist on the build agent before docker build, and again on the deployment agent for Compose.
Each build pushes images with new tags (frontend_<build> and backend_<build>). To tell Compose which tags to run, the pipeline writes a compose.env file and passes it with --env-file:
pipeline {
    agent any

    environment {
        mydockerimage = "deependrabhatta/node_js"
    }

    stages {
        stage('Write Frontend .env in production environment') {
            agent { label 'production' }
            steps {
                writeFile file: './FrontEnd/.env', text: "REACT_APP_API_URL=http://192.168.56.152:5000"
                sh "cat ./FrontEnd/.env"
            }
        }
        stage('Build docker image') {
            agent { label "production" }
            steps {
                echo "Building docker images"
                sh "docker image build --no-cache -t ${mydockerimage}:frontend_${BUILD_NUMBER} ./FrontEnd"
                sh "docker image build --no-cache -t ${mydockerimage}:backend_${BUILD_NUMBER} ./BackEnd"
            }
        }
        stage('Image scanning with trivy') {
            agent { label "production" }
            steps {
                echo "Scanning image for vulnerabilities"
                sh "trivy image ${mydockerimage}:frontend_${BUILD_NUMBER} > trivy_frontend_report.txt"
                sh "trivy image ${mydockerimage}:backend_${BUILD_NUMBER} > trivy_backend_report.txt"
            }
        }
        stage('Pushing docker image to dockerhub') {
            agent { label "production" }
            steps {
                echo "pushing image to docker hub registry"
                withDockerRegistry([credentialsId: 'jenkinsdockercred', url: '']) {
                    sh '''
                    docker push ${mydockerimage}:frontend_${BUILD_NUMBER}
                    docker push ${mydockerimage}:backend_${BUILD_NUMBER}
                    '''
                }
            }
        }
        stage('Preparing compose.env file for docker-compose.yaml') {
            agent { label "deployment" }
            steps {
                script {
                    writeFile file: 'compose.env', text: """
FRONTEND_IMAGE=${mydockerimage}:frontend_${BUILD_NUMBER}
BACKEND_IMAGE=${mydockerimage}:backend_${BUILD_NUMBER}
"""
                    sh "cat compose.env"
                }
            }
        }
        stage('Write Frontend .env') {
            agent { label 'deployment' }
            steps {
                writeFile file: './FrontEnd/.env', text: "REACT_APP_API_URL=http://192.168.56.152:5000"
                sh "cat ./FrontEnd/.env"
            }
        }
        stage('Deploy to devenv') {
            agent { label "deployment" }
            steps {
                echo 'Running a Development environment'
                sh '''
                docker compose --env-file compose.env down || true
                docker compose --env-file compose.env pull
                docker compose --env-file compose.env up -d
                '''
            }
        }
    }
    // post block: same mail and cleanWs() steps as in Example 2
}The first four stages run on the production agent: write .env, build both images, save Trivy reports to text files, and push. The last three run on the deployment agent: write compose.env and .env, then replace the running stack. The Docker Hub credential lives on the controller; agents use it through withDockerRegistry.
The Compose file reads the two image names from compose.env:
services:
  frontend:
    image: "${FRONTEND_IMAGE}"
    ports:
      - "3000:80"
    env_file:
      - ./FrontEnd/.env
    networks:
      - mynetwork

  backend:
    image: "${BACKEND_IMAGE}"
    depends_on:
      - mongodb
    env_file:
      - ./BackEnd/config.env
    ports:
      - "5000:5000"
    networks:
      - mynetwork

  mongodb:
    image: mongo:4.4
    command: [--bind_ip_all]
    volumes:
      - mongo-data:/data/db
    healthcheck:
      test: mongo --eval "db.adminCommand('ping')"
      interval: 5s
      timeout: 5s
      retries: 10
    networks:
      - mynetwork

volumes:
  mongo-data:

networks:
mynetwork:More on Compose files in Docker Compose.
Switching the registry to Harbor
The same pipeline also runs against a private Harbor registry. Harbor installation and certificate setup are covered in Dockerfile and Registries. In the Jenkinsfile only the image name and the push stage change:
     environment {
-        mydockerimage = "deependrabhatta/node_js"
+        mydockerimage = "harbor.registry.local/jenkins/mylocalimage"
     }
 ...
-        stage('Pushing docker image to dockerhub') {
+        stage('Pushing docker image to harbor registry') {
             agent { label "production" }
             steps {
-                withDockerRegistry([credentialsId: 'jenkinsdockercred', url: '']) {
+ withDockerRegistry([credentialsId: 'Harborregistrycredentials', url: 'https://harbor.registry.local']) {Extra setup for Harbor:
- Install the Harbor CA certificate on every node that talks to Harbor, including the controller.
- Without a real DNS record, add the registry name to
/etc/hostson every node. - On each node, run
docker login harbor.registry.localonce to prove the certificate works. - In Jenkins, add a Username with password credential with the Harbor user and password (ID
Harborregistrycredentials).
$ cat /etc/hosts
127.0.0.1 localhost
127.0.1.1 vagrant
192.168.56.220 harbor.registry.localTroubleshooting
| Problem | Cause and fix |
|---|---|
ping between VMs shows 100% packet loss | Check the IP. My agents pinged 192.168.156.150 instead of 192.168.56.150. hostname -I shows each VM's real addresses. |
| Agent does not come online | Read the node's Log page. Most often Java is missing on the agent, the remote root directory does not exist, or the private key in the credential does not match the key copied with ssh-copy-id. |
Docker steps fail with permission denied on /var/run/docker.sock | Add the agent user to the docker group, then disconnect and relaunch the agent (or restart Jenkins). The running agent process does not see the new group until it restarts. |
| Deploy stage cannot find the image | The deployment agent has no local copy. Push first, then pull on the deployment agent, as the Compose stage does. |
| Harbor push or pull fails with a certificate error | The CA certificate is missing on that node. Install it and test with docker login harbor.registry.local. |
| Frontend calls the wrong API URL | .env is not in Git. Write it in the pipeline before docker build on the build agent. |
Key takeaways
- The controller schedules jobs; agents run them. Executors set how many jobs a node runs at once.
- An SSH agent needs Java, a remote root folder and the controller's key in a Jenkins credential.
- Labels decide where work runs:
agent { label 'production' }per stage lets one pipeline build on one node and deploy on another. - A node that did not build an image must pull it from a registry, so push before you deploy.
- Tag images with
BUILD_NUMBERand pass the tag to Compose through an env file.
Next in this series: Jenkins and GitHub Webhooks.
Keep reading
- MERN Stack CI/CD Pipeline with GitHub Actions and a Self-Hosted Runner
Build a GitHub Actions pipeline that builds MERN stack Docker images, pushes them to Docker Hub and deploys them to a VM through a self-hosted runner.
- SonarQube and Nexus in a Jenkins Pipeline
Install SonarQube and Sonatype Nexus, define a quality gate, and extend a Jenkins pipeline to scan Java code and publish each WAR build to a Nexus repository.
- Jenkins Pipeline for Building and Deploying Docker Images
Write a declarative Jenkinsfile that builds a Maven app, packs it into a Docker image, scans it with Trivy, pushes it to Docker Hub, deploys it and emails the team.