Vagrant
Vagrant is an automation tool to manage VM lifecycle, right from creating avirtual machine to making any changes, deleting it, recreating it, provisioningit, anything that we do manually with VMs, we…


ON THIS PAGE
Vagrant is an automation tool to manage VM lifecycle, right from creating a
virtual machine to making any changes, deleting it, recreating it, provisioning
it, anything that we do manually with VMs, we can automate that by using
vagrant. Vagrant is a command line tool.
VM Management process
- OS Installations
- Time Consuming
- Manual setup
- Tough Replication for Multi VM
- Documentations for Multi VM
Vagrant for VM’s
- No OS installations
- VM Setup through Images(vagrant boxes)
- Images/ Boxes available in Vagrant cloud
- Manage VM’s with a file(Vagrantfile)
- VM changes automatic through Vagrantfile
- Vagrant commands to manage VM’s
- Provisioning VM/ Executing commands & scripts
Vagrant Architecture
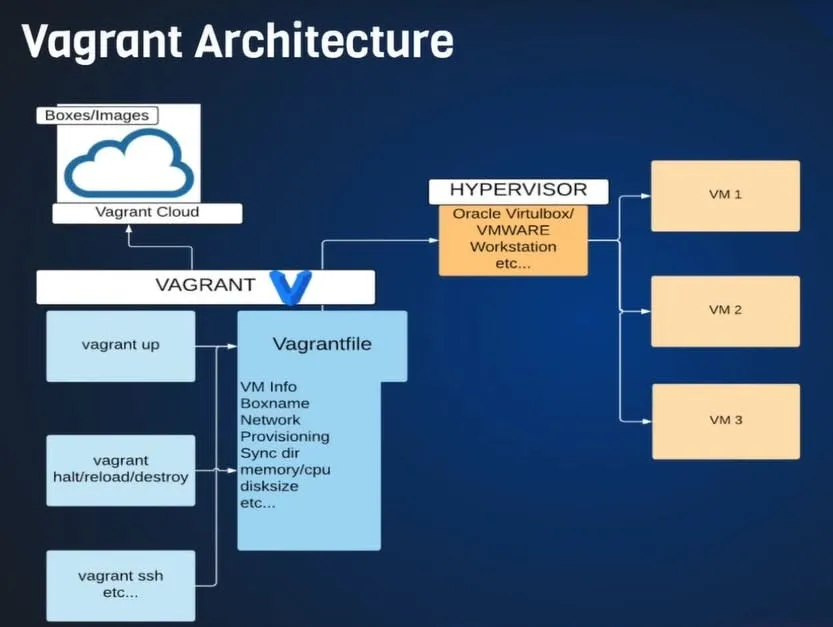
Vagrant file: Vagrant file is file that is written in ruby language and has all the informatio related machine like VM info network info [public, private], Disk, RAM, Software, Sync directory.
To setup vagrant VM
- First install virtual box like virtual box or VM workstation.
- Now install vagrant and install in your host machine not in VM.
- check by using vagrant –version command.
- Create a Project Directory(Folder/Directory at any location of your choice)
- Run vagrant init to initalize a vagrant file.
- This will create a vagrant file in that directory.
- Now modify the file based on your requirement.
- Below is an example to setup a UBUNTU24.04 machine
- Yo can use any box by going to hashicorp site.
Vagrant.configure("2") do |config|

  config.vm.box = "bento/ubuntu-24.04"
  config.vm.box_version = "202502.21.0"

  config.vm.hostname = "Dipendra"

  config.vm.network "private_network", ip: "192.168.56.210"

#config.vm.network "public_network", bridge: "Killer(TM) Wi-Fi 7 BE1750x 320MHz Wireless Network Adapter (BE200NGW)"

  # config.vm.synced_folder "../Ubuntu24.04", "/home/ubuntu"

  config.vm.provider "virtualbox" do |vb|
  vb.name = "Ubuntu24"
  vb.memory = 4024
  vb.cpus = 4
  end
  config.vm.provision "shell", inline: <<-SHELL
    apt-get update
  #   apt-get install -y apache2
  SHELL
end- Now run the machine using Vagrant commands like vagrant up
- Login with ‘vagrant ssh’ command for Linux VM.
- By default hostname is vagrant and password is also vagrant.
Commands
- Vagrant up → to start vm
- Vagrant ssh → to login vm
- Vagrant halt → to poweroff vm
- Vagrant reload → to reload/reboot vm
- Vagrant destroy → to delete vm
- vagrant global-status → to see the status of all the VMs. It also shows some stale information.
- vagrant global-status –prune → to remove old information
- vagrant status → to show vm status in the current directory
Other Configurations
- Vagrant IP, Memory & CPU
- Vagrant IP and network
- Bridged network
- private_network
- Changing RAM size
- vb.memory = “value” #Allocating RAM
- vb.cpus = “value” #Allocation core
- Vagrant Sync Directories
- Default sync directory inside vm
- /vagrant/
- Use Cases
- preserve the files in the vm where there is a chance of vm being corrupted
or aborted - When using the IDEs for coding
- preserve the files in the vm where there is a chance of vm being corrupted
- Syntax:
- config.vm.synced_folder “../data”, “/opt/vagrant_data”
- config.vm.synced_folder “./shared_folder”, “/home/vagrant/shared_folder”
- Here:
- ./Shared_folder is the folder of our host machine
- /home/vagrant/shared_folder is the path to the virtual machine
- Default sync directory inside vm
- Provision
- Means executing the commands or scripts when the vm comes up. In other technologies, this is also called bootstrapping.
- config.vm.provision “shell”, inline: <<-SHELL
Write script here
SHELL - On a already created vm, update the Vagrantfile and run
- vagrant reload –provision
- Vagrant IP and network
📝 Vagrant VM Management: Full Setup Guide (Using 127.0.0.1)
This guide provides the robust steps to connect and manage your new VM (db-server) from any directory on your Linux host.
Step 1: Initial VM Setup & Preparation 🚀
- Configure VM:
- Ensure your new VM’s
Vagrantfilehas a unique hostname and static IP:Rubyconfig.vm.network "private_network", ip: "192.168.56.220" # Static IP (For network access) config.vm.hostname = "db-server"
- Ensure your new VM’s
- Start the VM:
cd /path/to/new/vm/folder vagrant up
Step 2: System Integration (SSH Config) 🔗
This step allows you to connect (ssh) to the VM from anywhere using a simple name.
- Generate and View the Key Path: While inside the new VM’s directory, generate a temporary config file, and use
catto view the required key path:Generate the config and save it to a temporary file vagrant ssh-config > temp_config.txtView the key path cat temp_config.txt | grep IdentityFile- Copy the absolute path that is output (it will look like
/home/dipendra/.../private_key). - You can then delete
temp_config.txt.
- Copy the absolute path that is output (it will look like
- Edit the Global SSH Config: Open your primary SSH configuration file:
nano **~/.ssh/config**
- Paste & Customize the Block: Paste the configuration block at the bottom. This uses the reliable
127.0.0.1(localhost) connection method:
Host db-server # <--- RENAME THIS: Use the VM's hostname or a unique  name HostName
127.0.0.1 # <--- Use reliable localhost IP
User vagrant
Port 2222 # <--- Use the standard Vagrant port
UserKnownHostsFile /dev/null
StrictHostKeyChecking no
PasswordAuthentication no
Identity file /path/to/new/vm/folder/.vagrant/machines/default/virtualbox/private_key # <--- PASTE KEY PATH HERE
IdentitiesOnly yes
LogLevel FATALOr simply copy paste this command output in .ssh/config file
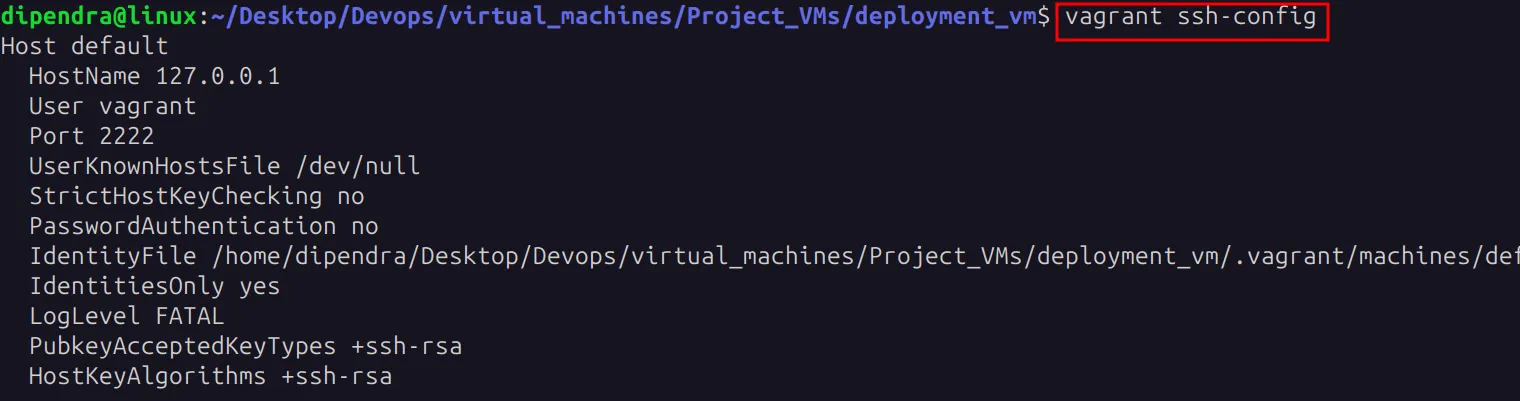
- Save and Exit.
- Test the Connection: Test the direct connection from anywhere on your host system:
ssh db-server
Step 3: Workflow Automation (CLI Aliases) ⚙️
This step allows you to manage (vagrant up, halt) the VM from anywhere using custom commands.
- Open your shell configuration file:
nano ~/.bashrc(Use~/.zshrcif you use Zsh)
- Add the Startup and Shutdown Aliases:
- Paste the following aliases, replacing the host name (
db-server) and the directory path with the details for your new VM:# Vagrant Shortcuts for DB Server VMalias db-up='(cd /path/to/new/vm/folder && vagrant up)'alias db-down='(cd /path/to/new/vm/folder && vagrant halt)'
- Paste the following aliases, replacing the host name (
- Save, Exit, and Reload: Apply the changes to your current shell session:
**source ~/.bashrc**
💡 Alternative: Static IP Connection Note
If you find that the 127.0.0.1:2222 connection is slow or unstable, you can try connecting directly to the static IP you configured, as it sometimes offers better performance:
| Connection Method | HostName | Port | Stability |
|---|---|---|---|
| Port Forwarding (Default) | 127.0.0.1 | 2222 | Highest Reliability |
| Static IP (Alternative) | 192.168.56.220 | (Omit or use 22) 22 is ssh port | Higher Potential Performance |
To switch to the static IP method, simply change the HostName in your ~/.ssh/config file to the static IP and remove the Port 2222 line:
Host deployment
  HostName 192.168.56.212
  User vagrant
  Port 22 //optional
  UserKnownHostsFile /dev/null
  StrictHostKeyChecking no
  PasswordAuthentication no
  IdentityFile /path
  IdentitiesOnly yes
  LogLevel FATAL
  PubkeyAcceptedKeyTypes +ssh-rsa
HostKeyAlgorithms +ssh-rsaKeep reading
- Ansible playbook II
First Read ansible playbook1 before starting this section. Ansible “file” and “template” module File ownership create directory create file permission syslinks Template To understand this let’s…
- Ansible Playbook I
In this blog we will explore different playbooks example in ansible. Earlier we have used Ad-hoc command to configure another machine using ansible host. But in that approach we don’t have any data…
- Shell Scripting
It is a way to automate tasks by writing a series of commands in a text file called script that Linux shell can execute. It’s like creating a ‘to do list’ for your computer to follow step by step…