SonarQube and Nexus in a Jenkins Pipeline
Install SonarQube and Sonatype Nexus, define a quality gate, and extend a Jenkins pipeline to scan Java code and publish each WAR build to a Nexus repository.

ON THIS PAGE
A pipeline that ships code without inspecting it, or without keeping the exact artifact it deployed, makes releases hard to trust and hard to roll back. This guide adds two stages to a Java pipeline: SonarQube analysis judged by a quality gate, and an upload of the built .war file to Sonatype Nexus, so every build is both inspected and versioned outside Jenkins. Both servers run on Vagrant VMs and are installed by script.
| Machine | IP | Runs |
|---|---|---|
| Jenkins | 192.168.56.5 | Jenkins (port 8080) |
| SonarQube | 192.168.56.6 | SonarQube (port 9000) |
| Nexus | 192.168.56.5 | Nexus (port 8081), on the Jenkins VM |
Prerequisites
- The Jenkins pipeline from Jenkins pipelines, building a Maven web app.
- Ubuntu VMs reachable from Jenkins, as in the table above.
- A Maven build that produces Surefire test results, a JaCoCo XML report and a Checkstyle report.
SonarQube in short
SonarQube has two parts:
- SonarQube server: the web dashboard. It stores analysis results, applies quality gates and needs a database (PostgreSQL here) and an embedded Elasticsearch.
- SonarScanner: a command-line client that runs during the build, analyzes the source code and uploads a report to the server.
A quality profile is the set of rules used to analyze code in one language. A quality gate is a set of pass or fail conditions on the results, for example "coverage on new code is at least 80%". If a project fails its gate, it should not be released.
Install SonarQube
Install SonarQube Community Build on an Ubuntu VM with the script below. It sets the kernel and user limits SonarQube needs, installs Java 17 and PostgreSQL, creates the database, installs SonarQube as a systemd service and puts Nginx in front of it.
#!/bin/bash
set -e

echo "=== SonarQube Installation Started ==="

# Kernel limits for SonarQube's embedded Elasticsearch
cat <<EOT > /etc/sysctl.d/99-sonarqube.conf
vm.max_map_count=524288
fs.file-max=131072
EOT
sysctl --system

# User limits for the sonar user
cat <<EOT > /etc/security/limits.d/99-sonarqube.conf
sonar   -   nofile   131072
sonar   -   nproc    8192
EOT

# Install Java 17
apt-get update -y
apt-get install openjdk-17-jdk wget curl unzip ca-certificates -y
java -version

# Install PostgreSQL from the PostgreSQL apt repository
install -d /usr/share/postgresql-common/pgdg
curl -o /usr/share/postgresql-common/pgdg/apt.postgresql.org.asc --fail https://www.postgresql.org/media/keys/ACCC4CF8.asc
echo "deb [signed-by=/usr/share/postgresql-common/pgdg/apt.postgresql.org.asc] https://apt.postgresql.org/pub/repos/apt $(lsb_release -cs)-pgdg main" > /etc/apt/sources.list.d/pgdg.list
apt-get update -y
apt-get install postgresql postgresql-contrib -y
systemctl enable postgresql
systemctl start postgresql

# Create the database and its user (lab password, change it)
sudo -u postgres psql -c "CREATE USER sonar WITH ENCRYPTED PASSWORD 'admin123';"
sudo -u postgres psql -c "CREATE DATABASE sonarqube OWNER sonar;"
sudo -u postgres psql -c "GRANT ALL PRIVILEGES ON DATABASE sonarqube TO sonar;"

# Install SonarQube
mkdir -p /opt
cd /opt
curl -O https://binaries.sonarsource.com/Distribution/sonarqube/sonarqube-25.9.0.112764.zip
unzip -o sonarqube-25.9.0.112764.zip
mv sonarqube-25.9.0.112764 sonarqube

# Create the sonar user and give it the install folder
groupadd sonar || true
useradd -c "SonarQube - User" -d /opt/sonarqube/ -g sonar sonar || true
chown -R sonar:sonar /opt/sonarqube

# Point SonarQube at PostgreSQL
cp /opt/sonarqube/conf/sonar.properties /root/sonar.properties_backup
cat <<EOT > /opt/sonarqube/conf/sonar.properties
sonar.jdbc.username=sonar
sonar.jdbc.password=admin123
sonar.jdbc.url=jdbc:postgresql://localhost/sonarqube
sonar.web.host=0.0.0.0
sonar.web.port=9000
sonar.web.javaAdditionalOpts=-server
sonar.search.javaOpts=-Xmx512m -Xms512m -XX:+HeapDumpOnOutOfMemoryError
sonar.log.level=INFO
sonar.path.logs=logs
EOT

# systemd service
cat <<EOT > /etc/systemd/system/sonarqube.service
[Unit]
Description=SonarQube service
After=syslog.target network.target

[Service]
Type=simple
User=sonar
Group=sonar
ExecStart=/opt/sonarqube/bin/linux-x86-64/sonar.sh console
Restart=always
LimitNOFILE=131072
LimitNPROC=8192

[Install]
WantedBy=multi-user.target
EOT

systemctl daemon-reload
systemctl enable sonarqube
systemctl start sonarqube

echo "=== Waiting for SonarQube to start (this may take 1-3 minutes) ==="
until curl -s http://127.0.0.1:9000 > /dev/null; do
  sleep 10
  echo "Still starting..."
done
echo "SonarQube is now running!"

# Nginx reverse proxy on port 80
apt-get install nginx -y
rm -f /etc/nginx/sites-enabled/default /etc/nginx/sites-available/default
cat <<EOT > /etc/nginx/sites-available/sonarqube
server {
    listen      80;
    server_name _;

    access_log  /var/log/nginx/sonar.access.log;
    error_log   /var/log/nginx/sonar.error.log;

    proxy_buffers 16 64k;
    proxy_buffer_size 128k;

    location / {
        proxy_pass  http://127.0.0.1:9000;
        proxy_next_upstream error timeout invalid_header http_500 http_502 http_503 http_504;
        proxy_redirect off;

        proxy_set_header    Host            \$host;
        proxy_set_header    X-Real-IP       \$remote_addr;
        proxy_set_header    X-Forwarded-For \$proxy_add_x_forwarded_for;
        proxy_set_header    X-Forwarded-Proto http;
    }
}
EOT

ln -s /etc/nginx/sites-available/sonarqube /etc/nginx/sites-enabled/sonarqube
systemctl enable nginx
systemctl restart nginx

ufw allow 80,9000,9001/tcp || true

# On Vagrant the second address is the private network IP
SERVER_IP=$(hostname -I | awk '{print $2}')

echo "======================================================"
echo " SonarQube installation completed successfully!"
echo " Access it via:  http://$SERVER_IP:9000/"
echo " Default login: admin / admin"
echo "======================================================"The limit values follow the SonarQube Linux pre-installation guide. The \$ in the Nginx block stops Bash from expanding Nginx variables inside the heredoc. SonarQube asks you to change the admin password at the first login.
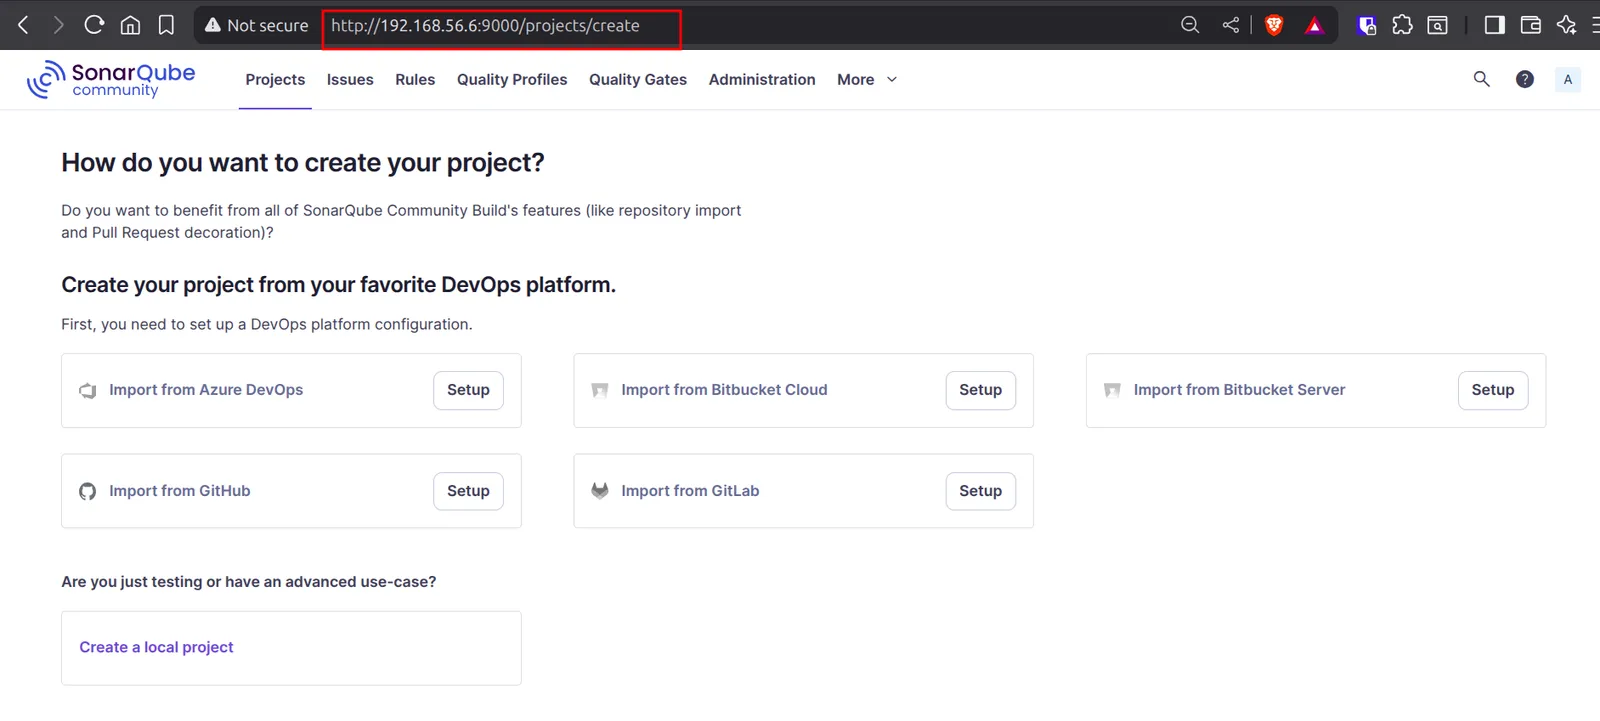
Open http://<server-ip>:9000 in a browser:
Quality gates
Create a custom gate under Quality Gates; the lab gate is named demoo-dipen. Like the built-in Sonar way gate, it follows "Clean as You Code": the conditions apply to new code only, so old code does not block today's change.
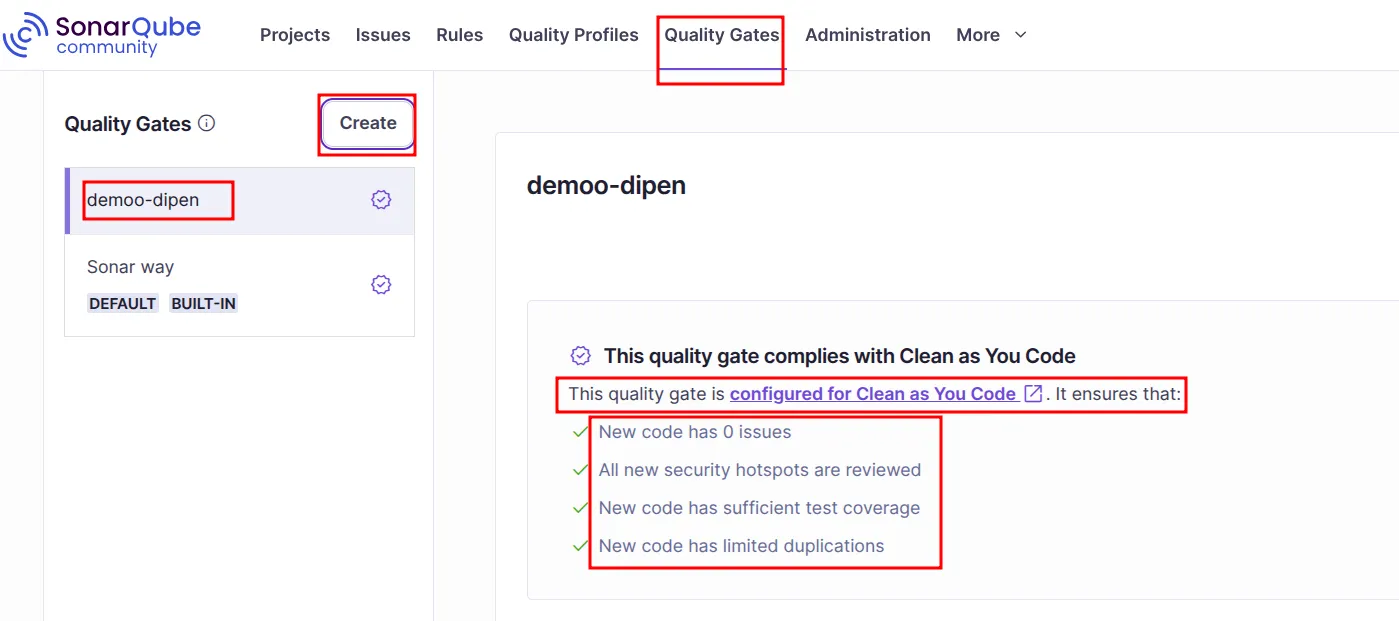
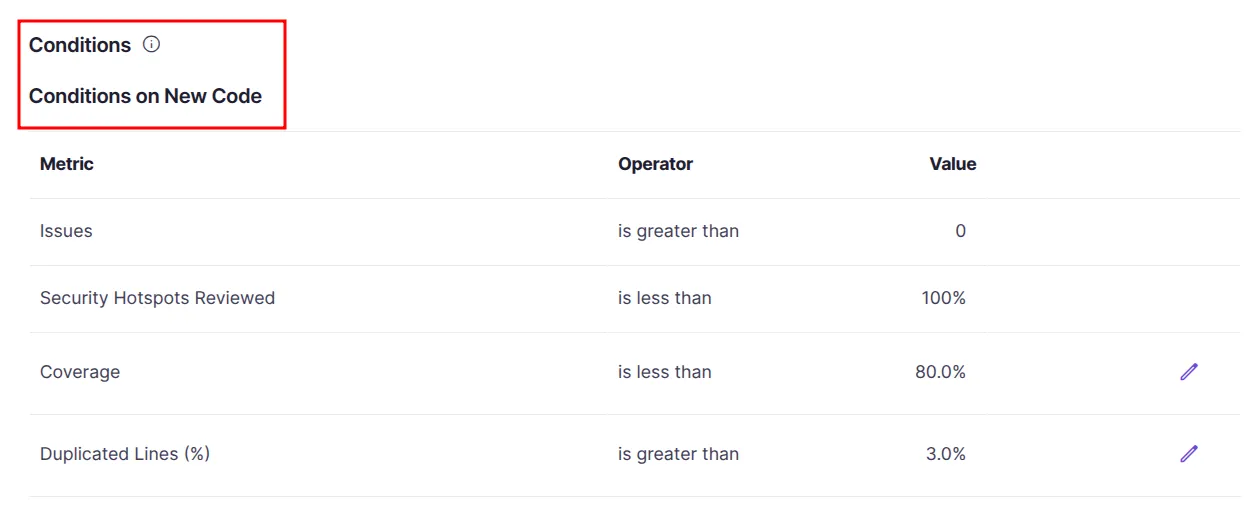
The gate fails if any of these is true on new code:
| Metric | Fails when | Meaning |
|---|---|---|
| Issues | greater than 0 | Bugs, vulnerabilities or code smells (hard-to-maintain code) |
| Security Hotspots Reviewed | less than 100% | Security-sensitive code that a person must review and mark safe |
| Coverage | less than 80% | Share of code run by unit tests |
| Duplicated Lines (%) | greater than 3% | Copy-pasted blocks |
Projects also receive A to E ratings for security, reliability and maintainability. These ratings can be used as conditions, and each project can be assigned its own gate.
Administration
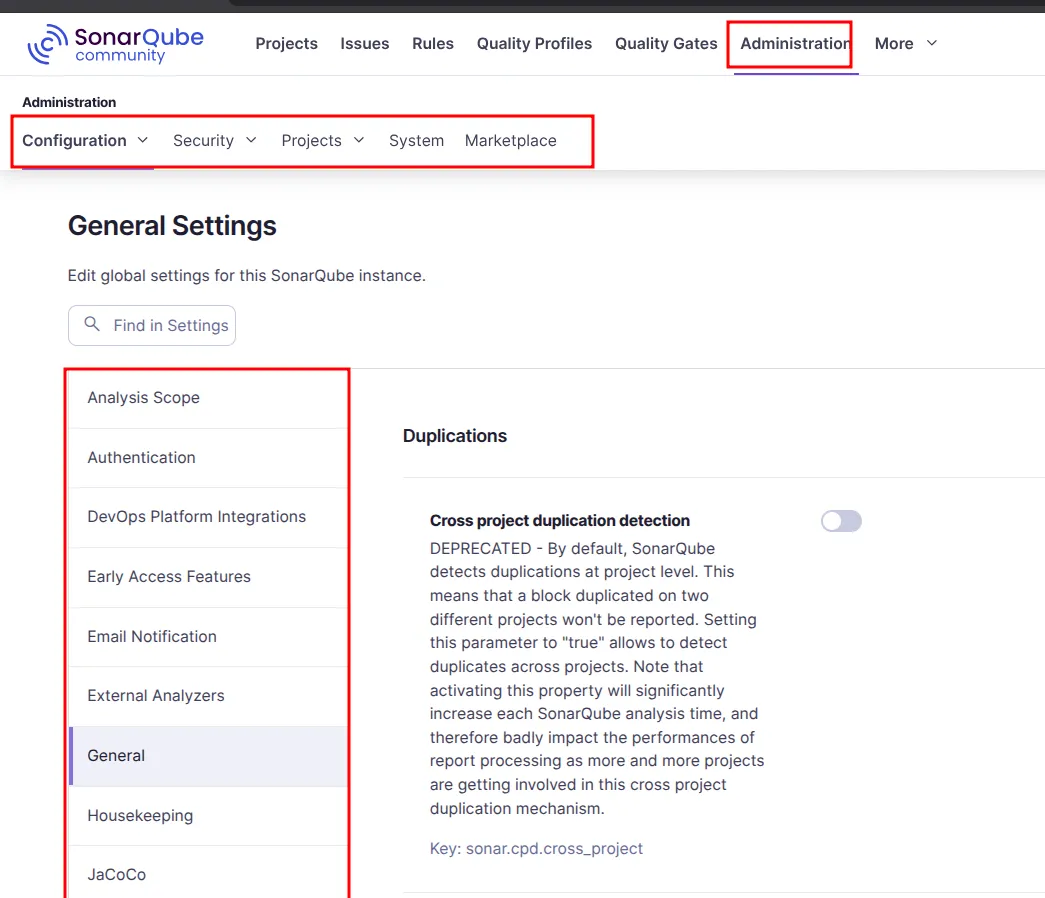
Administration holds the server settings: users, groups and permissions under Security, authentication (LDAP, SAML, GitHub, GitLab), email, webhooks, default quality gates and profiles, plugins in Marketplace, and system health and logs under System.
Connect Jenkins to SonarQube
The scanner runs on the machine that builds the code, so Jenkins needs the scanner and the server address.
Install the plugin
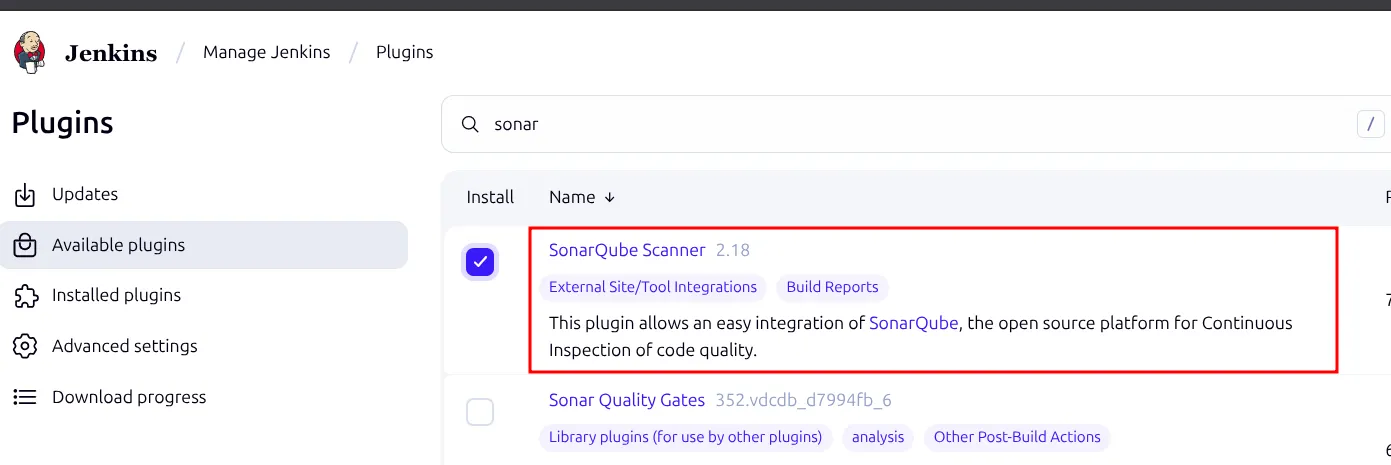
In Manage Jenkins → Plugins → Available plugins, install SonarQube Scanner.
Add the scanner as a tool
In Manage Jenkins → Tools, click Add SonarQube Scanner, name it, tick Install automatically and pick a version. Jenkins downloads the scanner the first time a job asks for it.
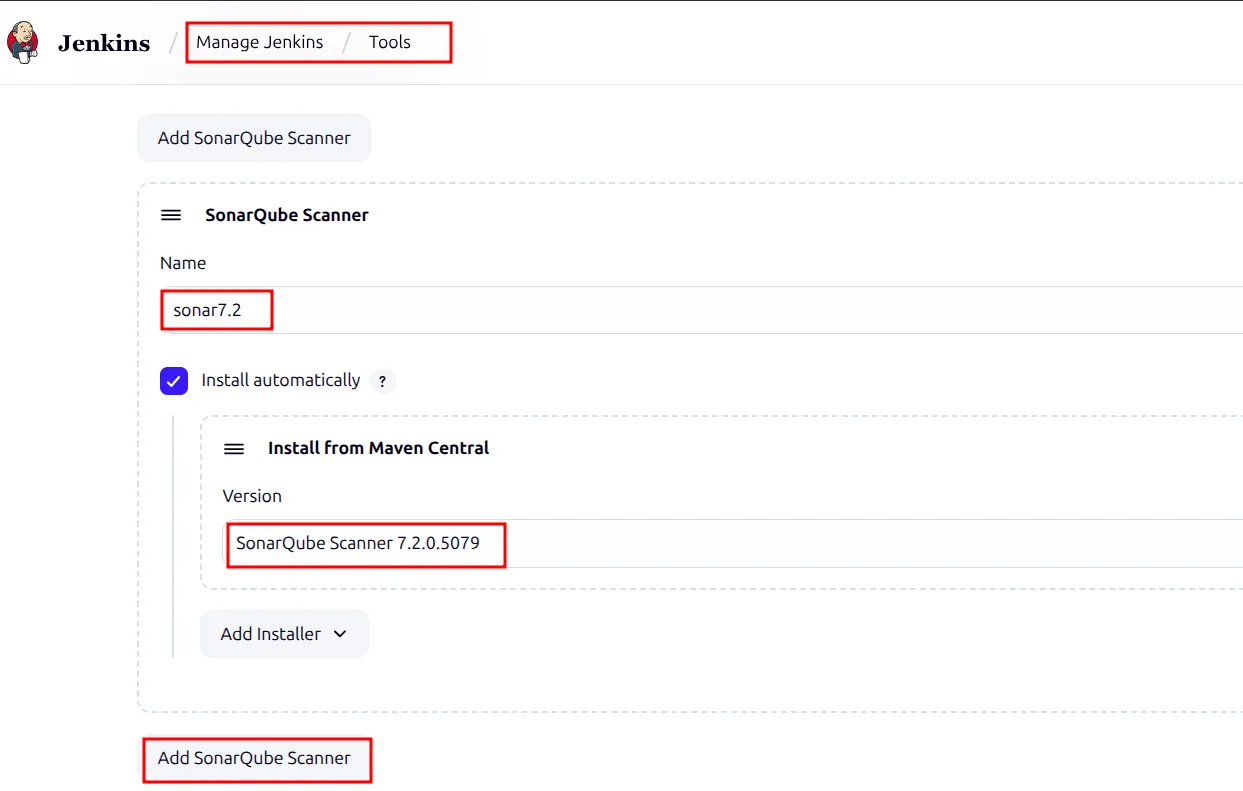
The pipeline loads the tool by that name:
environment {
    scannerHome = tool 'sonar7.2'   // name from Manage Jenkins → Tools
}Add the SonarQube server and token
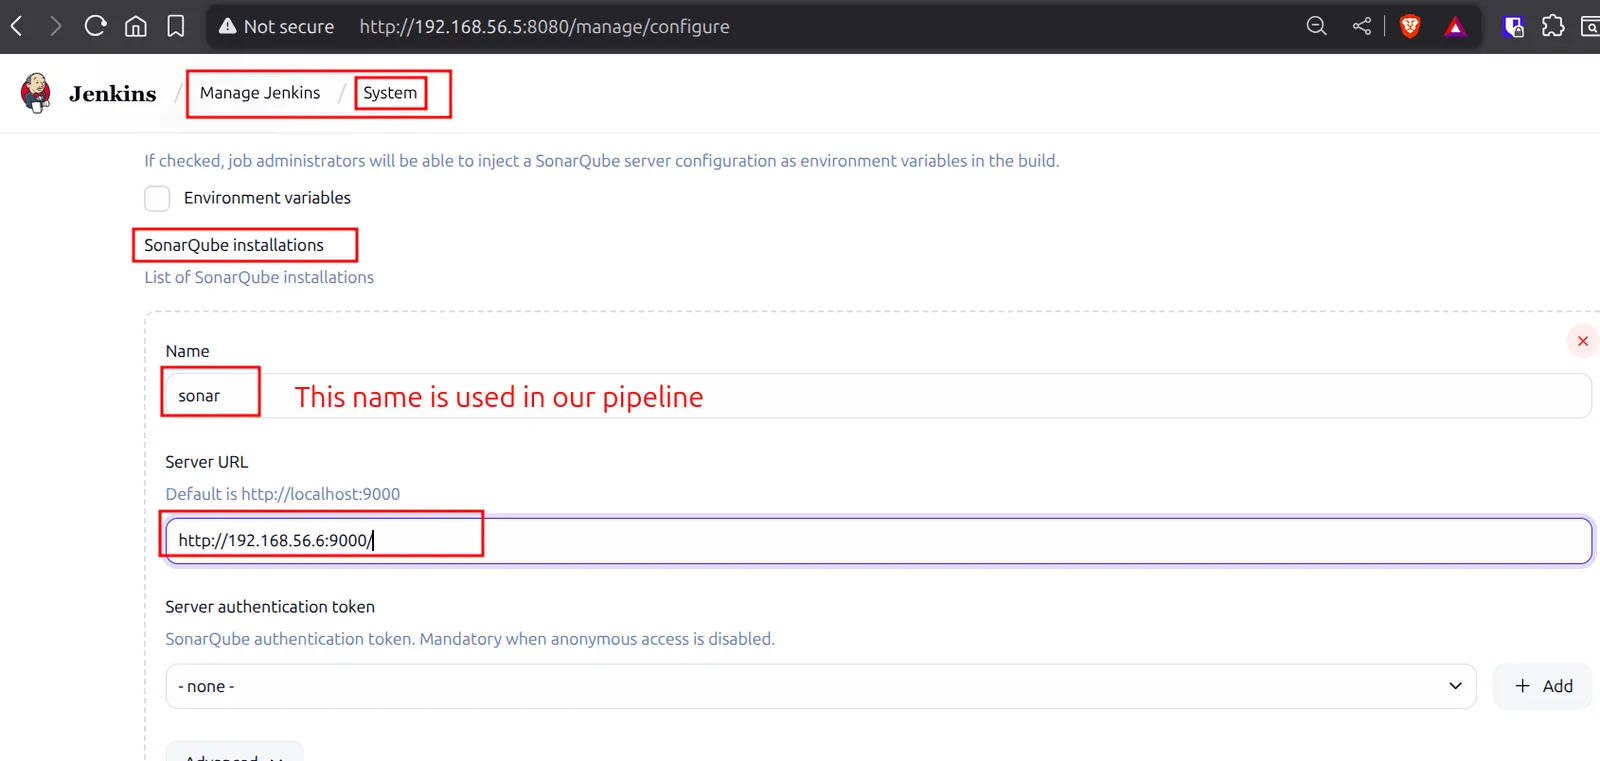
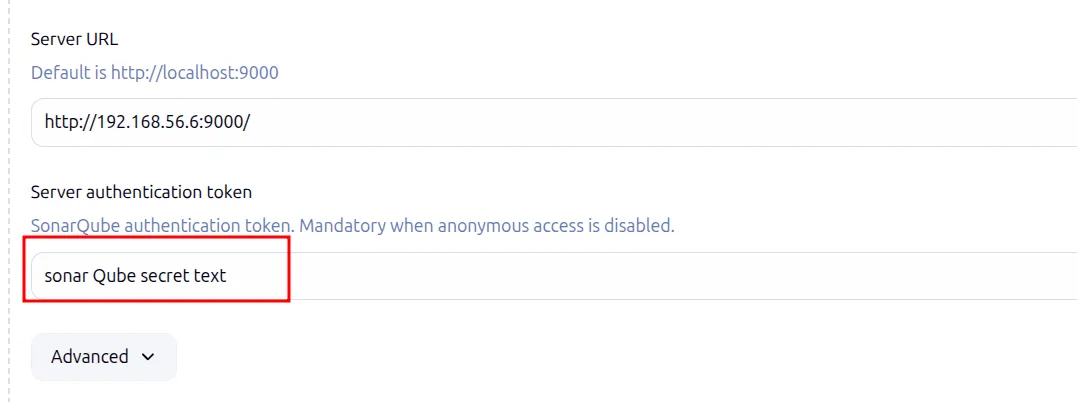
In Manage Jenkins → System → SonarQube installations, add a server. The Name is what the pipeline uses in withSonarQubeEnv.
Jenkins needs a token to talk to SonarQube. In SonarQube, go to Administration → Security → Users and open the Tokens menu for your user:
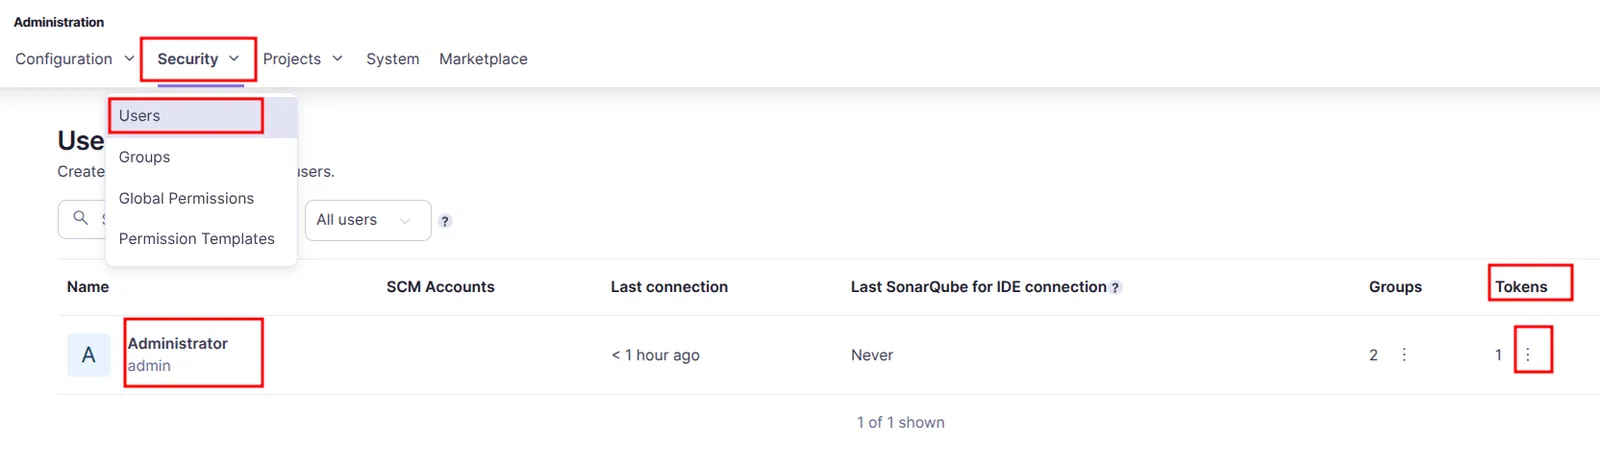
Enter a name such as Jenkins, choose an expiry and click Generate. Copy the token right away; SonarQube shows it only once.
Back in Jenkins, add the token as a Secret text credential:
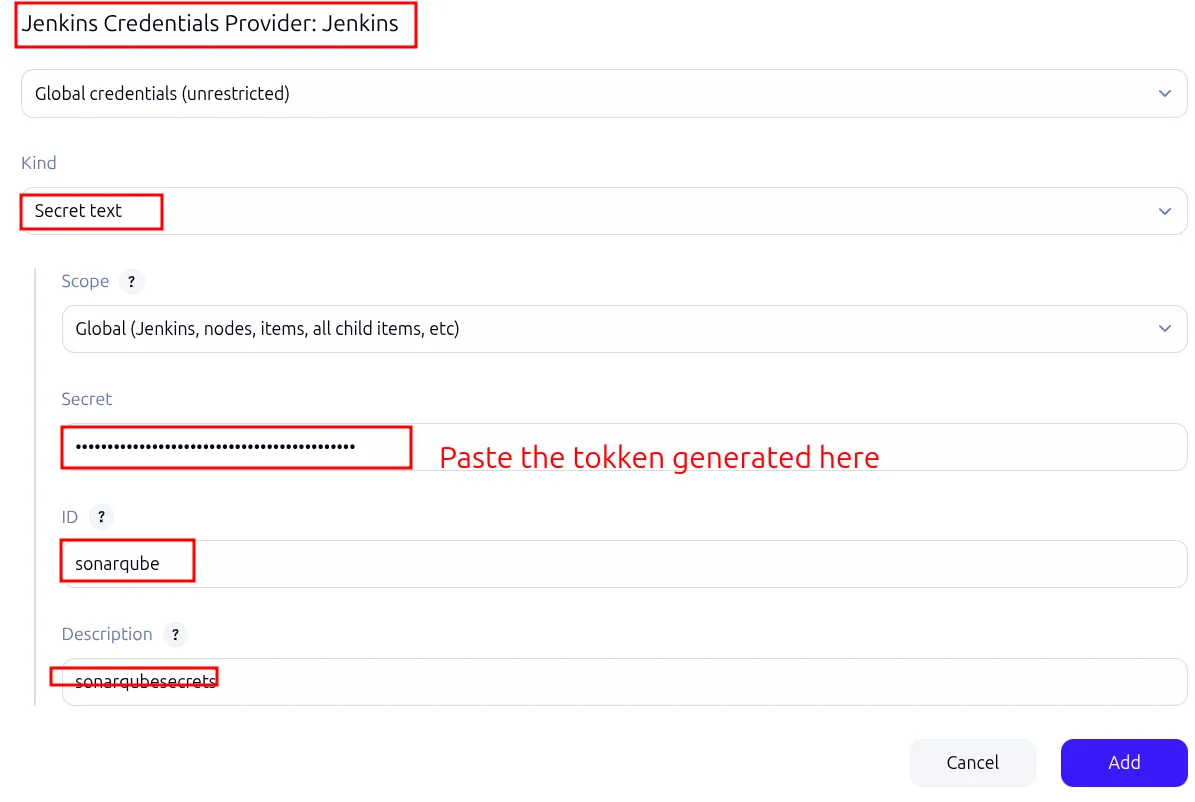
Then select it as the Server authentication token and save:
The analysis stage
stage('Sonar Analysis') {
    steps {
        // 'sonar' is the server name from Manage Jenkins → System
        withSonarQubeEnv('sonar') {
            sh '''${scannerHome}/bin/sonar-scanner \
                -Dsonar.projectKey=java-tomcat-sample \
                -Dsonar.projectName=java-tomcat-sample \
                -Dsonar.projectVersion=4.0 \
                -Dsonar.sources=src/ \
                -Dsonar.junit.reportPaths=target/surefire-reports/ \
                -Dsonar.coverage.jacoco.xmlReportPaths=target/site/jacoco/jacoco.xml \
                -Dsonar.java.checkstyle.reportPaths=target/checkstyle-result.xml'''
        }
    }
}withSonarQubeEnv passes the server URL and token to the scanner. The properties:
| Property | Value here | Meaning |
|---|---|---|
sonar.projectKey | java-tomcat-sample | Unique project ID in SonarQube; here it matches the Maven artifactId. |
sonar.projectName | java-tomcat-sample | Name shown in the dashboard |
sonar.projectVersion | 4.0 | Version label shown in the dashboard |
sonar.sources | src/ | Folder with the source code |
sonar.junit.reportPaths | target/surefire-reports/ | Unit test results from Maven Surefire |
sonar.coverage.jacoco.xmlReportPaths | target/site/jacoco/jacoco.xml | JaCoCo coverage report (XML) |
sonar.java.checkstyle.reportPaths | target/checkstyle-result.xml | Checkstyle results from the earlier stage |
The artifactId in pom.xml:
<project xmlns="http://maven.apache.org/POM/4.0.0" xmlns:xsi="http://www.w3.org/2001/XMLSchema-instance"
  xsi:schemaLocation="http://maven.apache.org/POM/4.0.0 http://maven.apache.org/maven-v4_0_0.xsd">
  <modelVersion>4.0.0</modelVersion>
  <groupId>com.example</groupId>
  <artifactId>java-tomcat-sample</artifactId>
  <packaging>war</packaging>
  <version>1.0.1</version>
<name>hello Maven Webapp</name>The result
The build log ends with a link to the results:
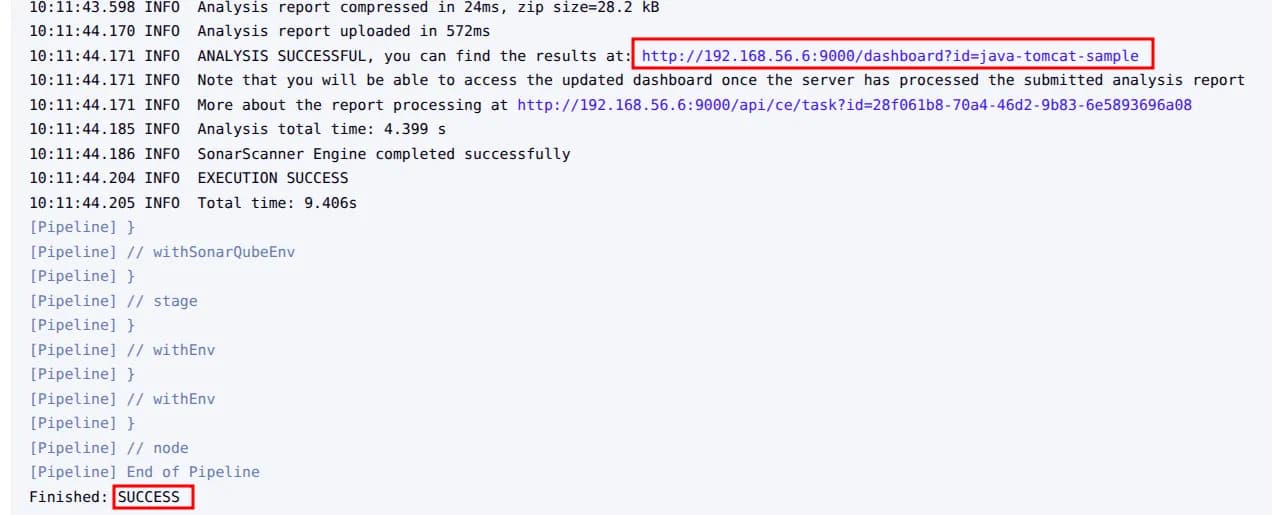
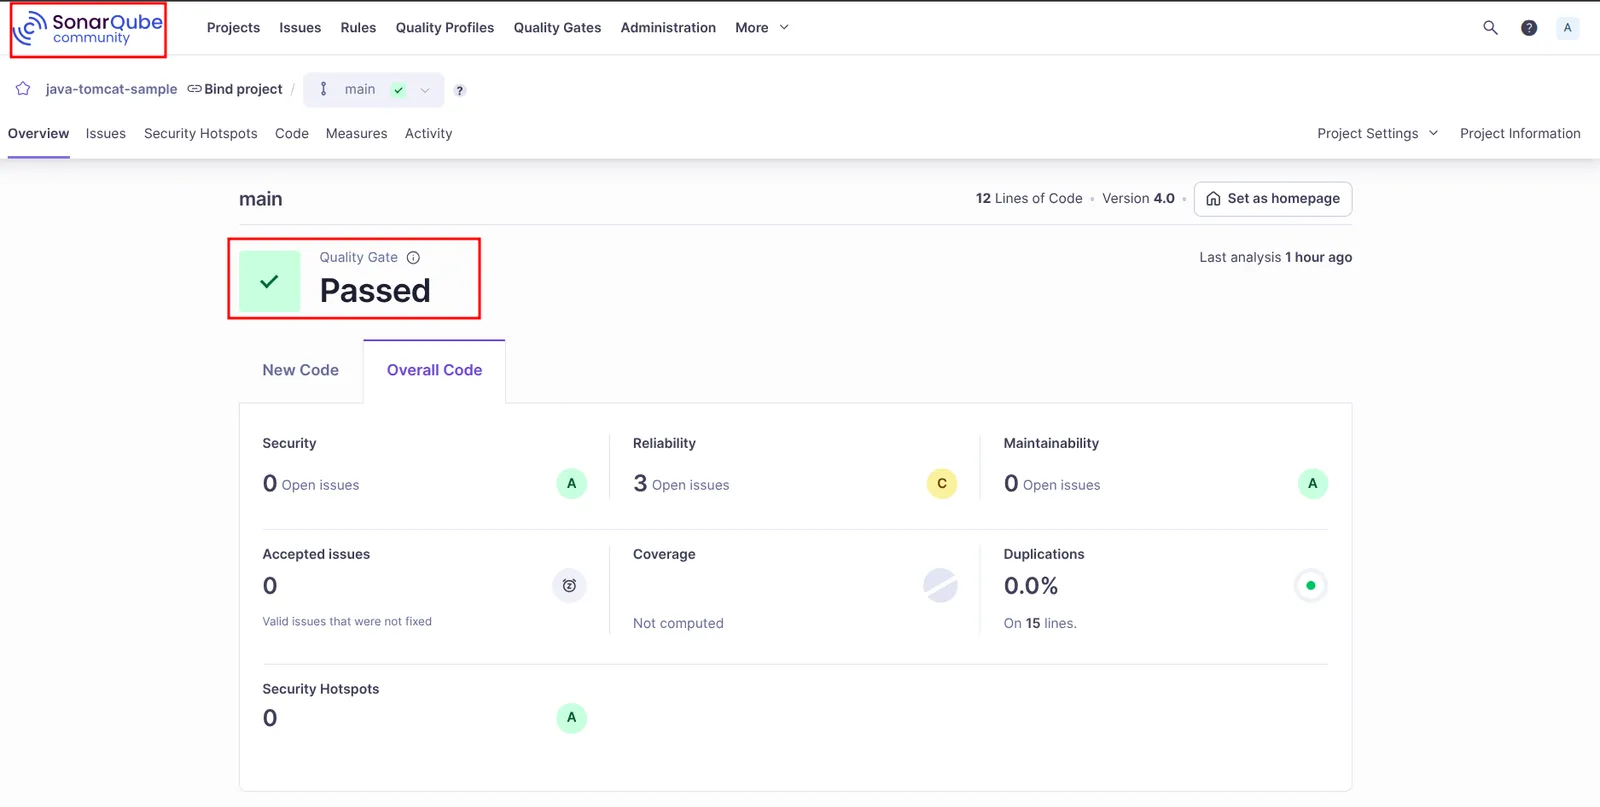
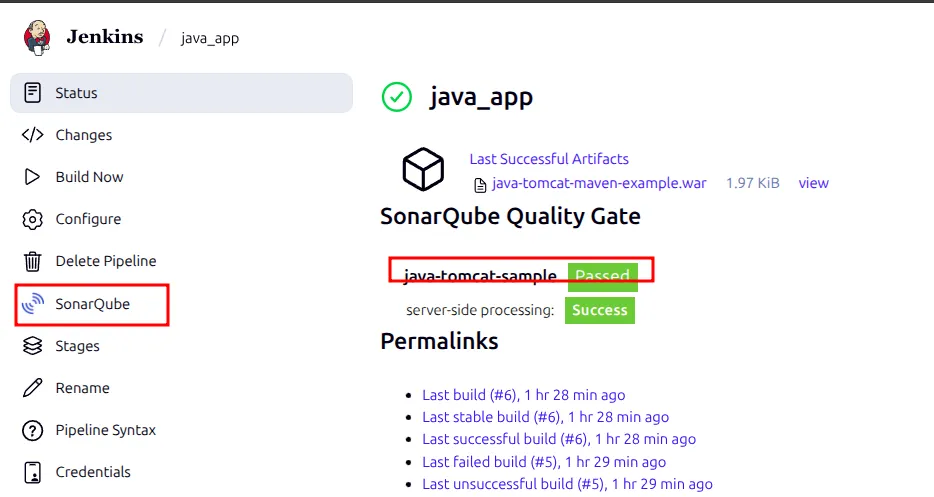
The gate passed even with three reliability issues and no coverage. That is because the conditions apply to new code, and the first analysis has no new code to compare against. Jenkins also shows the gate status on the job page:
Artifact repositories
Jenkins keeps archived artifacts with each build, but that is not a good long-term store. An artifact repository keeps every build's output (.war, .jar, Docker images, npm packages) with a version, so other teams and deploy jobs can download exactly the build they need.
| Tool | Notes |
|---|---|
| JFrog Artifactory | Supports many package formats; commercial, with a free tier |
| Apache Archiva | Open source, focused on Maven |
| Sonatype Nexus Repository | Maven, Docker, npm and more; free Community Edition |
This pipeline uses Sonatype Nexus Community Edition.
Install Sonatype Nexus
#!/bin/bash
set -e

NEXUS_VERSION="3.84.1-01"
NEXUS_URL="https://download.sonatype.com/nexus/3/nexus-${NEXUS_VERSION}-linux-x86_64.tar.gz"
NEXUS_DIR="nexus-$NEXUS_VERSION"

echo "Starting Nexus installation..."

echo "Installing Java and dependencies..."
sudo apt update
sudo apt install openjdk-17-jdk wget -y

echo "Creating directories..."
sudo mkdir -p /opt/nexus/
sudo mkdir -p /tmp/nexus/

echo "Downloading Nexus..."
cd /tmp/nexus/
sudo wget $NEXUS_URL -O nexus.tar.gz
echo "Extracting Nexus..."
sudo tar xzvf nexus.tar.gz
sudo rm -f /tmp/nexus/nexus.tar.gz

# The archive holds two folders: nexus-<version> (the app) and sonatype-work (the data)
echo "Installing Nexus to /opt/nexus/"
sudo rsync -avzh /tmp/nexus/ /opt/nexus/

echo "Creating nexus user..."
if id "nexus" &>/dev/null; then
    echo "User nexus already exists."
else
    sudo useradd nexus
fi

echo "Setting permissions..."
sudo chown -R nexus:nexus /opt/nexus

echo "Creating systemd service..."
cat <<EOT | sudo tee /etc/systemd/system/nexus.service > /dev/null
[Unit]
Description=nexus service
After=network.target

[Service]
Type=forking
LimitNOFILE=65536
ExecStart=/opt/nexus/$NEXUS_DIR/bin/nexus start
ExecStop=/opt/nexus/$NEXUS_DIR/bin/nexus stop
User=nexus
Restart=on-abort

[Install]
WantedBy=multi-user.target
EOT

echo "Configuring Nexus..."
sudo sh -c "echo 'run_as_user=\"nexus\"' > /opt/nexus/$NEXUS_DIR/bin/nexus.rc"

echo "Starting Nexus service..."
sudo systemctl daemon-reload
sudo systemctl enable nexus
sudo systemctl start nexus

echo "Waiting for Nexus to start (this may take a few minutes)..."
sleep 30

if systemctl is-active --quiet nexus; then
    IP_ADDRESS=$(hostname -I | awk '{print $2}')

    echo "=================================================="
    echo "Nexus installation completed successfully!"
    echo "Nexus is now running on: http://$IP_ADDRESS:8081"
    echo "=================================================="
    echo "Default credentials:"
    echo "Username: admin"
    echo "Password: Check /opt/nexus/sonatype-work/nexus3/admin.password"
    echo "=================================================="
else
    echo "Nexus service failed to start. Please check logs with: journalctl -u nexus.service -b"
    exit 1
fi

sudo rm -rf /tmp/nexus/Nexus needs more CPU, memory and disk than a small VM usually has; on a small VM it fails to start. Check the Nexus system requirements before sizing the VM.
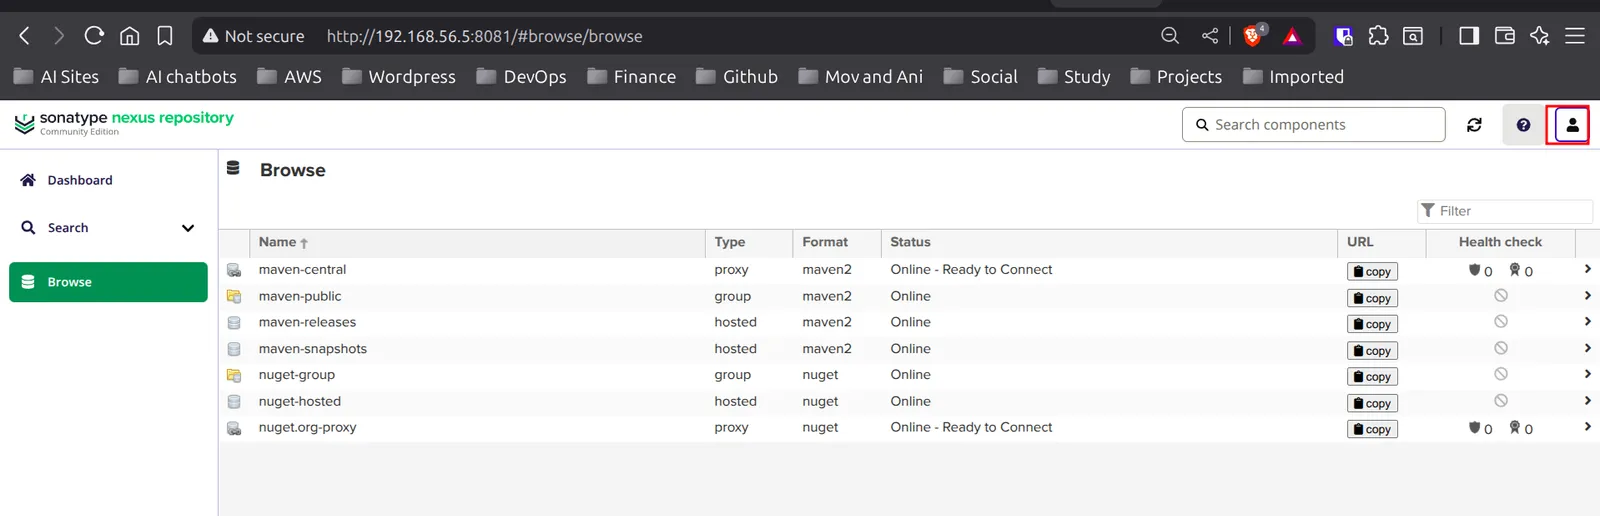
Open http://<server-ip>:8081 and click the sign-in icon at the top right:
The first admin password is in a file on the server:
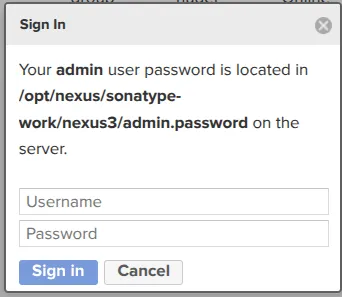
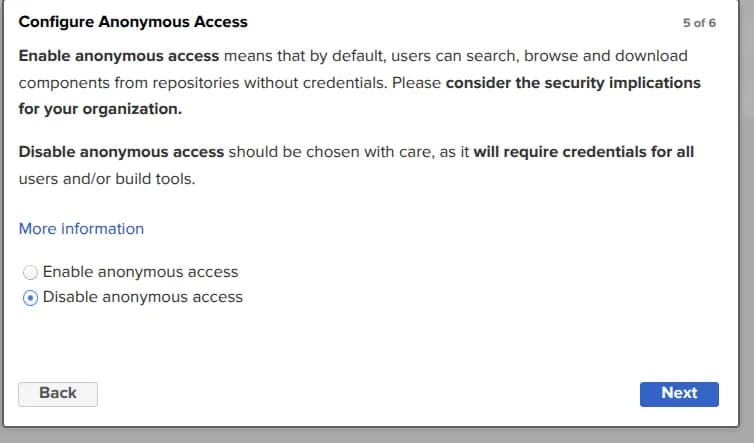
$ sudo cat /opt/nexus/sonatype-work/nexus3/admin.passwordThe setup wizard then asks for a new password and whether to allow anonymous access. Disable it so that every user and build tool must authenticate:
Create a Maven hosted repository
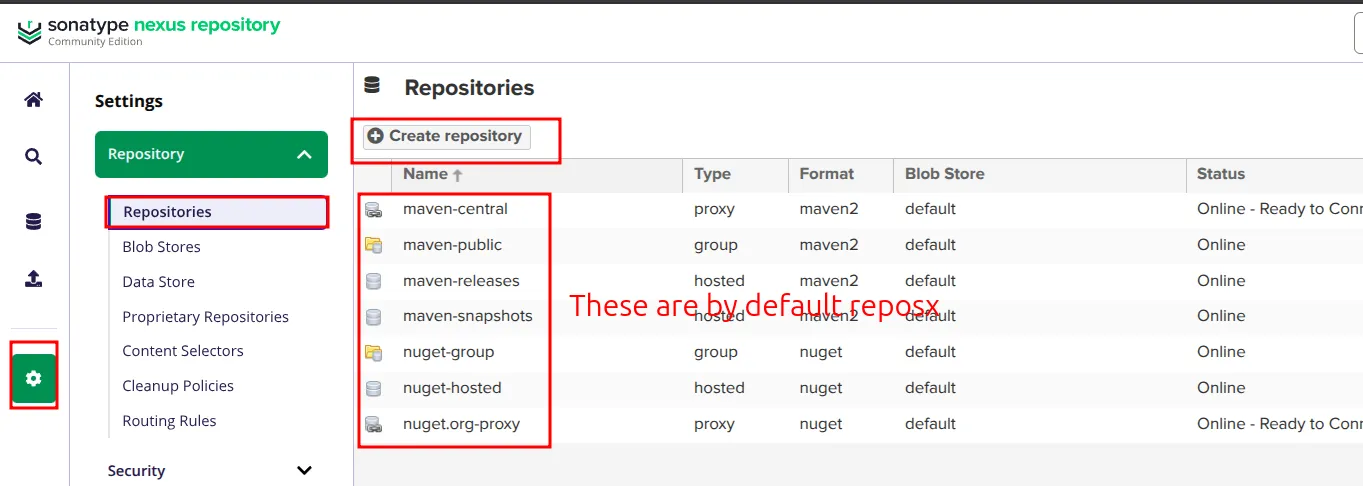
Nexus comes with some repositories. A proxy repository caches a remote one (like Maven Central), a hosted repository stores your own files, and a group combines several behind one URL. Build outputs belong in a hosted repository.
Go to Settings (gear icon) → Repository → Repositories → Create repository:
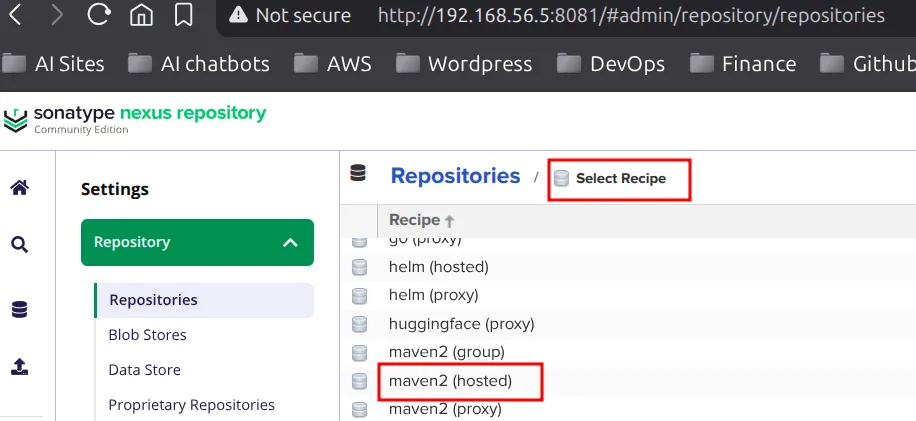
Choose the recipe maven2 (hosted):
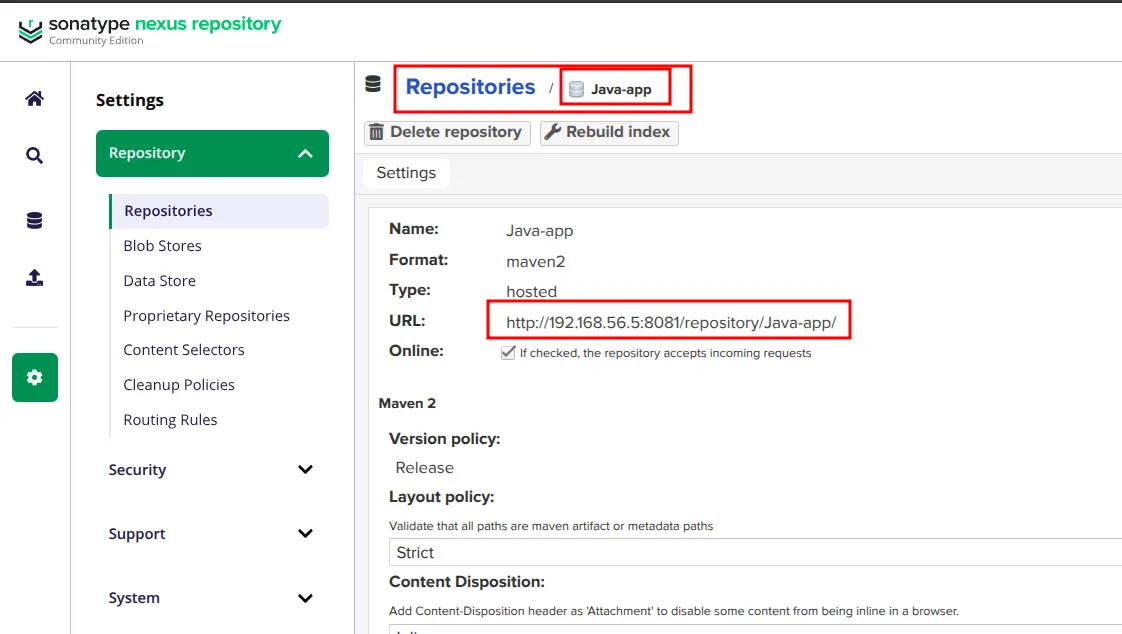
Give it a name and create it. The lab repository is Java-app, with version policy Release:
Upload the WAR from Jenkins
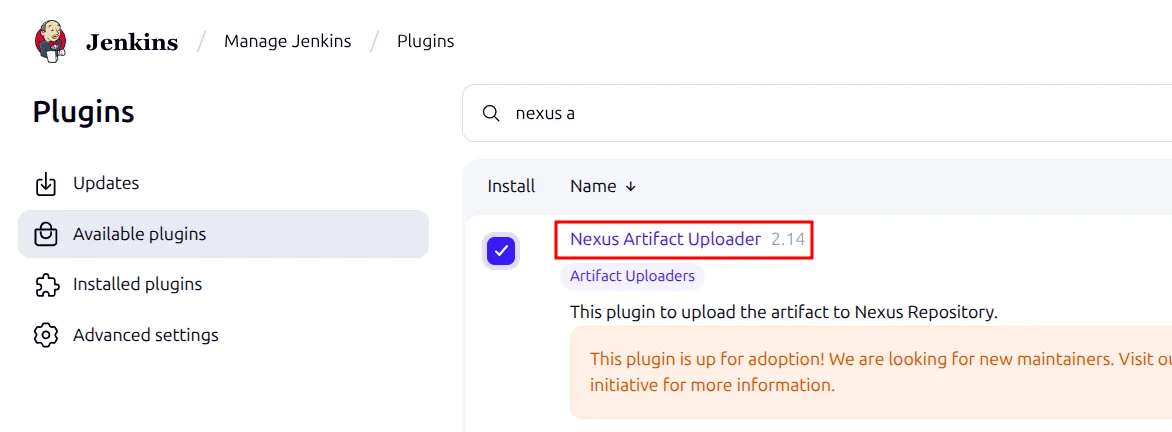
Install the Nexus Artifact Uploader plugin:
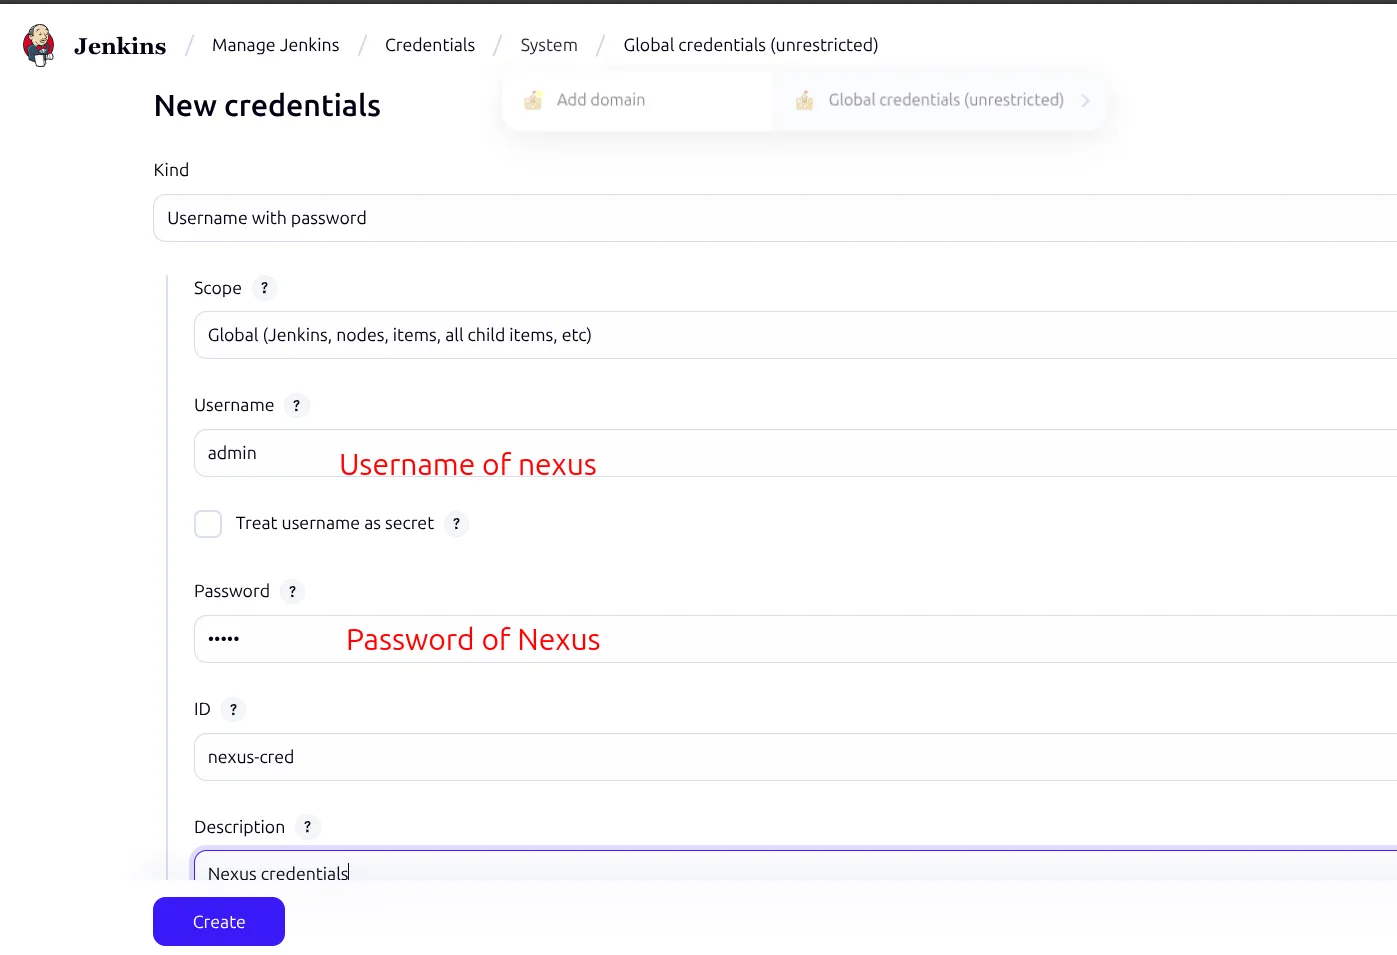
Add the Nexus login as a Username with password credential with ID nexus-cred:
Then add the upload stage after the build:
stage("UploadArtifact") {
    steps {
        nexusArtifactUploader(
            nexusVersion: 'nexus3',
            protocol: 'http',
            nexusUrl: '192.168.56.5:8081',
            groupId: 'QA',
            version: "${env.BUILD_ID}-${env.BUILD_TIMESTAMP}",
            repository: 'Java-app',
            credentialsId: 'nexus-cred',
            artifacts: [
                [artifactId: 'java-tomcat-sample',
                 classifier: '',
                 file: 'target/java-tomcat-maven-example.war',
                 type: 'war']
            ]
        )
    }
}| Field | Value | Meaning |
|---|---|---|
nexusVersion | nexus3 | Nexus 3 API |
protocol | http | The lab Nexus has no TLS |
nexusUrl | 192.168.56.5:8081 | Host and port only, no http:// and no trailing slash |
groupId | QA | Top folder in the repository |
version | build ID + build timestamp | A new version for every build. A release repository normally refuses to overwrite an existing version. |
repository | Java-app | The hosted repository created above |
credentialsId | nexus-cred | The Jenkins credential |
artifactId | java-tomcat-sample | Same as in pom.xml |
file | target/java-tomcat-maven-example.war | Path to the built WAR |
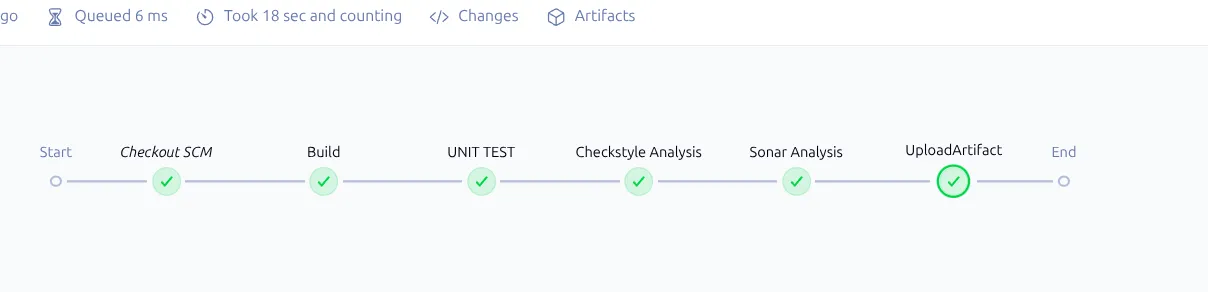
The full pipeline now runs checkout, build, unit tests, Checkstyle, Sonar analysis and the upload:
The WAR is in Nexus, together with .md5 and .sha1 checksum files that let a download be checked for damage:
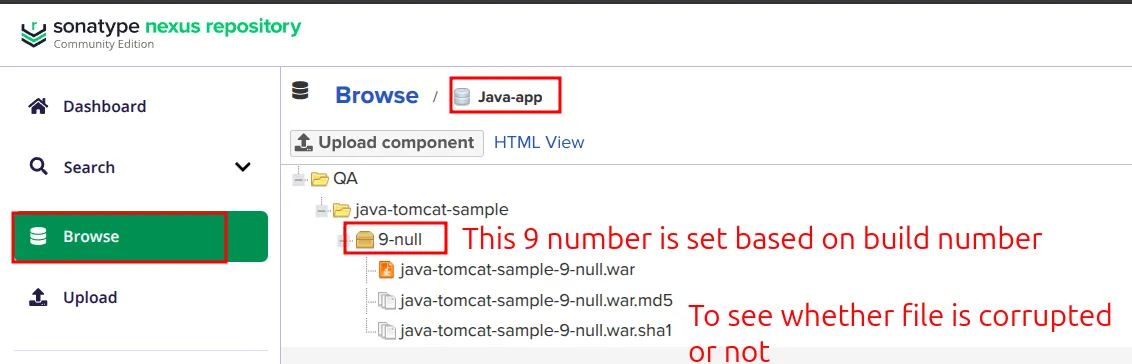
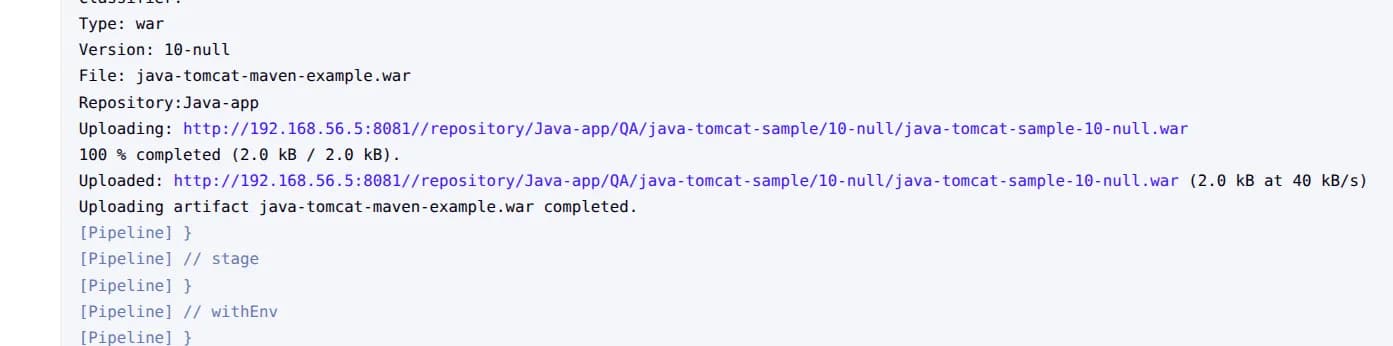
The version is 9-null: 9 is the build number, but BUILD_TIMESTAMP was empty because the plugin that sets it was not installed. The console log of the next build shows the same thing:
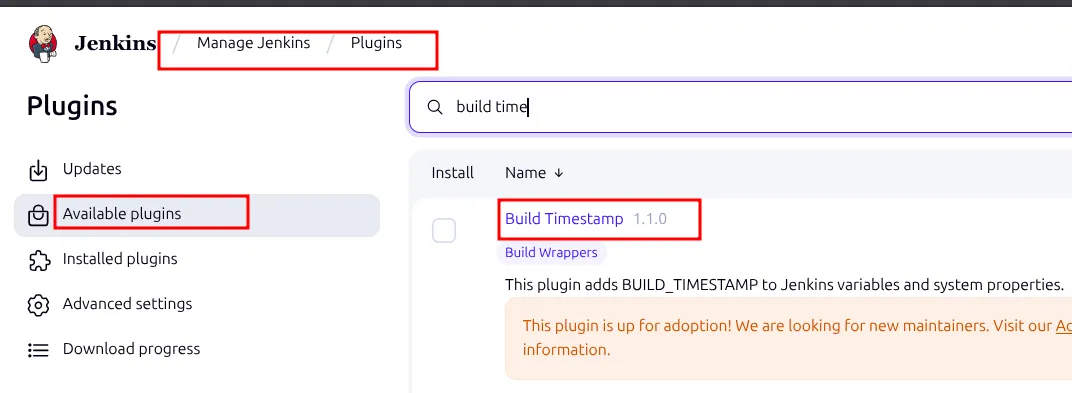
The fix is the Build Timestamp plugin, which adds the BUILD_TIMESTAMP variable:
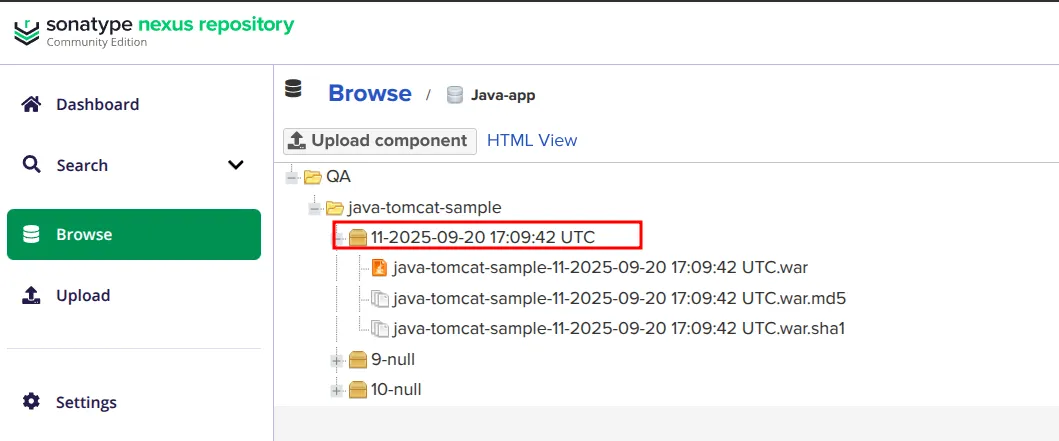
After installing it, new uploads carry the timestamp:
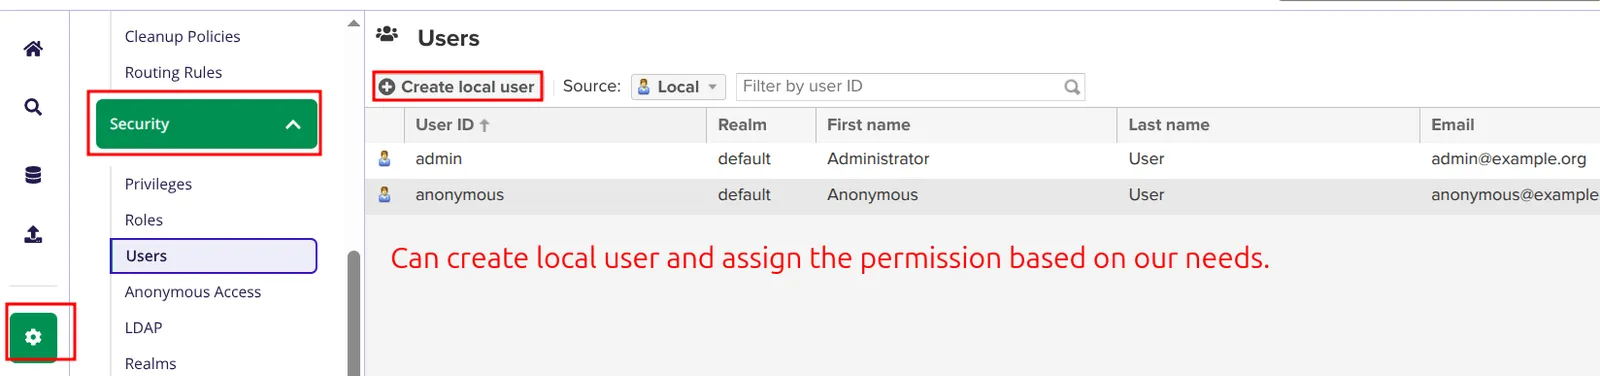
Instead of sharing the admin account, create users with only the rights they need in Settings → Security → Users → Create local user:
Troubleshooting
| Problem | Cause and fix |
|---|---|
| SonarQube stops shortly after starting | Usually the Elasticsearch limits. Check vm.max_map_count with sysctl vm.max_map_count and read the files in /opt/sonarqube/logs/. |
| Coverage shows "Not computed" | SonarQube needs the JaCoCo XML report. Generate it in the Maven build (JaCoCo report goal) and point sonar.coverage.jacoco.xmlReportPaths at it. |
| Gate passes although the code has issues | The gate checks new code only. Issues in old code show on the Overall Code tab. |
Nexus version is 9-null | BUILD_TIMESTAMP is not set. Install the Build Timestamp plugin. |
Upload URL contains 8081//repository | Caused by nexusUrl: '192.168.56.5:8081/'. Remove the trailing slash. |
Version contains spaces and colons (11-2025-09-20 17:09:42 UTC) | That is the default timestamp format. A pattern without spaces, set in the Build Timestamp section of Manage Jenkins → System, gives cleaner file names. |
| Nexus does not start | The VM is too small, or a path in the service file is wrong. Check journalctl -u nexus.service -b. |
Key takeaways
- SonarQube has a server (dashboard and gates) and a scanner (runs in the build). Jenkins installs the scanner as a tool and finds the server by name.
- Store the SonarQube token as a Secret text credential; SonarQube shows it only once.
- Quality gate conditions apply to new code. Add
waitForQualityGateif a failed gate should stop the pipeline. - Nexus hosted repositories store build outputs; give every build a unique version.
nexusUrlis host and port only, andBUILD_TIMESTAMPneeds the Build Timestamp plugin.
Keep reading
- Build and Deploy a Java WAR to Tomcat with Maven and Jenkins
Build a Java web app with Maven, deploy the WAR to Tomcat by hand, then automate the same build and deploy with two chained Jenkins freestyle jobs.
- Jenkins Distributed Builds with Agents and Labels
Connect two Vagrant VMs to Jenkins as SSH agents, use labels to choose where each stage runs, and ship a Java app and a Node.js app across separate nodes.
- Jenkins Pipeline for Building and Deploying Docker Images
Write a declarative Jenkinsfile that builds a Maven app, packs it into a Docker image, scans it with Trivy, pushes it to Docker Hub, deploys it and emails the team.