Getting Started with Ansible: Install, Inventory and Ad-hoc Commands
Install Ansible in a Python virtual environment, connect Vagrant VMs with passwords and SSH keys, write a first inventory and manage packages with ad-hoc commands.

ON THIS PAGE
Shell and Python scripts work for one machine, but they become hard to maintain when the same change must reach hundreds of servers. Ansible applies that change from a single control node over SSH, with no agent on the managed machines. This guide installs Ansible on an Ubuntu Vagrant VM, connects it to other VMs with a password and then an SSH key, builds a first inventory, and uses ad-hoc commands to install Apache, manage its service and copy a file.
Configuration management: push vs pull
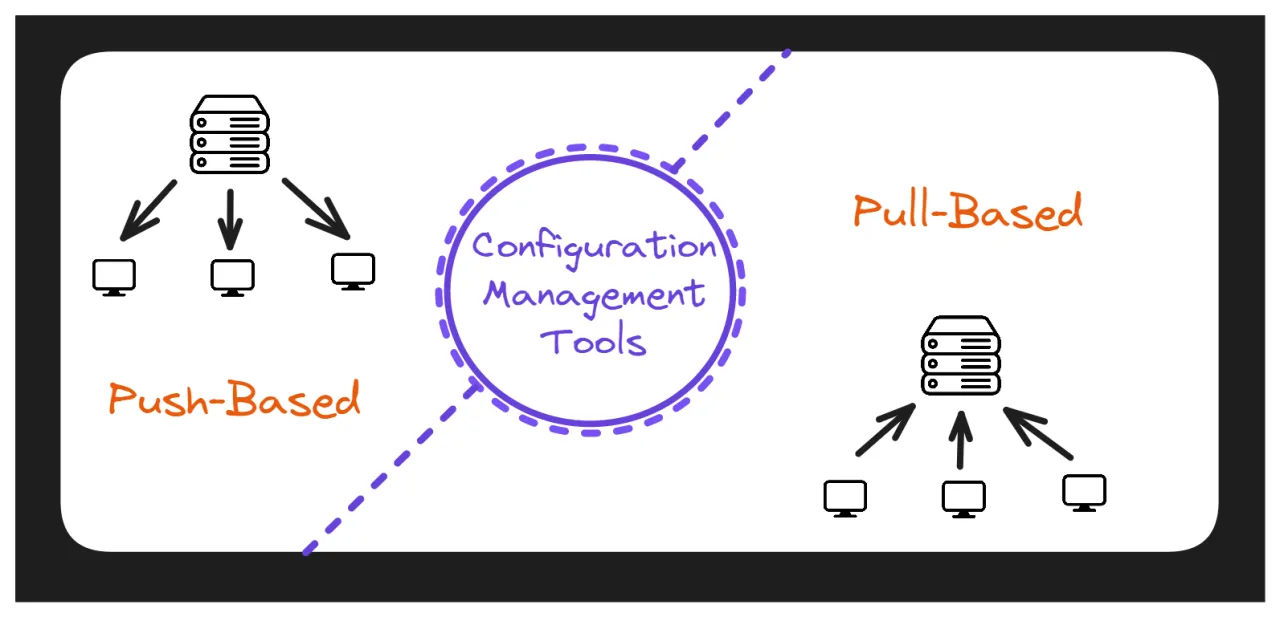
Configuration management keeps servers in a known, desired state for their whole life: the right packages, files, users and services. Every tool has a central place where the configuration lives and a set of managed machines (nodes). Tools differ in how the configuration reaches the nodes.
| Model | How it works | Examples |
|---|---|---|
| Pull | An agent runs on every node. At a regular interval it fetches the configuration from the server, compares it with the node, and fixes any difference. | Puppet, Chef, CFEngine |
| Push | The control machine connects to the nodes and pushes the changes. The control machine starts the conversation, not the nodes. | Ansible, SaltStack (salt-ssh) |
Ansible is push-based and agentless: the nodes only need SSH and Python. Terraform is often listed next to these tools, but it is mainly a provisioning tool (it creates infrastructure), while Ansible configures what runs on it.
Consider a vulnerability in a package that runs on a thousand servers. Patching each server by hand is slow and error-prone. With Ansible, you describe the fix once and apply it to every server in a single run.
Ansible architecture
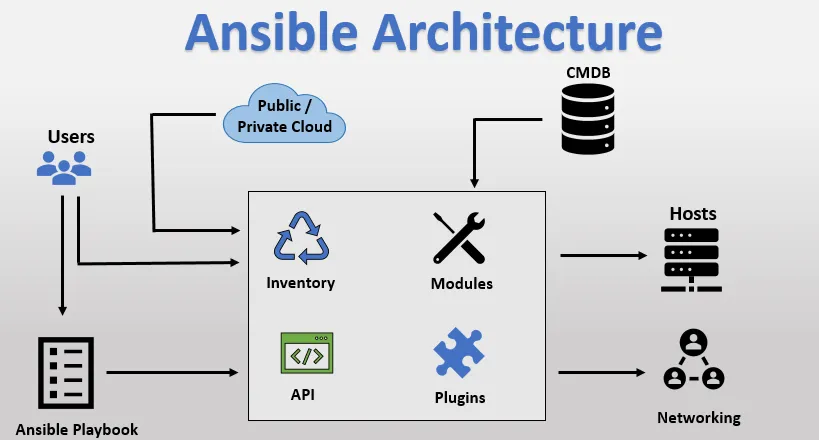
- Control node: the machine where Ansible is installed and where you run commands and playbooks. It must be Linux or macOS. Windows cannot be a control node without WSL (Windows Subsystem for Linux), but Ansible can still manage Windows machines.
- Managed nodes (hosts): servers, cloud instances or network devices that Ansible configures.
- Inventory: a file (INI or YAML) that lists the managed nodes, puts them in groups, and stores connection details such as IP, user, port, credentials and variables.
- Modules: small programs Ansible pushes to the nodes to do one job, such as
apt,serviceorcopy. Most modules take parameters that describe the desired state, not the steps. - Playbook: a YAML file with an ordered list of tasks. It describes the desired state of the systems. Playbooks are covered in part 2.
Install Ansible with pip in a virtual environment
You can install Ansible with apt, from the official PPA, with pip or with pipx. The Ubuntu apt package often lags behind the current release, so this guide uses pip inside a Python virtual environment.
On Ubuntu 24.04, pip refuses to install packages into the system Python (PEP 668, the "externally-managed-environment" error). A virtual environment avoids that and keeps Ansible separate from system packages.
$ sudo apt update
$ sudo apt install -y python3-pip python3-venv
$ python3 -m venv ~/myenv
$ source ~/myenv/bin/activate
(myenv) $ pip install ansible
(myenv) $ ansible --version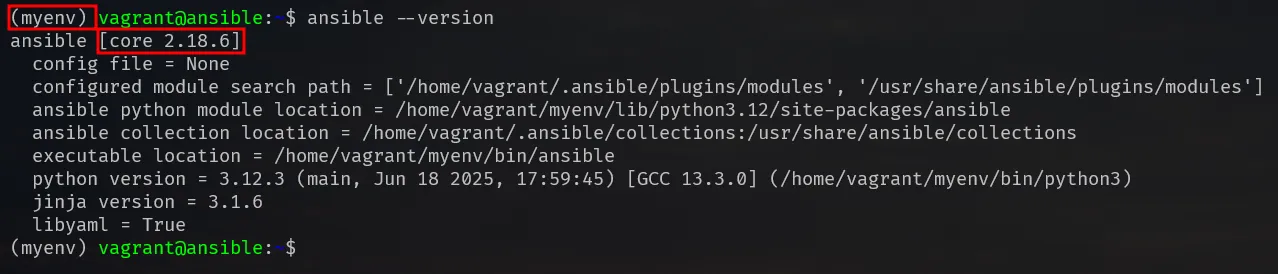
The environment is active only in the current shell. After a reboot or a new login, activate it again with source ~/myenv/bin/activate.
Connect to the managed nodes
Ansible depends on SSH, so the control node must reach each node first. Check the network, then log in manually:
$ ping -c 5 192.168.56.211
$ ssh vagrant@192.168.56.211Password authentication on Vagrant boxes
The main SSH server config is /etc/ssh/sshd_config. It includes every file in /etc/ssh/sshd_config.d/, and on my Vagrant Ubuntu box the file 50-cloud-init.conf there turns password login on.
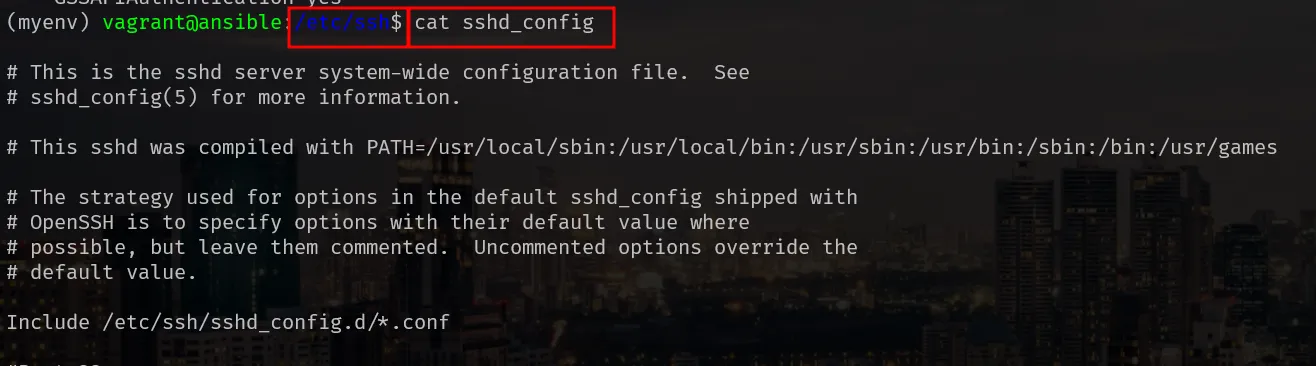

If you change it to PasswordAuthentication no and restart SSH, password login stops working and only keys are accepted. On a Windows host, Vagrant keeps the private key it generated for each VM under .vagrant\machines\<name>\virtualbox\private_key in the project folder.
SSH key authentication
Key-based login is more secure than passwords, and the remaining examples use it. Generate a key pair on the control node and copy the public key to each node:
$ ssh-keygen -t ed25519 -f ansible_key
$ ssh-copy-id -i ansible_key.pub vagrant@192.168.56.212
$ ssh -i ~/ansible_examples/example3/ansible_key vagrant@192.168.56.212ssh-copy-id appends the public key to ~/.ssh/authorized_keys on the node. You can also paste the content of ansible_key.pub into that file manually. My first key used -t rsa; ed25519 is the modern default and produces shorter keys.
Write the first inventory
Create a project directory containing a file named inventory. Each line defines a host alias with its connection variables, and a name in square brackets starts a group.

# Password login (needs sshpass on the control node)
vm1 ansible_host=192.168.56.211 ansible_user=vagrant ansible_password=vagrant

# SSH key login
centosvm1 ansible_host=192.168.56.212 ansible_user=vagrant ansible_ssh_private_key_file=/home/vagrant/ansible_examples/example3/ansible_key

[webservergrp]
vm1

[dbservers]
centosvm1Ad-hoc commands
An ad-hoc command is a one-line Ansible command that runs a single module against one or more hosts. It suits quick checks. For repeatable work, use playbooks, which can be reviewed and kept in version control.
| Flag | Meaning |
|---|---|
-i | path to the inventory file |
-m | module to run |
-a | arguments for the module |
--become | run the task with sudo (privilege escalation) |
Test the connection with the ping module
$ ansible -i inventory -m ping vm1The ping module logs in over SSH and checks that Python works. It is not an ICMP ping. The first attempt in my lab failed, because password login over SSH requires the sshpass program on the control node:

After sudo apt install sshpass the same command returned pong:

Install and remove a package
$ ansible -i inventory -m apt -a "name=apache2 state=present" vm1The command fails with a permission error, because installing packages requires root:
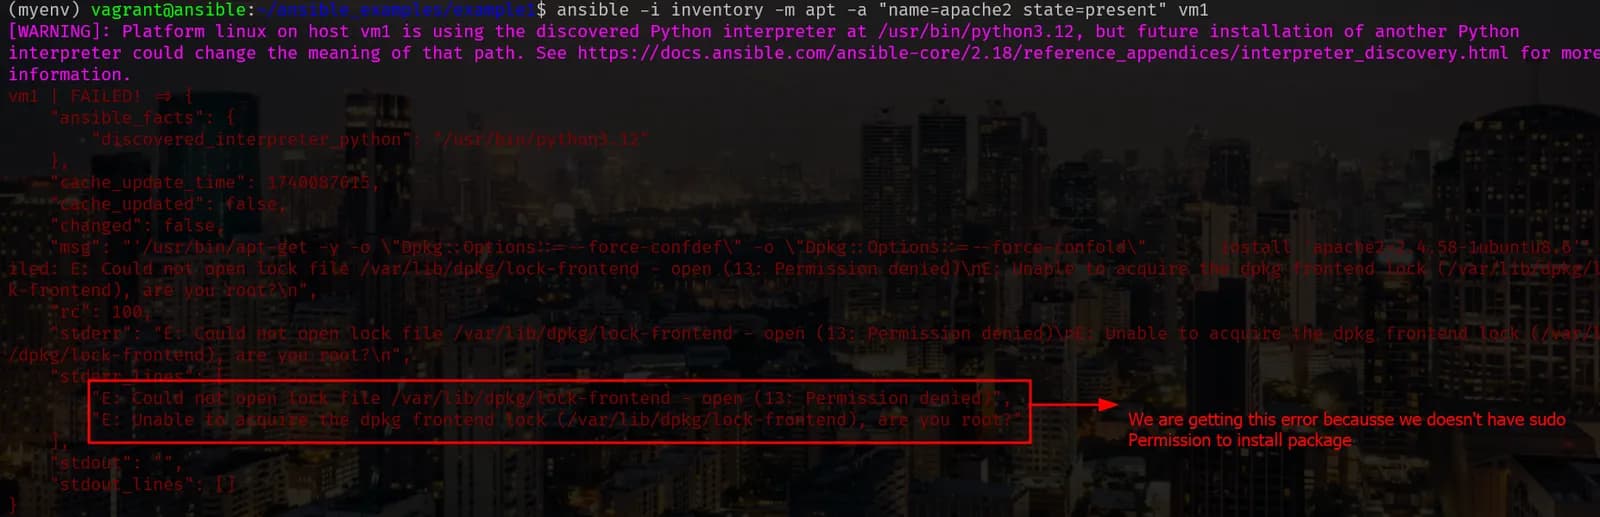
Add --become to run the module with sudo, and the installation succeeds:
$ ansible -i inventory -m apt -a "name=apache2 state=present" vm1 --become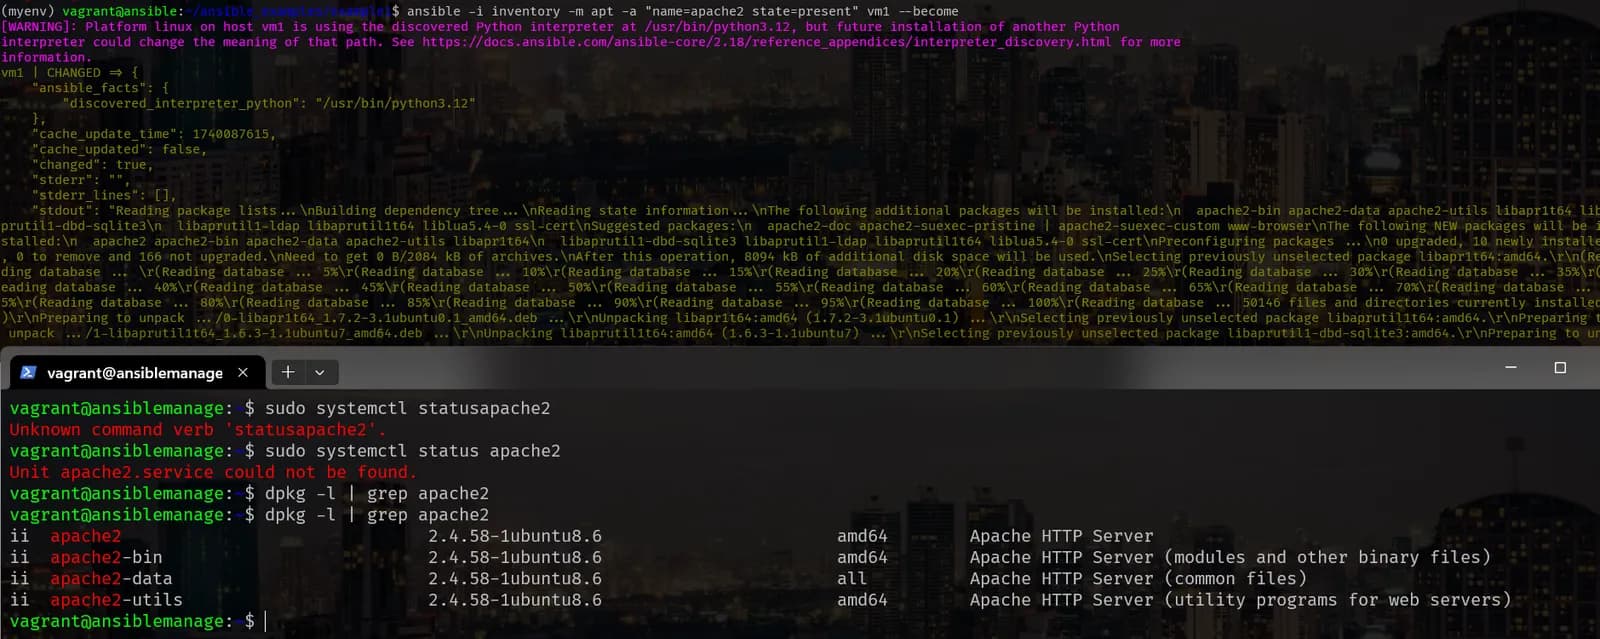
To remove it, set the state to absent:
$ ansible -i inventory -m apt -a "name=apache2 state=absent" vm1 --becomeManage the service
$ ansible -i inventory -m service -a "name=apache2 state=started" vm1 --become
$ ansible -i inventory -m service -a "name=apache2 state=started enabled=yes" vm1 --become
$ ansible -i inventory -m service -a "name=apache2 state=stopped enabled=no" vm1 --becomeThe first command starts Apache, the second also enables it at boot, and the third stops and disables it.
Copy a file and see idempotency
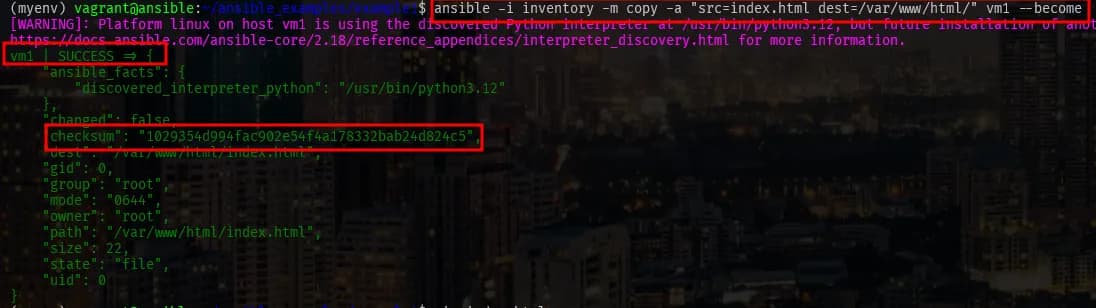
$ ansible -i inventory -m copy -a "src=index.html dest=/var/www/html/" vm1 --become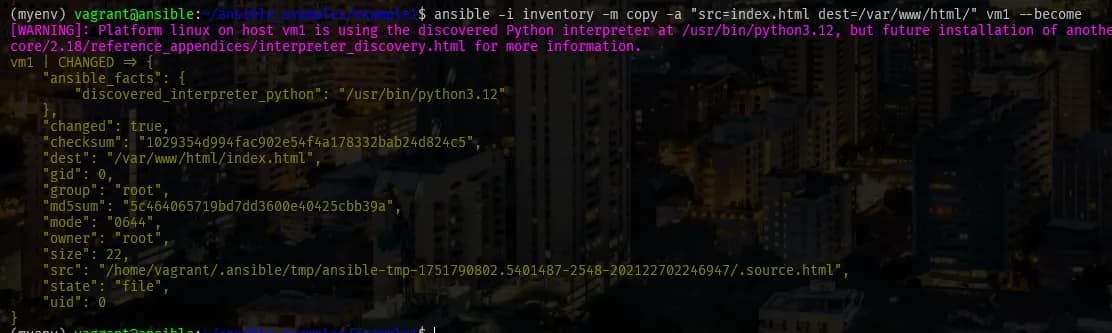
Run the same command again without editing the file, and the result is SUCCESS with "changed": false. The copy module compares checksums and copies only when the file differs. This is idempotency: running the same task many times gives the same result and changes nothing that is already correct.
The ansible.cfg file
ansible.cfg stores default settings so you do not repeat them on every command. Ansible uses the first file it finds, in this order:
- The file in the
ANSIBLE_CONFIGenvironment variable, if set. Example:ANSIBLE_CONFIG=/home/vagrant/ansible/example4/ansible.cfg ansible-playbook deploy.yaml ansible.cfgin the current directory (the project folder).~/.ansible.cfgin the user's home directory./etc/ansible/ansible.cfg. Theaptpackage creates it; apipinstall does not.
Run ansible-config view or ansible --version to see which file is in use. To generate a fully commented example file:
$ ansible-config init --disabled > ansible.cfgEvery line in the generated file starts with ; (a comment), with a description above it. Uncomment the lines you need. The most useful settings are:
Setting (in [defaults]) | What it does |
|---|---|
inventory | default inventory path (default /etc/ansible/hosts) |
remote_user | default SSH user on the nodes |
private_key_file | default SSH private key |
host_key_checking | False skips the "authenticity of host can't be established" prompt on first connect; use in labs only |
forks | how many hosts Ansible works on in parallel (default 5) |
ask_pass | ask for the SSH password at run time |
become_password_file | file that holds the sudo password used by --become |
executable | shell used on the nodes (default /bin/sh) |
home | root directory for Ansible files on the controller (default ~/.ansible) |
local_tmp | temporary directory on the controller |
A minimal project file looks like this:
[defaults]
inventory = ./inventory
remote_user = vagrant
host_key_checking = FalseCommon mistakes
you must install the sshpass program: password login needssshpasson the control node. Install it, or switch to SSH keys.Could not open lock file /var/lib/dpkg/lock-frontend: the task needs root. Add--become.Permissions 0664 for 'ansible_key' are too open: SSH ignores a private key that other users can read. Fix it withchmod 600 ansible_key.- pip
externally-managed-environmenterror: install Ansible inside a virtual environment, or withpipx.
Key takeaways
- Ansible is push-based and agentless; nodes need only SSH and Python.
- Install the latest Ansible with
pipin a virtual environment, created as your normal user. - The inventory holds hosts, groups and connection variables; use SSH keys instead of passwords.
- Ad-hoc commands (
ansible -i inventory -m module -a "args") are for quick tasks; add--becomefor root. - Modules are idempotent: a second run reports
changed: falsewhen nothing needs to change. - Ansible reads the first
ansible.cfgit finds:ANSIBLE_CONFIG, then the current directory, then home, then/etc/ansible.
Next in this series: Ansible Playbooks.
Keep reading
- Ansible Templates, Handlers, Roles and Vault
Push chrony NTP config with templates, edit sshd_config with lineinfile, restart services only on change with handlers, then organize it all into a role and encrypt secrets with Vault.
- Ansible Playbooks: Apache, MariaDB, Variables, Conditionals and Loops
Write Ansible playbooks that install Apache and MariaDB, create a database and user, and use variables, facts, when conditions and loops across Ubuntu and CentOS VMs.
- Vagrant for Local VMs: Vagrantfile, Commands and SSH Shortcuts
Create and manage VirtualBox VMs with Vagrant: an Ubuntu 24.04 Vagrantfile, daily commands, synced folders, provisioning, and SSH config and aliases to reach VMs from anywhere.