Build and Deploy a Java WAR to Tomcat with Maven and Jenkins
Build a Java web app with Maven, deploy the WAR to Tomcat by hand, then automate the same build and deploy with two chained Jenkins freestyle jobs.

ON THIS PAGE
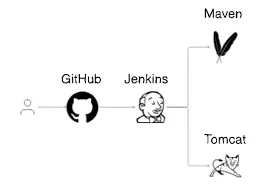
Automating a deployment is easier once the manual steps are clear: build the WAR file, copy it to Apache Tomcat, and reload the app. This guide packages a Java web app with Maven, deploys it to Tomcat by hand, and then automates the same flow with two chained Jenkins freestyle jobs, one that builds and archives the WAR and one that deploys it.
Prerequisites
- An Ubuntu VM with
sudoaccess. In this lab the same VM also runs Jenkins on port 8080. - Jenkins installed as described in Jenkins Basics.
- A GitHub repository to hold the app code.
Maven in short
Apache Maven is a build tool for Java. You describe the project in a pom.xml file (POM means Project Object Model): its name, version, dependencies and plugins. Maven then downloads the dependencies, compiles, tests and packages the code.
Build lifecycle
Maven runs a fixed sequence of phases. Running one phase runs every phase before it, so mvn package also validates, compiles and tests.
| Phase | What it does |
|---|---|
validate | Checks that the project is correct and all needed information is there. |
compile | Compiles the source code (.java files into .class bytecode). |
test | Runs unit tests on the compiled code. Nothing is packaged yet. |
package | Bundles the compiled code into a distributable file such as a JAR or WAR. |
verify | Runs checks on integration test results to make sure quality criteria are met. |
install | Copies the package into the local repository (~/.m2) so other local projects can use it. |
deploy | Copies the package to a remote repository to share with other developers. |
clean is a separate lifecycle that deletes the target folder, which is why builds often run mvn clean package.
Install Java and Maven
Maven needs a full JDK, not only a JRE, to compile code:
$ sudo apt update
$ sudo apt install openjdk-21-jdk maven
$ mvn --versionCreate and package the web app
Generate a web app skeleton from the Maven webapp archetype (a project template):
$ mvn archetype:generate -DarchetypeArtifactId=maven-archetype-webapp
Define value for property 'groupId': Dipen
Define value for property 'artifactId': dipendra
Define value for property 'version' 1.0-SNAPSHOT: v 2.0.0
Define value for property 'package' Dipen: wargroupIdis the group or organisation (usually a reversed domain, likenp.com.example).artifactIdis the project name and the folder that gets created.packageis the Java package name. This archetype creates only a JSP page and no Java classes, so the value has no effect here.
Confirm with y. Maven creates the pom.xml and a simple "Hello World" JSP app.
Add the WAR plugin and a fixed output file name inside <project> in pom.xml:
<build>
  <finalName>dipendra_webapp</finalName>
  <plugins>
    <plugin>
      <groupId>org.apache.maven.plugins</groupId>
      <artifactId>maven-war-plugin</artifactId>
      <version>3.4.0</version>
    </plugin>
  </plugins>
</build>Build the package:
$ mvn package
$ ls target/*.war
target/dipendra_webapp.warSet up Tomcat
Apache Tomcat is a free, open source web server and servlet container for Java web apps. Tomcat 11 needs Java 17 or later.
Download the Core binary tar.gz from the Tomcat 11 download page. Use the binary distribution, not the -src source archive, which must be built before it can run. This guide uses 11.0.11, extracted to /opt/apache-tomcat1:
$ wget https://archive.apache.org/dist/tomcat/tomcat-11/v11.0.11/bin/apache-tomcat-11.0.11.tar.gz
$ tar xzvf apache-tomcat-11.0.11.tar.gz
$ sudo mv apache-tomcat-11.0.11 /opt/apache-tomcat1
$ cd /opt/apache-tomcat1/bin
$ sudo ./startup.sh
$ sudo ./shutdown.shThe .sh scripts are for Linux and the .bat scripts for Windows. Both start Catalina, the main Tomcat process. To run Tomcat as a proper service that starts on boot and restarts on failure, see Running Tomcat as a systemd Service.
The key directories:
| Folder | Contents |
|---|---|
bin | Start, stop and helper scripts. |
conf | Configuration: server.xml, tomcat-users.xml and others. |
webapps | Deployed apps. A WAR file copied here is deployed automatically. |
logs | catalina.out and access logs. Check here first when something fails. |
Configure Tomcat before deploying
Change the port
Jenkins already listens on 8080 on this VM, so move the Tomcat HTTP connector to 8081:
-    <Connector port="8080" protocol="HTTP/1.1"
+ <Connector port="8081" protocol="HTTP/1.1"If you run more than one Tomcat on the same machine, each instance also needs its own shutdown port (default 8005):
-<Server port="8005" shutdown="SHUTDOWN">
+<Server port="8010" shutdown="SHUTDOWN">Add manager users
The Manager app (/manager/html) lists, deploys and removes apps. It requires a user with the correct roles. Create two users: one for browser access, and one that Jenkins uses to deploy through the Manager's text API.
<tomcat-users>
  <role rolename="manager-gui"/>
  <role rolename="admin-gui"/>
  <role rolename="manager-script"/>
  <user username="admin" password="CHANGE_ME" roles="manager-gui,admin-gui"/>
  <user username="tomcat" password="CHANGE_ME" roles="manager-script"/>
</tomcat-users>Allow remote access to the Manager and Host Manager
By default the Manager and Host Manager apps accept requests only from localhost. A RemoteAddrValve in each app's context.xml enforces this:
/opt/apache-tomcat1/webapps/manager/META-INF/context.xml/opt/apache-tomcat1/webapps/host-manager/META-INF/context.xml
In my lab I commented out the valve in both files, which allows access from any IP:
<Context antiResourceLocking="false" privileged="true">
  <!-- <Valve className="org.apache.catalina.valves.RemoteAddrValve"
         allow="127\.\d+\.\d+\.\d+|::1|0:0:0:0:0:0:0:1" /> -->
  ...
</Context>A safer option is to keep the valve and add only your own network to allow, for example a VirtualBox host-only network:
-         allow="127\.\d+\.\d+\.\d+|::1|0:0:0:0:0:0:0:1" />
+ allow="127\.\d+\.\d+\.\d+|::1|0:0:0:0:0:0:0:1|192\.168\.56\.\d+" />Restart Tomcat to apply the changes:
$ cd /opt/apache-tomcat1/bin
$ sudo ./shutdown.sh
$ sudo ./startup.shDeploy the WAR by hand
Copy the WAR into webapps. Tomcat extracts it into a folder with the same name, without .war:
$ sudo cp target/dipendra_webapp.war /opt/apache-tomcat1/webapps/
$ ls /opt/apache-tomcat1/webappsThe app now appears in the Manager app as /dipendra_webapp and opens at http://192.168.56.150:8081/dipendra_webapp/.
To serve it at the root URL (http://192.168.56.150:8081/) instead, replace the default ROOT app:
$ sudo rm -rf /opt/apache-tomcat1/webapps/ROOT
$ sudo cp target/dipendra_webapp.war /opt/apache-tomcat1/webapps/ROOT.warAutomate it with Jenkins freestyle jobs
Before creating the Jenkins jobs, confirm the following:
- Maven and a JDK must be on the Jenkins machine (installed as above, or set up under Manage Jenkins > Tools).
- Tomcat must be set up as above, with the
manager-scriptuser for Jenkins. - The app code must be in a GitHub repository.
Job 1: build and archive the WAR
Create a freestyle job named maven_deploy:
- Source Code Management: Git, the repository URL, credentials if the repo is private, and the branch.
- Build Steps: Invoke top-level Maven targets with goals
clean package. Ifpom.xmlis not at the repo root, set its path under Advanced > POM. - Post-build Actions: Archive the artifacts with
**/*.war, which matches the WAR anywhere in the workspace and saves it with the build.
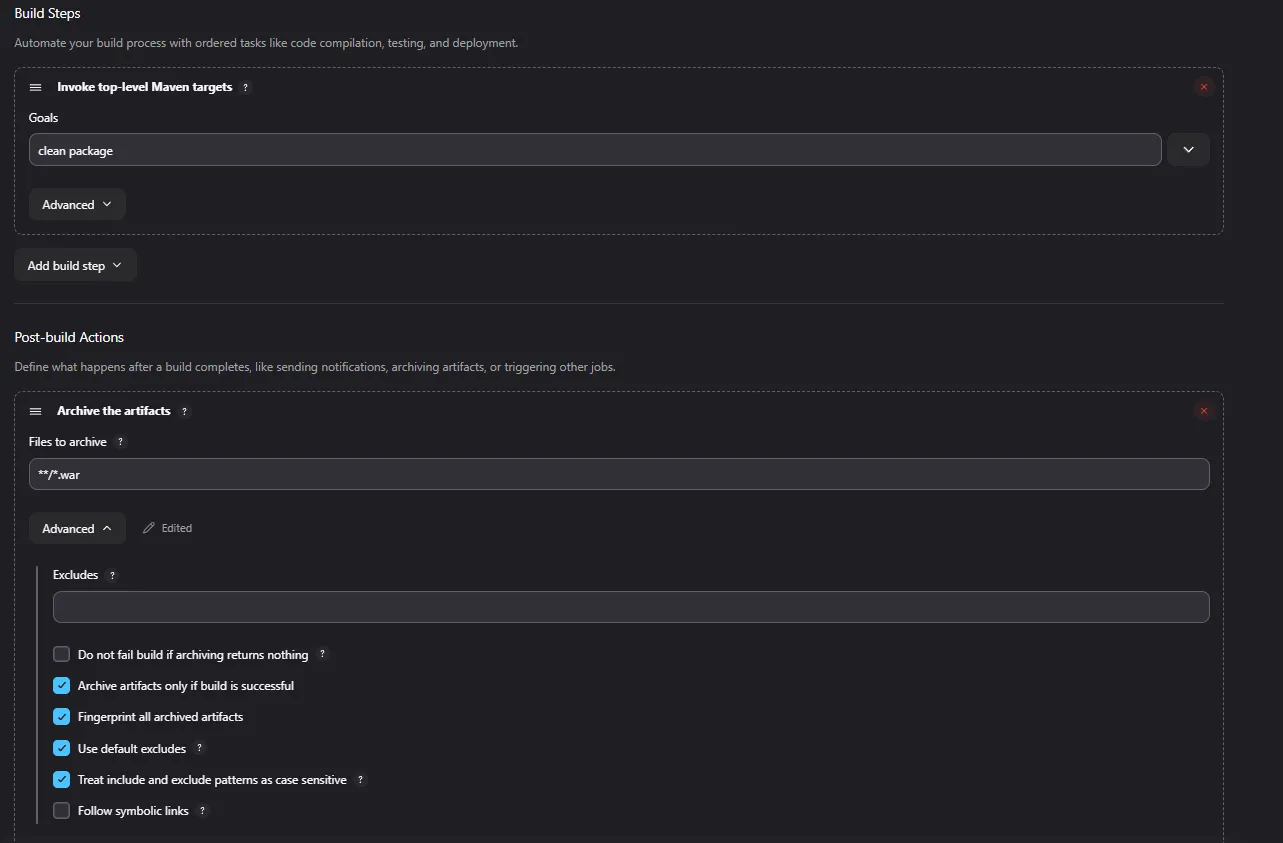
After a successful build, the WAR appears as an artifact on the build page.
Job 2: deploy the WAR to Tomcat
Install two plugins from Manage Jenkins > Plugins, then restart Jenkins:
- Copy Artifact: copies artifacts from another job's build.
- Deploy to container: deploys a WAR or EAR to Tomcat and other servers through their manager API.
$ sudo systemctl restart jenkinsThen create a second freestyle job, deploy_tomcat_using_maven.
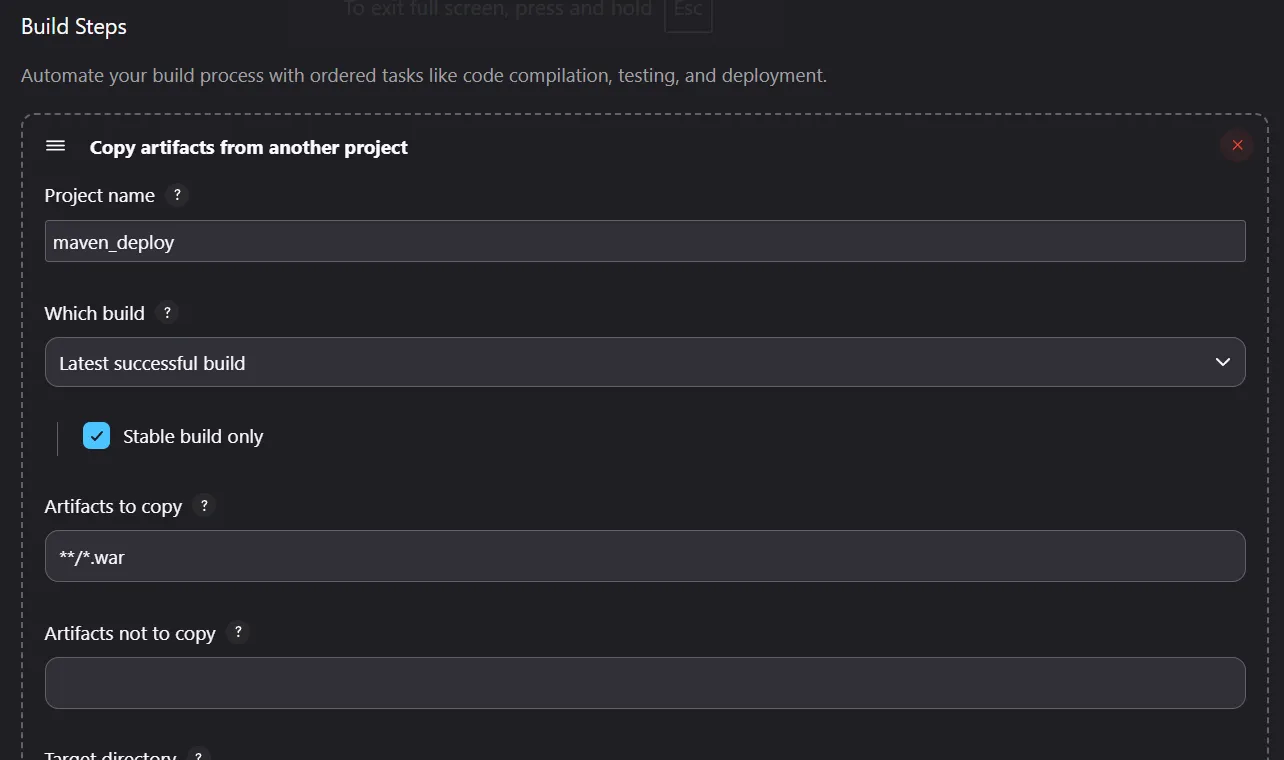
Build step: Copy artifacts from another project, taking **/*.war from the latest successful (stable) build of maven_deploy:
Post-build action: Deploy war/ear to a container:
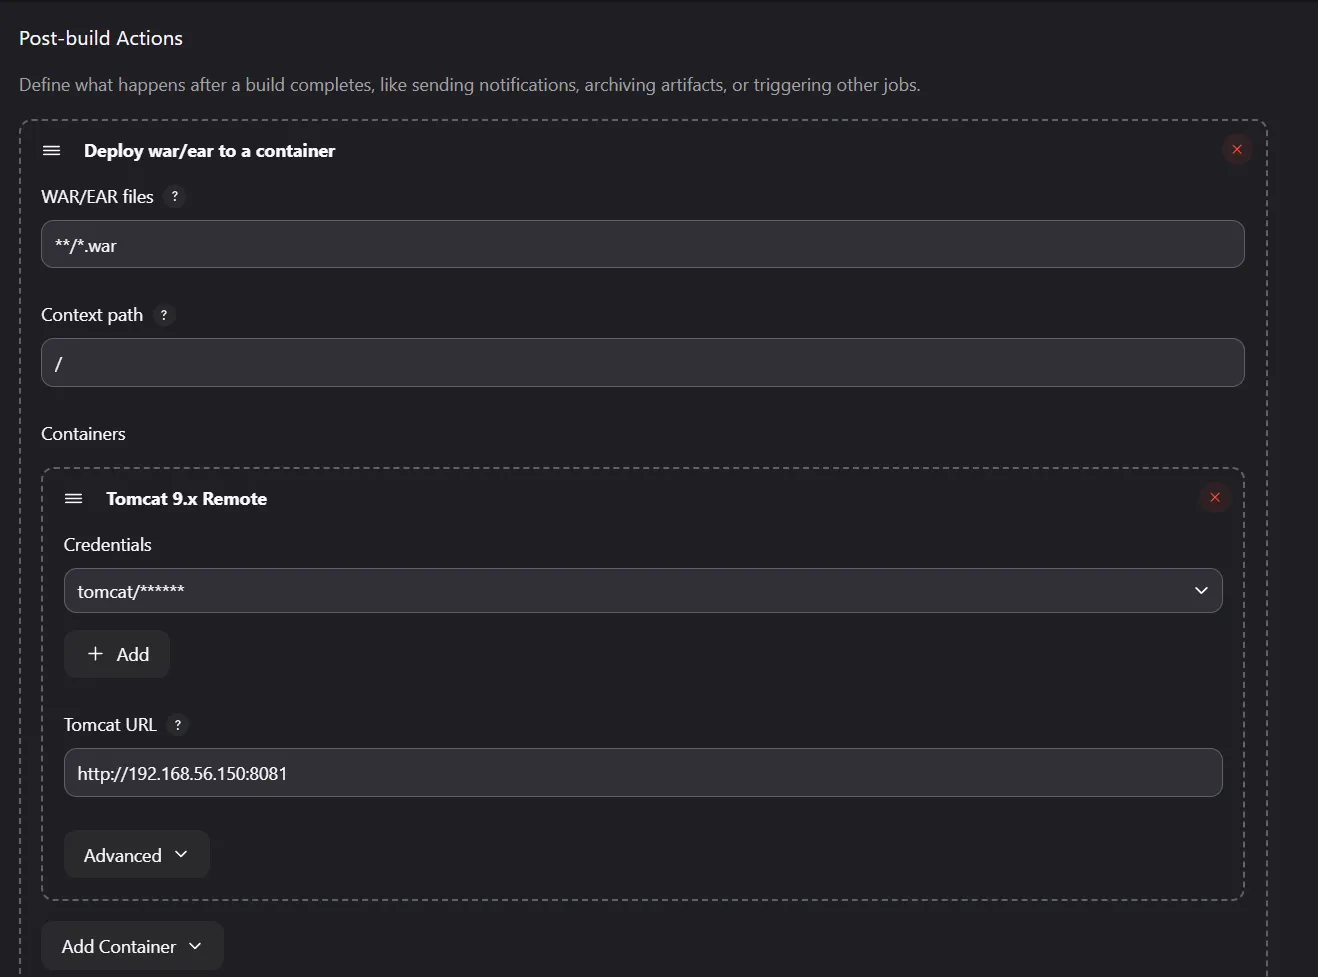
- WAR/EAR files:
**/*.war. - Context path: the URL path the app is deployed under.
/replaces theROOTapp, so the site opens at the Tomcat root. A name likemyappdeploys it asmyapp.warnext toROOT, and it opens athttp://192.168.56.150:8081/myapp/. If left blank, the WAR file name is used. - Containers: Tomcat 9.x Remote worked for my Tomcat 11, with the Tomcat URL
http://192.168.56.150:8081. - Credentials: click Add and create a Username with password credential with the
manager-scriptuser, an ID and a description, then select it.
Save and build. The app is now live at the Tomcat URL.
Chain the two jobs
Rather than start the deploy job by hand, have the build job trigger it. In maven_deploy, add the post-build action Build other projects and pick Trigger only if build is stable:
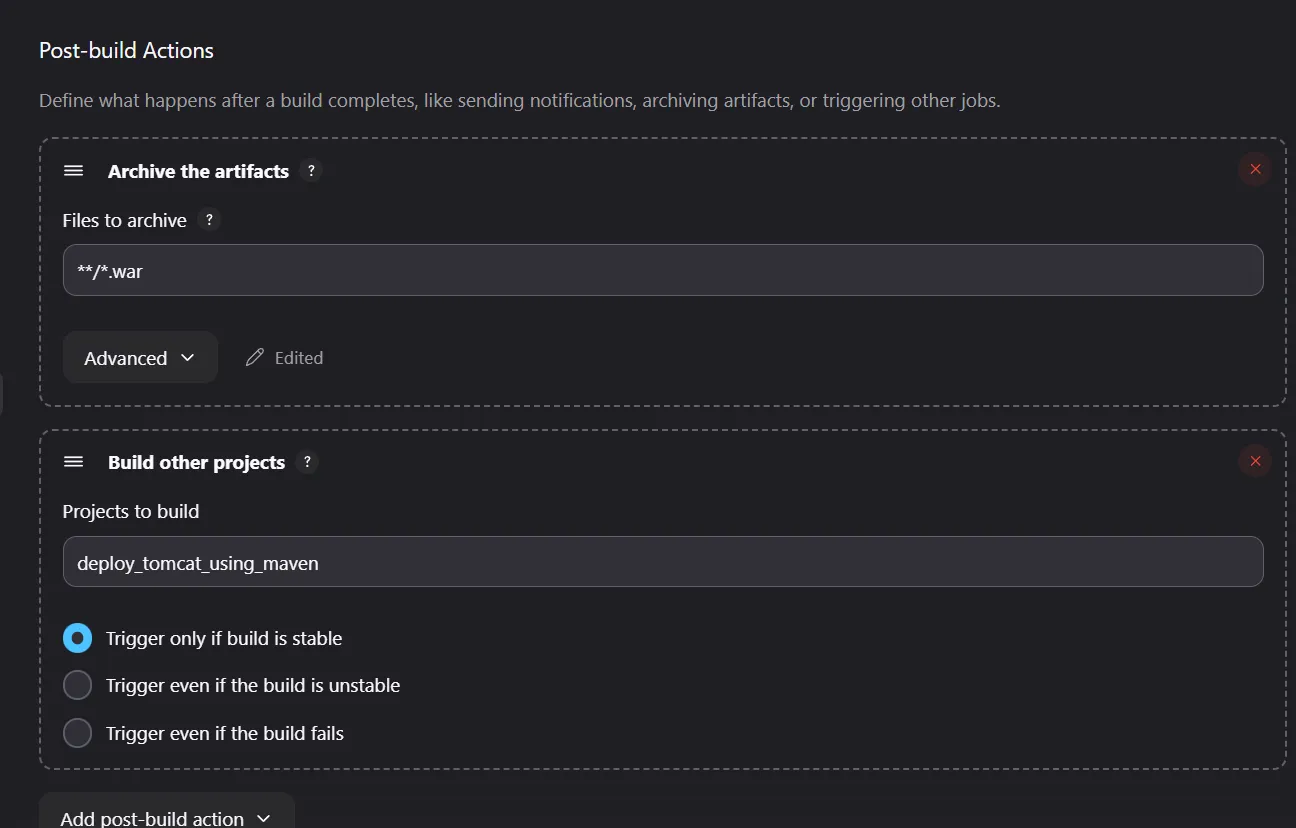
Now one build of maven_deploy builds the WAR and then deploys it. maven_deploy is the upstream job and deploy_tomcat_using_maven is the downstream job.
Manual approval before deploying
To keep the deploy as a manual step, use the Build Pipeline plugin. Its post-build action Build other projects (manual step) adds the downstream job, which runs only when someone starts it. The Build Pipeline plugin is no longer actively maintained (it is up for adoption), so for new work a pipeline input step is the better choice. The next part uses one.
Troubleshooting
- Tomcat does not start or the port is taken: another service, here Jenkins, is on 8080. Change the connector port in
server.xml. - 403 Access Denied on
/manager/htmlfrom another machine: theRemoteAddrValvein the Manager'scontext.xmlstill allows only localhost.
Key takeaways
mvn clean packageruns every lifecycle phase up topackageand leaves the WAR intarget/.- Tomcat deploys any WAR copied into
webapps. Name itROOT.warto serve it at/. - Give Jenkins its own Tomcat user with only
manager-script, and keep the Manager restricted by IP. - Splitting build and deploy into upstream and downstream jobs lets you rerun each step on its own.
- Freestyle chains work, but a pipeline defined in code is easier to review and extend.
Next in this series: Jenkins Pipeline for Building and Deploying Docker Images.
Keep reading
- SonarQube and Nexus in a Jenkins Pipeline
Install SonarQube and Sonatype Nexus, define a quality gate, and extend a Jenkins pipeline to scan Java code and publish each WAR build to a Nexus repository.
- Jenkins Distributed Builds with Agents and Labels
Connect two Vagrant VMs to Jenkins as SSH agents, use labels to choose where each stage runs, and ship a Java app and a Node.js app across separate nodes.
- Jenkins Pipeline for Building and Deploying Docker Images
Write a declarative Jenkinsfile that builds a Maven app, packs it into a Docker image, scans it with Trivy, pushes it to Docker Hub, deploys it and emails the team.