Jenkins Pipeline for Building and Deploying Docker Images
Write a declarative Jenkinsfile that builds a Maven app, packs it into a Docker image, scans it with Trivy, pushes it to Docker Hub, deploys it and emails the team.

ON THIS PAGE
Chained freestyle jobs become hard to review and extend as a build grows. This guide replaces the freestyle jobs from the previous part with a declarative Jenkins pipeline that builds the same Maven web app, packages it into a Docker image, scans it with Trivy, pushes it to Docker Hub, deploys a container and emails the team. The same stage layout underpins most production CI/CD pipelines.
Prerequisites
- Jenkins installed as described in Jenkins Basics, with the Maven app from the previous part in a GitHub repository.
- Docker installed on the Jenkins VM, as described in Docker Installation and Commands.
- A Docker Hub account, and a Gmail account with 2-Step Verification for email alerts.
Pipeline concepts in short
A pipeline describes the whole build-test-deploy process as code. The code lives in a text file called a Jenkinsfile, usually committed to the same Git repository as the app. As a result, the pipeline is reviewed, versioned and changed like any other code.
A pipeline has three building blocks:
- Agent (node): the machine, or container, that runs the work.
agent anymeans "any available executor". - Stage: a named group of work, such as "Build", "Test" or "Deploy". Stages appear as columns in the Jenkins UI, so you can see where a build failed.
- Step: a single action inside a stage, for example
sh 'mvn clean package'to run a shell command, orechoto print a message.
Pipelines also survive a Jenkins restart, can pause and wait for a person to approve, and can run stages in parallel. Freestyle jobs handle none of these well.
Declarative versus scripted
Both kinds of pipeline are written in a Groovy-based language. The difference is how much structure they enforce:
| Declarative | Scripted | |
|---|---|---|
| Starts with | pipeline { ... } | node { ... } |
| Style | Fixed structure: agent, environment, stages, post | Plain Groovy code with loops and conditions anywhere |
| Best for | Most pipelines; easier to read and validate | Complex logic that declarative cannot express |
This guide uses declarative syntax throughout. The Pipeline syntax reference lists every directive.
Create a first pipeline in the Jenkins UI
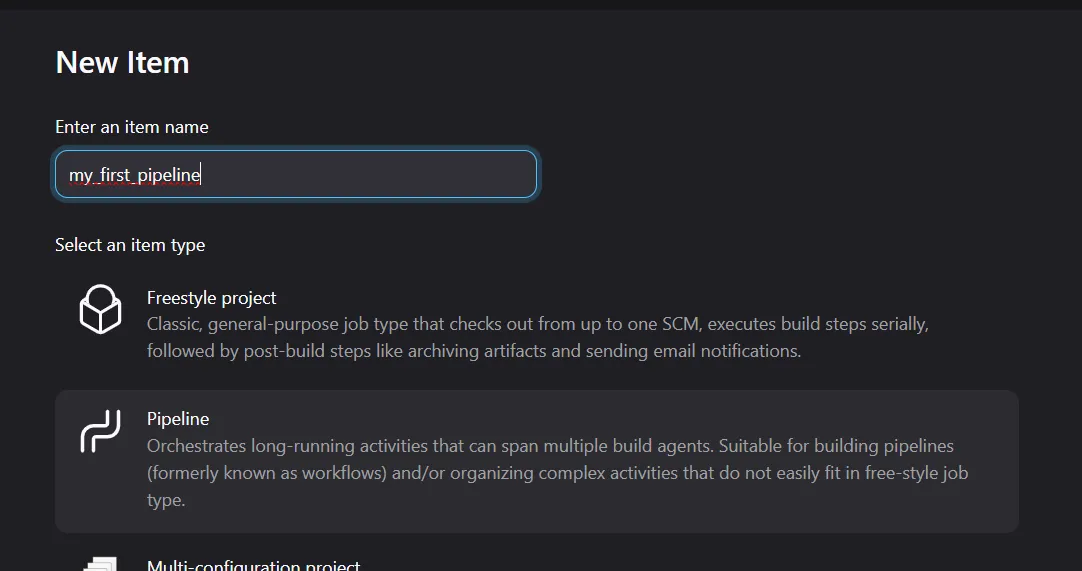
In New Item, give the job a name and choose Pipeline:
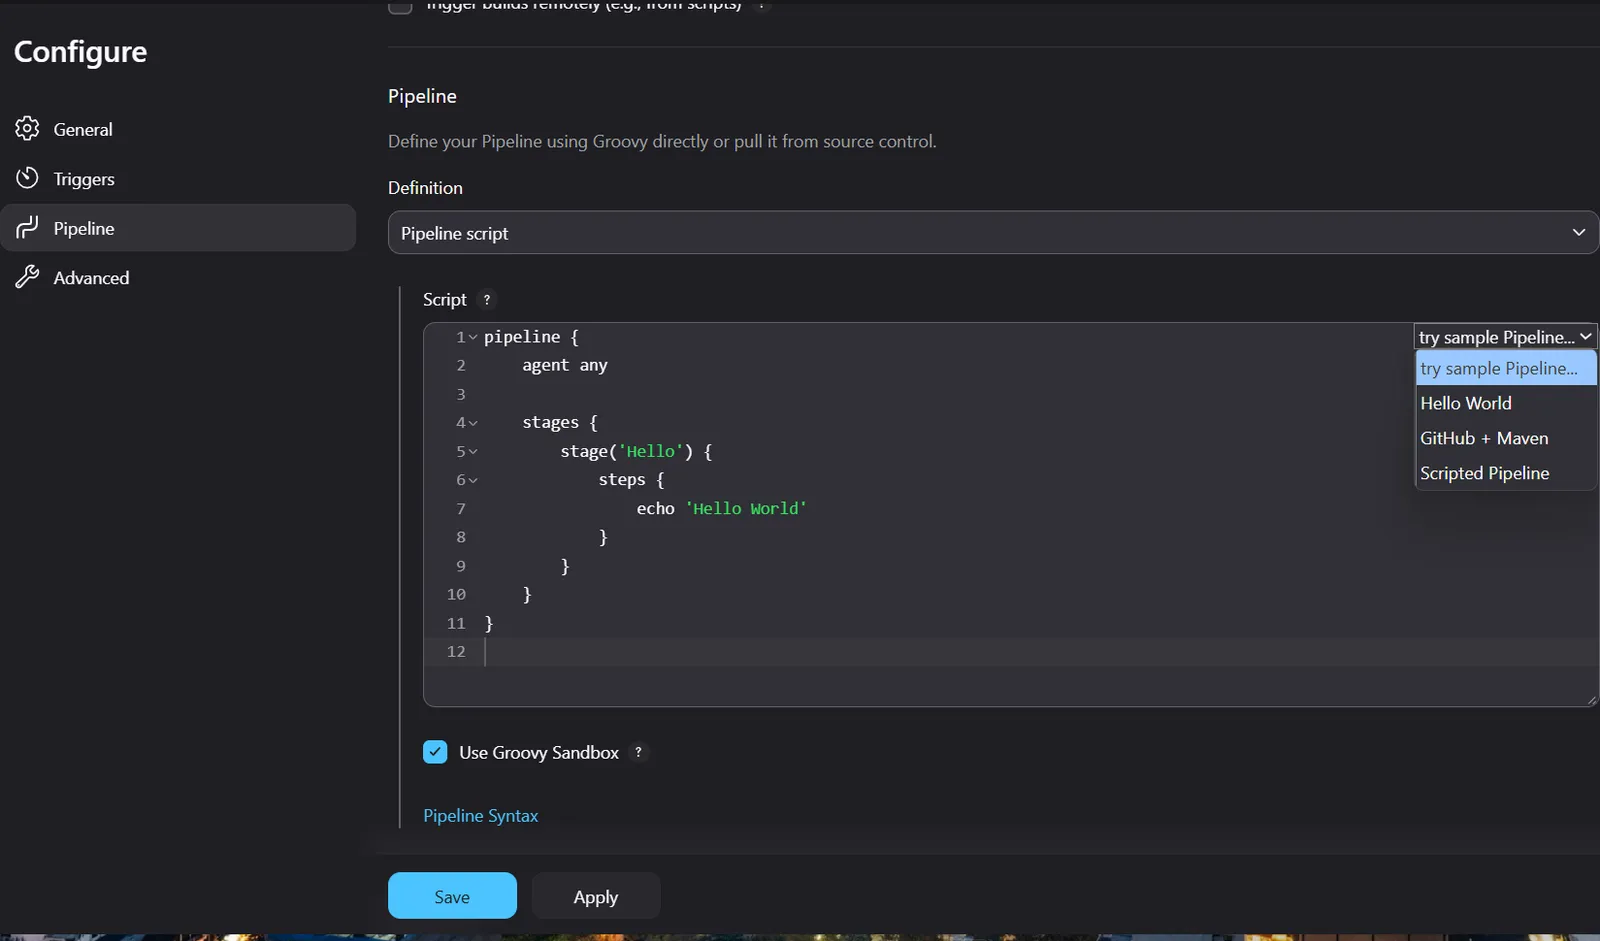
In the Pipeline section, keep Pipeline script as the definition and pick the Hello World sample from the "try sample Pipeline" menu:
After saving, the job page looks like a freestyle job, with two new links: Pipeline Syntax and Stages.
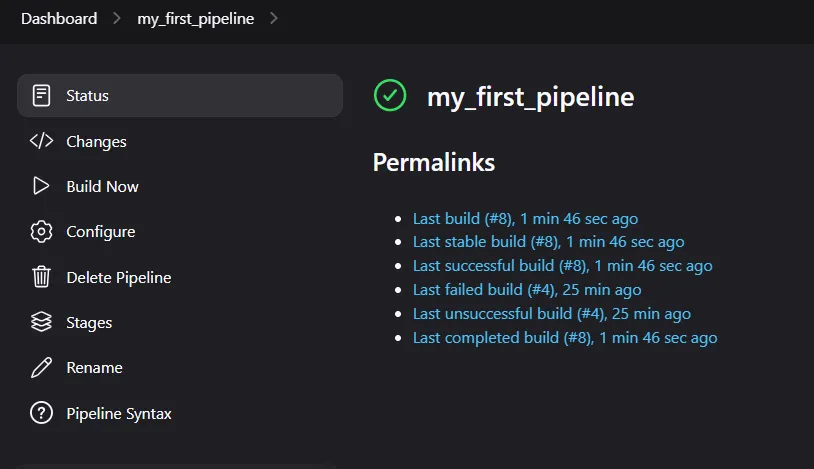
- Pipeline Syntax is a snippet generator. Pick a step, for example copying an artifact, fill in the form, and it generates the matching pipeline code.
- Stages shows every build with the result of each stage:
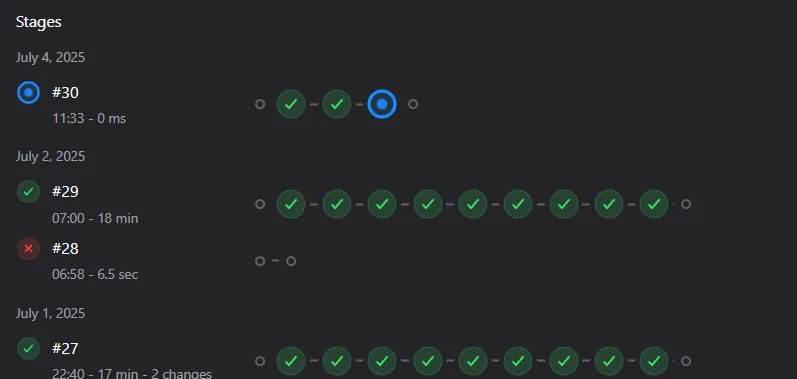
Clicking a build number opens the build page:
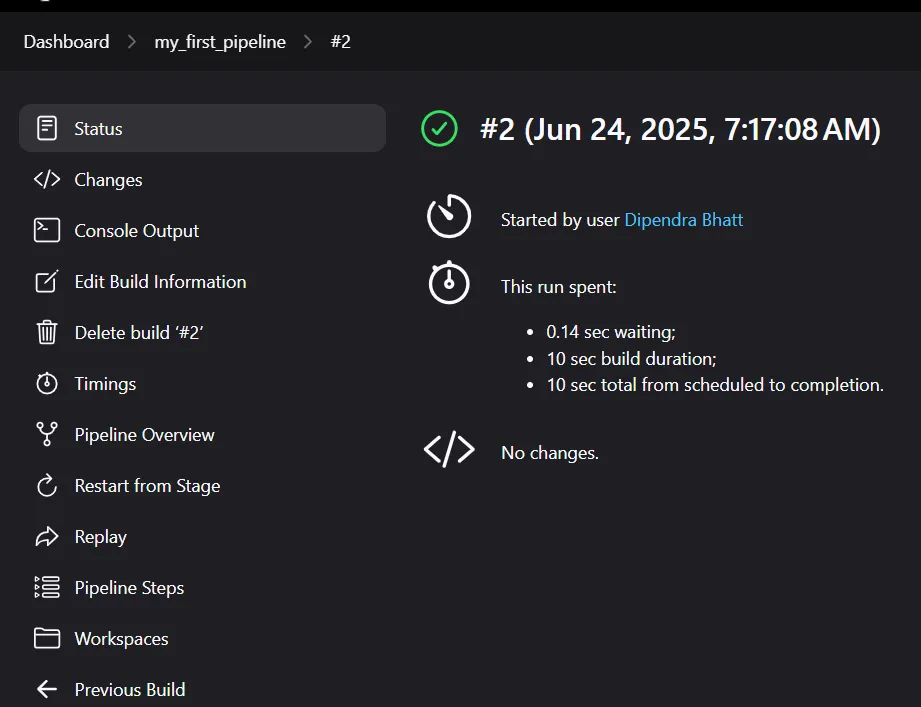
| Link | What it does |
|---|---|
| Console Output | The full log of the build. |
| Pipeline Overview | The stage graph and the log of each stage. |
| Restart from Stage | Rerun the build starting from a chosen stage, skipping the ones before it. |
| Replay | Rerun the build with an edited script. The edit applies to that run only; the saved job or Jenkinsfile is not changed. |
| Pipeline Steps | Every step with its own output. |
Next, sketch the planned stages with placeholder echo steps:
pipeline {
    agent any

    stages {
        stage('Compile the code') {
            steps {
                echo 'We are compiling the code'
            }
        }
        stage('Unit test') {
            steps {
                echo 'Running unit test'
            }
        }
        stage('Security scan') {
            steps {
                echo 'Run security scan'
            }
        }
        stage('Build docker image') {
            steps {
                echo 'Creating docker image'
            }
        }
        stage('Push image to the registry') {
            steps {
                echo 'Pushing image to the registry'
            }
        }
    }
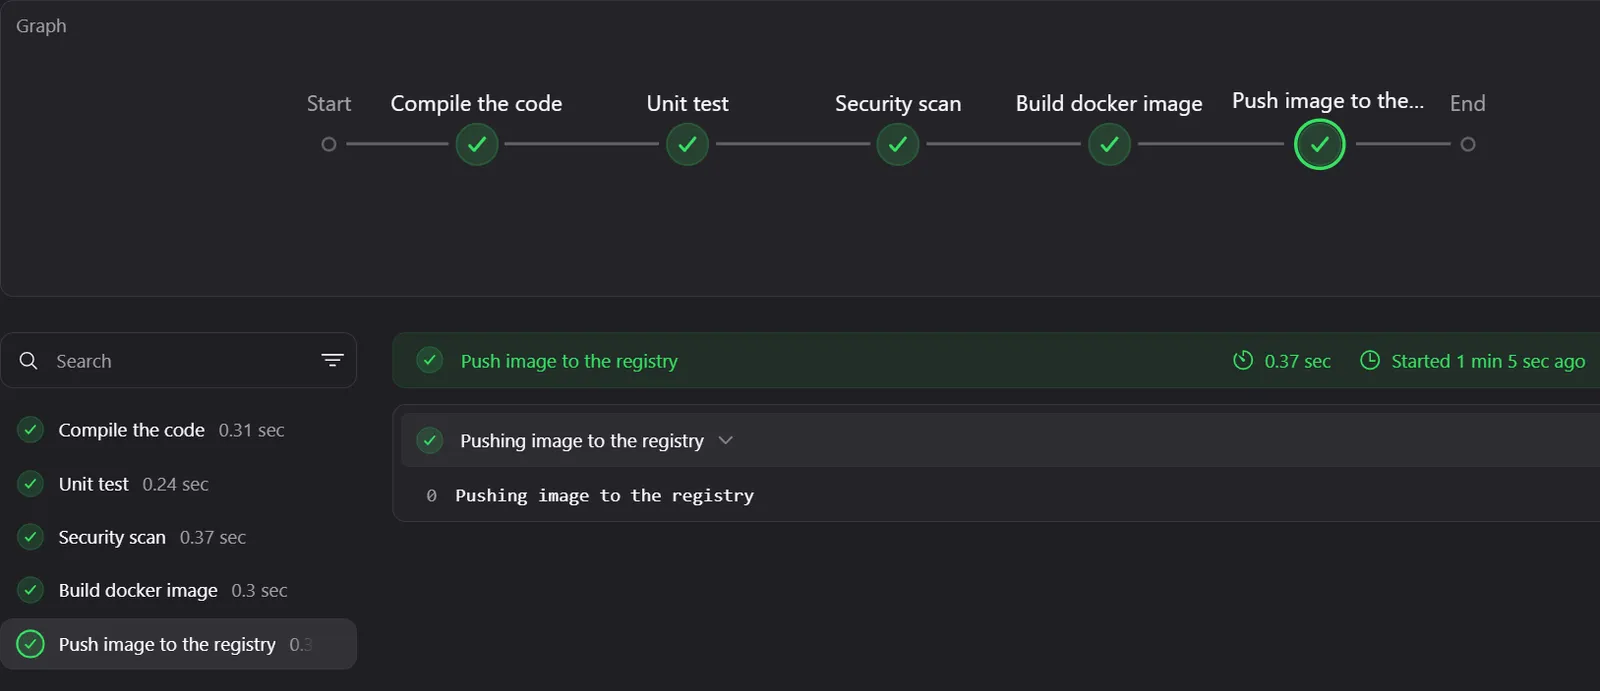
}Pipeline Overview now shows all five stages:
Moving the Jenkinsfile to Git
Production pipelines are not typed into the Jenkins UI. The Jenkinsfile lives in the repository next to the code:
- Commit the
Jenkinsfileto the GitHub repo. In this example, the repo holds both the Maven app and theJenkinsfile. - In the job, change the definition to Pipeline script from SCM and choose Git.
- Enter the repository URL, credentials if the repo is private, and the branch.
- Change Script Path only if the file is not called
Jenkinsfileat the repo root.
On every build, Jenkins clones the repo and runs the Jenkinsfile from it.
Containerising the app
Before adding Docker to the pipeline, I tested the image by hand on the Jenkins VM. The Dockerfile sits in the Maven project folder:

The image is based on the official Tomcat image and copies the WAR in as ROOT.war, so the app is served at /:
FROM tomcat:9.0.106-jdk8-corretto

LABEL "version"="1.0"

WORKDIR /usr/local/tomcat

COPY **/*.war /usr/local/tomcat/webapps/ROOT.war

EXPOSE 8080

CMD [ "catalina.sh", "run" ]Build the image and run Tomcat in a detached container:
$ docker image build -t mylocalimage:v1 .
$ docker container run -d --name mytomcat -p 8085:8080 mylocalimage:v1The site then opens at http://<vm-ip>:8085. To inspect the files instead, run the image with -it ... bash to get a shell inside the container; the WAR is in webapps. Passing bash replaces the image's CMD, so Tomcat does not start until you run catalina.sh start inside.
With the Dockerfile working, commit it to the GitHub repo. More on writing Dockerfiles in Dockerfile and Registries.
The full Jenkinsfile
The final pipeline is below. It was built one stage at a time, and the sections that follow explain each part. Email addresses are replaced with placeholders.
pipeline {
    agent any

    environment {
        mydockerimage = "deependrabhatta/jenkins_data"
    }

    stages {
        stage('Compile the code') {
            steps {
                echo 'packaging the code'
                sh 'mvn clean package'
            }
            post {
                success {
                    echo "Archiving the Artifacts...."
                    archiveArtifacts artifacts: '**/*.war'
                }
            }
        }

        stage('Build docker image') {
            steps {
                echo "Building docker images"
                sh 'docker image build -t ${mydockerimage}:${BUILD_NUMBER} .'
            }
        }

        stage('Image scanning with trivy') {
            steps {
                echo "Scanning image vulnerability"
                sh 'trivy image ${mydockerimage}:${BUILD_NUMBER}'
            }
        }

        stage('Pushing docker image to dockerhub') {
            steps {
                echo "pushing image"
                withDockerRegistry([credentialsId: 'jenkinsdockercred', url: '']) {
                    sh '''
                    docker push $mydockerimage:$BUILD_NUMBER
                    '''
                }
            }
        }

        stage('Deploy to devenv') {
            steps {
                echo 'Running a Development environment'
                sh '''
                docker container stop myapp || true
                docker container rm myapp || true
                docker run -d --name myapp -p 8089:8080 ${mydockerimage}:${BUILD_NUMBER}
                '''
            }
        }

        stage('Deploy Production Environment') {
            steps {
                timeout(time: 5, unit: 'DAYS') {
                    input message: 'Approve PRODUCTION Deployment?'
                }
                echo "Running app on Prod env"
                sh '''
                docker stop mymanualdeployapp || true
                docker rm mymanualdeployapp || true
                docker run -itd --name mymanualdeployapp -p 8083:8080 $mydockerimage:$BUILD_NUMBER
                '''
            }
        }
    }

    post {
        always {
            mail to: 'approver@example.com',
            subject: "Job '${JOB_NAME}' (${BUILD_NUMBER}) is waiting for input",
            body: "Please go to ${BUILD_URL} and verify the build"
        }
        success {
            mail bcc: 'qa-lead@example.com',
            body: """Hi Team,
            Build #$BUILD_NUMBER is successful, please go through the url
            $BUILD_URL
            and verify the details.
            Regards,
            DevOps Team""",
            cc: 'jenkins-alerts@example.com',
            from: 'jenkins-alerts@example.com',
            replyTo: '',
            subject: 'BUILD SUCCESS NOTIFICATION',
            to: 'dev-team@example.com'
        }
        failure {
            mail bcc: '',
            body: """Hi Team,
            Build #$BUILD_NUMBER is unsuccessful, please go through the url
            $BUILD_URL
            and verify the details.
            Regards,
            DevOps Team""",
            cc: 'qa-lead@example.com',
            from: 'jenkins-alerts@example.com',
            replyTo: 'dev-team@example.com',
            subject: 'BUILD FAILED NOTIFICATION',
            to: 'dev-team@example.com'
        }
    }
}Stage by stage
environment
environment defines variables for the whole pipeline. mydockerimage holds the image name, which must match the Docker Hub repository deependrabhatta/jenkins_data or the push fails later. BUILD_NUMBER is one of the variables Jenkins sets on every build (see using environment variables), so each build gets its own image tag: jenkins_data:15, jenkins_data:16 and so on.
Compile the code
mvn clean package builds the WAR, exactly like the freestyle job in part 2. The stage-level post { success { ... } } block archives the WAR only if this stage passes, so it can be downloaded from the build page later.
Build docker image
docker image build builds the image from the Dockerfile in the workspace and tags it with the build number. Single quotes around the sh command mean the shell expands ${mydockerimage}, not Groovy; Jenkins passes environment variables to the shell, so this works.
The first time I ran this stage it failed:

Jenkins runs builds as the jenkins user, and that user had no permission to access the Docker daemon. The fix is to add jenkins to the docker group and restart Jenkins so the new group takes effect:
$ sudo usermod -aG docker jenkins
$ sudo systemctl restart jenkinsAfter that, every build left a new image tag on the VM. In this earlier run the image was still called mytomcatimage:

Image scanning with Trivy
Trivy is an open source scanner that finds known vulnerabilities (CVEs) in container images. Install it on the Jenkins VM using the Trivy installation guide and run a manual scan first:
$ trivy image mytomcatimage:16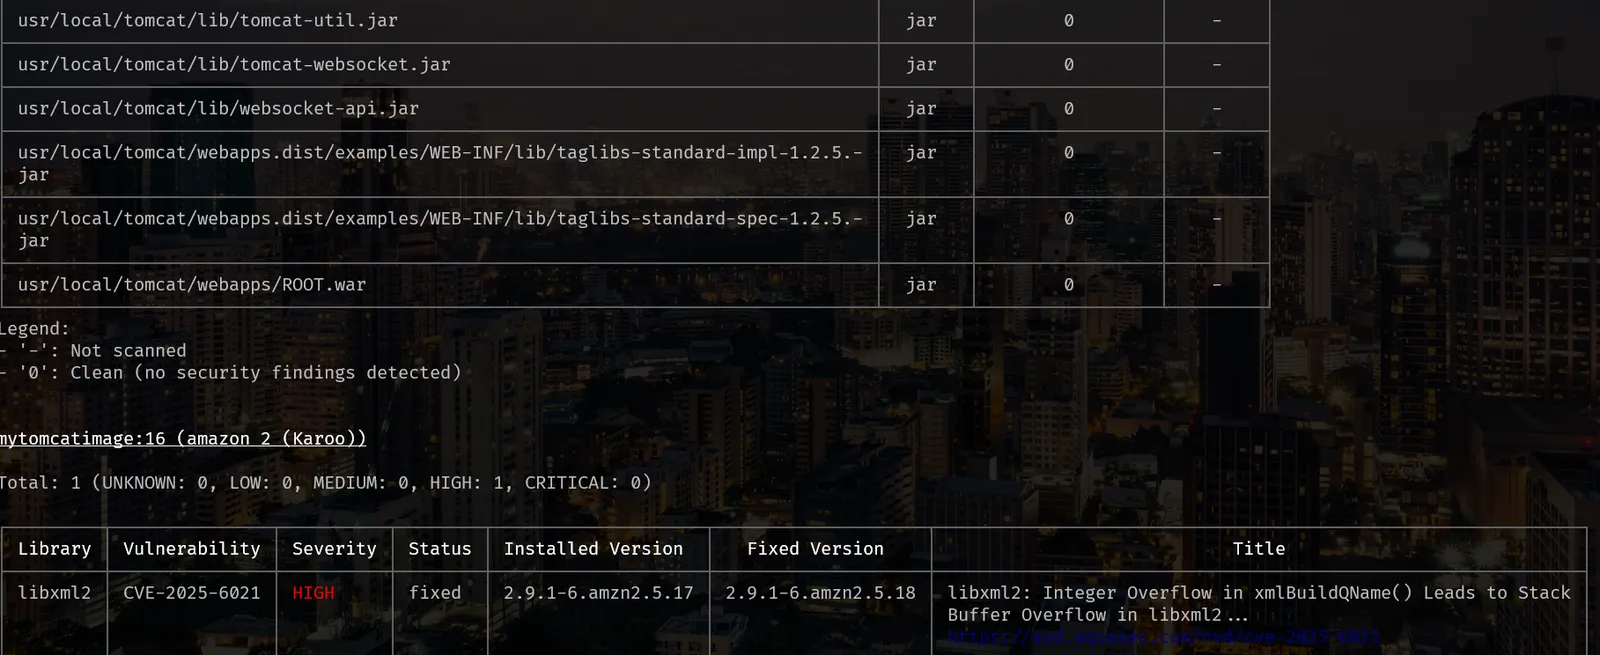
The scan found one HIGH vulnerability in libxml2 from the base image, with a fixed version available. In the pipeline the same command runs on the new image.
Pushing the image to Docker Hub
Pushing needs Docker Hub credentials stored in Jenkins:
- In Docker Hub, go to Account settings > Personal access tokens and generate a token. Use the token instead of your password.
- In Jenkins, go to Manage Jenkins > Credentials and add a Username with password credential: your Docker Hub username and the token. Give it the ID
jenkinsdockercred. - Install the Docker Pipeline plugin, which provides
withDockerRegistry.
withDockerRegistry logs in with that credential, runs the steps inside the block, then logs out. An empty url means Docker Hub; for Harbor or another registry, put its URL there. The ''' triple quotes let one sh step run several lines of shell.
The tag must match the repository name, as in docker push deependrabhatta/jenkins_data:16. If you built the image under another name, retag it with docker tag before pushing, or the push is rejected.
Deploy to devenv
This stage replaces the running dev container with one from the new image. docker container stop and rm fail on the first run because no myapp container exists yet; || true ignores that failure so the stage continues. The app is then on port 8089.
Here the build and the deploy happen on the same machine, which is acceptable for a lab. Production setups build on one machine and deploy to separate servers, a Swarm or Kubernetes cluster, or with Ansible.
Deploy Production Environment
Not every build should reach production. The input step pauses the pipeline and shows an Approve PRODUCTION Deployment? prompt in Jenkins. If someone approves, the stage deploys the container on port 8083; if they abort, the build stops there. timeout aborts the wait after five days so builds do not wait indefinitely.
Email notifications
The pipeline-level post block runs after all stages and reports the result. Declarative pipelines support these conditions:
| Condition | Runs when |
|---|---|
always | Every time, whatever the result. |
success | The build succeeded. |
failure | The build failed. |
unstable | The build is unstable, for example because of test failures. |
aborted | The build was aborted, usually by hand. |
changed | The result differs from the previous build. |
fixed | This build passed and the previous one failed or was unstable. |
regression | This build failed, was unstable or aborted, and the previous one passed. |
unsuccessful | The result is anything except success. |
cleanup | Last, after every other condition, whatever the result. |
Set up SMTP for Gmail
The mail step needs an SMTP server. Go to Manage Jenkins > System and scroll to E-mail Notification:
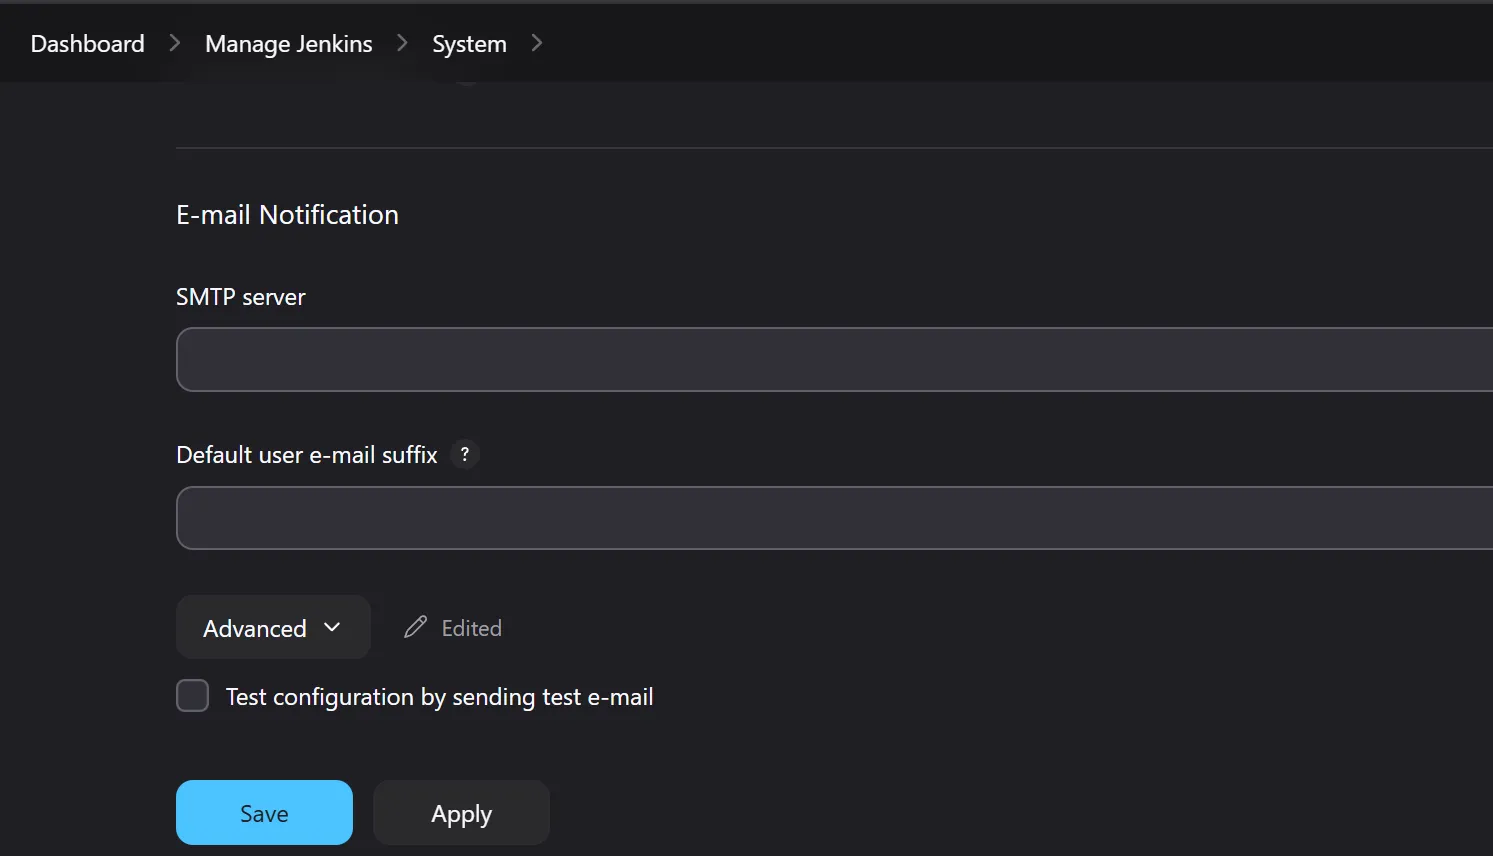
- SMTP server:
smtp.gmail.com, or your organisation's mail server. - Under Advanced, tick Use SMTP Authentication. The user name is the Gmail address that sends the mail.
- Password: not the Gmail password but an app password. In your Google account, search for "App passwords", confirm your identity and create one for Jenkins. App passwords need 2-Step Verification turned on.
- Use SSL with port 465, or Use TLS with port 587. I used SSL on 465.
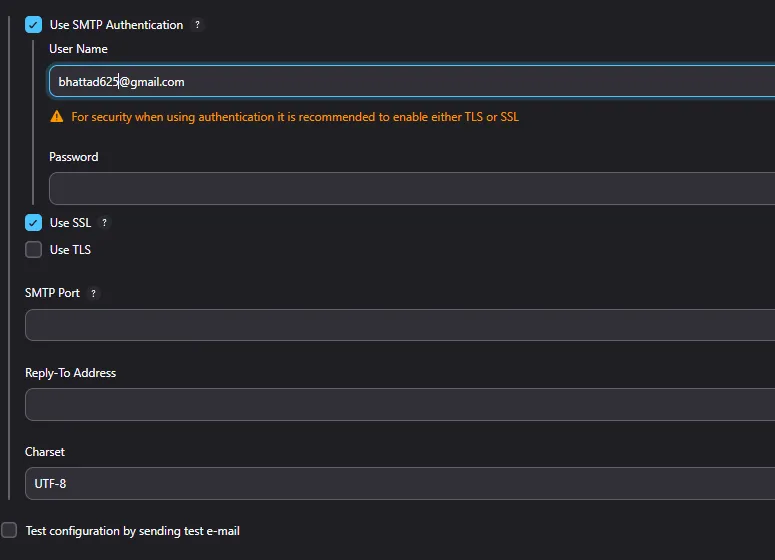
Tick Test configuration by sending test e-mail to check the settings before saving:

The same SMTP settings also work for freestyle jobs through the E-mail Notification post-build action.
The mail step fields
In this pipeline's post block, always sends a short note, success a success mail and failure a failure mail. The fields work like a normal email:
| Field | Meaning |
|---|---|
to | Main recipient, the person or team being notified. |
cc | Gets a visible copy, so everyone sees they were informed. |
bcc | Gets a hidden copy that other recipients cannot see. |
from | Sender address. It should match the SMTP user set up in Jenkins. |
replyTo | Where replies go. Can be left empty. |
subject | Title of the email, for example "BUILD SUCCESS NOTIFICATION". |
body | The message. Triple double quotes (""") allow several lines and still expand $BUILD_NUMBER and $BUILD_URL. |
Common mistakes
permission denied ... /var/run/docker.sock: thejenkinsuser is not in thedockergroup, or Jenkins was not restarted after adding it.- Push rejected: the image tag does not match the Docker Hub repository name.
docker stopwith an image name: stop and remove containers by container name, not image name.- Syntax error near
post: thepostblock is insidestagesor a brace is missing. - Security stage always green: Trivy needs
--exit-code 1to fail the build.
Key takeaways
- Keep the
Jenkinsfilein Git with the app, and use Pipeline script from SCM. - Tag images with
$BUILD_NUMBERso every build produces a traceable image. - Store registry and SMTP credentials in Jenkins; use a Docker Hub token and a Gmail app password, never real passwords.
- Use
inputwithtimeoutas a manual gate before production. - A
postblock withsuccessandfailurekeeps the team informed without anyone watching Jenkins.
Next in this series: Distributed Builds in Jenkins.
Keep reading
- MERN Stack CI/CD Pipeline with GitHub Actions and a Self-Hosted Runner
Build a GitHub Actions pipeline that builds MERN stack Docker images, pushes them to Docker Hub and deploys them to a VM through a self-hosted runner.
- SonarQube and Nexus in a Jenkins Pipeline
Install SonarQube and Sonatype Nexus, define a quality gate, and extend a Jenkins pipeline to scan Java code and publish each WAR build to a Nexus repository.
- Jenkins Distributed Builds with Agents and Labels
Connect two Vagrant VMs to Jenkins as SSH agents, use labels to choose where each stage runs, and ship a Java app and a Node.js app across separate nodes.