Kubernetes Cluster Setup with kubeadm and Amazon EKS
Build a three-node Kubernetes cluster with kubeadm on EC2 or VirtualBox, resolve common CNI and certificate errors, then create an Amazon EKS cluster and deploy a multi-tier app.

ON THIS PAGE
minikube hides how a cluster is put together; kubeadm exposes every part of it. This guide builds a cluster with one control plane node and two workers, on AWS EC2 and on VirtualBox VMs, then repeats the job with Amazon EKS and deploys a multi-tier voting app to it. The kubeadm errors covered along the way (a Pod CIDR mismatch, certificate errors, workers that would not join) are the same ones that appear on production clusters.
The cluster layout
This guide uses the simplest layout that still behaves like a real cluster: one control plane node and two worker nodes. In large production setups the control plane components themselves run on several machines for high availability. That is out of scope here.
Requirements from the kubeadm install guide:
| Requirement | Detail |
|---|---|
| Machines | A compatible Linux host for each node (this guide uses Ubuntu). |
| Memory | At least 2 GB RAM per machine. |
| CPU | At least 2 CPUs on the control plane node. |
| Network | Full network connectivity between all nodes. |
| Identity | A unique hostname, MAC address and product_uuid on every node. |
| Ports | The required ports open between nodes (6443 for the API server, 10250 for the kubelet, and others). |
| Swap | Turned off, or explicitly tolerated by the kubelet. |
Prepare the machines
On AWS EC2
-
Create three EC2 instances from the same Ubuntu AMI, with one key pair and one security group:
- Control plane:
t2.medium(2 vCPU, 4 GiB), to meet the CPU requirement. - Workers: I used
t2.micro. It has only 1 GiB of memory, below the 2 GB the guide asks for, so uset3.smallor larger where the budget allows.
- Control plane:
-
Let the nodes talk to each other. The simplest approach is an inbound rule in the shared security group: All traffic from the security group's own ID. Every instance in that group can then reach every other one. The alternative, one rule per instance IP, is slower to maintain.
-
Set a unique hostname on each machine:
terminal$ sudo hostnamectl set-hostname k8s-controlplane $ sudo hostnamectl set-hostname k8s-worker01 $ sudo hostnamectl set-hostname k8s-worker02 -
Make the names resolve. AWS gives every instance a private IPv4 DNS name, but this setup adds the private IPs to
/etc/hostson every node. Private IPs do not change when an instance is stopped and started, unlike public IPs.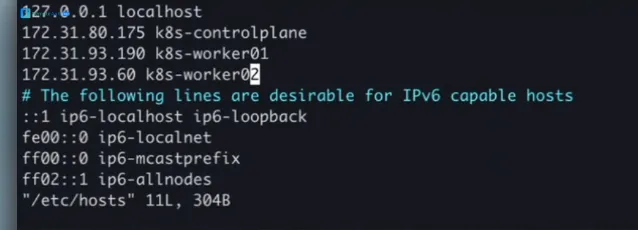
-
Check that the MAC address and
product_uuidare different on every node, and that the nodes can ping each other by name:terminal$ ip addr show $ sudo cat /sys/class/dmi/id/product_uuid $ ping -c 2 k8s-worker01
On VirtualBox
The same layout runs locally on VirtualBox VMs named control-plane, worker1 and worker2 on a host-only network. The control plane has the static IP 192.168.56.49. Vagrant can create VMs like these.
The important difference: a VirtualBox VM usually has two network adapters, a NAT adapter for internet access and a host-only adapter for the cluster network. The default route goes through the NAT adapter, so kubeadm picks the NAT address unless you tell it otherwise. In my lab, this caused certificate errors. The fix is in Initialize the control plane.
Common steps on all nodes
Run every step in this section on all three nodes.
1. Load the kernel modules
overlay is used by the container runtime's storage, and br_netfilter lets iptables see bridged pod traffic. Flannel will not start without br_netfilter.
$ cat <<EOF | sudo tee /etc/modules-load.d/k8s.conf
overlay
br_netfilter
EOF
$ sudo modprobe overlay
$ sudo modprobe br_netfilter2. Turn off swap
By default the kubelet refuses to start when swap is on. Turn it off now, then comment out the swap line in /etc/fstab so it stays off after a reboot:
$ sudo swapoff -a
$ sudo sed -i 's|^/swap.img|#/swap.img|g' /etc/fstabThe sed pattern matches Ubuntu's default /swap.img entry. Check your own /etc/fstab if your swap is a partition. Reboot once, then confirm with free -h that swap shows 0.
3. Enable IP forwarding
$ cat <<EOF | sudo tee /etc/sysctl.d/k8s.conf
net.bridge.bridge-nf-call-iptables  = 1
net.bridge.bridge-nf-call-ip6tables = 1
net.ipv4.ip_forward                 = 1
EOF
$ sudo sysctl --system
$ sysctl net.ipv4.ip_forward
net.ipv4.ip_forward = 1sysctl --system applies the file without a reboot. Pods on different nodes cannot talk to each other until forwarding is on.
4. Install containerd
Kubernetes talks to the container runtime through the Container Runtime Interface (CRI). The main options are:
| Runtime | Notes |
|---|---|
| containerd | Supported directly through CRI. The usual choice, and what EKS uses. |
| CRI-O | A runtime built only for Kubernetes. |
| Docker Engine | Does not implement CRI. It needs the extra cri-dockerd adapter, because the kubelet's built-in Docker support (dockershim) was removed in Kubernetes 1.24. |
This guide uses containerd. On EC2, install the containerd.io package from Docker's apt repository. The repository setup matches the Docker install guide (also covered in Docker installation and commands), but only containerd is installed.
$ sudo apt-get update
$ sudo apt-get install -y ca-certificates curl
$ sudo install -m 0755 -d /etc/apt/keyrings
$ sudo curl -fsSL https://download.docker.com/linux/ubuntu/gpg -o /etc/apt/keyrings/docker.asc
$ sudo chmod a+r /etc/apt/keyrings/docker.asc
$ echo "deb [arch=$(dpkg --print-architecture) signed-by=/etc/apt/keyrings/docker.asc] https://download.docker.com/linux/ubuntu $(. /etc/os-release && echo "${UBUNTU_CODENAME:-$VERSION_CODENAME}") stable" | sudo tee /etc/apt/sources.list.d/docker.list > /dev/null
$ sudo apt-get update
$ sudo apt-get install -y containerd.ioThe VirtualBox VMs use Ubuntu's own package instead (sudo apt install -y containerd). Both work.
The packaged config file can have the CRI plugin turned off, so generate a full default config. Then switch the cgroup driver to systemd. The kubelet and the runtime must use the same cgroup driver (systemd or cgroupfs), and systemd is the recommended one.
$ sudo mkdir -p /etc/containerd
$ containerd config default | sudo tee /etc/containerd/config.toml > /dev/null
$ sudo sed -i 's/SystemdCgroup = false/SystemdCgroup = true/' /etc/containerd/config.toml
$ grep SystemdCgroup /etc/containerd/config.toml
            SystemdCgroup = true
$ sudo systemctl restart containerd
$ sudo systemctl enable containerd
$ sudo systemctl status containerdSee container runtimes for the containerd 1.x and 2.x config sections.
5. Install kubeadm, kubelet and kubectl
| Package | Role |
|---|---|
kubeadm | Bootstraps the cluster. |
kubelet | The node agent that starts pods and containers. Runs on every node. |
kubectl | The command-line client. |
They come from the community repository at pkgs.k8s.io. Each Kubernetes minor version has its own repository. This guide installs v1.33; change v1.33 in both URLs to the version you want:
$ sudo apt-get update
$ sudo apt-get install -y apt-transport-https ca-certificates curl gpg
$ sudo mkdir -p -m 755 /etc/apt/keyrings
$ curl -fsSL https://pkgs.k8s.io/core:/stable:/v1.33/deb/Release.key | sudo gpg --dearmor -o /etc/apt/keyrings/kubernetes-apt-keyring.gpg
$ echo 'deb [signed-by=/etc/apt/keyrings/kubernetes-apt-keyring.gpg] https://pkgs.k8s.io/core:/stable:/v1.33/deb/ /' | sudo tee /etc/apt/sources.list.d/kubernetes.list
$ sudo apt-get update
$ sudo apt-get install -y kubelet kubeadm kubectl
$ sudo apt-mark hold kubelet kubeadm kubectl
$ sudo systemctl enable --now kubeletapt-mark hold stops a normal apt upgrade from moving the cluster to a new version by accident. Kubernetes upgrades should be done on purpose, with kubeadm upgrade.
Initialize the control plane
Run this section on the control plane only. The create-cluster guide has the details.
The --pod-network-cidr must match the network plugin you will install. Flannel's default is 10.244.0.0/16 and Calico's is 192.168.0.0/16. This guide uses Flannel:
$ sudo kubeadm init --pod-network-cidr 10.244.0.0/16On VirtualBox, also tell kubeadm which IP to use, so the API server listens on the host-only address and that address is in its TLS certificate:
$ sudo kubeadm init \
    --pod-network-cidr 10.244.0.0/16 \
    --apiserver-advertise-address 192.168.56.49 \
--apiserver-cert-extra-sans 192.168.56.49If more than one runtime is installed (for example containerd and cri-dockerd), choose one with --cri-socket, such as --cri-socket unix:///var/run/cri-dockerd.sock. Otherwise kubeadm finds containerd by itself.
kubeadm init installs and starts the control plane components (API server, etcd, scheduler, controller manager) as pods, creates the certificates, and prints the next steps. Copy the admin kubeconfig so you can use kubectl as your normal user, not root:
$ mkdir -p $HOME/.kube
$ sudo cp -i /etc/kubernetes/admin.conf $HOME/.kube/config
$ sudo chown $(id -u):$(id -g) $HOME/.kube/configAt the end, the output also prints the kubeadm join command for the workers:

The token expires after 24 hours. To get a fresh join command later:
$ sudo kubeadm token create --print-join-commandJoin the worker nodes
Run the join command as root on each worker:
$ sudo kubeadm join 172.31.80.175:6443 --token <token> \
--discovery-token-ca-cert-hash sha256:<hash>On the VirtualBox workers in my lab, the join hung at the preflight checks. Two changes fixed it. First, tell the kubelet where the containerd socket is:
$ echo 'KUBELET_EXTRA_ARGS=--container-runtime-endpoint=unix:///run/containerd/containerd.sock' | sudo tee /etc/default/kubeletSecond, clean up what the failed attempts left behind, then join again with a fresh command from the control plane:
$ sudo kubeadm reset --force
$ sudo rm -rf /var/lib/kubelet/* /etc/cni/net.d/*
$ sudo systemctl daemon-reload
$ sudo systemctl stop kubelet
$ sudo kubeadm join 192.168.56.49:6443 --token <token> \
--discovery-token-ca-cert-hash sha256:<hash>Back on the control plane, all three nodes are listed but NotReady:

NotReady is expected at this point: there is no pod network yet.
Install a network plugin
On the control plane, as the normal user, install Flannel:
$ kubectl apply -f https://github.com/flannel-io/flannel/releases/latest/download/kube-flannel.yml
$ kubectl get pods -n kube-flannel
$ kubectl get nodesAfter a minute the Flannel pods are Running and every node is Ready. Check the system pods too:
$ kubectl get ns
$ kubectl get pods -n kube-systemTo use Calico instead, initialize with --pod-network-cidr 192.168.0.0/16 and follow the Calico install guide. The old docs.projectcalico.org/manifests/calico.yaml link from many tutorials is out of date. Calico now publishes a versioned manifest and an operator.
| Calico | Flannel | |
|---|---|---|
| Main goal | Network policy and security | Simple pod connectivity |
| Networking | Layer 3 routing (BGP), optional VXLAN overlay | VXLAN overlay |
| NetworkPolicy | Enforced natively | Not enforced. You need another component. |
| Fits | Large and production clusters | Small, test and lab clusters |
Flannel is sufficient for a lab. For production, Calico is the more common choice because it enforces NetworkPolicy.
Troubleshooting kubeadm
| Problem | Cause | Fix |
|---|---|---|
Flannel pod crashes right away, CoreDNS stays Pending, nodes stay NotReady | kubeadm init ran with --pod-network-cidr 192.168.0.0/16 (Calico's range), but the Flannel manifest expects 10.244.0.0/16. | sudo kubeadm reset on every node, then kubeadm init --pod-network-cidr 10.244.0.0/16. Or edit the network in the Flannel manifest to match. |
| Certificate validation errors on VirtualBox | kubeadm used the NAT adapter's IP, so the API server certificate did not include the host-only IP the nodes use. | Init with --apiserver-advertise-address and --apiserver-cert-extra-sans set to the host-only IP. |
x509: certificate signed by unknown authority from kubectl | ~/.kube/config was still from an earlier cluster after a reset. | Copy /etc/kubernetes/admin.conf to ~/.kube/config again. |
| Worker join hangs at preflight | The kubelet could not find the runtime socket. | Set --container-runtime-endpoint in /etc/default/kubelet, reset, and join again. |
| Join fails with an invalid token | Tokens expire after 24 hours. | kubeadm token create --print-join-command on the control plane. |
Nodes NotReady after join | No CNI plugin installed yet. | Install Flannel or Calico. |
containerd, Amazon ECS and Amazon EKS
These three names often appear together, but they are different layers:
| containerd | Amazon ECS | Amazon EKS | |
|---|---|---|---|
| What it is | A container runtime | AWS's own container orchestrator | Managed Kubernetes on AWS |
| Orchestration | None. It runs containers it is told to run. | Yes, with AWS concepts (tasks, services) | Yes, standard Kubernetes |
| Kubernetes | Runs under the kubelet through CRI | Not Kubernetes. No kubectl, Helm or manifests. | Full Kubernetes API, works with kubectl and Helm |
| When to pick it | You do not pick it directly. EKS and kubeadm clusters use it. | Simple Docker workloads that will only ever run on AWS | Kubernetes workloads, or teams that want portability |
Cloud container registries
Each cloud has a managed image registry that its Kubernetes service can pull from with cloud IAM instead of passwords. The general registry workflow (tag, push, pull, Harbor) is in Dockerfile and registries.
| Registry | Cloud | Notes |
|---|---|---|
| Amazon ECR | AWS | Private and public repositories, image scanning, lifecycle policies to remove old images. EKS nodes pull with an IAM role. You pay for storage and data transfer. |
| Azure Container Registry (ACR) | Azure | Microsoft Entra ID (formerly Azure AD) based RBAC, geo-replication, Helm chart storage, webhooks. Used with AKS. |
| Artifact Registry | Google Cloud | Replaces the deprecated Container Registry (gcr.io). Stores container images, Helm charts and other packages. Used with GKE. |
Amazon EKS
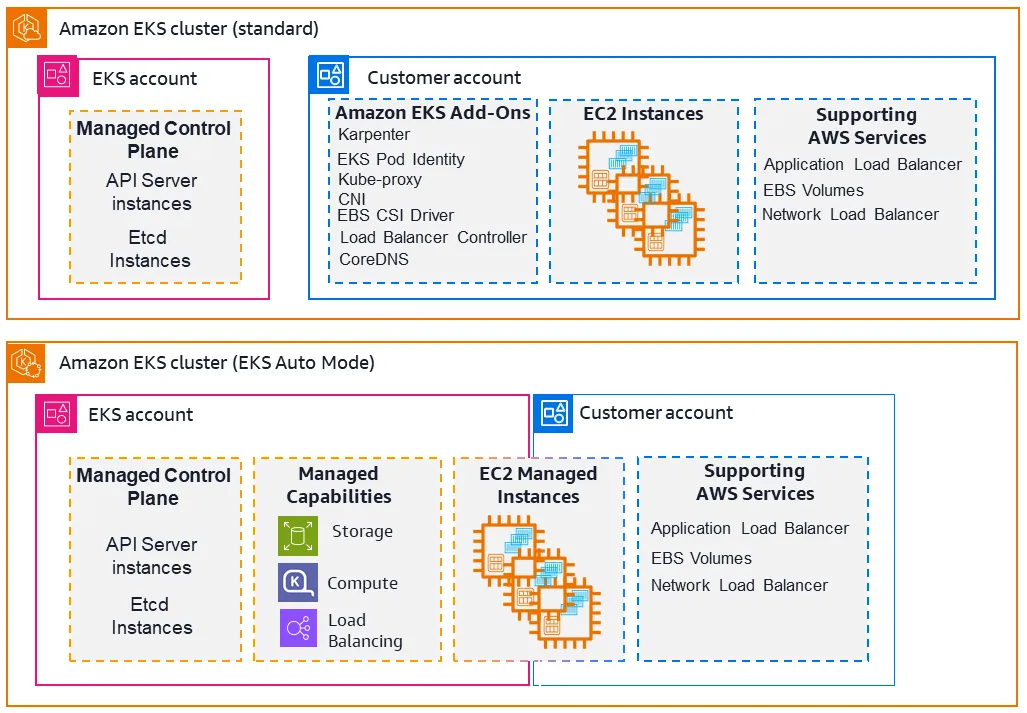
Amazon Elastic Kubernetes Service (EKS) is managed Kubernetes. AWS runs the control plane (API server and etcd) in its own account. You cannot SSH into those machines, but you talk to the API server with kubectl as usual. You own the worker nodes, which are normal EC2 instances in your VPC. With EKS Auto Mode, AWS manages the nodes, storage and load balancing too.
In standard mode, used here, AWS handles everything the kubeadm section did by hand (control plane, certificates, etcd). You still choose and pay for the worker nodes.
Prerequisites
- A VPC with subnets that meet the EKS network requirements. This guide uses the default VPC. See the VPC guide to build your own.
kubectl, within one minor version of the cluster's Kubernetes version.- AWS CLI v2, installed and configured. The AWS IAM guide covers the setup; verify it with
aws s3 ls, which lists your S3 buckets. - An IAM user or role with permission to create and describe EKS clusters.
Create the cluster in the console
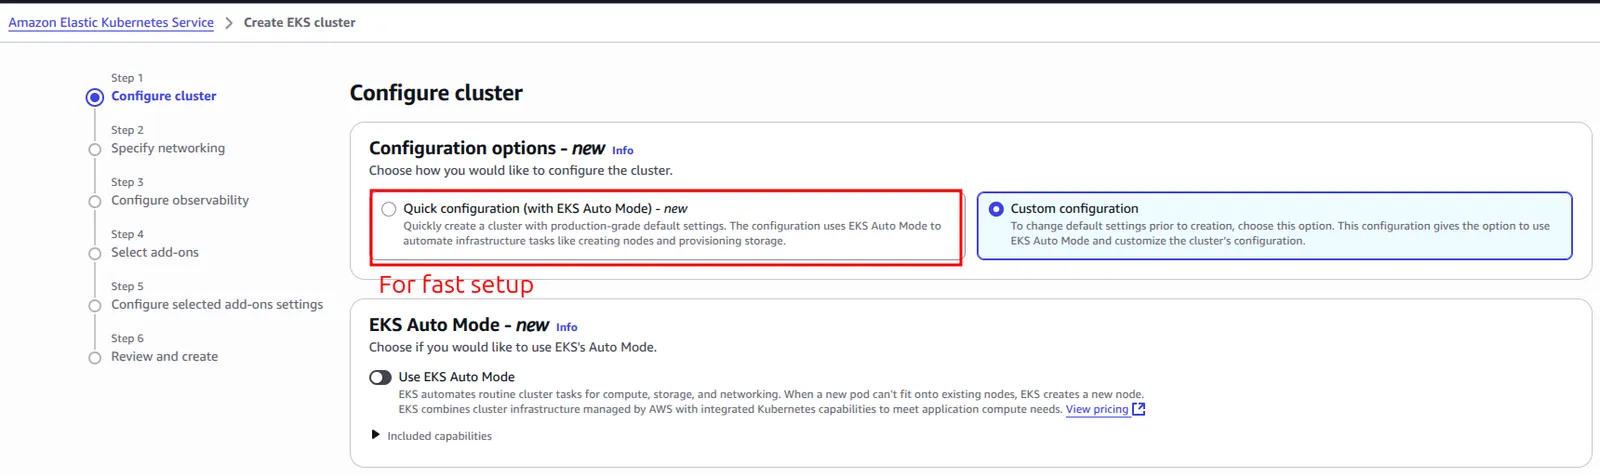
The steps follow the EKS create-cluster guide. In the EKS console, choose Create cluster. "Quick configuration" turns on EKS Auto Mode, so choose Custom configuration and turn Auto Mode off to add your own node group:
The cluster IAM role lets the control plane manage AWS resources for you. Choose Create recommended role and follow the prompts. The console attaches the right policy.

The remaining settings:
| Setting | Value |
|---|---|
| Kubernetes version | The latest offered |
| Upgrade policy | Standard |
| Cluster access | Allow cluster administrator access (your IAM identity becomes cluster admin) |
| Cluster authentication mode | EKS API |
| Envelope encryption, ARC zonal shift, deletion protection | Defaults |
On the networking page, select the default VPC and its subnets in all Availability Zones:
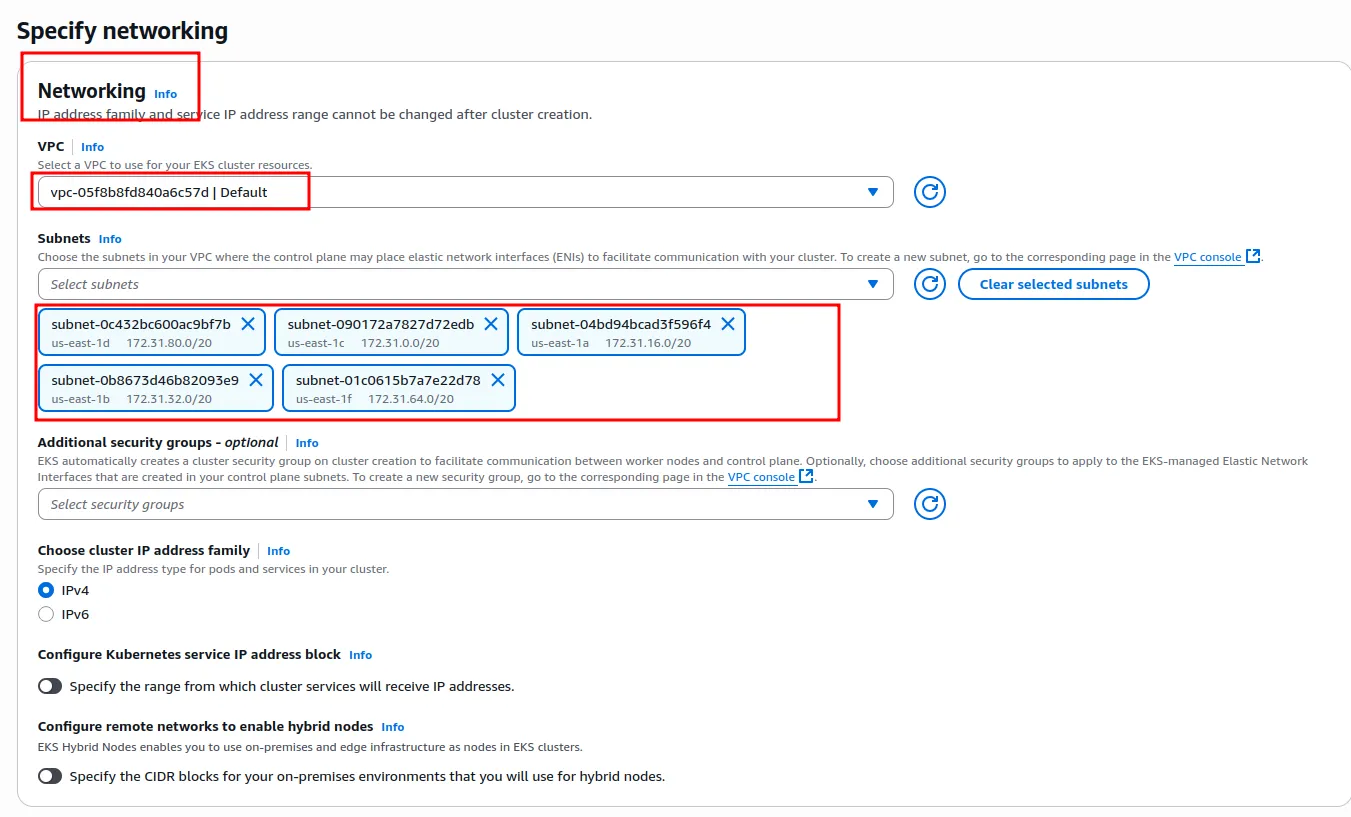
For cluster endpoint access, choose Public and private. Observability, add-ons and add-on settings stay at their defaults. Creation takes about 8 to 10 minutes, and sometimes 20 minutes or more. The cluster page has tabs for Overview, Resources (pods and other objects) and Compute (node groups).
Connect kubectl to the cluster
Check the status from the CLI, then write the cluster into your kubeconfig:
$ aws eks describe-cluster --region us-east-1 --name <cluster_name> --query cluster.status
"ACTIVE"
$ aws eks update-kubeconfig --region us-east-1 --name <cluster_name>This adds a new context to ~/.kube/config. kubectl config view shows the cluster certificate, the server URL, the contexts (and which one is active) and the user entry.
$ kubectl config view
$ kubectl get svc
$ kubectl get namespaces
$ kubectl get nodeskubectl get nodes returns nothing yet, because the cluster has no worker nodes.
Add a managed node group
On the cluster's Compute tab, choose Add node group.
-
Node IAM role. Create a role with trusted entity AWS service and use case EC2, and attach these policies:
AmazonEKSWorkerNodePolicyAmazonEC2ContainerRegistryReadOnly(the current node role guide suggests the narrowerAmazonEC2ContainerRegistryPullOnly; either lets nodes pull images from ECR)AmazonEKS_CNI_Policy(AWS recommends moving this to a separate role for the VPC CNI add-on in production)
The role in this lab is named
EKS_nodegroup_dipendra_policy, and no launch template is used. -
Compute and scaling:
Setting Value AMI type Default Capacity type On-Demand Instance type t3.mediumDisk size 20 GB Desired / minimum / maximum nodes 2 / 1 / 3 Maximum unavailable during updates 1 node Node auto repair Default -
Networking: select the subnets. Leave remote access (SSH into nodes) off, because it requires a key pair and an open security group.
-
Review and create.
EKS launches the nodes as EC2 instances (you can see them in the EC2 console) and joins them to the cluster. You can reach the nodes, but the control plane stays out of reach.
$ kubectl get nodesBoth nodes show Ready. No CNI step was needed: EKS installs the Amazon VPC CNI add-on for you.
Deploy the voting app
To test the cluster, deploy the example voting app, a small multi-tier app where users vote for cats or dogs:
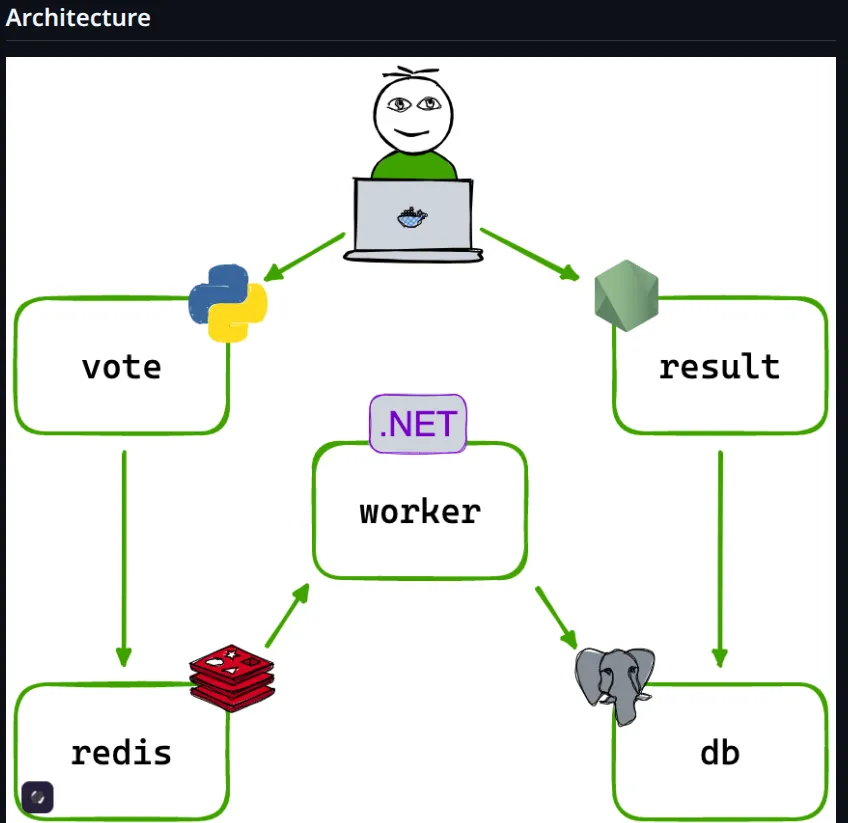
| Component | Technology | Service type |
|---|---|---|
| vote | Python web app | LoadBalancer (users open it) |
| redis | Redis, queues new votes | ClusterIP |
| worker | .NET, moves votes from Redis to Postgres | none (it only connects out) |
| db | Postgres | ClusterIP |
| result | Node.js web app, shows live results | LoadBalancer (users open it) |
Only the two web apps need to be reached from the internet. Everything else talks inside the cluster through ClusterIP Services.
The manifests are in the repo's k8s-specifications folder. The vote Deployment:
apiVersion: apps/v1
kind: Deployment
metadata:
  labels:
    app: vote
  name: vote
spec:                 # spec of the Deployment
  replicas: 1
  selector:
    matchLabels:
      app: vote
  template:
    metadata:
      labels:
        app: vote
    spec:             # spec of the pod
      containers:
        - image: dockersamples/examplevotingapp_vote
          name: vote
          ports:
            - containerPort: 80
name: voteThe vote Service ships as a NodePort. On EKS, change it to LoadBalancer, and make the same change in result-service.yaml:
apiVersion: v1
kind: Service
metadata:
  labels:
    app: vote
  name: vote
spec:
  type: LoadBalancer    # was NodePort
  ports:
    - name: vote-service
      port: 5000          # the Service port
      targetPort: 80      # the port the app listens on in the pod
      nodePort: 31000     # the port on each node (30000-32767)
  selector:
app: voteOf the three ports, only port is required. The course recording used port: 8080, while the copy of the repo used here has 5000. Either works, as long as you browse to the port the Service uses.
Apply the whole folder at once:
$ kubectl apply -f k8s-specifications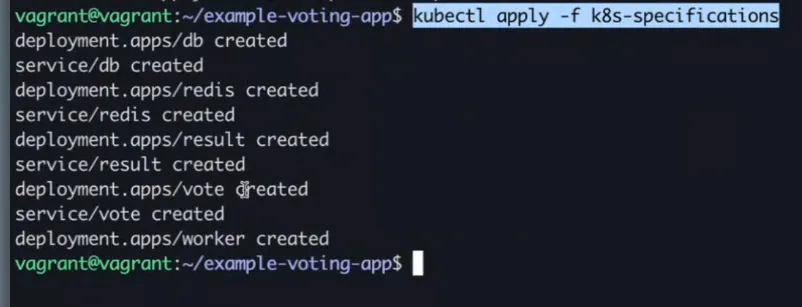
$ kubectl get deployments
$ kubectl get pods
$ kubectl get svc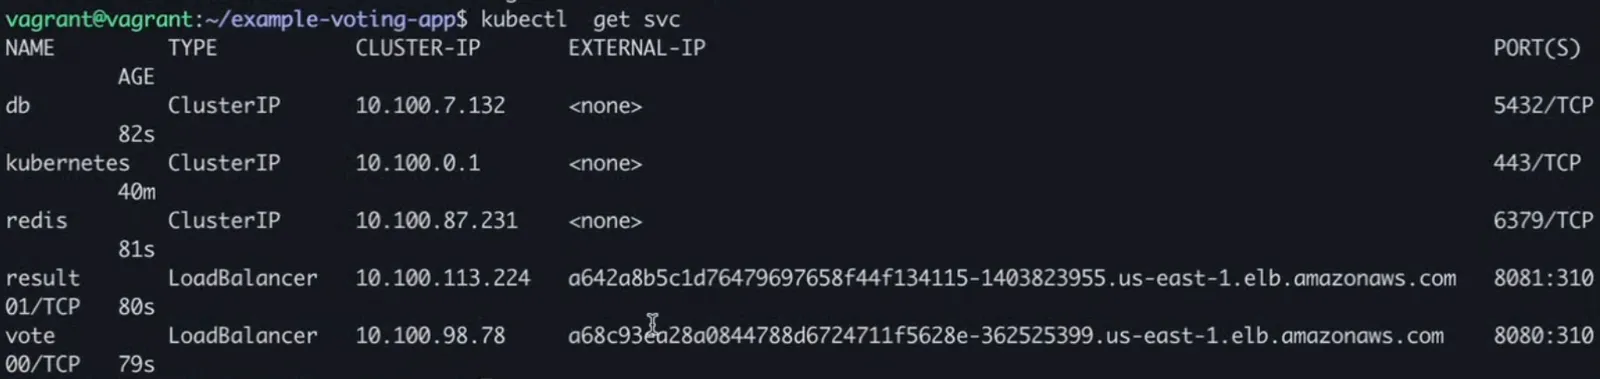
For each LoadBalancer Service, AWS created a load balancer and put its DNS name in EXTERNAL-IP. Opening http://<that name>:<port> shows the vote and result pages. Compare this with the <pending> status on minikube in part 2.
Clean up
kubectl delete -f k8s-specifications. This also deletes the load balancers that the Services created.- Delete the node group. This terminates its EC2 instances.
- Delete the cluster.
- Check the EC2 and load balancer consoles for anything left over.
Scheduling: taints, tolerations and node affinity
Taints and tolerations keep pods off specific nodes, and they are a common interview topic.
A useful analogy: a taint is a mosquito net on a room (the node). Mosquitoes (pods) cannot get in. A toleration is a mosquito that has become immune to the net, so it is allowed in. The taint goes on the node, and the toleration goes in the pod spec.
$ kubectl taint nodes k8s-worker01 key=value:NoSchedule
$ kubectl taint nodes k8s-worker01 key=value:NoSchedule-The second command, with a trailing -, removes the taint. A pod that should still be allowed on that node carries a matching toleration:
spec:
  tolerations:
    - key: "key"
      operator: "Equal"
      value: "value"
effect: "NoSchedule"The control plane node has a taint by default. That is why your app pods land only on the workers. A toleration only allows a pod onto a tainted node. It does not send it there. To attract pods to particular nodes, use node affinity (or the simpler nodeSelector), which matches node labels. See taints and tolerations and assigning pods to nodes.
Autoscaling: HPA, VPA and KEDA
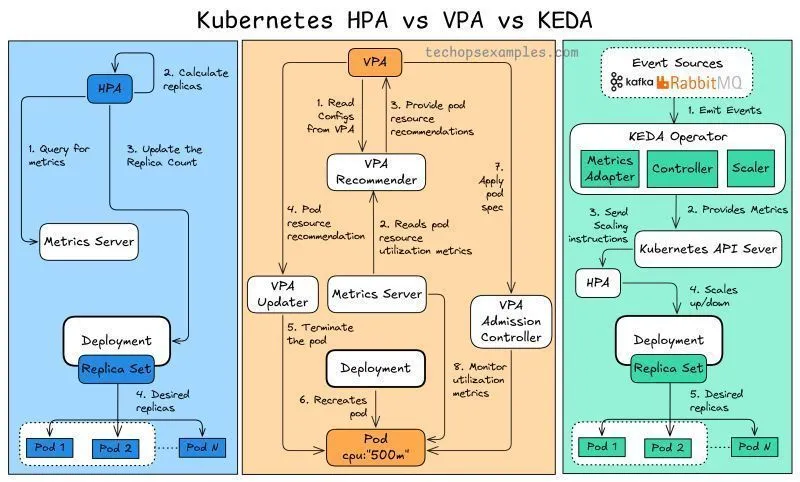
| Horizontal Pod Autoscaler (HPA) | Vertical Pod Autoscaler (VPA) | KEDA | |
|---|---|---|---|
| What it changes | The number of pod replicas | The CPU and memory requests of each pod | The number of replicas, driven by external events |
| Based on | CPU, memory or custom metrics (via metrics-server) | Observed usage over time | Queue length, HTTP traffic and other event sources (Kafka, RabbitMQ) |
| Example | Add web pods during a sale, remove them after | Give a data processing job more memory as its data grows | Scale order workers when a queue fills up, and down to zero when it is empty |
| Watch out for | Limited by node capacity. Best for stateless apps. | Usually restarts pods to apply new sizes | Extra operator to install. Needs an event source. |
| Built in | Yes | No, an add-on | No, a CNCF project you install |
Further learning
- Helm, to package and install apps as charts instead of loose YAML files.
- Argo CD, for GitOps: the cluster syncs itself from a Git repo.
- Ingress, for one entry point that routes HTTP traffic to many Services.
- Storage: PersistentVolumes (PV) and PersistentVolumeClaims (PVC). In a multi-node cluster, use shared or cloud storage that every node can mount.
- Upgrading a running cluster safely with
kubeadm upgradeand EKS version upgrades.
Labels tie all of this together. Services, Deployments, affinity rules and network policies all select pods by label, so plan your labels early.
Key takeaways
- kubeadm needs the same preparation on every node: kernel modules, swap off, IP forwarding, containerd with the
systemdcgroup driver, and pinnedpkgs.k8s.iopackages. --pod-network-cidrmust match the CNI plugin. Flannel expects10.244.0.0/16.- On VirtualBox, set
--apiserver-advertise-addressand--apiserver-cert-extra-sansto the host-only IP, or kubeadm uses the NAT address. - Nodes stay
NotReadyuntil a network plugin runs. Join tokens expire after 24 hours. - EKS removes the control plane work. You still choose node groups, IAM roles and networking, and you pay for all of it.
- A
LoadBalancerService on EKS creates a real AWS load balancer. Delete the Services before the cluster so none are left behind.
Next in this series: kubectl Cheat Sheet.
Keep reading
- Kubernetes with minikube: Pods, Deployments and Services
Set up a local Kubernetes cluster with minikube, then create pods, ReplicaSets and Deployments from YAML, roll updates forward and back, and expose nginx with Services.
- Kubernetes Architecture: Control Plane, Nodes and Add-ons
How a Kubernetes cluster is built: what the control plane and node components do, which add-ons matter, and when to use kubectl, kind, minikube or kubeadm.
- kubectl Cheat Sheet by Category
The most-used kubectl commands, grouped by task: cluster info, namespaces, pods, Deployments, Services, ConfigMaps, Secrets, storage, contexts and debugging.