Terraform
Overview If we need manage infrastructure code can be use in wide range like in aws, azure or in GCP. If we want to use specially in AWS. For azure Terraform is not fully open source for now…

ON THIS PAGE
Overview
If we need manage infrastructure code
- Terraform
- can be use in wide range like in aws, azure or in GCP.
- cloudformation
- If we want to use specially in AWS.
- bicep
- For azure
Terraform is not fully open source for now.
opentofu
Opentofu is the fork of the terraform. Opentofu is the manifest of the terraform. Opentofu is gaining a lot of popularity. The configuration and all other things of AWS and opentofu is same.
Terraform
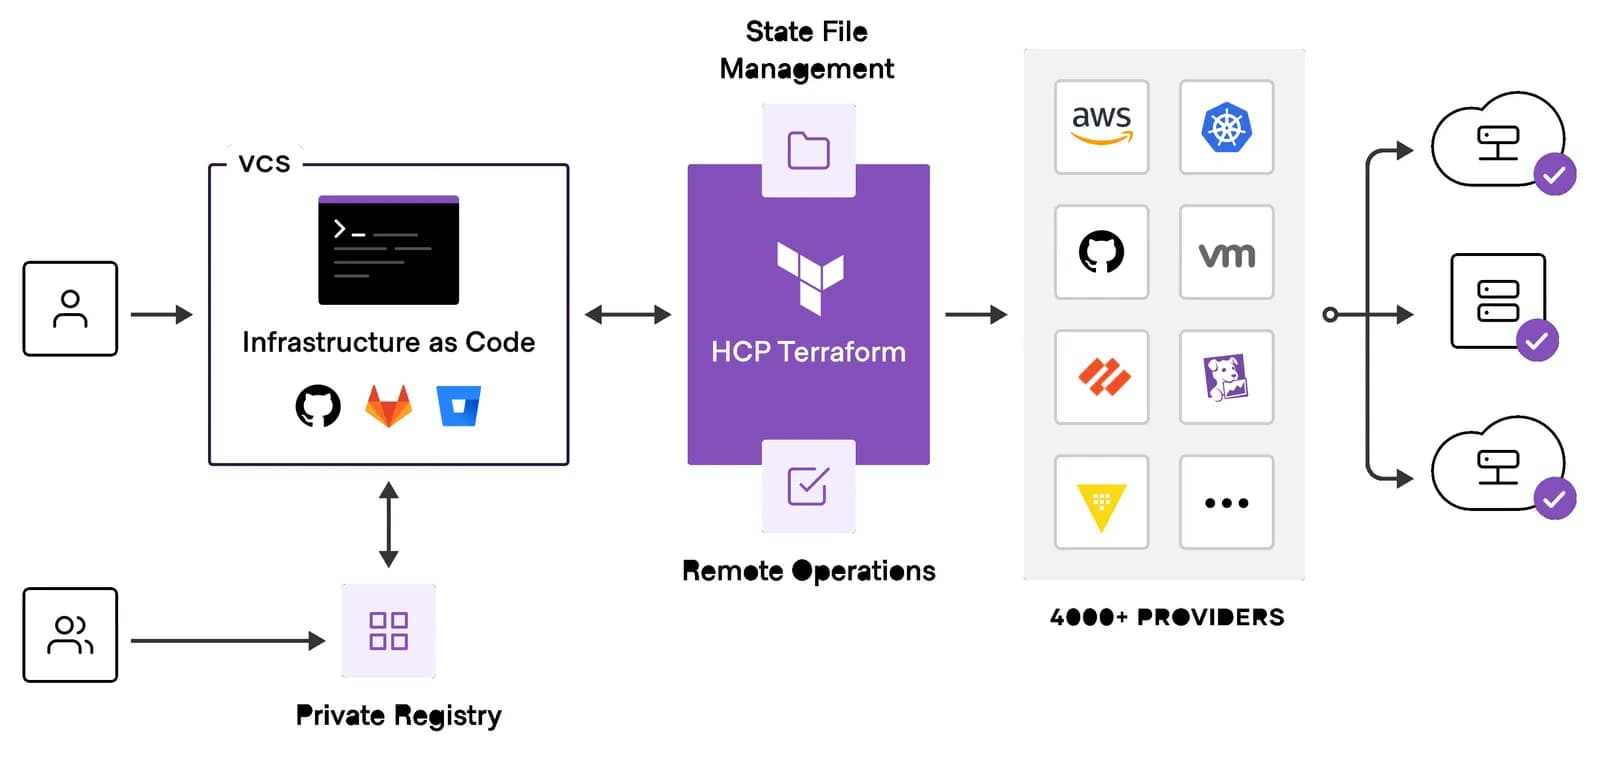
HashiCorp Terraform is an infrastructure as code tool that lets you define both cloud and on-prem resources in human-readable configuration files that you can version, reuse, and share. You can then use a consistent workflow to provision and manage all of your infrastructure throughout its lifecycle. Terraform can manage low-level components like compute, storage, and networking resources, as well as high-level components like DNS entries and SaaS features.
| Hands On: Try the Get Started tutorials to start managing infrastructure on popular cloud providers: Amazon Web Services, Azure, Google Cloud Platform, Oracle Cloud Infrastructure, and Docker. |
|---|
How does Terraform work?
Terraform creates and manages resources on cloud platforms and other services through their application programming interfaces (APIs). Providers enable Terraform to work with virtually any platform or service with an accessible API.
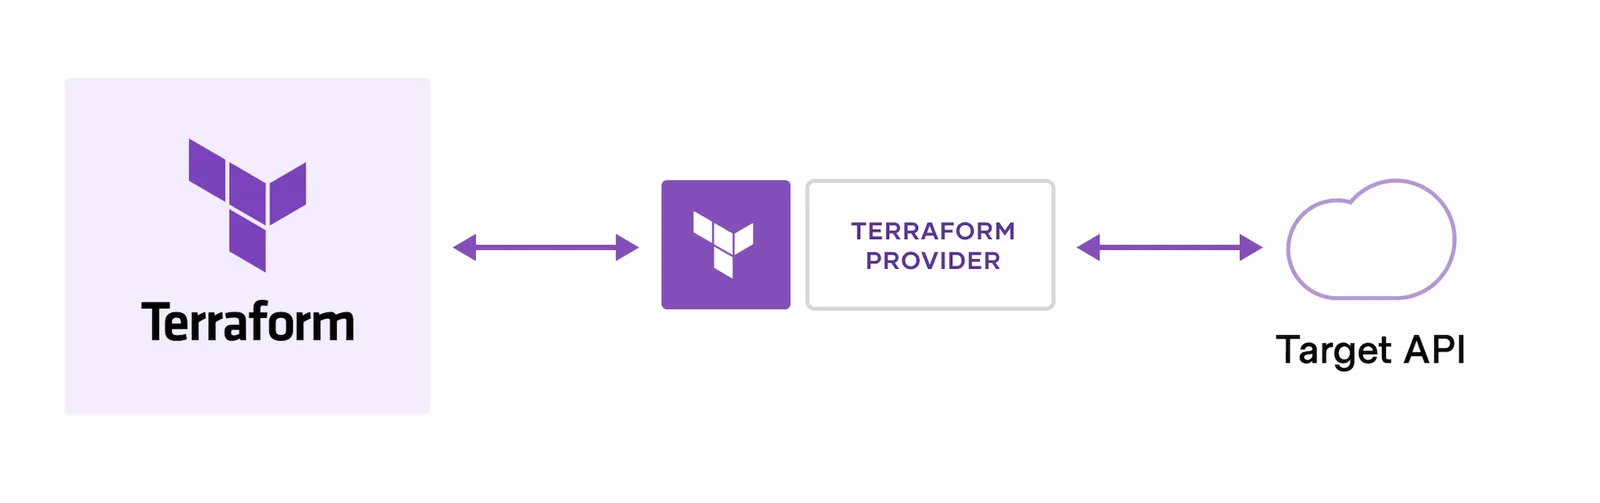
HashiCorp and the Terraform community have already written thousands of providers to manage many different types of resources and services. You can find all publicly available providers on the Terraform Registry, including Amazon Web Services (AWS), Azure, Google Cloud Platform (GCP), Kubernetes, Helm, GitHub, Splunk, DataDog, and many more.
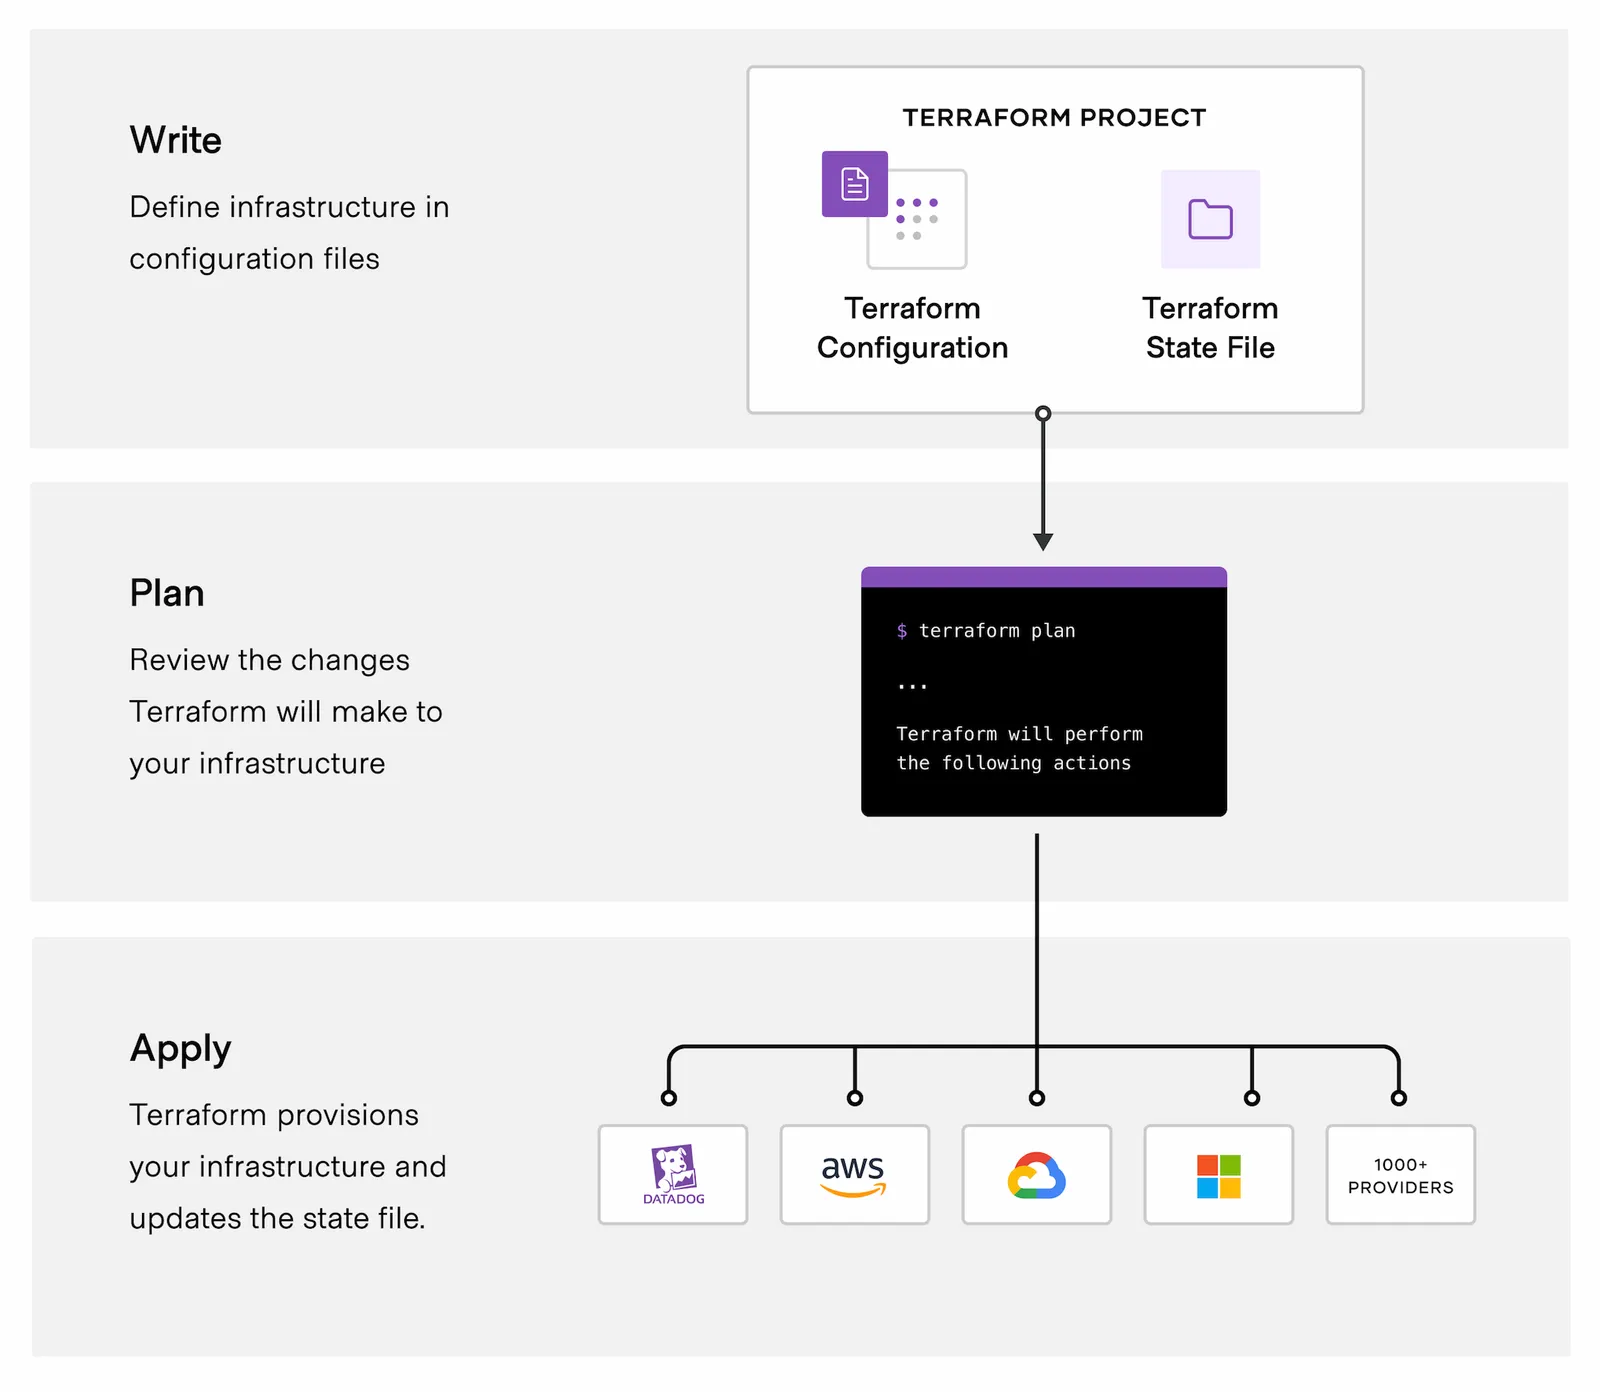
The core Terraform workflow consists of three stages:
- Write: You define resources, which may be across multiple cloud providers and services. For example, you might create a configuration to deploy an application on virtual machines in a Virtual Private Cloud (VPC) network with security groups and a load balancer.
- Plan: Terraform creates an execution plan describing the infrastructure it will create, update, or destroy based on the existing infrastructure and your configuration.
- Apply: On approval, Terraform performs the proposed operations in the correct order, respecting any resource dependencies. For example, if you update the properties of a VPC and change the number of virtual machines in that VPC, Terraform will recreate the VPC before scaling the virtual machines.
How to install Terraform
Follow this document to install terraform.
- To see the version of the terraform

- To see in which path the terraform is installed.

How to launch EC2 instance in AWS using terraform
First create a file having instance .tf
- First create a file having instance .tf
- For example instance.tf
provider "aws" {
  region = us-east-1
}terraform init: This will install the plugin related to the AWS.
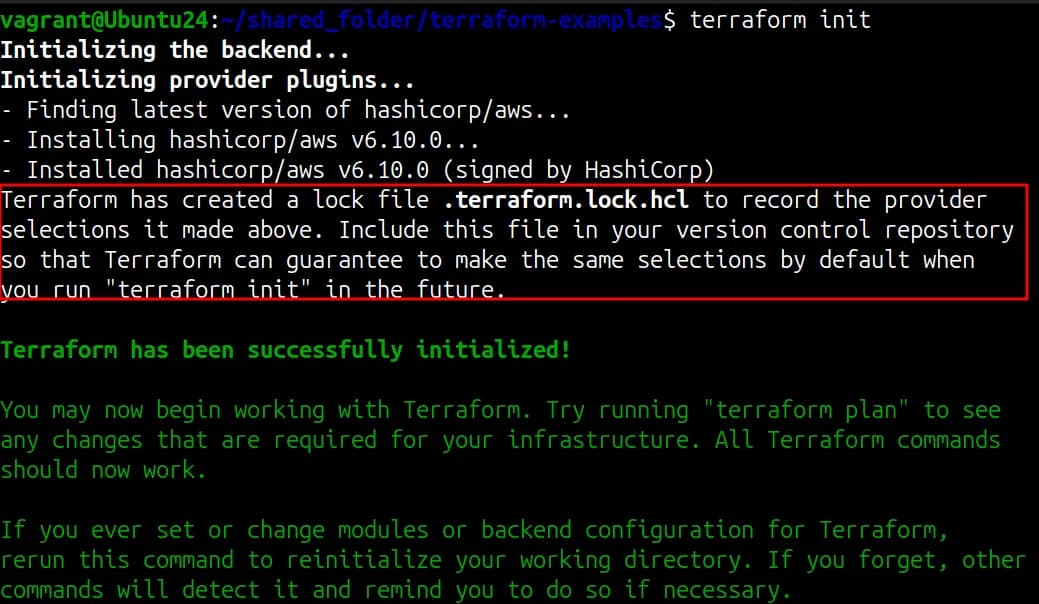
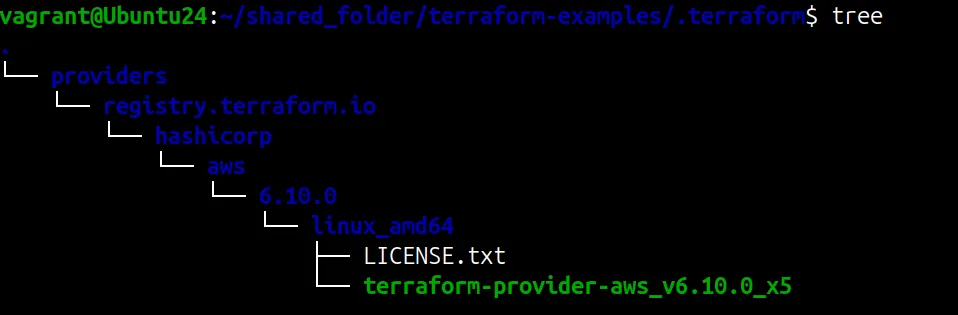
- Now we can see after running terraform init it has installed the plugin and created a new directory .terraform and new file .terraform.lock.hcl
Before creating Instance in AWS using your local machine you need to make sure AWS CLI is installed in your local machine. For this you can follow this link below:
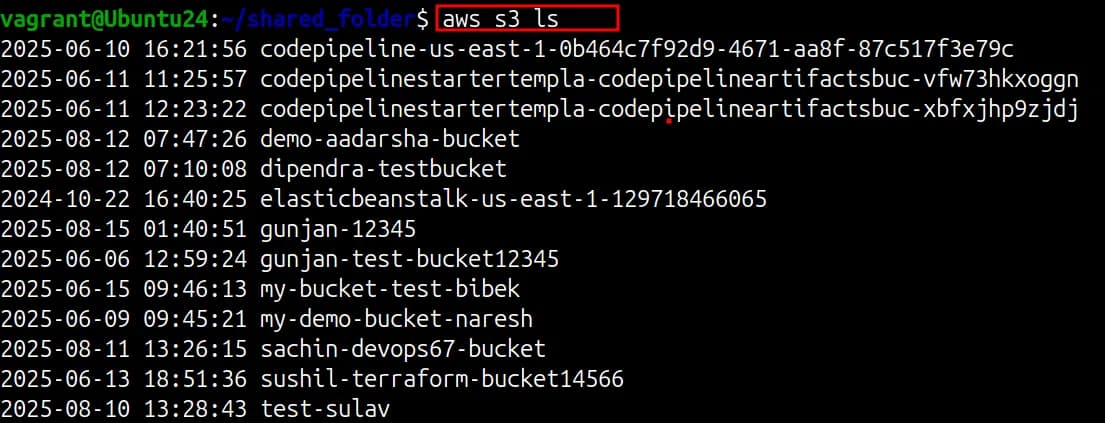
- After configuring AWS CLI you can validate whether it is installed or not by using simple command like:
- s3 bucket ls
- You will see the output like this
Now let’s create EC2 instance in AWS.
So all the things are basically same. that we have done while creating EC2 instance. Like providing name, selecting AMI, Instance type, security groups, etc. But now instead of using GUI we are mentioning all these things in a file.
provider "aws" {
  region = "us-east-1"
}

resource "aws_instance" "demo_server_dipendra" {
  ami                    = "ami-0360c520857e3138f"
  instance_type          = "t2.micro"
  vpc_security_group_ids = ["sg-05694bdfc51f0d457"]
  tags = {
    Name       = "demo-vm-dipenra_Bhatta",
    created_by = "terraform"
  }
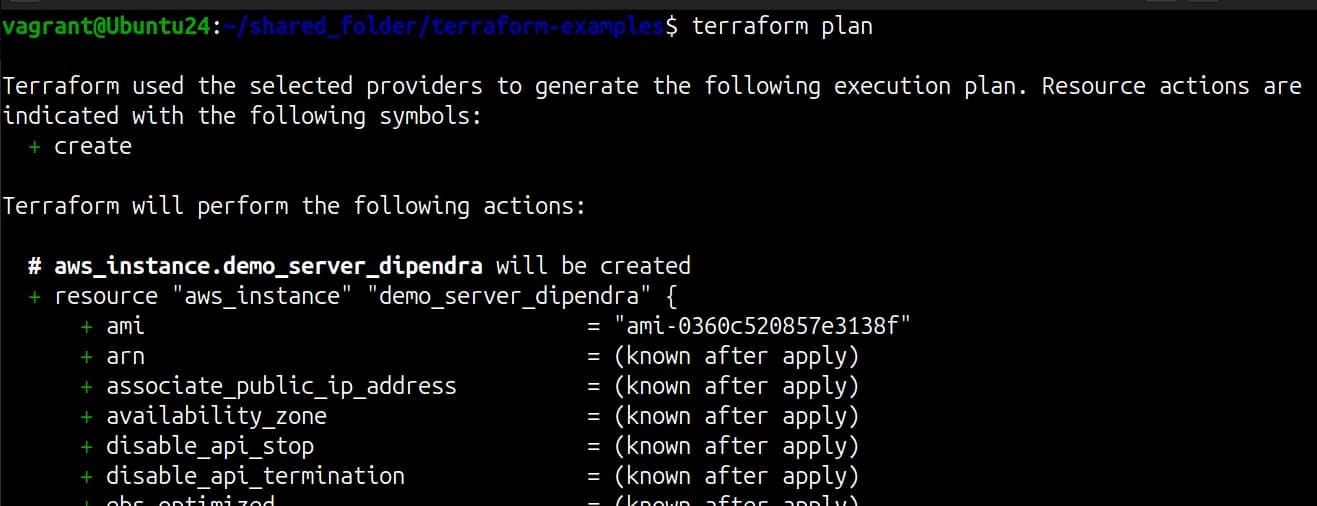
}- terraform plan: This will show what changes will it do in the aws
- terraform apply: To apply these things in AWS.
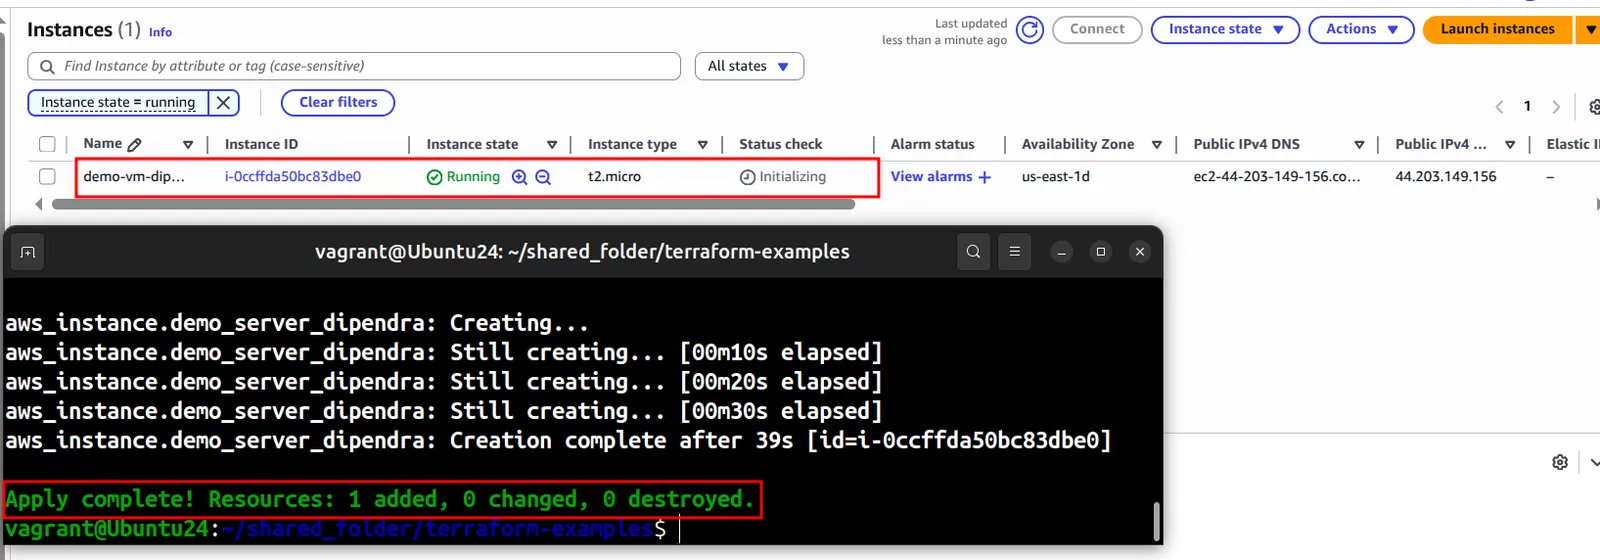
- After launching the instance we can see here a new file is created that have all the data of the EC2 instance that we have created. ie; terraform.tfstate
- This has all the details of the EC2 instance like which vpc, ip, security groups,etc.
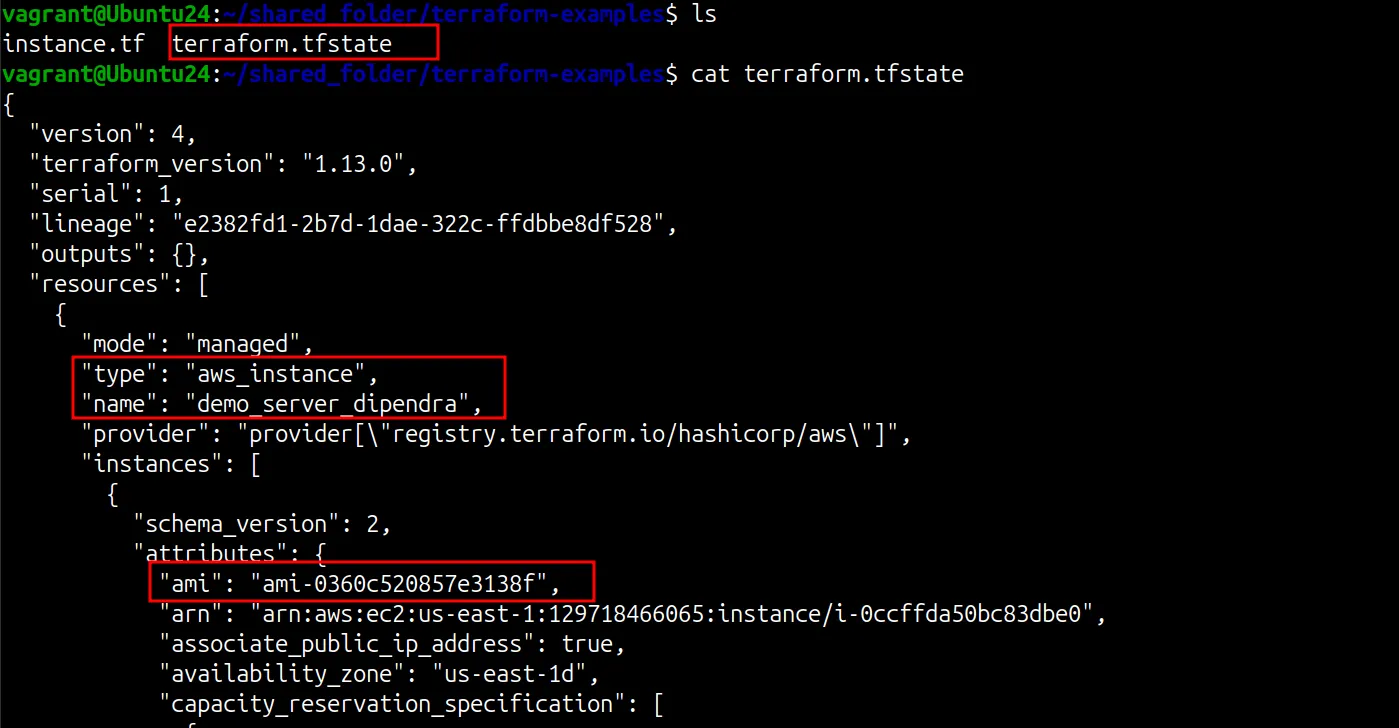
- Now if we run command terraform plan then it will show compare the instance.tf and terraform.tfstate and tell whether there is any changes or not.
NOW IF YOU RUN THE terraform plan / terraform apply without making any changes we will see a message like no changes are made.
So Does the command actually comes to the AWS and see there whether the configurations are same or not?
The simple answer is NO. It has compared with the .tfstate file. If it detect the changes between the instance.tf and terraform.tfstate. If it see the changes in the code then it will change the instance otherwise it will throw the there are no changes.

Now if we made small change like change tag, AMIs or anything else. In this case i am adding a new tag in the code.
After that if we run terraform plan then we can see the changes it will be making in the remote EC2.
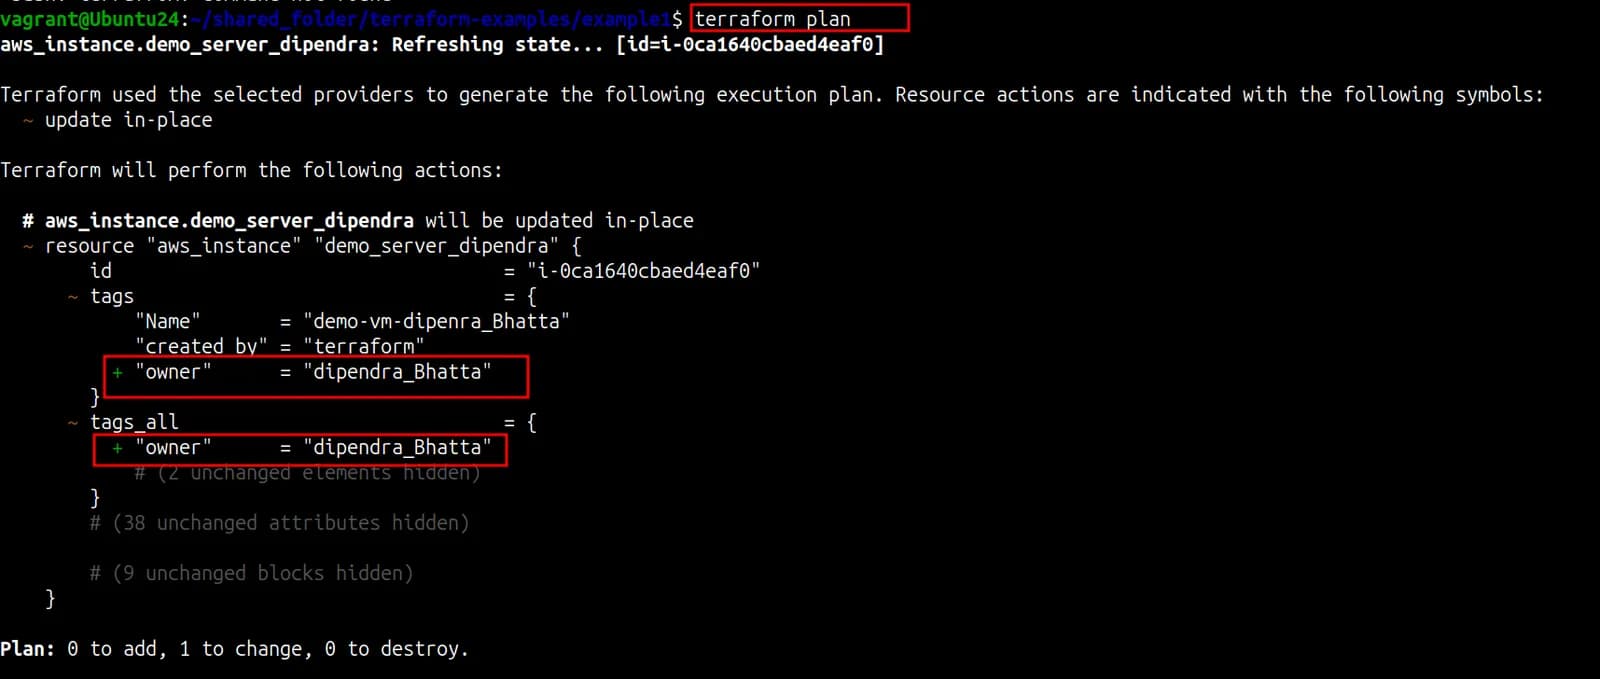
But these changes are not reflected in the aws instances because we don’t have run terraform apply command.
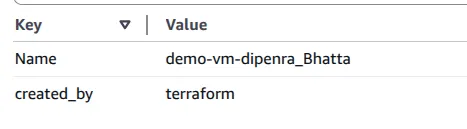
Now if you run terraform apply you can see the changes in remote EC2.
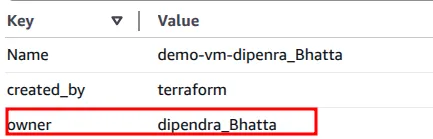
After running this you will see the new file is created ie; terraform.tfstate.backup.
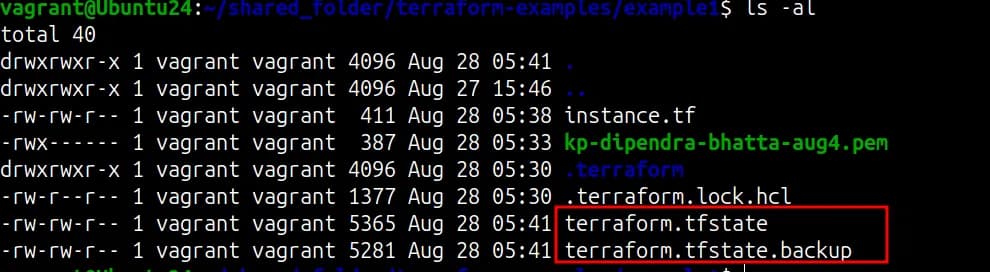
This file has the configuration of the initial state before the changes were made. The terraform keeps one backup of the initial state so that if we want to see changes, roll back to the previous state we can do this easily. It will take backup of only one stage earlier not more than that.
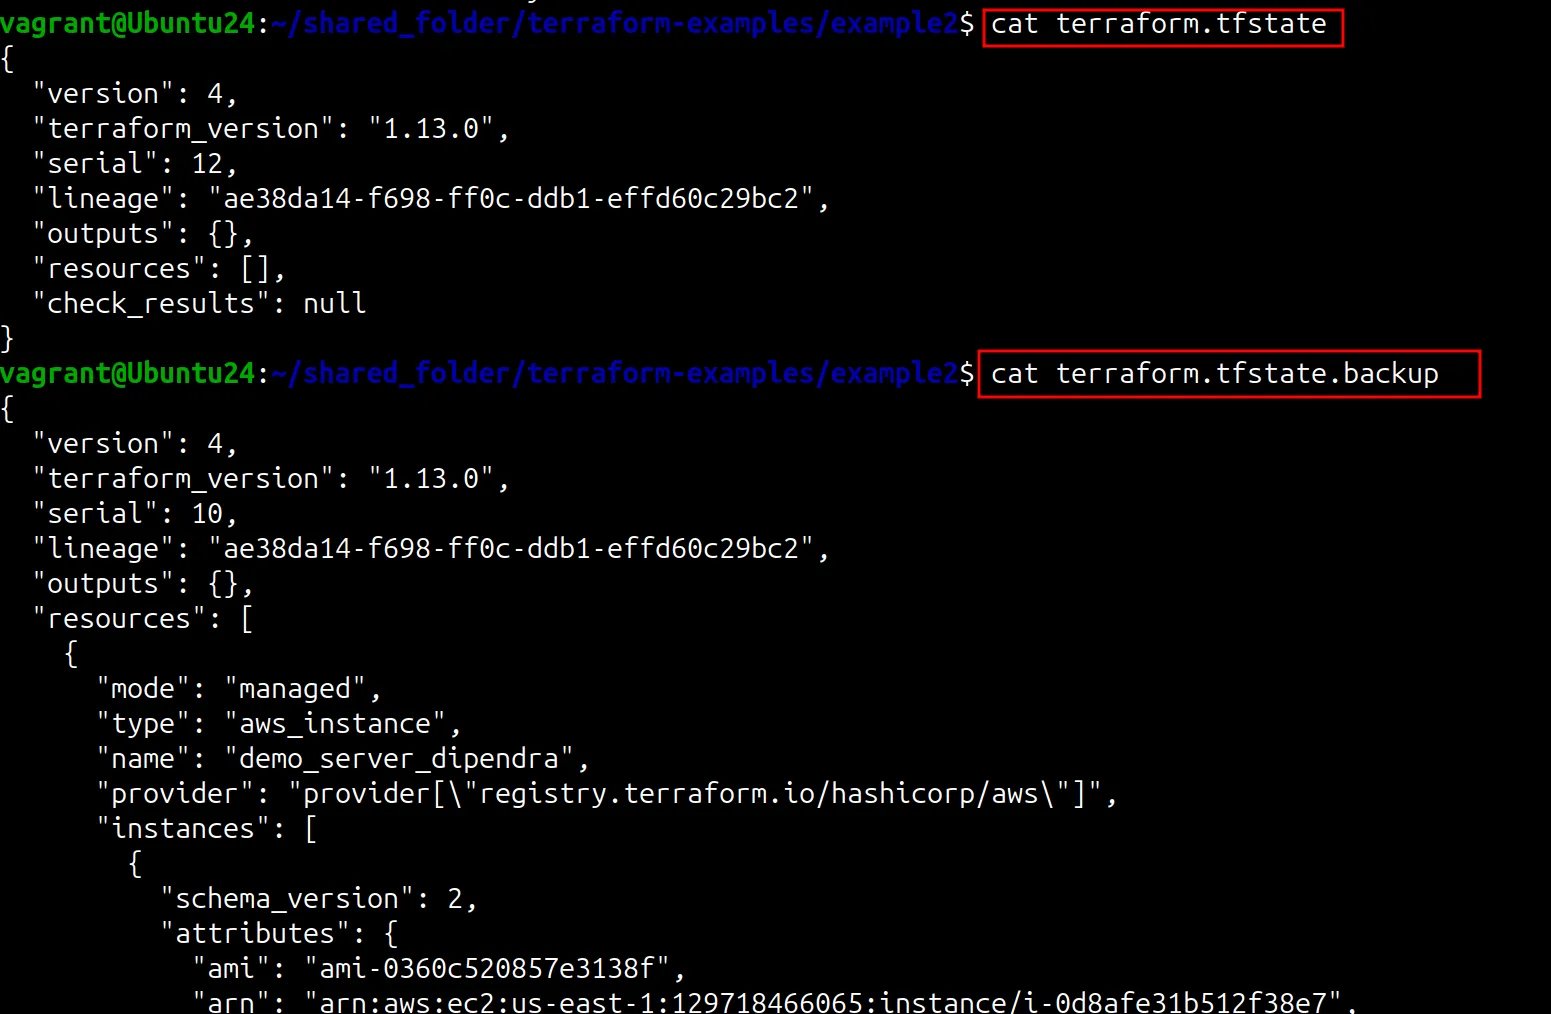
Now if you run the terraform destroy then you can see the terraform.tfstate file is empty now and terraform.tfstate.backup file has configurations.
What are the Basic Files in terraform Project
These names are automatically recognized by the terraform. We don’t need to mention them anywhere.
- There is one main file called main.tf in the directory
- provider.tf: This file has the information of the provider
- variables.tf: Secrets, datas or any value that changes will be placed here.
- For example: secrets, datas, AMIs, tags, security groups, key pairs.
create three separate files. ie;
- instance.tf
resource "aws_instance" "demo_server_dipendra" {
  ami                    = var.AMIS
  instance_type          = var.INSTANCE_TYPE
  vpc_security_group_ids = [ var.SECURITY_GROUP ]
  availability_zone      = var.ZONE
  tags = {
    Name       = "demo-vm-dipendra-Bhatta",
    created_by = "terraform"
  }
}- providers.tf
provider "aws" {
  region = "us-east-1"
}- variables.tf
#Default value is picked when nothing is defined
#Wwe can decleare variable like in capital letter as shown or we can define them like "region" this also.


variable REGION {
  description = "The region where resources is to be created"
  default     = "us-east-1"
  type        = string
}

variable ZONE {
  description = "The resouces zone where we need to deploy resources"
  default     = "us-east-1a"
  type        = string
}

variable SECURITY_GROUP {
  description = "SG name"
  default     = "sg-05694bdfc51f0d457"
}

variable AMIS {
  description = "The AMI ID of the instance"
  default     = "ami-0360c520857e3138f"
  type        = string
}


variable INSTANCE_TYPE {
  default = "t2.nano"
}Now if you init the file now can see the new plugin is installed in this directory.
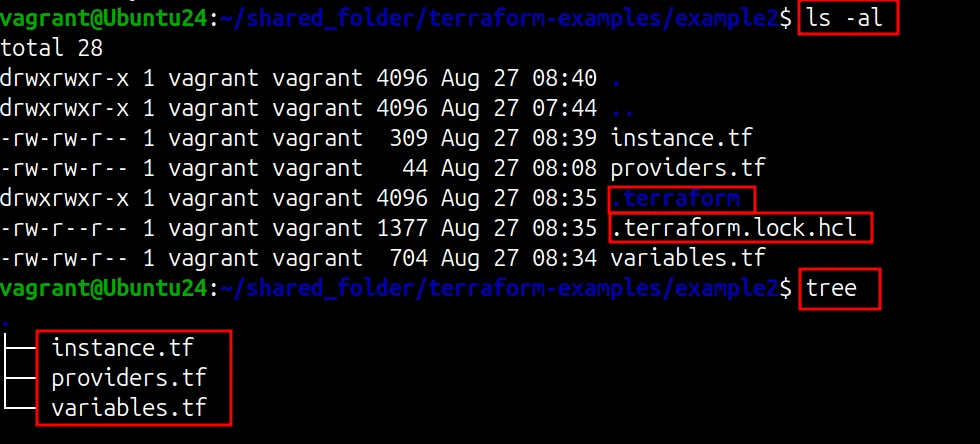
- Now you can see the new plugin is installed in this directory.
- Now do validation using terraform validate and also use terraform plan to see plan.
- Now if you run command terraform apply you can see the .tfstate and .tfstate.backup files are created and your instance is launched in AWS successfully.
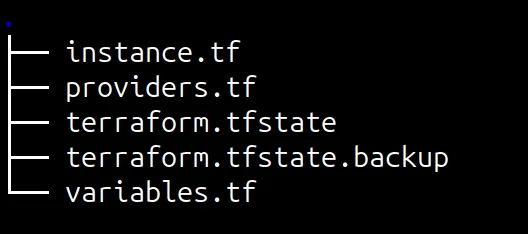
- Now let’s shutdown the machine from the AWS GUI. Now if you run terraform apply after deleting the instance manually from GUI you can see

- It will now compare with the local file and will create the new resource as we have deleted the old one earlier.
Now again in GUI let’s add a new tag.
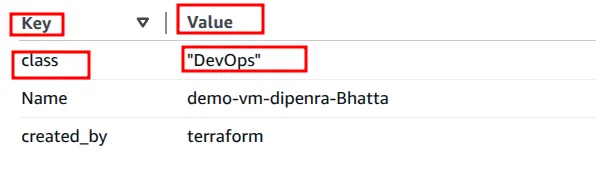
- This tag is now available locally
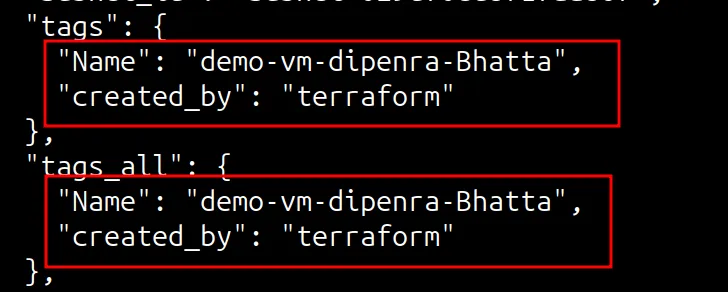
- Now if we run terraform refresh then we can see the new tag here.
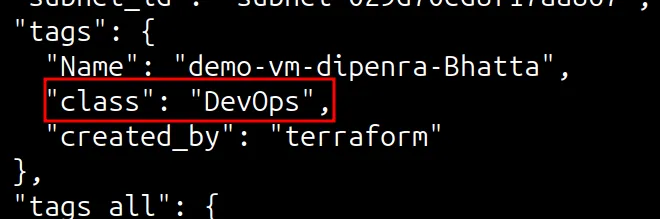
- Here we can see the new changes is reflected in our .tfstate file.
Now If we manually stop the EC2 instance then it will cause a drift known as terraform drift
Terraform drift
terraform drift: Remote resource euta state ma xa but tyo changes is not reflected in your local machine.
Terraform drift refers to the situation where the actual state of your infrastructure in a cloud environment or on-premises diverges from the state defined in your Terraform configuration files and the associated Terraform state file.
- **Manual Changes:**Direct modifications to infrastructure resources outside of Terraform’s management, such as changes made through a cloud provider’s console (UI) or command-line interface (CLI).
- **Automated External Processes:**Changes made by other automation tools or scripts that are not integrated with your Terraform workflow.
- **Resource Eviction or Deletion:**Resources being unexpectedly removed or modified by the cloud provider or other external factors.
NOTE: READ IN DETAIL FROM OFFICIAL DOCUMENT
- Now when you run terraform refresh you can see the stage.
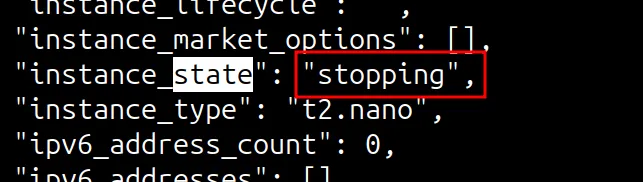
- The EC2 instance is stopped successfully. We need to run the terraform apply time to time to keep the details of the state up to date locally also.
The main point is you need to run terraform refresh and terraform apply time to time so that it can see notice the drift timely.
NOTE: THE SECURITY GROUP AND AMI ID IS DIFFERENT IN DIFFERENT REGION. ie;
Here you can see the different AMIs ID based on the regions. This is the AMI id of ubuntu 24.04
us-east-1: ami-0360c520857e3138f
us-east-2: ami-0cfde0ea8edd312d4So to solve this problem we can use mapping type variables:
Mapping variables
instance.tf
resource "aws_instance" "demo_server_dipendra" {

  ami                    = var.AMIS[ var.REGION ]
#changes made

  instance_type          = var.INSTANCE_TYPE
  vpc_security_group_ids = [var.SECURITY_GROUP]
  availability_zone      = var.ZONE
  tags = {
    Name       = "demo-vm-dipendra-Bhatta",
    created_by = "terraform"
  }
}providers.tf
provider "aws" {
  region = var.REGION
}variables.tf
variable "REGION" {
  description = "The region where resources is to be created"
  default     = "us-east-2"
  type        = string
}

variable "ZONE" {
  description = "The resouces zone where we need to deploy resources"
  default     = "us-east-1a"
  type        = string
}

variable "SECURITY_GROUP" {
  description = "SG name"
  default     = "sg-05694bdfc51f0d457"
}

variable "AMIS" {

  description = "The AMI ID of the instance"
  default = {
    us-east-1 = "ami-0360c520857e3138f"
    us-east-2 = "ami-0cfde0ea8edd312d4"
  }
  type = map(any)
}
#changes made

variable "INSTANCE_TYPE" {
  default = "t2.nano"
}Now if you run terraform plan then you can see when region is us-east-2 it will pick that AMI

LET’S change the region in the variables.tf to us-east-1 then
variable "REGION" {
  description = "The region where resources is to be created"
  default     = "us-east-1"
  type        = string
}
In this way you can use mapping variables.
Provisioners
Important: Use provisioners as a last resort. There are better alternatives for most situations. Refer to Declaring Provisioners for more details.Provisioners are a Last Resort
Terraform meta argument //imp
- depends_on
- Certain aagadi ko block complete na huda xamman arko run na garne
- The
depends_onmeta-argument in Terraform is used to specify explicit dependencies between resources or modules when Terraform cannot automatically infer them. It ensures that the resource or module declaring the dependency is created or updated only after all actions on the dependency object are complete.
  depends_on = [
    aws_iam_role_policy.example
]Official Document of meta arguments
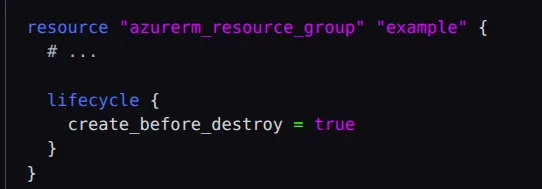
- lifecycle
- Suppose we have create a EC2 instance. So if you have made some changes in configuration so if you run terraform apply then it will destroy the old resource and create a new one. If you have an live environment then you want to create a new one and delete a old one. So to change this behaviour you can change this using this meta argument.
- Can use various things with this thing need to explore official document.
- Most used lifecycle-rules are
- create_before_destroy
- ignore_changes
- prevent_destroy
- For looping we can use
- count
- To make multiple resources we can use count.
- Ex: count = 4 # create four similar EC2 instances
- We don’t use count for most of the time because:
- IMPORTANT
- If we remove the web1 from previous example, and if we run terraform apply, the expectation is it will remove one resource web1, however in reality it will remove one resource and change two others, this happens because while we are using count, the resources are created as list. The first element in a list is always 0.
- Suppose we have created 5 instances using count. For example we have deleted 1 then it will have 4. Then it cause problem but in this place if we have used for_each then it will be better.
- To make multiple resources we can use count.
- for_each
- To do certain iteration repeatedly. Suppose we have to create resources in different regions then we can usefor_each.
- count
- provider
- We have placed the details of the provider in provider.tf file. The
providermeta-argument specifies which provider configuration to use for a resource, overriding Terraform’s default behavior of selecting one based on the resource type name. - Example;
provider "google" {alias = "europe" region = "europe-west1"}
- We have placed the details of the provider in provider.tf file. The
- provisioner
- file
- local_exec
- remote_exec
All provisioners support the when and on_failure meta-arguments, which are described below (see Destroy-Time Provisioners and Failure Behavior).
Why not to use provisioners? Provisioners are a Last Resort
However, they also add a considerable amount of complexity and uncertainty to Terraform usage. Firstly, Terraform cannot model the actions of provisioners as part of a plan because they can in principle take any action. Secondly, successful use of provisioners requires coordinating many more details than Terraform usage usually requires: direct network access to your servers, issuing Terraform credentials to log in, making sure that all of the necessary external software is installed, etc.
- Terraform plan doesn’t show what the provisioner are doing .
- When we run terraform plan we can see what changes will it make but the thing inside the provisioners are not seen here. Sometimes it will cause a serious issue.
- Most of the provisioner need the direct connection to the machine. ie; ssh or winrm. This will increase the chance of the leakage of security credentials.
- Compromise the security.
- Logging information is also shared.
The following sections describe some situations which can be solved with provisioners in principle, but where better solutions are also available. We do not recommend using provisioners for any of the use-cases described in the following sections.
- Passing data into virtual machines and other compute resources
- Provisioning files using cloud-config
- Running configuration management software
- Example;Chef, ansible etc.
- First-class Terraform provider functionality may be available
How to use Provisioners
If you are certain that provisioners are the best way to solve your problem after considering the advice in the sections above, you can add a provisioner block inside the resource block of a compute instance.
resource "aws_instance" "web" {
  # ...

  provisioner "local-exec" {
    command = "echo The server's IP address is ${self.private_ip}"
  }
}The local-exec provisioner requires no other configuration, but most other provisioners must connect to the remote system using SSH or WinRM. You must include a connection block so that Terraform knows how to communicate with the server.
Types of provisioners
First you need connection to use any of these provisioners. To establish connection we need
username //providing username directly
password_file //providing file
ip address //self.publicip //Using this approach
local-exec: Executes commands on the machine where Terraform is being run. Useful for local operations like logging or triggering external processes. If we want to install certain packages and tools in this machine.- Run the command in the local and the effect can be seen in the remote.
remote-exec: Executes commands on a remote resource (e.g., a newly created virtual machine). This requires aconnectionblock to define how Terraform connects to the remote resource (e.g., via SSH or WinRM).- If we run the commands in the remote machine then it is know as remote-exec. For remote-exec we need to do connection first before running commands.
- Can run with the inline command or can run the content of the script.
- file provisioners: The
fileprovisioner copies files or directories from the machine running Terraform to the newly created resource. Thefileprovisioner supports bothsshandwinrmtype connections.
file_provisioners
The file provisioner copies files or directories from the machine running Terraform to the newly created resource. The file provisioner supports both ssh and winrm type connections.
Copies files or directories from the local machine to a remote resource. This also requires a connection block.
- So how to copy the files from local machine to remote machine.
- For this we need to establish connection.
For this we need to establish connection. To know more about connection follow this link.
Connecting through a Bastion Host with SSH
For example we are running a machine in private ip in which our db is running and with public ip our frontend service is running. SO frontend has public ip and can be accessible remotely. But the DB server has private ip and NAT gateway is not attached because we don’t want to expose our DB server to the internet. Suppose we need to install DB package or do some configuration in this case how can we access that machine.
So in this case we can configure Bastion host. THis is the intermediate machine from which we can configure or connect the machine ie; running in private ip/ private subnet.
- Important for the exam
- The
sshconnection also supports the following arguments to connect indirectly with a bastion host. - If we want to access the machine connected in which public ip is not assigned. Then we can connect by creating a bastion host. This is an intermediate machine.
Example:
When we copy without using terraform we will use this command. ie;
scp -i demo-key myfile.txt ubuntu@54.212.10.0:/tmp
If we want to do this task using the terraform then we need to mention file, establish ssh connection and also need the key pair.
For this we will have four files:
deploy_app.sh
#!/bin/bash
sudo apt install apache2 wget unzip -y
sudo systemctl start apache2
sudo systemctl enable apache2
sudo cd /tmp/
sudo wget https://www.tooplate.com/zip-templates/2129_crispy_kitchen.zip
suod unzip -o 2129_crispy_kitchen.zip
sudo cp -r 2129_crispy_kitchen/* /var/www/html/
sudo systemctl restart apache2instance.tf
resource "aws_instance" "demo_server_dipendra" {
  ami                    = var.AMIS[var.REGION]
  instance_type          = var.INSTANCE_TYPE
  vpc_security_group_ids = [var.SECURITY_GROUP]
  availability_zone      = var.ZONE
  tags = {
    Name       = "demo-vm-dipendra-Bhatta",
    created_by = "terraform"
    owner = "Deependra-Bhatta"
  }
  #To copy the file from local to remote machine
  provisioner "file" {
    source      = "deployapp.sh"
    destination = "/tmp/deployapp.sh"
  }

  #To execute the file

  provisioner "remote-exec" {
    inline = [
      "chmod u+x /tmp/deployapp.sh",
      "sudo /tmp/deployapp.sh"
    ]
  }

  #Providing username and the key
  connection {
    user        = var.USER
    private_key = file("/home/vagrant/shared_folder/terraform-examples/kp-dipendra-bhatta-aug4.pem")
    host        = self.public_ip
  }
}variables.tf
#Default value is picked when nothing is defined
#Wwe can decleare variable like in capital letter as shown or we can define them like "region" this also.


variable "REGION" {
  description = "The region where resources is to be created"
  default     = "us-east-1"
  type        = string
}

variable "ZONE" {
  description = "The resouces zone where we need to deploy resources"
  default     = "us-east-1a"
  type        = string
}

variable "SECURITY_GROUP" {
  description = "SG name"
  default     = "sg-05694bdfc51f0d457"
}

variable "AMIS" {

  description = "The AMI ID of the instance"
  default = {
    us-east-1 = "ami-0360c520857e3138f"
    us-east-2 = "ami-0cfde0ea8edd312d4"
  }
  type = map(any)
}


variable "INSTANCE_TYPE" {
  default = "t2.nano"
}

variable "USER" {
  default = "ubuntu"
}providers.tf
provider "aws" {
  region = var.REGION
}After creating these files if we run terraform apply now we can see the file provisioning is running.
aws_instance.demo_server_dipendra: Provisioning with ‘file’…
We can see all the process of apt update and other commands here.
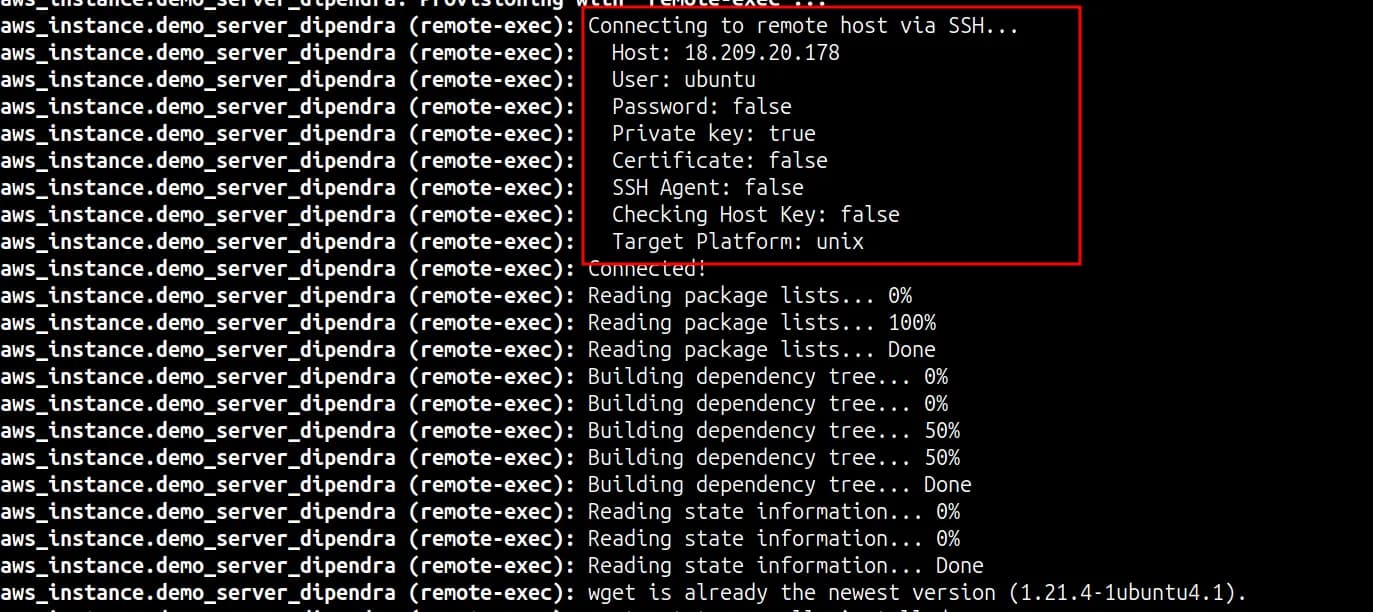
After sometime it should be completed without any errors.

Here we can see now we can successfully browse the application with machine IP address.
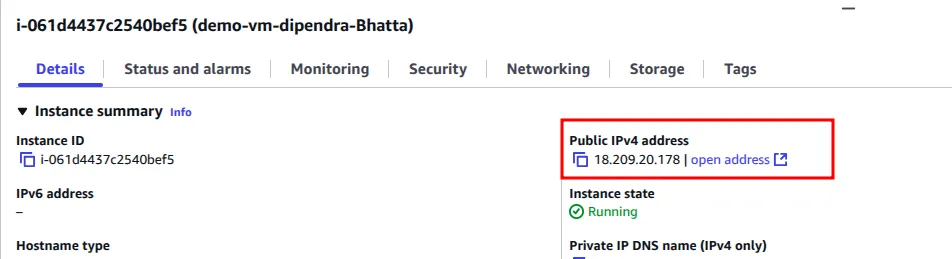
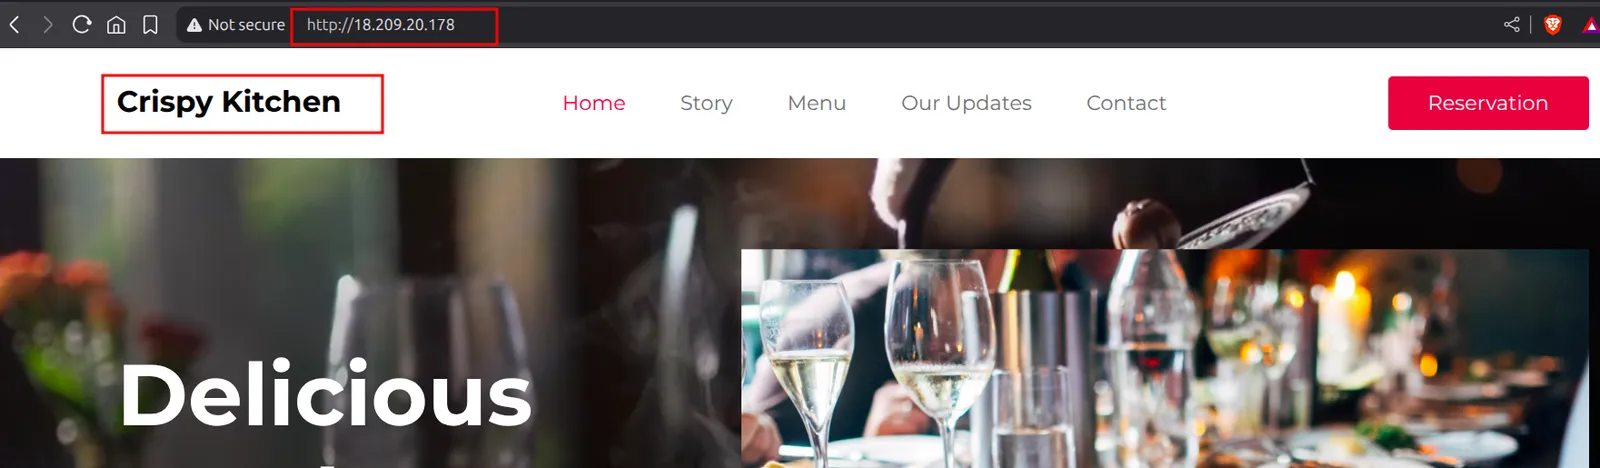
- To browse this application we need this IP.. But we need to go to the console to see this ip or we can see the ip in .tfstate file. But it is becoming difficult to see that ip if we have large number of files or . So to see this IP we have different approaches. ie;
- We can print the ip when we run terraform apply. For this we have the concept of output values.
Output values
Output values make information about your infrastructure available on the command line, and can expose information for other Terraform configurations to use. Output values are similar to return values in programming languages.
Output values have several uses:
- A child module can use outputs to expose a subset of its resource attributes to a parent module.
- A root module can use outputs to print certain values in the CLI output after running
terraform apply. - When using remote state, root module outputs can be accessed by other configurations via a
terraform_remote_statedata source.
Example:
output "instance_ip_addr" {
  value = aws_instance.server.private_ip
}Now let’s print public_ip, private_ip and public_dns of our instance.
instance.tf
resource "aws_instance" "demo_server_dipendra" {
  ami                    = var.AMIS[var.REGION]
  instance_type          = var.INSTANCE_TYPE
  key_name               = "kp-dipendra-bhatta-aug4"
  vpc_security_group_ids = [var.SECURITY_GROUP]
  availability_zone      = var.ZONE
  tags = {
    Name       = "demo-vm-dipendra-Bhatta",
    created_by = "terraform"
    owner      = "Deependra-Bhatta"
  }
  #To copy the file from local to remote machine
  provisioner "file" {
    source      = "deploy_app.sh"
    destination = "/tmp/deploy_app.sh"
  }

  #To execute the file

  provisioner "remote-exec" {
    inline = [
      "chmod u+x /tmp/deploy_app.sh",
      "sudo /tmp/deploy_app.sh"
    ]
  }

  #Providing username and the key
  connection {
    user        = var.USER
    private_key = file("kp-dipendra-bhatta-aug4.pem")
    host        = self.public_ip
  }
}

output "My_instance_public_ip_address" {
  value = aws_instance.demo_server_dipendra.public_ip
}

output "My_instance_private_ip" {
  value = aws_instance.demo_server_dipendra.private_ip
}

output "My_instance_public_url" {
  value = aws_instance.demo_server_dipendra.public_dns
}So when we run the terraform plan we can see these configurations.
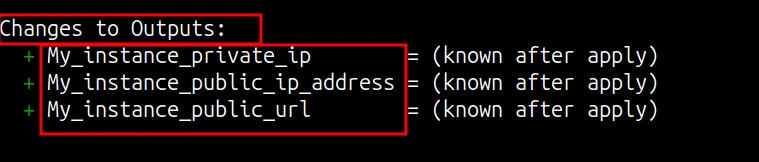
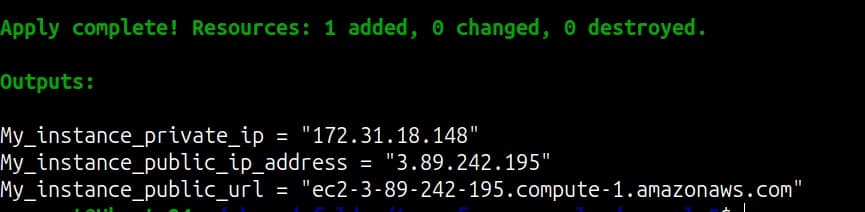
Now you can see these outputs when you run terraform apply command. Here in below diagram you can see the output like this.
Backend Concept
when we are working in the team then we have the terraform.tfstate file only in our local machine. But the configurations are in our local machine not in the github.But when another people want to work in this infrastructure he have only configuration files in github. He doesn’t know what is the state of the resource or doesn’t know whether it is running or not. This will cause a serious issue. To solve this terraform has backend concept. With the help of backend we can store these state files in any remote location like amazon s3. So that any one can use the configuration in the absence of developer who have created this first.
- For this create a bucket in s3 and copy the name of the bucket. Just place the name of the bucket and create it. For now don’t configure anything else.
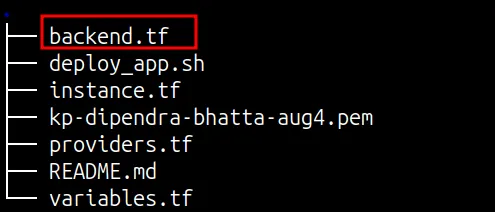
All the files are same in above example ie; Example 1. We just need to this additional file.
backend.tf
terraform {
  backend "s3" {
    bucket = "backend-bucket-dipendra-bhatta"
    #Filename in the s3 bucket where you want to store
    key    = "terraform"
    region = "us-east-1"
  }
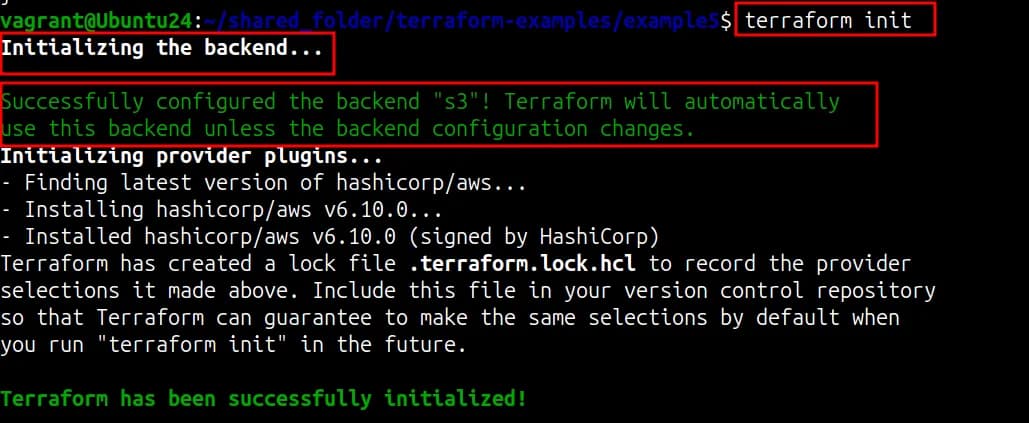
}- After you run terraform init command you will see like this. Now the state files will be stored in this bucket that we have configured.
- So if anyone else run terraform apply command then it will fetch the state from the s3 bucket.
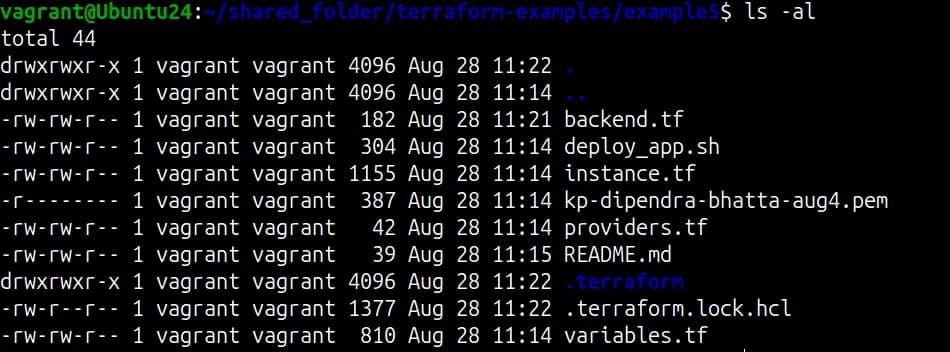
File structure:
- Now if you run terraform apply command you will not see the state file locally in your machine. ie;
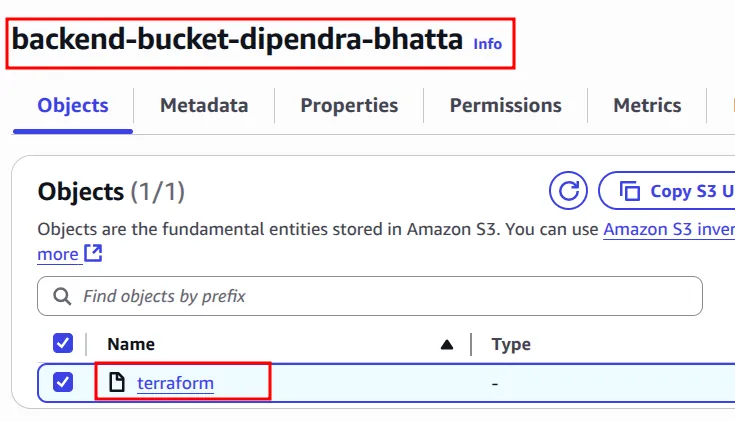
- Now if you look into your s3 bucket you will see the files in the s3 bucket in aws.
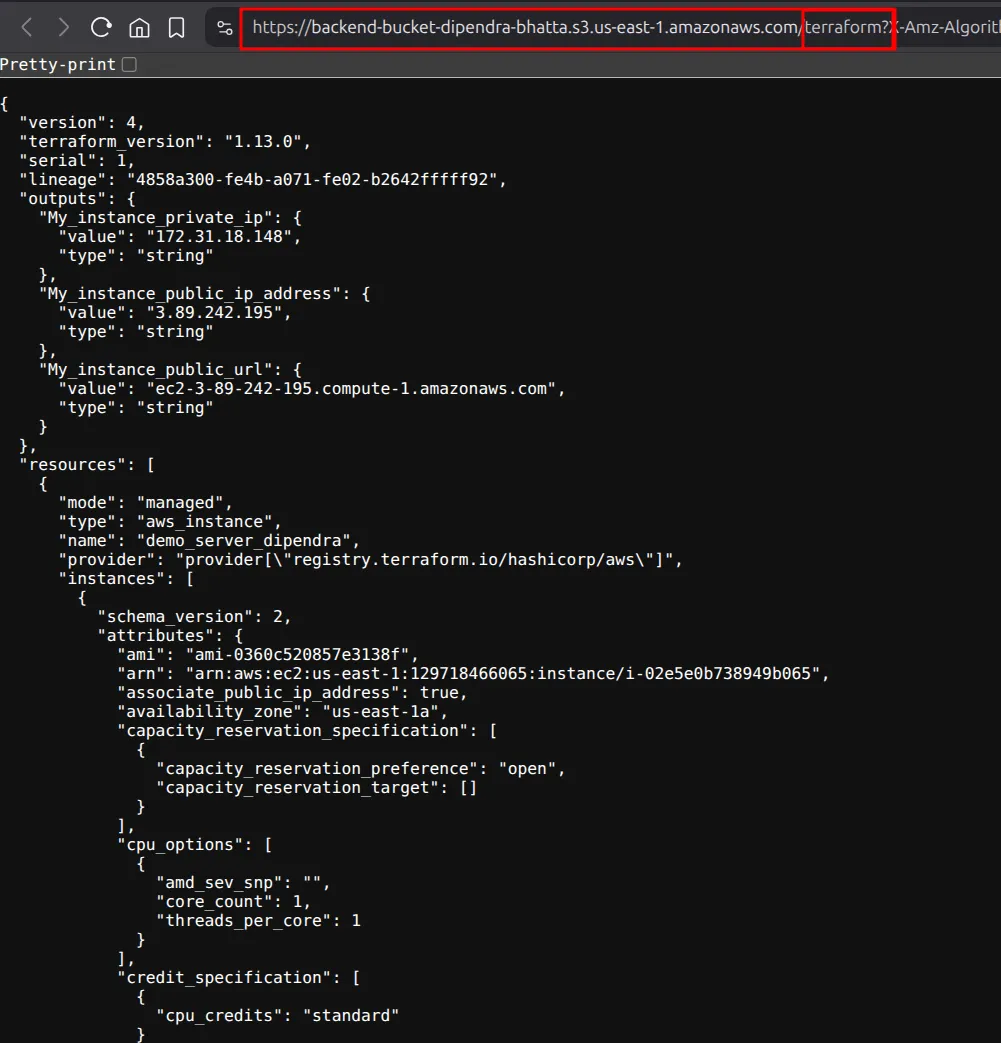
- Now if you open this file you can now see the details of the EC2 instance similar to the terraform.tfstate file .
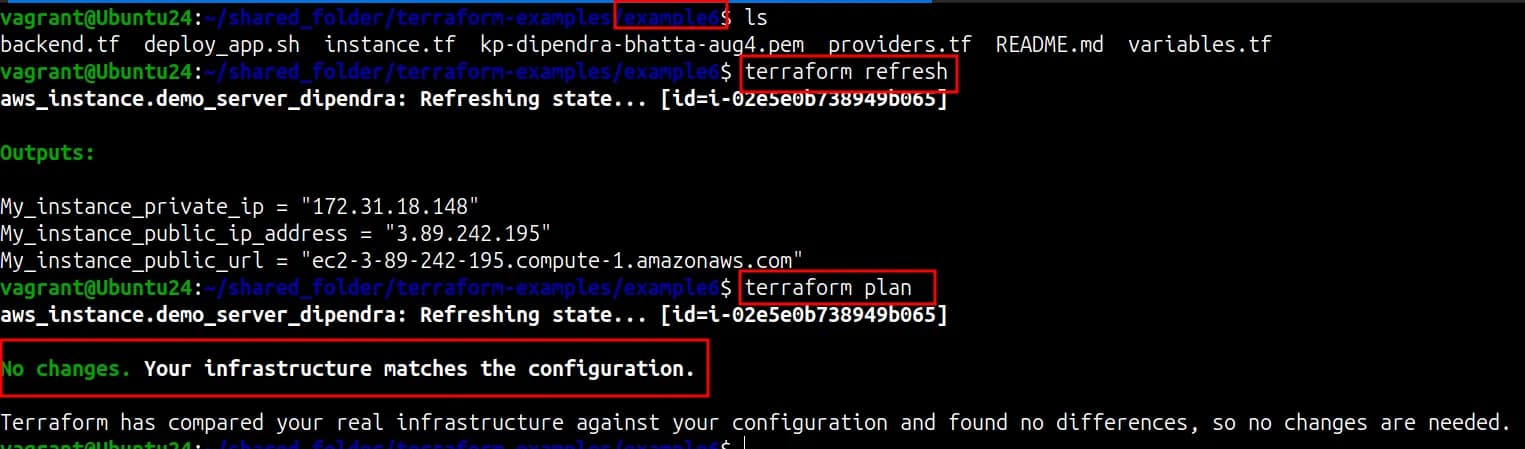
Now if you try to move this file in another location then run terraform plan and refresh command then you will see it will send query to s3 and will tell the state of the instance.
- This way we can prevent the accidental disaster between team members.
State Lock
If multiple people are working at the same configuration then we can place lock. The main use of this lock is when one user is running the command then until the lock is free another user cannot run the command. We can also do the state lock.
Workspaces
- In AWS we can create different environments like development, testing, production, etc. So if we want to create multiple environments then it will have multiple copies and multiple configuration files. It will be difficult for us to manage.
- Problems
- Code duplication
- Difficult to manage
- Accidental configuration
- Problems
So to solve this we have the concept of the workspace. In this concept we can re-use the same configuration file for different environments. Workspace simplifies this thing.
- terraform workspace
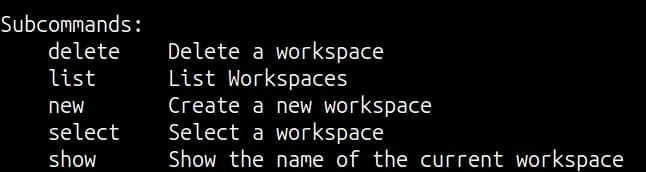
- terraform workspace list: To see workspace
- By default we have a workspace named default

- terraform workspace show : To see the name of current workspace
- terraform workspace new <workspace_name>: To create new workspace
- terraform workspace new dev

- terraform workspace select <workspace_name>: To switch to different workspaces
terraform workspace select prod
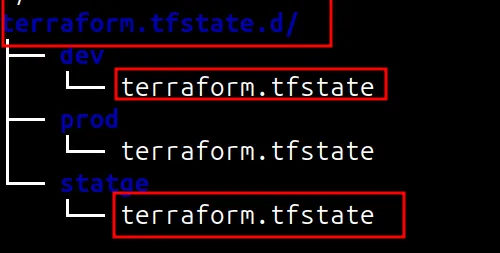
Switched to workspace "prod".WHEN we create different workspace then there will be a new directory created when we run terraform init command .ie; terraform.tfstate.d
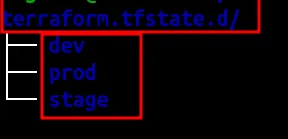
EXAMPLE:
- Let’s create three workspaces. ie; dev, prod and stage using command terraform workspace new <workspace_name>.
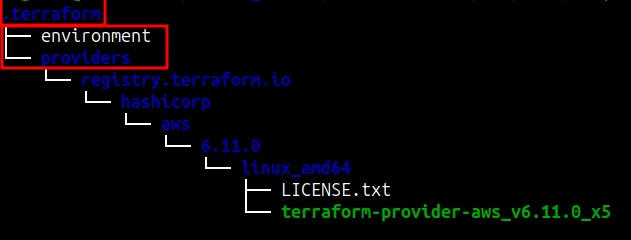
- here environmnt has the
main.tf
resource "aws_instance" "demo_server_dipendra" {
  ami = var.AMIS[var.REGION]
  #This is used to pull the mapping variables
  key_name               = "kp-dipendra-bhatta-aug4"
  instance_type          = lookup(var.INSTANCE_TYPE, terraform.workspace, "t2.micro")
#This command will look for the workspace to select the proper instance type
  vpc_security_group_ids = [var.SECURITY_GROUP]
  availability_zone      = var.ZONE

  tags = {
    #Set name based on the terraform workspaces
    Name       = "${terraform.workspace}-vm-dipendra-bhatta",
    created_by = "Terraform-code"
    owner      = "Deependra-Bhatta"
  }
}
output "instance_id" {
  value = aws_instance.demo_server_dipendra.id
}

output "instance_name" {
  value = terraform.workspace
}lookup
The lookup function in Terraform is used to retrieve a value from a map given a specific key. It is particularly useful for handling dynamic configurations and providing default values when a key might not be present in the map.
lookup(map, key, default_value)Arguments:
map: The map (or object) from which to retrieve the value.key: The key whose corresponding value is to be retrieved from themap.default_value: (Optional, but recommended) The value to return if thekeyis not found in themap. If omitted and the key is not found, Terraform will raise an error.- Example: lookup(var.INSTANCE_TYPE, terraform.workspace, “t2.micro”)
providers.tf
provider "aws" {
  region                = var.REGION
}variables.tf
variable "REGION" {
  description = "The region where resources is to be created"
  default     = "us-east-1"
  type        = string
}

variable "ZONE" {
  description = "The resources zone where we need to deploy resources"
  default     = "us-east-1b"
  type        = string
}

variable "SECURITY_GROUP" {
  description = "SG name"
  default     = "sg-05694bdfc51f0d457"
}

variable "AMIS" {

  description = "The AMI ID of the instance"
  default = {
    us-east-1 = "ami-0360c520857e3138f"
    us-east-2 = "ami-0cfde0ea8edd312d4"
  }
  type = map(any)
}


variable "INSTANCE_TYPE" {
  type = map(any)
  default = {
    dev   = "t2.micro"
    stage = "t2.nano"
    prod  = "t2.small"
  }
}FOLDER STRUCTURE
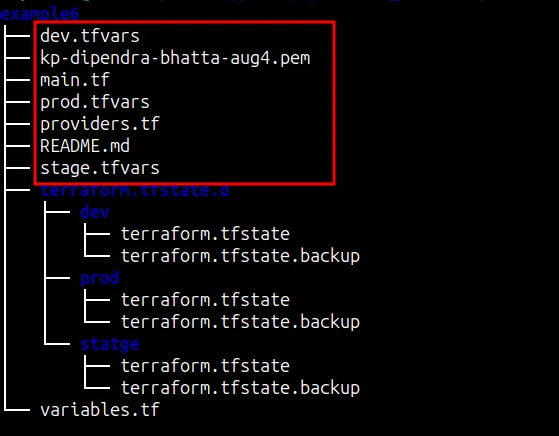
- Here stage.tfvars, devs.tfvars and prod.tfvars are empty. Here we can keep the values based on the environment.
Now when we run terraform apply command we can see the different instances are created in different workspaces with similar configuration. Only change here is the tag and the instance type that you can see in the above code.

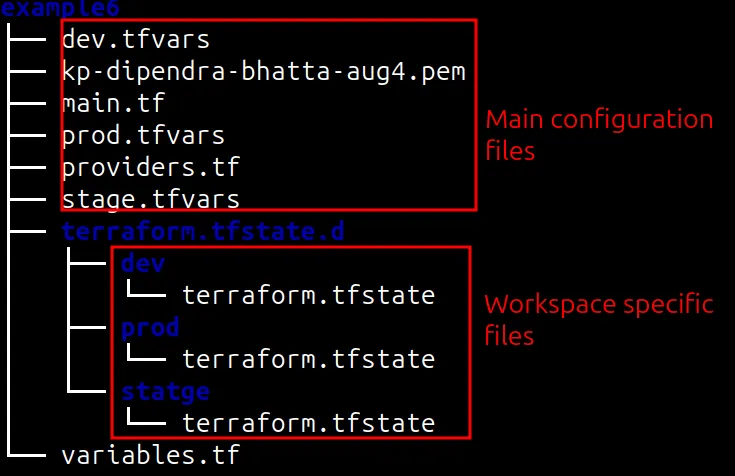
Here you can see now their state is placed in their specific folder. All of them have different configuration which is placed in their specific folders.
Now this is our file structure for this demo. Main configuration files have configuration for all all workspaces and terraform.tfstate.d has their state files.
When we run terraform destroy command it doesn’t affect other workspaces. It will only delete the workspace from which we have run this command.

- We can configure regions based on our requirement. For example we want to deploy the dev environment near
If you don’t want to use workspace //Traditional Approach
If you don’t want to use workspace then you need create different files for different environments
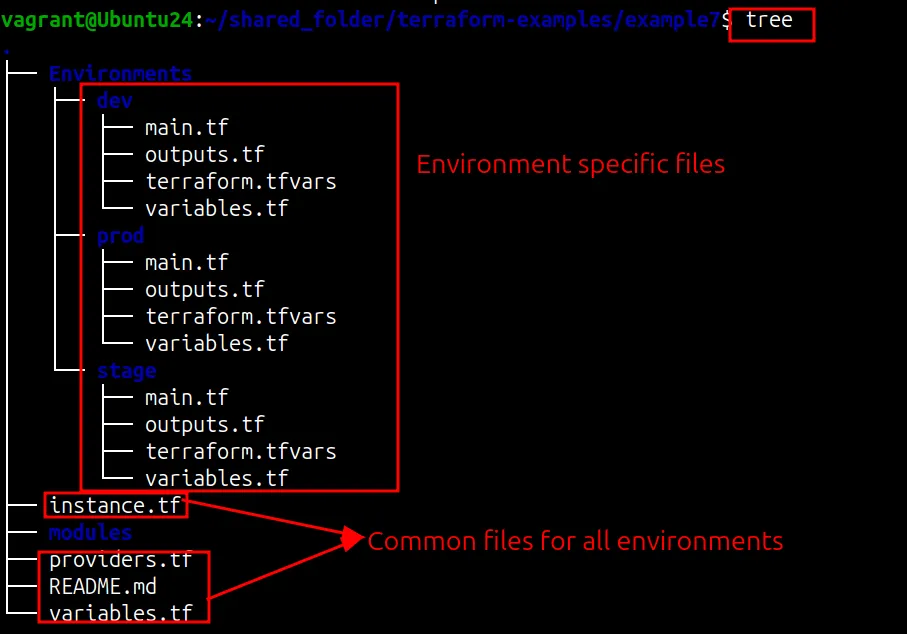
- here terraform.tfvars is used in the case of complex scenarios. SO we define the placeholder for variables in variables.tf file and in terraform.tfvars we place the actual value required by variables.tf. This approach is done because the variables values are changed frequently.
- Here we can see the another directory called modules. THis has the reusable code that is placed in terraform registry so that another people also can access that.
Modules
For example when doing coding we use same code at multiple times. We can place the similar code in the modules call them and use them in other places. We can keep the modules locally or can place in terraform cloud or we can use the modules created by other users.
Modules are containers for multiple resources that are used together. A module consists of a collection of .tf and/or .tf.json files kept together in a directory. Modules are the main way to package and reuse resource configurations with Terraform.
DIfferent types of modules
The Root Module
Every Terraform configuration has at least one module, known as its root module, which consists of the resources defined in the .tf files in the main working directory.
Child Modules
A Terraform module (usually the root module of a configuration) can call other modules to include their resources into the configuration. A module that has been called by another module is often referred to as a child module.
Child modules can be called multiple times within the same configuration, and multiple configurations can use the same child module.
Published Modules
In addition to modules from the local filesystem, Terraform can load modules from a public or private registry. This makes it possible to publish modules for others to use, and to use modules that others have published.
The Terraform Registry hosts a broad collection of publicly available Terraform modules for configuring many kinds of common infrastructure. These modules are free to use, and Terraform can download them automatically if you specify the appropriate source and version in a module call block.
Also, members of your organization might produce modules specifically crafted for your own infrastructure needs. HCP Terraform and Terraform Enterprise both include a private module registry for sharing modules internally within your organization.
How to create modules
syntax: If the file is in locally
module "servers" {
  source = "./app-cluster"

  servers = 5
}syntax: If the file is in remote server
module "consul" {
  source  = "hashicorp/consul/aws"
  version = "0.0.5"

  servers = 3
}THIS is very very important in terms of terraform. Need to study in detail.- It is better to use the existing modules that is already available in terraform registry. The use of terraform using modules is considered as best practice in the case of terraform.
Advance topics
- To create VPC
- To create load balancer
- auto scaling groups create
- Blue green deployment
- How to deploy in blue green deployment with the help of terraform
- blue for workspace
- Create another replica for green deployment.
- switch the environment then
- Now need to switch traffic from one zone to another zone then we can do it.
- How to deploy in blue green deployment with the help of terraform
Terraform Init
When are the .terraform and .terraform.lock.hcl are created .They are created when we initialize the project. In this diagram it is installing aws plugin because in providers we have mentioned AWS. Only after this is installed now terraform can work with AWS / can use its features. All the platform have different provider plugins like microsoft, azure.
- Suppose we are working in a team.
1st developer initialized the project and has created the infrastructure from the code. Now due to some circumstances the 1st developer becomes busy or went into vacation now another developer cloned the code from the github and applied the terraform apply. So this can delete the infrastructure or create a new one due to which there will be a problem - Now if he run the terraform init then the version will be changed. This will cause inconsistency and we won’t be able to create desired infrastructure. So to overcome this issue we need to commit the .terraform.lock.hcl in the github so that it will not cause inconsistency. Here we can see the version and detail of the provider in this file.
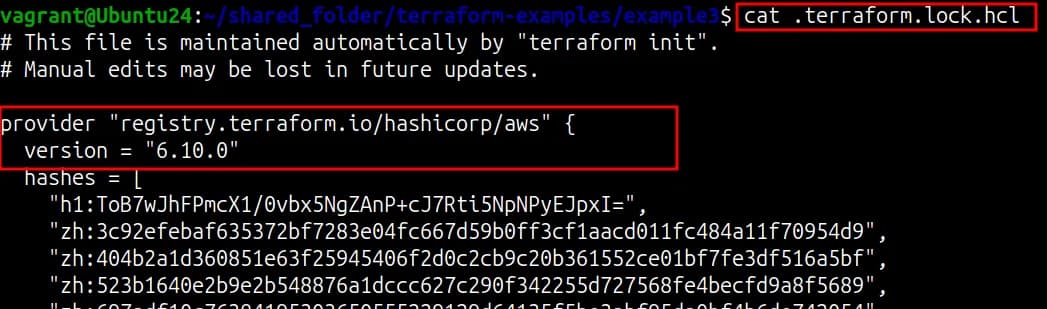
- So if another developer initialize the project having this file in the directory then it will create the infrastructure using this same version and configurations.
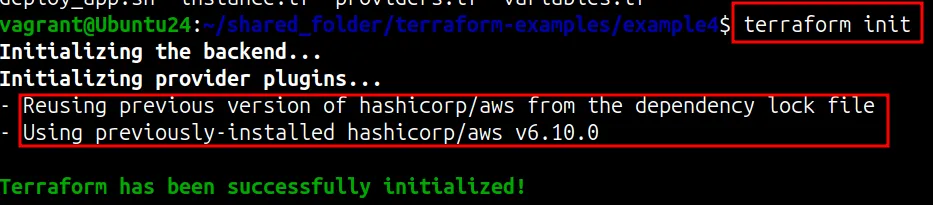
- Now we can see the it is using the earlier version and the earlier provider details. This will help to maintain consistency.
So basically, provider plugins ko details record garxa esle.
Commands
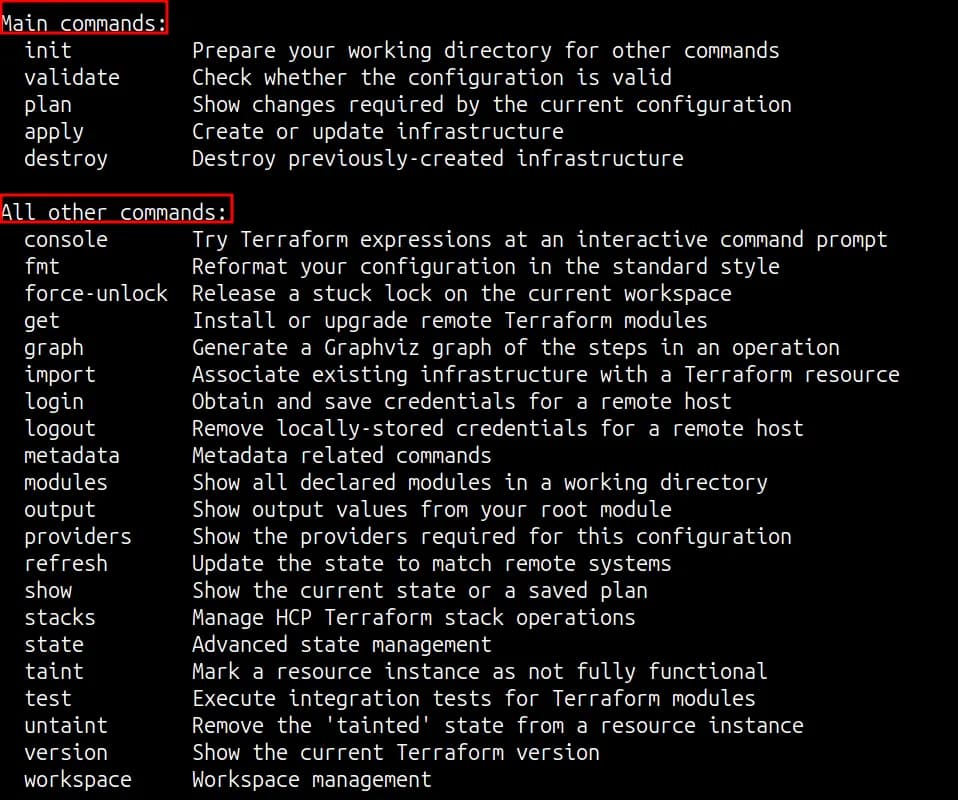
- terraform –help: To get help of the commands
- terraform fmt : To arrange the file code in proper formatting
- terraform validate: To validate the file whether it is good or not
- terraform init: This will install the plugin related to the provider. Configures the packing that we have defined.
- terraform plan: This will show what changes will it do in the aws
- terraform apply: To apply these things in AWS.
- terraform destroy: To destroy the infrastructure created by terraform
- terraform refresh: To refresh the new changes in the local machine file.
- terraform apply -auto-approve: To auto approve the request without passing the yes each and every time.
- If you are confident then only use this command sometimes by mistakely it will delete the resources that we don’t want to and create resources that we don’t want to.
- terraform graph: can print the graph of your infrastructure and also export that graph as image also.
- terraform console: Will provide the console to test terraform commands. Can use this to debug and run the terraform commands to see what changes will it do.
- Example; We will print the content of the file using file command in console.
- file(“~/shared_folder/terraform-examples/example5/instance.tf”)
- TO see the length of variable.
- length(var.ZONE)
- 10
- length(var.ZONE)
- We can check various things from the console.
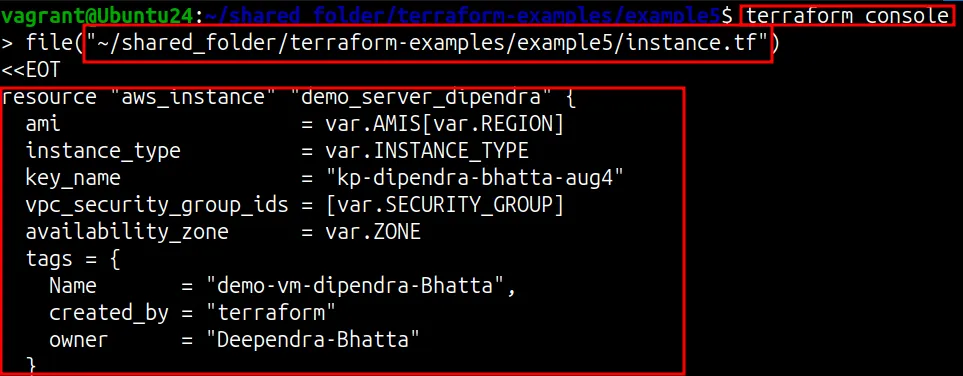
- terraform workspace
- terraform workspace list: To see workspace
- By default we have a workspace named default
- terraform workspace show <workspace_name>: To see the name of the default workspace
- terraform state:
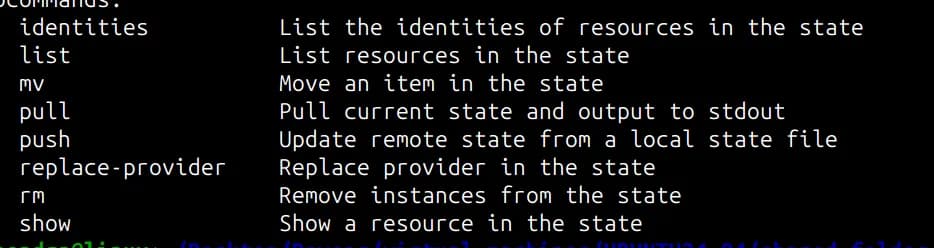
Other topics
- Mutual and immutable
- list, tuples and dictionaries in terraform
- data sources
Keep reading
- OpenTofu
OpenTofu is a reliable, flexible, community-driven infrastructure as code tool under the Linux Foundation’s stewardship. It serves as a drop-in replacement for Terraform, preserving your existing…
- Ansible playbook II
First Read ansible playbook1 before starting this section. Ansible “file” and “template” module File ownership create directory create file permission syslinks Template To understand this let’s…
- Ansible Playbook I
In this blog we will explore different playbooks example in ansible. Earlier we have used Ad-hoc command to configure another machine using ansible host. But in that approach we don’t have any data…