Build a Custom AWS VPC with Public and Private Subnets
Build a custom VPC step by step with an internet gateway, public and private subnets and a route table, then launch an EC2 instance and confirm what makes a subnet public.

ON THIS PAGE
When an EC2 instance cannot reach the internet, the cause is almost always in the VPC: a missing route, a detached gateway or a missing public IP. This guide builds a custom VPC piece by piece (the VPC, an internet gateway, a public and a private subnet, and a route table) and launches an EC2 instance into the public subnet. The VPC and more wizard creates all of this in one click, but building each component yourself shows exactly what makes a subnet public.
Prerequisites
- An AWS account with permission to manage VPC and EC2 resources.
- An EC2 key pair and familiarity with the launch wizard, as covered in the EC2 part of this series.
What a VPC is
A VPC (Virtual Private Cloud) is a private network inside an AWS Region. You choose its IP address range, divide it into subnets, and control routing and firewalls. Resources in a VPC are isolated from other AWS customers, in the same way as a network in your own data center.
| Piece | What it does |
|---|---|
| CIDR block | The VPC's IP range. 10.0.0.0/16 holds 65,536 addresses. |
| Subnet | A slice of the VPC's range that lives in one Availability Zone |
| Internet gateway | Connects the VPC to the internet; one per VPC |
| Route table | Rules that decide where traffic leaving a subnet goes |
| Public subnet | A subnet whose route table sends 0.0.0.0/0 to the internet gateway |
| Private subnet | A subnet with no route to the internet gateway |
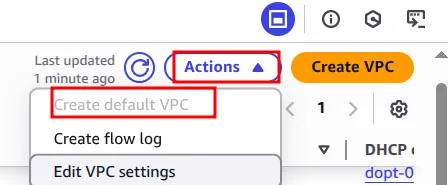
Every Region includes a default VPC (172.31.0.0/16) with a public subnet in each Availability Zone. You can delete it and create your own. To restore it, use Actions → Create default VPC; the option is greyed out while a default VPC exists.
How traffic flows from a public subnet to the internet
The diagram traces a packet from an instance in the public subnet to a website and back:
 EC2 instance in the public subnet (10.0.0.0/24)
 OS knows only its private IP; AWS also gave it a public IP
        |
        |  1. outbound check: security group, then the subnet's network ACL
        v
 Route table of the public subnet
   10.0.0.0/16  -> local             (traffic inside the VPC)
   0.0.0.0/0    -> internet gateway  (everything else)
        |
        |  2. destination is outside 10.0.0.0/16, so 0.0.0.0/0 matches
        v
 Internet gateway
        |  3. swaps the private source IP for the instance's public IP
        v
 Internet
        |  4. the reply comes back to the public IP; the gateway swaps it
        |     back to the private IP, and the security group lets it in
        |     because it is stateful
        v
EC2 instanceA subnet works as a public subnet only when all three of these conditions hold:
- An internet gateway is attached to the VPC.
- The subnet's route table has a route
0.0.0.0/0→ internet gateway. - The instance has a public IP (auto-assigned or an Elastic IP).
If any one is missing, the instance cannot reach the internet and the internet cannot reach the instance. A private subnet's route table has only the local route, so its instances can talk to anything inside the VPC but nothing outside it. To download updates, they need a NAT gateway in a public subnet, which is outside the scope of this guide.
Step 1: Create the VPC
Open VPC → Your VPCs → Create VPC. The VPC and more option previews and creates the subnets, route tables and gateway automatically.
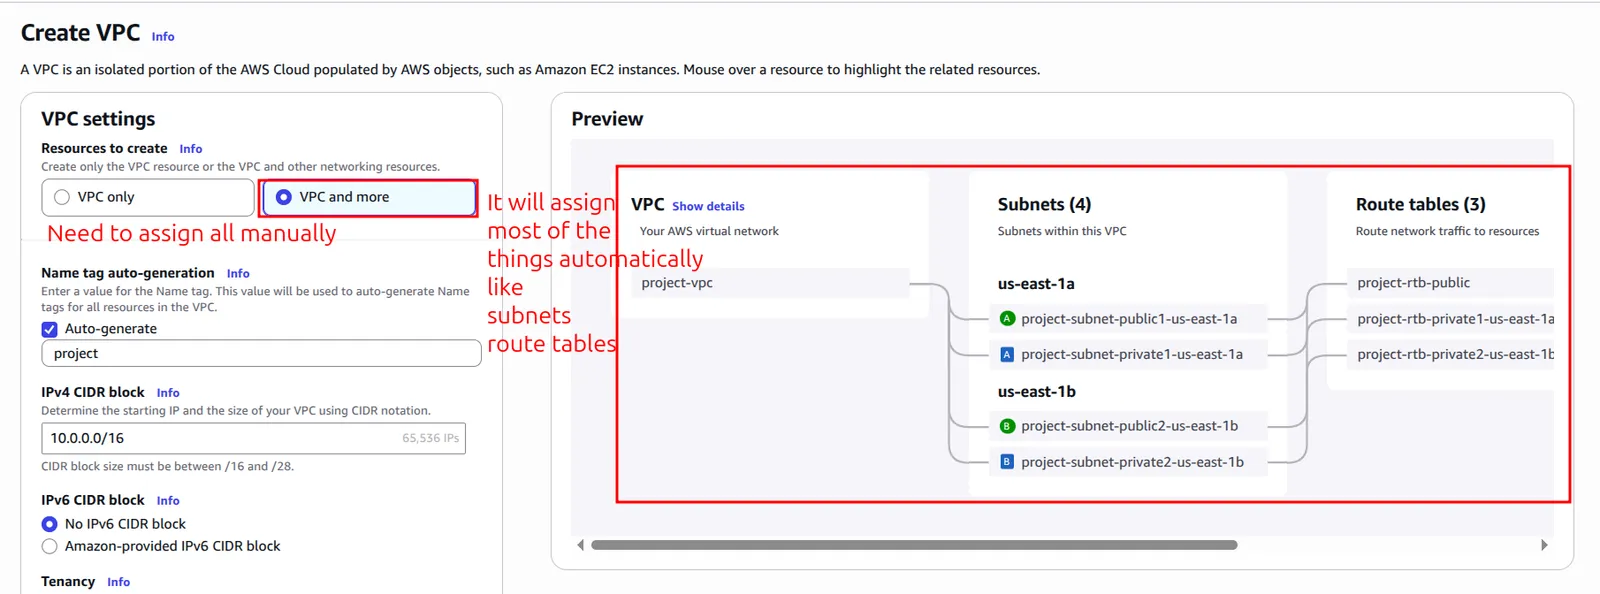
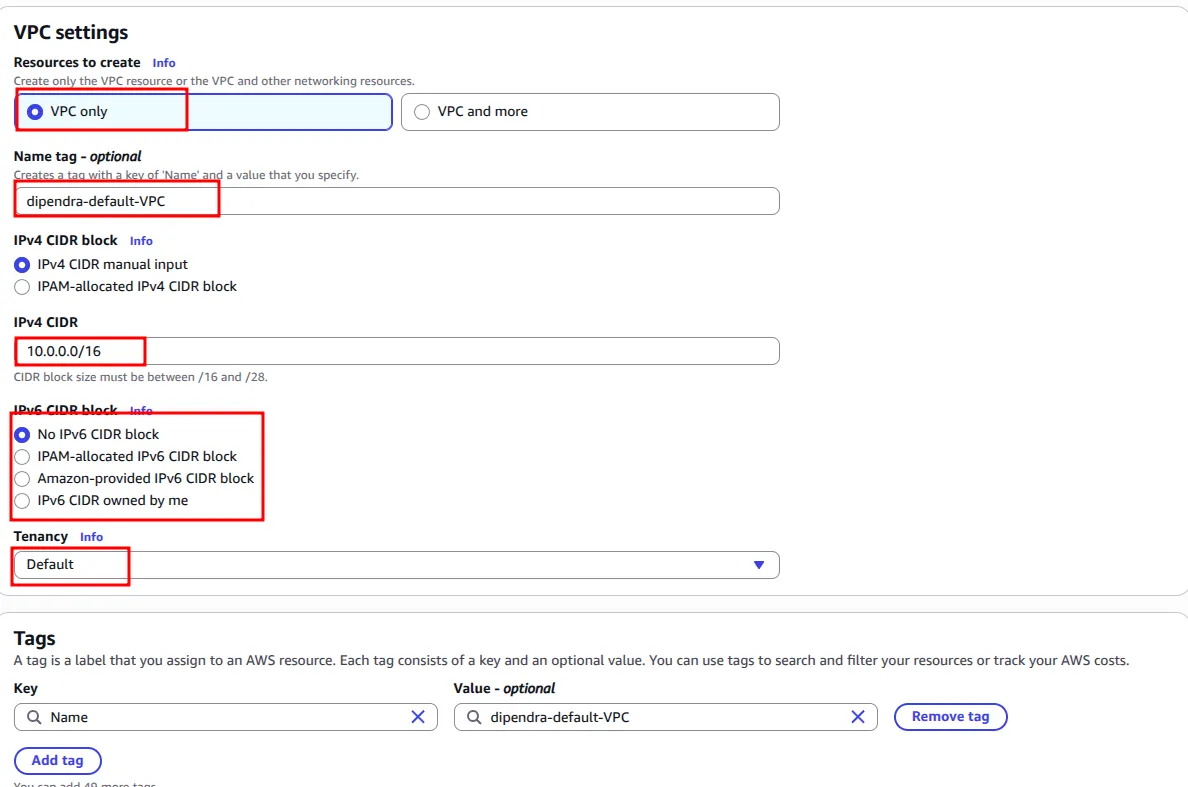
Choose VPC only to create each component separately:
- Name tag: a name for the VPC.
- IPv4 CIDR:
10.0.0.0/16. The block size must be between/16and/28. - IPv6: none.
- Tenancy: Default. Dedicated tenancy runs on single-customer hardware and costs more.
Step 2: Create and attach an internet gateway
An internet gateway carries traffic between the VPC and the internet. AWS runs it across many devices, so it is neither a single point of failure nor a bandwidth bottleneck. Without one, nothing in the VPC can reach the internet.
Open Internet gateways → Create internet gateway and give it a name.
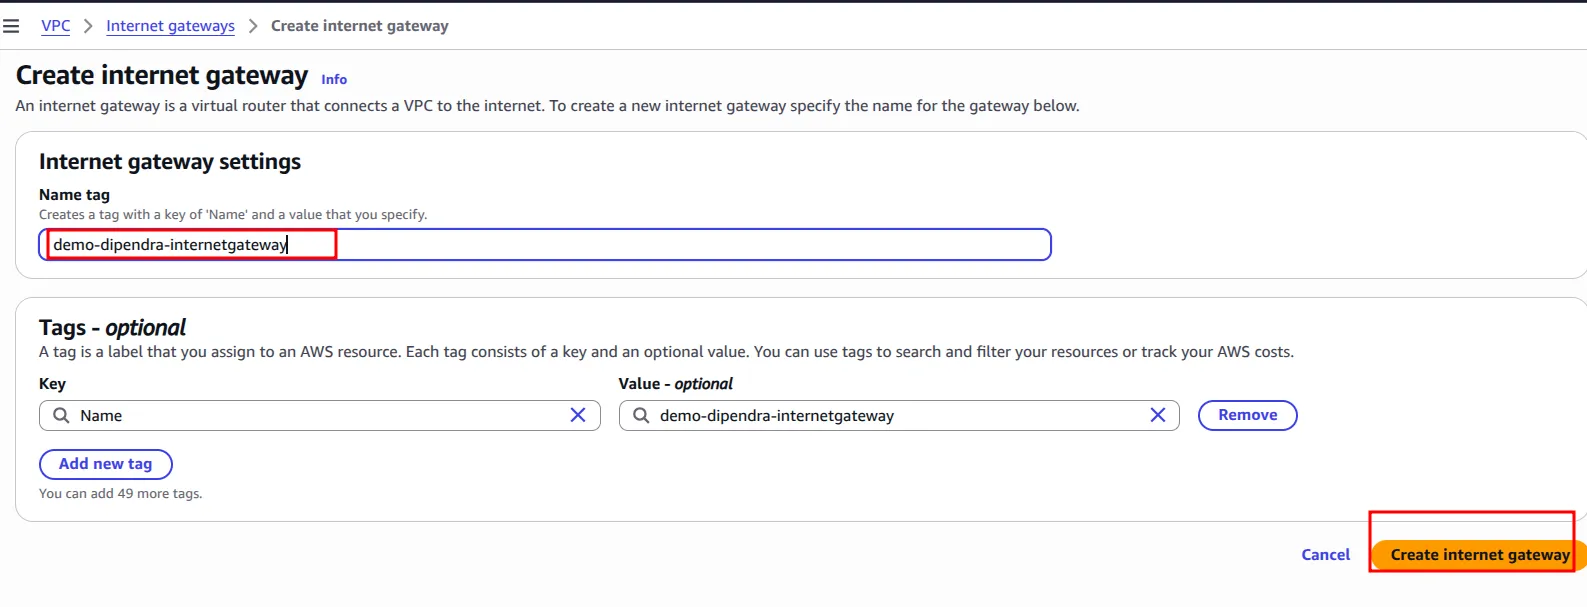
A new gateway starts in the Detached state. Select it, choose Actions → Attach to VPC, and pick your VPC.
Step 3: Create public and private subnets
Open Subnets → Create subnet and select your VPC's ID.
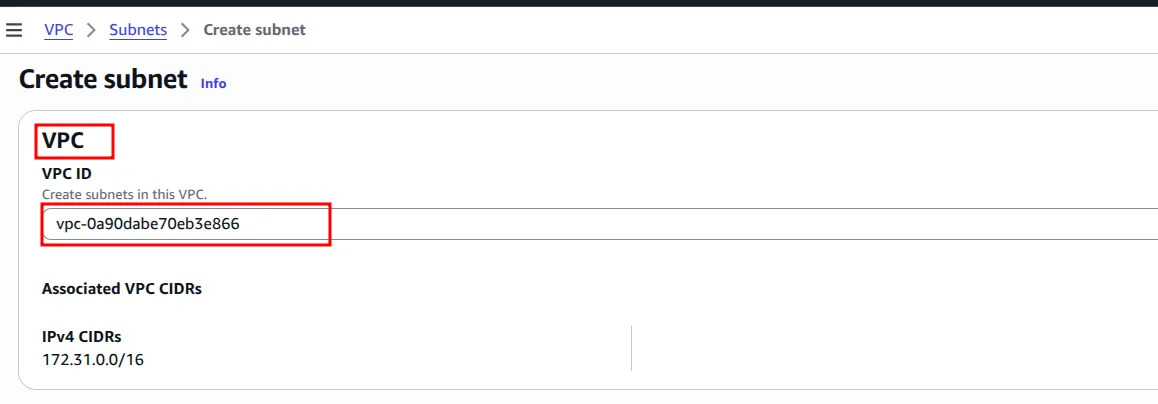
For each subnet, set a name, an Availability Zone and a CIDR block inside the VPC's range. Both subnets can be added in one form.
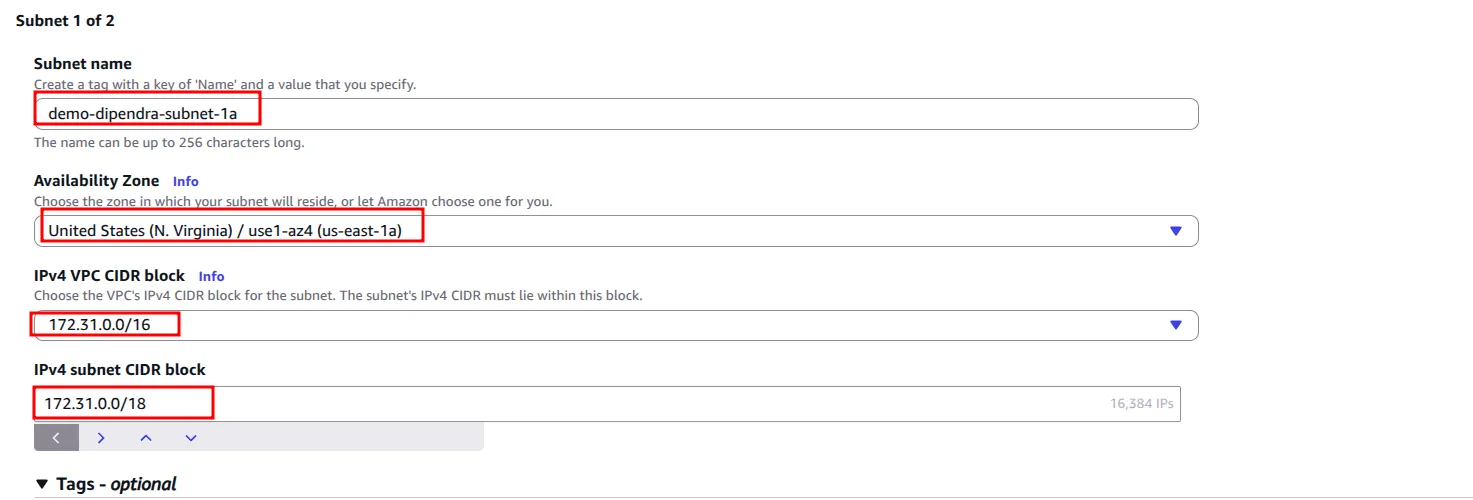
In the final setup, both subnets are in us-east-1a:
| Subnet | CIDR | Addresses |
|---|---|---|
demo-subnet-public-1a | 10.0.0.0/24 | 256, of which 251 usable |
demo-subnet-private-1a | 10.0.1.0/24 | 256, of which 251 usable |
AWS reserves 5 addresses in every subnet (the network address, the VPC router, DNS, one for future use and the broadcast address), so a /24 shows 251 available IPs. A /16 VPC has room for 256 subnets of size /24.
Step 4: Create a route table for the public subnet
Open Route tables → Create route table, give it a name, and select the VPC you created.
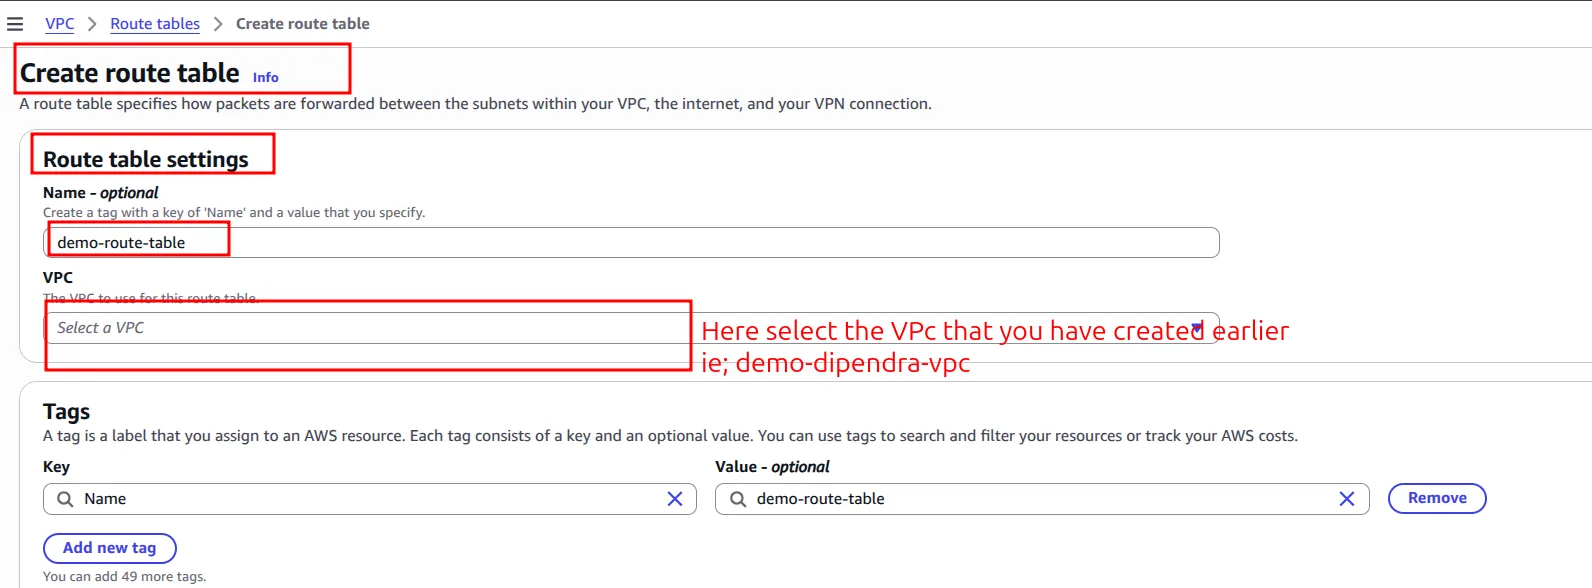
A subnet without an explicit route table association uses the VPC's main route table. Initially, both subnets use it.

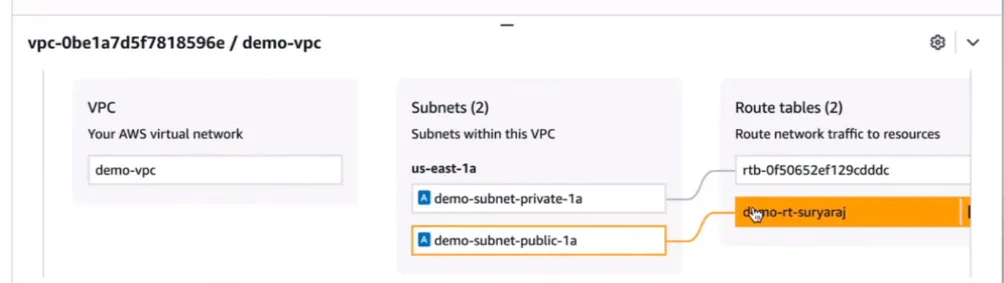
Open the new route table and choose Subnet associations → Edit subnet associations. Select only the public subnet. The private subnet stays on the main route table, which has only the local route.
The VPC resource map confirms the result: the public subnet uses the new route table, and the private subnet uses the main one.
Step 5: Launch an EC2 instance in the public subnet
In the launch wizard, open Network settings → Edit:
- VPC: the custom VPC.
- Subnet: the public subnet.
- Auto-assign public IP: Enable. New subnets in a custom VPC have this off by default.
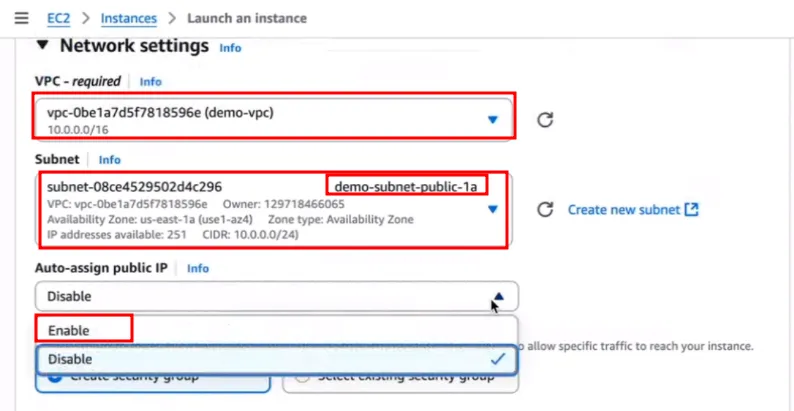
Security groups belong to a single VPC, so create a new one here that allows SSH from your IP. The remaining settings match the EC2 part of this series.
Step 6: Add the route to the internet gateway
In my lab, SSH to the new instance failed. The public subnet was associated with the route table, but the internet route was never added, so the table held only 10.0.0.0/16 → local.
Select the route table and choose Routes → Edit routes → Add route: destination 0.0.0.0/0, target Internet Gateway, then your gateway.
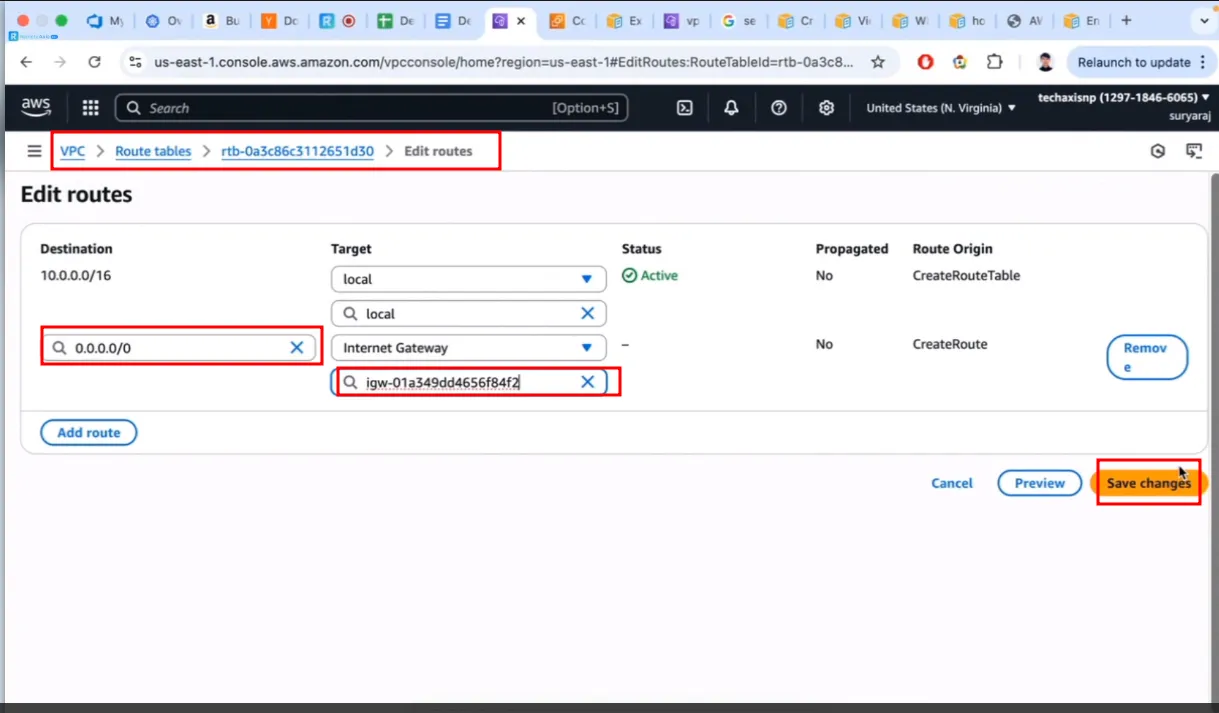
After you save the route, SSH to the instance's public IP succeeds.
Public vs private subnets in a multi-tier app
An instance's private IP is not reachable over the internet. Only resources inside the VPC, or connected to it through a VPN, can use it, which is the desired behavior for internal tiers. Consider an app with a frontend, a backend and a database:
| Tier | Who reaches it | Subnet |
|---|---|---|
| Frontend | Users on the internet | Public, with a public IP |
| Backend | Only the frontend | Private |
| Database | Only the backend | Private |
The frontend reaches the backend, and the backend reaches the database, over private IPs using the local route. Neither tier needs to be reachable from the internet, and placing both in private subnets removes that attack surface entirely.
Troubleshooting
- Instance has no public IP. Auto-assign public IP is off. Enable it on the subnet, or associate an Elastic IP.
- Instance has a public IP but SSH times out. Check these three in order: the internet gateway is attached, the subnet's route table has
0.0.0.0/0→ internet gateway, and the security group allows port 22 from your current IP. - Subnet shows a
172.31.x.xrange. It was created in the default VPC. Delete it and recreate it in the custom VPC.
Key takeaways
- A subnet is public only because of its route table:
0.0.0.0/0must point to an attached internet gateway. - An instance in a public subnet also needs a public IP, and auto-assign is off by default in custom subnets.
- Subnets without an explicit association use the main route table, so keep the main table private.
- AWS reserves 5 IPs in every subnet, so a
/24gives 251 usable addresses. - Put only internet-facing tiers in public subnets. Backends and databases belong in private subnets.
Next in this series: AWS developer tools
Keep reading
- AWS CodeBuild, CodeDeploy and CodePipeline Hands-On
Build code with AWS CodeBuild and a buildspec.yml, deploy it to an Auto Scaling group with CodeDeploy, and connect both into a pipeline with AWS CodePipeline.
- Amazon EC2 Hands-On: Launch, Scale and Monitor Instances
Launch an EC2 instance and connect over SSH, then add a launch template, an Auto Scaling group, an Application Load Balancer and a CloudWatch alarm, with fixes for common errors.
- AWS Global Infrastructure and Core Services
How AWS Regions, Availability Zones and edge locations fit together, which services are global or regional, the main storage types, and the shared responsibility model.