Distributed Build Example in Jenkins
Creating 2 VMs to know the concept of multistage distributed builds. Setting up Node in Jenkins master Setting label for Jenkins master Example 1: So first let’s run a simple pipeline in this node…

ON THIS PAGE
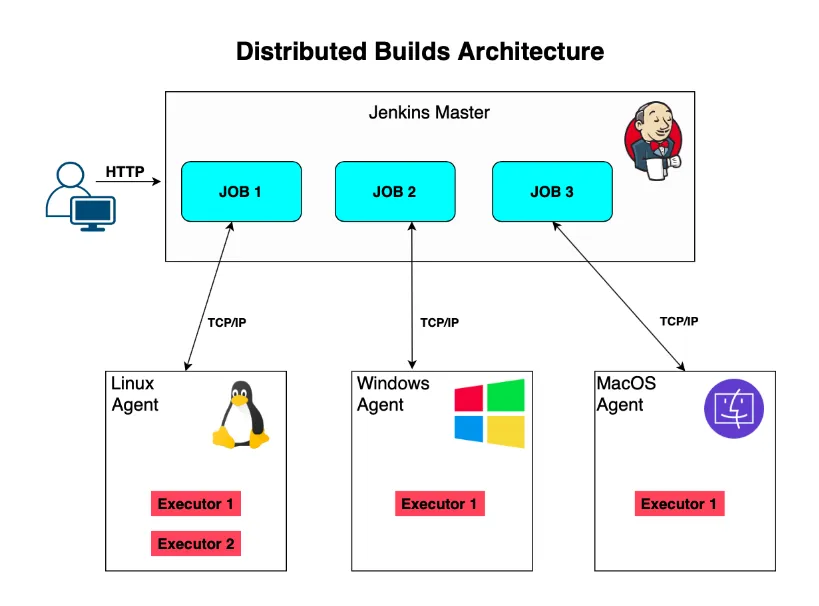
To know the concept of Jenkins distributed build we need to have on jenkins master and other executors. The jenkins master is the main machine in which jenkins server is running and nodes are the machine that will perform operations on the behalf of jenkins server.
An executor is a thread on a node that can execute a build or job. The number of executors on a node determines how many jobs can run concurrently on that node.
Lets’ understand this concept of distributed build by creating a pipeline that will build images in one executor and deploy those images in another executor.
Creating 2 VMs to know the concept of multistage distributed builds.
For this we need to install to machines. For now i am creating VM using vagrant file.
Vagrant.configure("2") do |config|

  config.vm.box = "bento/ubuntu-24.04"
  config.vm.box_version = "202502.21.0"

  config.vm.hostname = "jenkins"

  config.vm.network "private_network", ip: "192.168.56.150"

#config.vm.network "public_network", bridge: " "


  # config.vm.synced_folder "../Ubuntu24.04", "/home/ubuntu"

  # config.vm.synced_folder ".", "/vagrant", disabled: false

  config.vm.provider "virtualbox" do |vb|
  vb.name = "jenkin_vm"
  vb.memory = 4024
  vb.cpus = 4
  end
  config.vm.provision "shell", inline: <<-SHELL
    apt-get update
  #   apt-get install -y apache2
  SHELL
end- I have created two VMs using this vagrant file and need to use different “hostname, vb.name and ip address” for both machines. Changes that in above code and install the vagrant machine.
- We can also access them by using username and password for login. For example “ssh username_of_node@ipaddress_of_node” command. But for now i am using ssh-key pairs so that it would be more secure. For this:
- First generate ssh keys using command:
- ssh-keygen -t rsa
- This will generate public and private keys and now.
- Copy the keys to remote machine:
- ssh-copy-id usernameofnode@ipadressofnode
- ssh-copy-id vagrant@192.168.56.152
- ssh-copy-id usernameofnode@ipadressofnode
- First generate ssh keys using command:
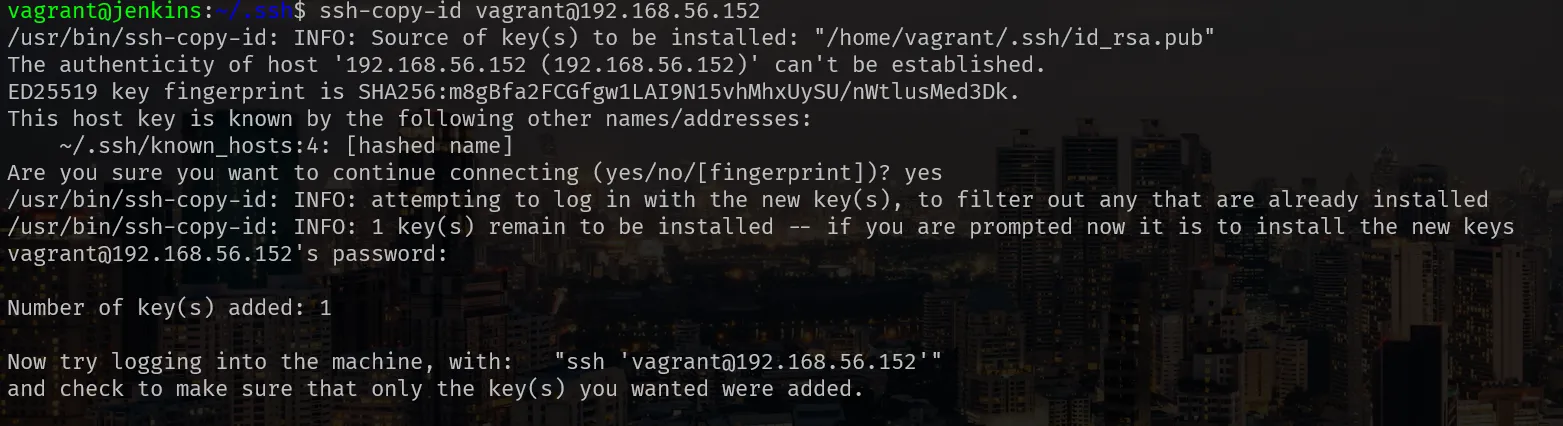
- Now we can login to the machine without using username and password.
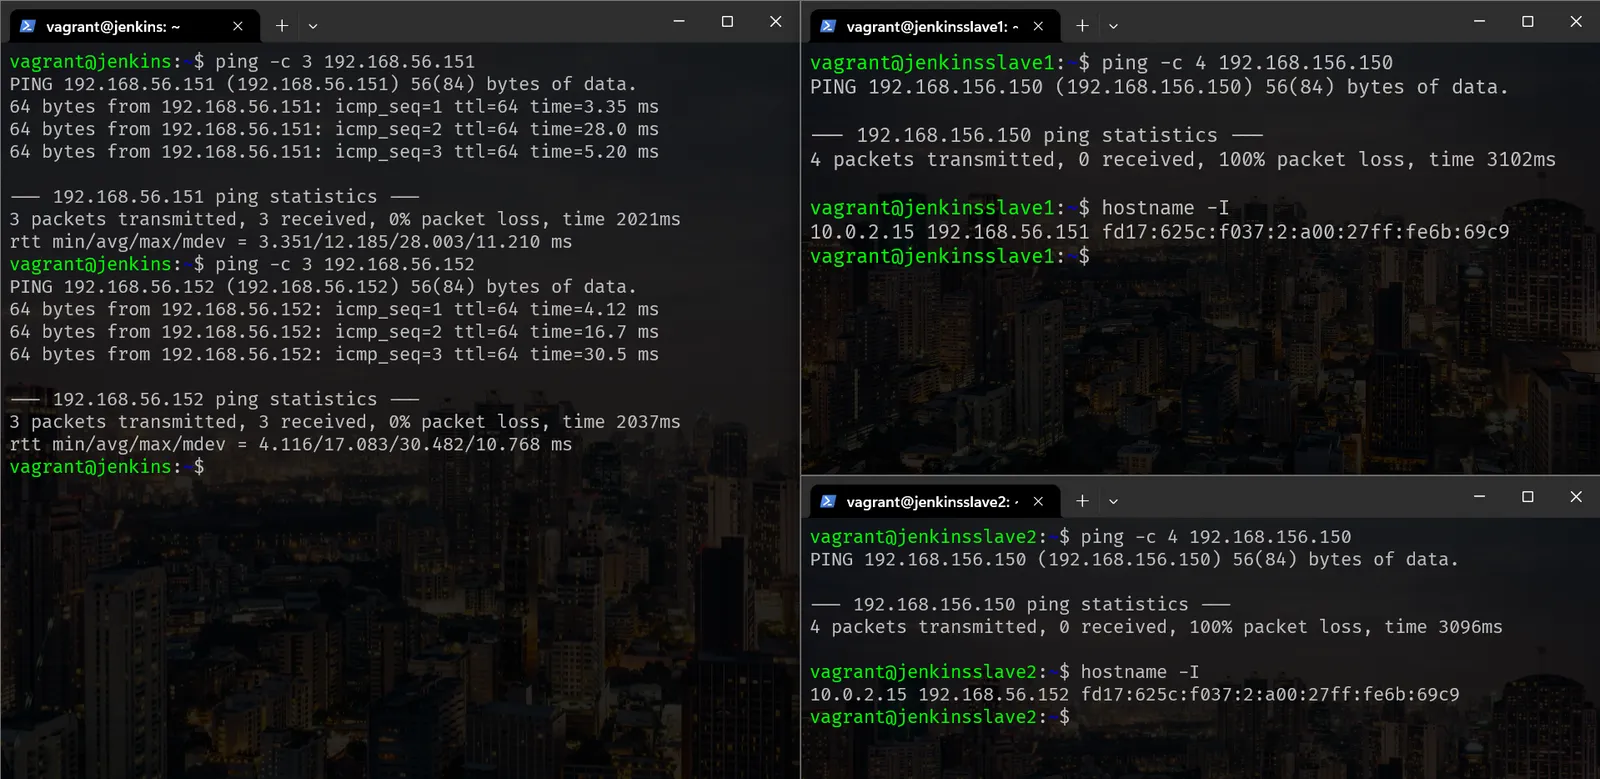
- In above picture we can see that all machines are communicating with each other well.
- After this need to install java in agent machine.
- For this you can follow the link and look for installation of java
Setting up Node in Jenkins master
- After conforming all this now let’s setup of jenkins master.
- For this open jenkins server in browser and go to
- Manage “Jenkins>>Nodes>>New node” and set node name and click the option “permanent agent”. And then create.
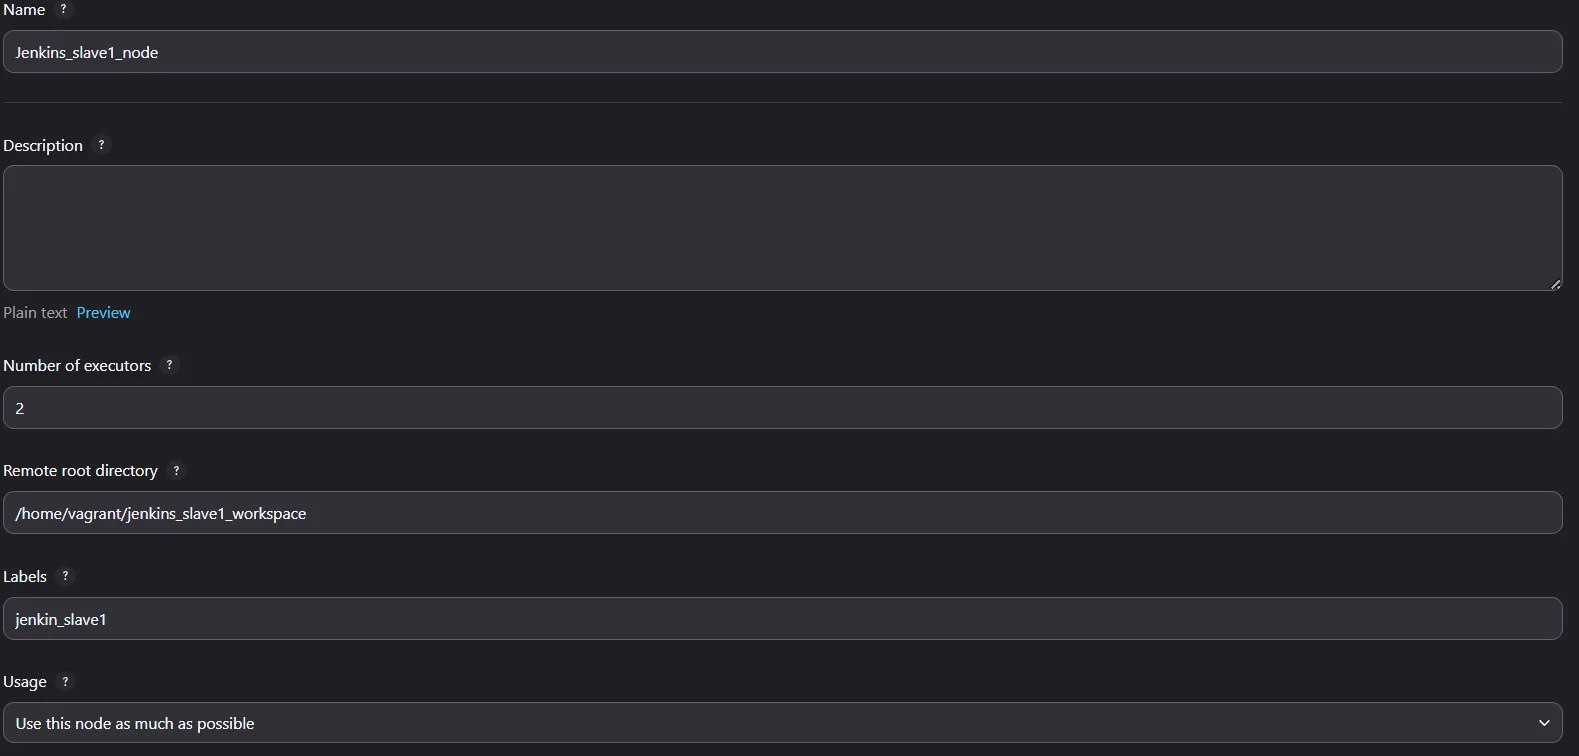
- Name
- Name of the node
- jenkin_slave1_node
- Name of the node
- Number of executors:
- Remote root directory
- For this create a directory in your slave node and paste that path here.
- /home/vagrant/jenkins_slave1_workspace
- For this create a directory in your slave node and paste that path here.
- Labels
- This label is used further code to mention node.
- jenkin_slave1
- This label is used further code to mention node.
- Usage:
- Use this node as much as possible
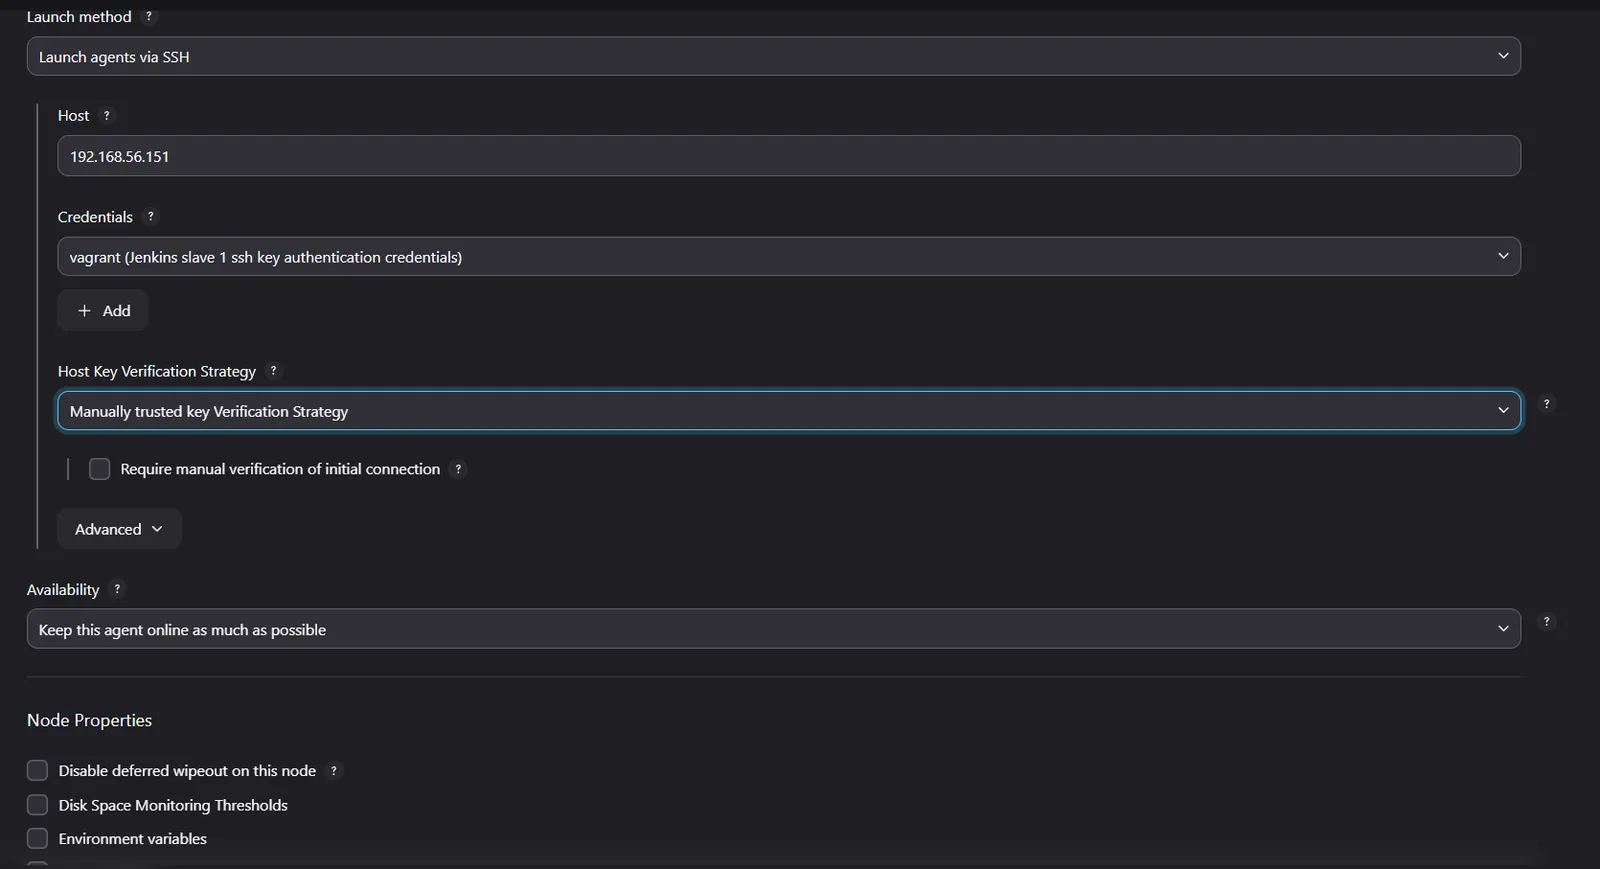
- Launch method
- For now i will use launch mode as SSH.
- Launch agents via SSH
- For now i will use launch mode as SSH.
- Host
- Ip of your worker node
- Or you can your your DNS name here
- 192.168.56.151
- Credentials
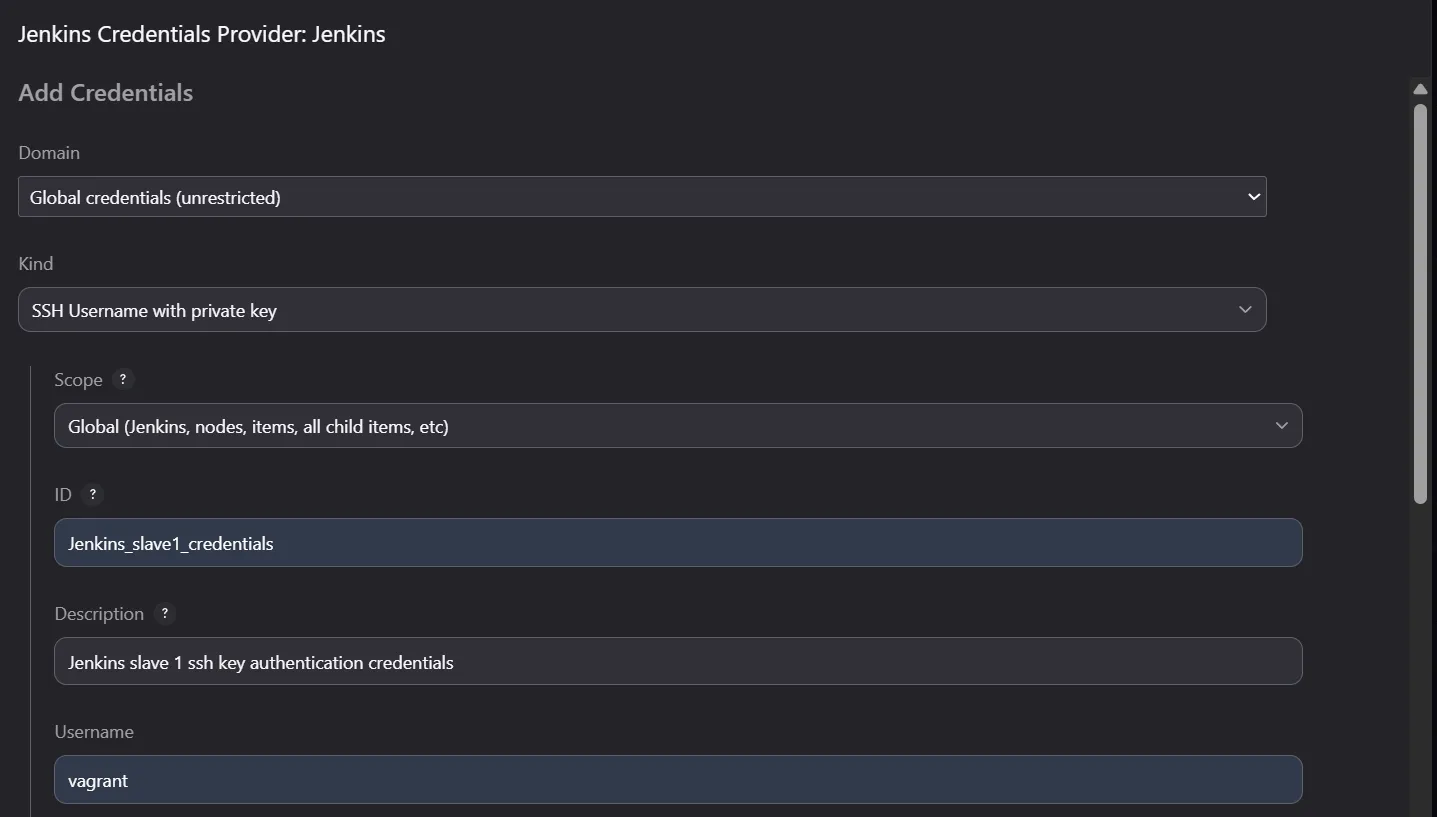
- For credentials you need to add new one. For now i have addeed ssh credentials that i have shown below.
- select kind, provide Id and description as shown in figure.
- For credentials you need to add new one. For now i have addeed ssh credentials that i have shown below.
-
Username:
- Username of the slave_node
- can see using command whoami
- Username of the slave_node
-
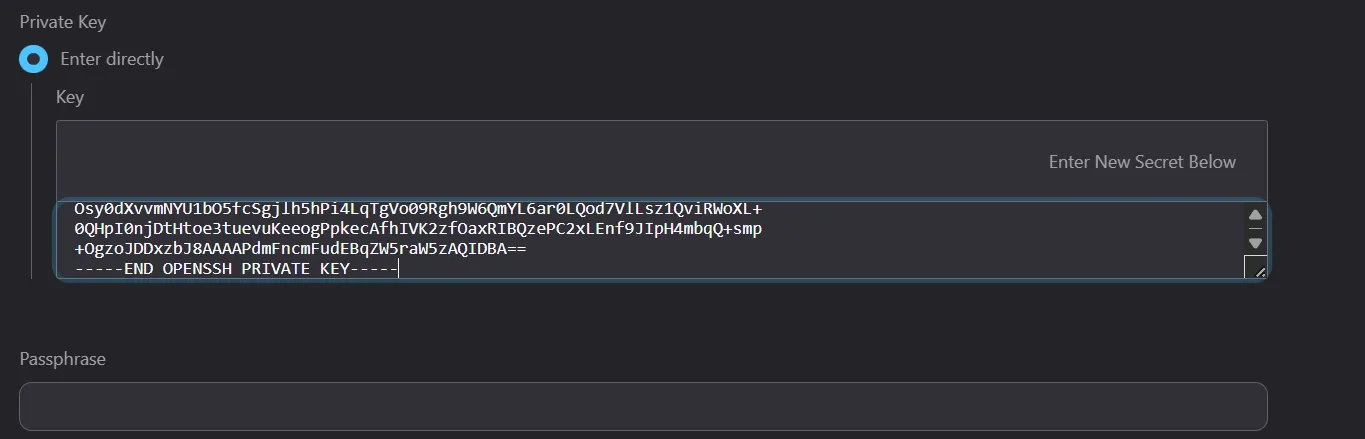
In place of private key
- Copy and paste the private key of master node directly,
-
Host Key Verification Strategy
- Manually trusted verification strategy.
-
Availability
- You can setup here based on your need.. For now i am setting
keep this agent online as much as possible.
- You can setup here based on your need.. For now i am setting
-
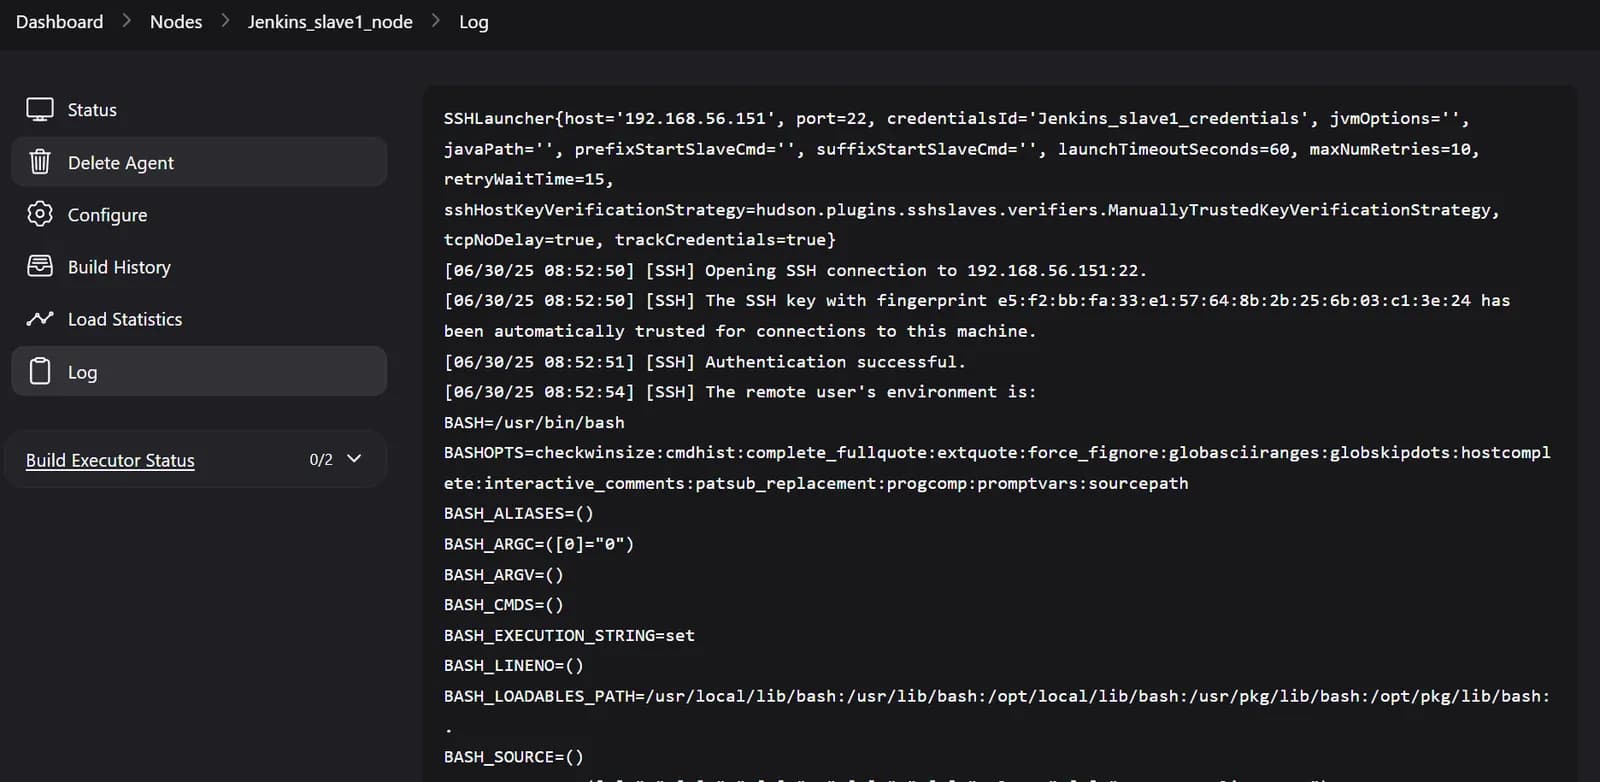
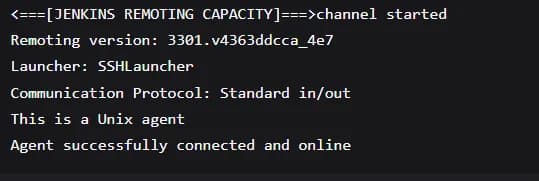
After adding all these setting you can now add the node. After adding node you can see logs like this and this means the agent is successfully added.
After setting all this let’s run simple freestyle project.
- Click new item >> Enter item name >> free-style project
- After this in general
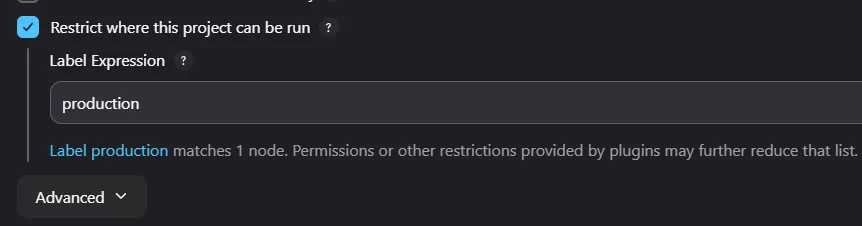
- Configure this setting and write your script and execute this. It will run now in production node instead of worker node. Small example is shown below:
#!/bin/bash
echo "Hello DevOps"
echo "$HOSTNAME"
echo $shell
whoami
date
who
df -h *Setting label for Jenkins master
- Go to manage jenkins>> Nodes>> Built-In Node
- Go to configure
- Labels:
- set label name there.
- Labels:
- Go to configure
- Now we can use this node in our pipeline but by default if any nodes are not available it will build in this node.
Examples
Example 1: So first let’s run a simple pipeline in this node
- For this let’s create a small pipeline to print from which user this script is running after that we will move to a bit complex pipeline.
- Go to new item>>select pipeline and give it a name. after that simply write a pipeline script.
pipeline {

    agent {label 'jenkin_slave1'}

    stages {
        stage('Hello') {
            steps {
                echo 'Hello World'

            }
        }
         stage('Some commands') {
            steps {
                sh '''
                date
                whoami
                hostname
                whoami
                touch hello.txt
                df -h * '''
            }
        }
    }
}- Now this script will run in “jenkin_slave1” node.
Example 2: Deploying Java app using multi distribution node.
Now let’s build implement these thing in real life code
pipeline {
    agent any

    environment {
        mydockerimage = "deependrabhatta/jenkins_data"
    }

    stages {
        stage('Compile the code') {
            agent {label "production"}
            steps {
                echo 'packaging the code'
                sh 'mvn clean package'
            }
            post {
                success {
                    echo "Archiving the Artifacts...."
                    archiveArtifacts artifacts: '**/*.war'
                }
            }
        }

         stage('Build docker image') {
            agent {label "production"}
            steps {
                echo "Building docker images'"
                sh 'docker image build -t ${mydockerimage}:${BUILD_NUMBER} .'
            }
        }
         stage('Image scanning with trivy') {
            agent {label "production"}
            steps {
                echo "Scanning image vulneriblity"
                sh 'trivy image ${mydockerimage}:${BUILD_NUMBER}'
        }
        }
         stage('Pushing docker image to dockerhub') {
            agent {label "production"}
            steps {
                echo "pushing image"
                withDockerRegistry ([credentialsId: 'jenkinsdockercred', url: '']) {
                    sh '''
                    docker push $mydockerimage:$BUILD_NUMBER
                    '''
                }
            }
        }
        stage('Deploy to devenv ') {
            agent {label "deployment"}
            steps {
                echo 'Running a Development environment'
                sh '''
                docker container stop myapp || true
                docker container rm myapp || true
                docker run -d --name myapp -p 8089:8080 ${mydockerimage}:${BUILD_NUMBER}
                '''
            }
        }
        stage('Deploy Production Environment') {
            steps {
                timeout(time:5, unit:'DAYS'){
                input message:'Approve PRODUCTION Deployment?'
                }
                echo "Running app on Prod env"
                sh '''
                docker stop mymanualdeployapp || true
                docker rm mymanualdeployapp || true
                docker run -itd --name mymanualdeployapp -p 8083:8080 $mydockerimage:$BUILD_NUMBER
                '''
            }
        }
    }
    post {
         always {
            mail to: 'animeislove1657@gmail.com',
            subject: "Job '${JOB_NAME}' (${BUILD_NUMBER}) is waiting for input",
            body: "Please go to ${BUILD_URL} and verify the build"
            cleanWs()
        }
        success {
            mail bcc: 'dipakbhatt363@gmail.com',
            body: """Hi Team,
            Build #$BUILD_NUMBER is successful, please go through the url
            $BUILD_URL
            and verify the details.
            Regards,
            DevOps Team""",
            cc: 'bhattad625@gmail.com',
            from: 'bhattad625@gmail.com',
            replyTo: '',
            subject: 'BUILD SUCCESS NOTIFICATION',
            to: 'bhattadeependra05@gmail.com'
        }
        failure {
            mail bcc: '',
            body: """Hi Team,
            Build #$BUILD_NUMBER is unsuccessful, please go through the url
            $BUILD_URL
            and verify the details.
            Regards,
            DevOps Team""",
            cc: 'dipakbhatt363@gmail.com',
            from: 'bhattad625@gmail.com',
            replyTo: 'bhattadeependra05@gmail.com',
            subject: 'BUILD FAILED NOTIFICATION',
            to: 'bhattadeependra05@gmail.com'
        }
    }
}- Here in this code i have just added two nodes one is to produce images and another is to deploy container.
- For this i have created two nodes ie;
- Production
- Deployment
- In production environment node we need to install
- Java to connect to the jenkins
- maven to package the code
- Docker to build image
- After installing docker and adding user restart jenkins server compulsory otherwise it will throw error.
- trivy to scan image
- In production we only need to install docker to deploy the code.
- To see detailed pipeline setup in single node click this button.
- All the setups are same to link i.e.; Jenkins pipeline. The only difference is in that example we are deploying all the setup is in jenkins master node but in this case we are setting up in different nodes.
Example 3: In this example i am trying to deploy a node_js application via jenkins pipeline.
- To run this setup we need the node_js code that i have in my github repo. Link. If you want to create from scratch pull main branch and for whole pipeline code see to jenkins branch.
- First clone the repo in your local machine.
- Need to create .env file in frontend
- REACT_APP_API_URL=http://192.168.56.152:5000
- config.env file in backend
- FRONTEND_DOMAIN=http://192.168.56.152:3000
- modify this line.
- Add the ip of your machine.
- FRONTEND_DOMAIN=http://192.168.56.152:3000
- Need to create .env file in frontend
- All the configuration steps are same in practice pipeline.
- Adding ssh-keypairs.
- Testing connectivity
- Installing java compulsory in both agents. Other tools like docker, trivy based on your need.
- Adding node and configuring node settings.
Now let’s move to the pipeline code
pipeline {
    agent any

    environment {
        mydockerimage = "deependrabhatta/node_js"
    }

    stages {
        stage('Write Frontend .env in production environment') {
            agent { label 'production' }
            steps {
                writeFile file: './FrontEnd/.env', text: "REACT_APP_API_URL=http://192.168.56.152:5000"
                sh "cat ./FrontEnd/.env"
            }
        }
         stage('Build docker image') {
            agent {label "production"}
            steps {
                echo "Building docker images'"
                sh "docker image build --no-cache -t ${mydockerimage}:frontend_${BUILD_NUMBER} ./FrontEnd"
                sh "docker image build --no-cache -t ${mydockerimage}:backend_${BUILD_NUMBER} ./BackEnd"
            }
        }
         stage('Image scanning with trivy') {
            agent {label "production"}
            steps {
                echo "Scanning image vulneriblity"
                sh "trivy image ${mydockerimage}:frontend_${BUILD_NUMBER} > trivy_frontend_report.txt"
                sh "trivy image ${mydockerimage}:backend_${BUILD_NUMBER} > trivy_backend_report.txt"
        }
        }
         stage('Pushing docker image to dockerhub') {
            agent {label "production"}
            steps {
                echo "pushing image to docker hub registry"
                withDockerRegistry ([credentialsId: 'jenkinsdockercred', url: '']) {
                    sh '''
                    docker push ${mydockerimage}:frontend_${BUILD_NUMBER}
                    docker push ${mydockerimage}:backend_${BUILD_NUMBER}
                    '''
                }
            }
        }
   }
}- These are the stages that i am building in my production node. For this let’s setup production environment.
- Our goal is to build docker image, scan the image and push the image from production node. For this firstly we need to install following
- Docker
- trivy
- java
- To setup docker credentials to push docker image you can refer to this link.
- Now we have pushed the image. The things we need to consider here are:
- We are building the image by using the code in git repository in which by default .env file is not pushed.
- Need to create .env file in pipeline if it is needed in build phase. In my case .env file is required in build phase that’s why i am creating with the help of pipeline in build phase.
- Build the image tag based on your docker hub repo.
- For Ex: “docker push deependrabhatta/node_js:tagname”
- Note: You can also use harbor registry as you docker registry
- We are building the image by using the code in git repository in which by default .env file is not pushed.
- Also make sure that the credentials ID for docker are are added in jenkins master node.
- After setting all these now the image will be pushed to the docker hub.
Now in deployment node
 stage('Preparing compose.env file for docker-compose.yaml ') {
            agent {label "deployment"}
            steps {
                script {
            writeFile file: 'compose.env', text: """
FRONTEND_IMAGE=${mydockerimage}:frontend_${BUILD_NUMBER}
BACKEND_IMAGE=${mydockerimage}:backend_${BUILD_NUMBER}
            """
            sh "cat compose.env"
                }
            }
        }
        stage('Write Frontend .env') {
            agent { label 'deployment' }
            steps {
                writeFile file: './FrontEnd/.env', text: "REACT_APP_API_URL=http://192.168.56.152:5000"
                sh "cat ./FrontEnd/.env"
            }
        }
        stage('Deploy to devenv ') {
            agent {label "deployment"}
            steps {
                echo 'Running a Development environment'
                sh '''
                docker compose --env-file compose.env down || true
                docker compose --env-file compose.env pull
                docker compose --env-file compose.env up -d
                '''
            }
        }
    }
    post {
        always {
            mail to: 'animeislove1657@gmail.com',
                subject: "Job '${JOB_NAME}' (${BUILD_NUMBER}) is waiting for input",
                body: "Please go to ${BUILD_URL} and verify the build"
            cleanWs()
            }
        success {
                mail bcc: 'dipakbhatt363@gmail.com',
                to: 'bhattadeependra05@gmail.com',
                cc: 'bhattad625@gmail.com',
                from: 'bhattad625@gmail.com',
                replyTo: '',
                subject: 'BUILD SUCCESS NOTIFICATION',
                body: """Hi Team,

                    Build #$BUILD_NUMBER is successful. Please review the build details at:
                    $BUILD_URL

                    Regards,
                    DevOps Team"""
                }
            failure {
                mail to: 'bhattadeependra05@gmail.com',
                cc: 'dipakbhatt363@gmail.com',
                bcc: '',
                from: 'bhattad625@gmail.com',
                replyTo: 'bhattadeependra05@gmail.com',
                subject: 'BUILD FAILED NOTIFICATION',
                body: """Hi Team,

                    Build #$BUILD_NUMBER is unsuccessful.
                    Please go through the following URL and verify the details:
                    $BUILD_URL

                    Regards,
                    DevOps Team
                    """
}- Add these code in above script and it will deploy this in deployment node.
- Here i have created “compose.env” from which i will taking environment variables during compose up command. Because each and every time we push new image to the dockerhub the name of image will be changed based on build number. So to overcome that issue i have used this approach.
services:
  frontend:
    image: "${FRONTEND_IMAGE}"
    ports:
      - "3000:80"
    env_file:
      - ./FrontEnd/.env
    networks:
      - mynetwork

  backend:
    image: "${BACKEND_IMAGE}"
    depends_on:
      - mongodb
    env_file:
      - ./BackEnd/config.env
    ports:
      - "5000:5000"
    networks:
      - mynetwork

  mongodb:
    image: mongo:4.4
    command: [--bind_ip_all]
    volumes:
      - mongo-data:/data/db

    healthcheck:
      test: mongo --eval "db.adminCommand('ping')"
      interval: 5s
      timeout: 5s
      retries: 10
    networks:
      - mynetwork

volumes:
  mongo-data:

networks:
mynetwork:- After that i have created .env file
- Now using compose.env i have deployed the containers.
Harbor Registry
pipeline {
    agent any

    environment {
        mydockerimage = "harbor.registry.local/jenkins/mylocalimage"
    }

    stages {
        stage('Write Frontend .env in production environment') {
            agent { label 'production' }
            steps {
                writeFile file: './FrontEnd/.env', text: "REACT_APP_API_URL=http://192.168.56.152:5000"
                sh "cat ./FrontEnd/.env"
            }
        }
         stage('Build docker image') {
            agent {label "production"}
            steps {
                echo "Building docker images'"
                sh "docker image build -t ${mydockerimage}:frontend_${BUILD_NUMBER} ./FrontEnd"
                sh "docker image build -t ${mydockerimage}:backend_${BUILD_NUMBER} ./BackEnd"
            }
        }
         stage('Image scanning with trivy') {
            agent {label "production"}
            steps {
                echo "Scanning image vulneriblity"
                sh "trivy image ${mydockerimage}:frontend_${BUILD_NUMBER} > trivy_frontend_report.txt"
                sh "trivy image ${mydockerimage}:backend_${BUILD_NUMBER} > trivy_backend_report.txt"
        }
        }
         stage('Pushing docker image to harbor registry') {
            agent {label "production"}
            steps {
                echo "pushing image to docker hub registry"
                withDockerRegistry ([credentialsId: 'Harborregistrycredentials', url: 'https://harbor.registry.local']) {
                    sh '''
                    docker push ${mydockerimage}:frontend_${BUILD_NUMBER}
                    docker push ${mydockerimage}:backend_${BUILD_NUMBER}
                    '''
                }
            }
        }
        stage('Preparing compose.env file for docker-compose.yaml ') {
            agent {label "deployment"}
            steps {
                script {
            writeFile file: 'compose.env', text: """
FRONTEND_IMAGE=${mydockerimage}:frontend_${BUILD_NUMBER}
BACKEND_IMAGE=${mydockerimage}:backend_${BUILD_NUMBER}
            """
            sh "cat compose.env"
                }
            }
        }
        stage('Write Frontend .env') {
            agent { label 'deployment' }
            steps {
                writeFile file: './FrontEnd/.env', text: "REACT_APP_API_URL=http://192.168.56.152:5000"
                sh "cat ./FrontEnd/.env"
            }
        }
        stage('Deploying container in devploying node ') {
            agent {label "deployment"}
            steps {
                echo 'Running a Development environment'
                sh '''
                docker compose --env-file compose.env down || true
                docker compose --env-file compose.env pull
                docker compose --env-file compose.env up -d
                '''
            }
        }
    }
    post {
        always {
            mail to: 'animeislove1657@gmail.com',
                subject: "Job '${JOB_NAME}' (${BUILD_NUMBER}) is waiting for input",
                body: "Please go to ${BUILD_URL} and verify the build"
            cleanWs()
            }
        success {
                mail bcc: 'dipakbhatt363@gmail.com',
                to: 'bhattadeependra05@gmail.com',
                cc: 'bhattad625@gmail.com',
                from: 'bhattad625@gmail.com',
                replyTo: '',
                subject: 'BUILD SUCCESS NOTIFICATION',
                body: """Hi Team,

                    Build #$BUILD_NUMBER is successful. Please review the build details at:
                    $BUILD_URL

                    Regards,
                    DevOps Team"""
                }
            failure {
                mail to: 'bhattadeependra05@gmail.com',
                cc: 'dipakbhatt363@gmail.com',
                bcc: '',
                from: 'bhattad625@gmail.com',
                replyTo: 'bhattadeependra05@gmail.com',
                subject: 'BUILD FAILED NOTIFICATION',
                body: """Hi Team,

                    Build #$BUILD_NUMBER is unsuccessful.
                    Please go through the following URL and verify the details:
                    $BUILD_URL

                    Regards,
                    DevOps Team
                    """
                }

    }
}- All the things are same as dockerhub but the things that we need to do in case of harbor registry are:
- Install certificates in all nodes including master
- Add the ip and name in /etc/hosts file if you don’t have a registered DNS name.
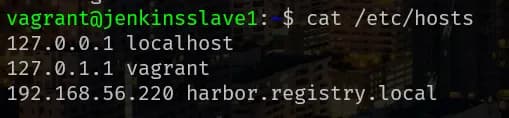
- In all nodes login using “docker login harbor.registry.local” command and provide credentials to verify whether certicates are installed correctly or not.
- To manage credentials in jenkins you can directly use “username with password” option and add username and password of harbor there.
- Need to provide URL of harbor registry in Jenkinsfile.
- withDockerRegistry ([credentialsId: ‘Harborregistrycredentials’, url: ‘https://harbor.registry.local’%5D)
- #devops
- #kubernetes
- #jenkins
- #technology
- #docker
- #ai
- #continous-integration-with-jenkins
- #jenkins-multi-distribution
- #multi-node-distribution-example
- #multi-node-distribution-explanation
Keep reading
- Github Hooks in Jenkins
🚀 Step 1: Install Required Jenkins Plugins Go to Jenkins Dashboard → Manage Jenkins → Manage Plugins. GitHub Integration GitHub Plugin Pipeline: GitHub (if not installed) Install and Restart…
- Maven, Tomcat and Jenkins simple project
In this project we are creating a maven project and deploying it with tomcat. We are building and deploying manually to see the manual steps of deploying a war file. After that we will be deploying…
- Apache web server
The Apache HTTP server, commonly known as Apache is a free and open-source web server, that delivers web content through the internet. As open-source software, its original source code is freely…