Maven, Tomcat and Jenkins simple project
In this project we are creating a maven project and deploying it with tomcat. We are building and deploying manually to see the manual steps of deploying a war file. After that we will be deploying…

ON THIS PAGE
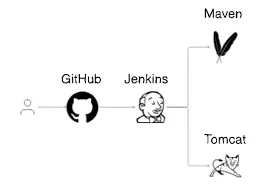
In this project we are creating a maven project and deploying it with tomcat. We are building and deploying manually to see the manual steps of deploying a war file. After that we will be deploying that file with the help of Jenkins which will automate the build and deployment process.
Maven
Apache Maven is a build tool for Java projects. Using a project object model (POM), Maven manages a project’s compilation, testing, and documentation. To build the project using maven we need to write pom.xml [It is an XML file that contains information about the project and configuration details used by Maven to build the project] file.
Build life cycle
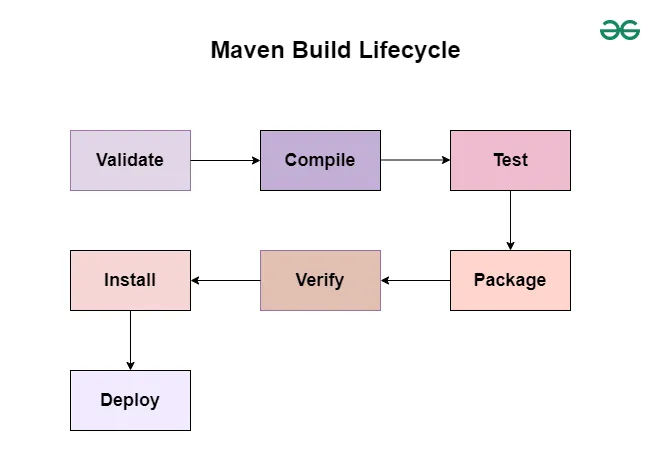
validate: Validate the project is correct and all necessary information is availablecompile: Compile the source code of the project ie; Translate the code to ML. For example pyc in python, javac in java.test: Test the compiled source code using a suitable unit testing framework. These tests should not require the code be packaged or deployedpackage: Take the compiled code and package it in its distributable format, such as a JAR or WAR.verify: Run any checks on results of integration tests to ensure quality criteria are metinstall: Install the package into the local repository, for use as a dependency in other projects locallydeploy: Done in the build environment, copies the final package to the remote repository for sharing with other developers and projects.
To Install maven
- I am currently installing maven in my Linux ubuntu machine.
- First we need to install java in our machine. Without java installed in the machine maven cannot be installed. Follow the official links to install latest java.
- After that if you are installing in Linux run the command.
sudo apt install maven
mvn –version :To check version after installation
mvn –help :To open help page
To create a small project using Maven (Manual Building and deployment process)
1.Generate the project using a Maven archetype:
mvn archetype:generate -DarchetypeArtifactId=maven-archetype-webapp
After running this you will see a prompt like:
Define value for property ‘groupId’: Dipen
Define value for property ‘artifactId’: dipendra
Define value for property ‘version’ 1.0-SNAPSHOT: v 2.0.0
Define value for property ‘package’ Dipen: war
After placing these values enter y for conformation. This will generate a pom.xml file. And also create a simple java webapp that will print hello world.
2.Now we need to add plugin
  <build>
    <finalName>dipendra_webapp</finalName>
    <plugins>
      <plugin>
        <groupId>org.apache.maven.plugins</groupId>
        <artifactId>maven-war-plugin</artifactId>
        <version>3.4.0</version>
      </plugin>
    </plugins>
</build>3.Now run mvn package command and it will create a .war file. Now to deploy this war file we will be using Apache-tomcat.
Tomcat
Apache Tomcat is free and open-source web server and Servlet container for Java code. It’s a production-ready Java development tool used to implement many types of Jakarta EE (formerly known as Java EE) specifications.
To install tomcat
- Copy the URL of latest version of tar.gz from the official link.
- Download binary distribution
- wget URL; Run this command in your Linux terminal.
- It will download the tar file so to extract the tar file run
tar xzvf filename command. - Now copy the extracted files to /opt directory.
- So if you want to start the tomcat you can simply go to the bin directory and run
- mkdir -p /opt/apache-tomcat-11.0.11-src/logs
- chown -R root:root /opt/apache-tomcat-11.0.11-src/logs
- chmod 755 /opt/apache-tomcat-11.0.11-src/logs
- ./**startup.sh :**To start the service
./shutdown.sh: To stop the service - If not we can also start and stop the service by creating service file for tomcat. For this refer to this page. How to create server file for tomcat
After creating service file and starting it we can use commands like- sudo systemctl start tomcat
sudo systemctl stop tomcat
- sudo systemctl start tomcat
- Note: .bat :used for windows
.sh: used for linux
catalina is the main process that manages the tomcat server. - Directories inside tomcat
- bin: Has scripts to shutdown or to run the services
- conf: Configuration files related to tomcat are in directory
- webapps: Code that is displayed in the browser is inside this
- If we want to deploy any services we need to place the code inside this directory.
Tomcat Configuration before deployment
- First we need to change port in conf/server.xml file. Because in my case jenkins is also running at the port 8080 and tomcat is also running at 8080. So to remove port conflicts i am changing the port for tomcat server.
<Connector port=”8081″ protocol=”HTTP/1.1″
Change port in this line. For now i am using 8081 - Then we need to add user for different roles in conf/tomcat-user.xml file. An example is shown below:
<user username=”tomcat” password=”tomcat1″ roles=”manager-gui, admin-gui”/>
<role rolename="manager-gui"/>
<role rolename="admin-gui"/>
<user username="admin" password="admin123" roles="manager-gui,admin-gui"/>-
Now change the context.xml file.
Hostmanager: /opt/apache-tomcat1/webapps/host-manager/META-INF/context.xml
Manager: /opt/apache-tomcat1/webapps/manager/META-INF/context.xmlIF you want to give access to the certain IP add the Ip there if you want to give access from any Ip you can simply remove 3 lines from the below.
<Context antiResourceLocking="false" privileged="true" >
Remove these lines
<Valve className="org.apache.catalina.valves.RemoteAddrValve"
         allow="127\.\d+\.\d+\.\d+|::1|0:0:0:0:0:0:0:1" />
  <Manager sessionAttributeValueClassNameFilter="java\.lang\.(?:Boolean|Integer|Long|Number|String)|org\.apache\.catalina\.filters\.CsrfPreventionFilter\$LruCache(?:\$1)?|java\.util\.(?:Linked)?HashMap"/>

</Context>- Note: If we are deploying multiple tomcat instances then we also need to change
- Shutdown port also in server.xml file. For example:
- Shutdown port also in server.xml file. For example:
FOR FULL ACCESS
1️⃣ Edit tomcat-users.xml (Create Full-Access User)
Open the file:
sudo nano /opt/apache-tomcat-11.0.11-src/conf/tomcat-users.xmlReplace everything (or just add inside <tomcat-users>...</tomcat-users> tags) with:
<tomcat-users>
    <!-- Full access user -->
    <role rolename="manager-gui"/>
    <role rolename="manager-script"/>
    <role rolename="manager-jmx"/>
    <role rolename="manager-status"/>
    <role rolename="admin-gui"/>
    <role rolename="admin-script"/>
    <user username="admin" password="admin123" roles="manager-gui,manager-script,manager-jmx,manager-status,admin-gui,admin-script"/>
</tomcat-users>This user now has all roles available.
2️⃣ Allow Remote Access to Manager & Host-Manager Apps
Tomcat by default restricts Manager and Host Manager to localhost.
You need to update both context.xml files:
a) Manager App
sudo nano /opt/apache-tomcat-11.0.11-src/webapps/manager/META-INF/context.xmlComment out <Valve> like this:
<Context antiResourceLocking="false" privileged="true">
    <!-- <Valve className="org.apache.catalina.valves.RemoteAddrValve"
           allow="127\.\d+\.\d+\.\d+|::1|0:0:0:0:0:0:0:1" /> -->
</Context>b) Host Manager App
sudo nano /opt/apache-tomcat-11.0.11-src/webapps/host-manager/META-INF/context.xmlDo the same:
<Context antiResourceLocking="false" privileged="true">
    <!-- <Valve className="org.apache.catalina.valves.RemoteAddrValve"
           allow="127\.\d+\.\d+\.\d+|::1|0:0:0:0:0:0:0:1" /> -->
</Context>3️⃣ Restart Tomcat
cd /opt/apache-tomcat-11.0.11-src/bin
./shutdown.sh
./startup.shTo deploy the app using Tomcat
- After configuring all this now we need to copy the .war file that we have generated using mvn package command to this path /opt/tomcat/web-apps. It will automatically extract the .war file and simply creates a directory without .war extension.
- After copying this we can now see the app in browser inside manager app with the name of **.war filename. If war file name is dipen.war then in manager app it can be seen as dipen.
- If we want to access the app directly when browsing tomacat. For example: http://192.168.56.150:8085/ like using this then we need to
- Remove the ROOT in webapps directory
- Rename the project name with ROOT.
- After that when we browse to tomcat URL we will directly see the page.
Now using Jenkins freestyle project
- We should need to install tomcat and maven in machine manually.
- If we are deploying multiple tomcat instances then need to set ports in server.xml file. [Installation and setup process is similar to manual process]
- Need to add manager-script user when we are deploying using Jenkins.
Now step by step process to build and deploy using Jenkins.
To build .war file and archive the artifact
- First push the code to you GitHub and copy the URL form there and place it in the source code management section. If it is public repo then provide credentials. If public then leave as it is. After that specify the branch of the git.
- Now in build steps.
- Invoke top-level maven target:
- Goals: Clean package ;First clean the existing package then create a new one
- Advanced:
- POM: Path to the POM file. If the file is in the current directory then we don’t need to specify path. If not then we need to specify the path.
- Invoke top-level maven target:
- Post-Build actions:
- Now to archieve the artifact so that we can we it later or can copy it we are setting post actions after build
- Archieve the atifact
- **/*.war <<Will archieve the .war extension file from project directory which is in the workspace>>
- Archieve the atifact
- Now to archieve the artifact so that we can we it later or can copy it we are setting post actions after build
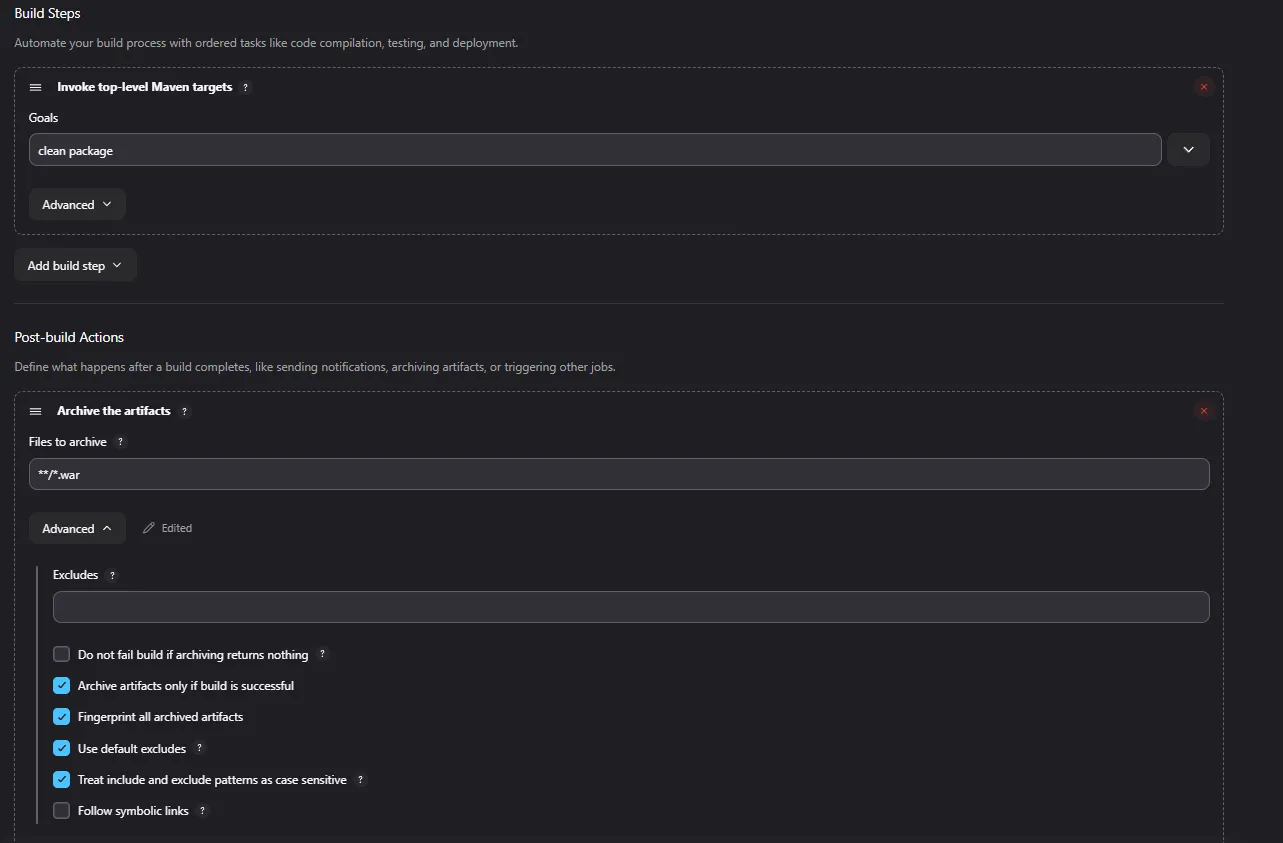
- This will create a .war artifact after build is successful.
To deploy the war file that we have created.
- First install the plugins through the Manage Jenkins > Plugins page
1.copy artifact
2.deploy to container
After installing the plugins restart the Jenkins
sudo systemctl restart jenkins - Create a freestyle project
Build step: Need to copy artifact
Post-Build: Need to deploy to war/ear container.
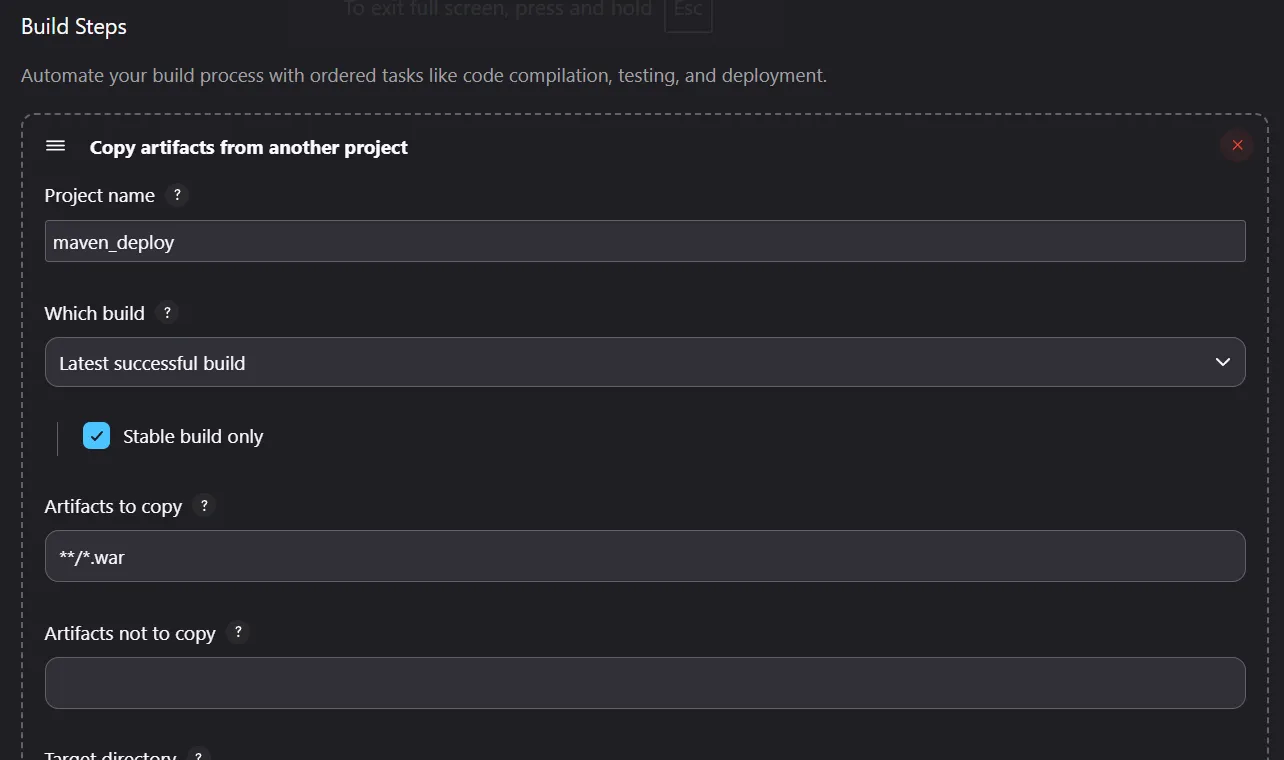
Here maven_deploy is the project name in which we have build the war file.
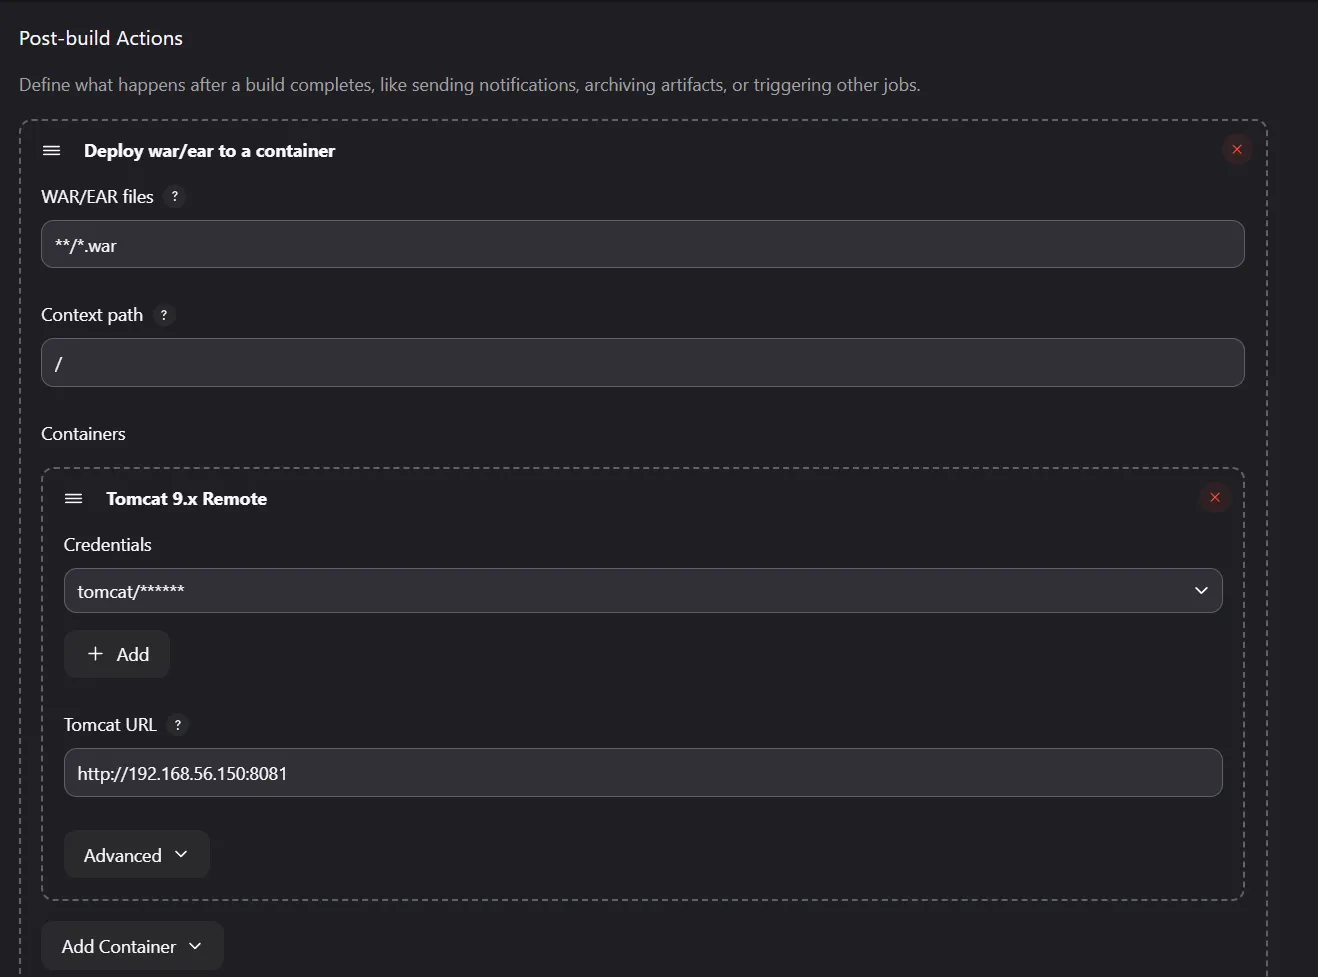
- Here context path is defining inside webapps in which we have to build the project. If we use / then it will replace ROOT inside the webapps directory.
If we provide name example [myapp] or leave it blank it will not overwrite the root and create another directory for the project and deploy that. If we use myapp here it will create myapp.war file and deploy that.
In this case we need to specify the path along with name to browse. For example: http://192.168.56.150:8081/myapp/ - Configure the settings provided in the image.
- For credentials:
- Click on add
- Kind: Username with password
- Username: Username of manager-script
- password: Password of manager-script
- Id: Create a ID {To uniquely identify it}
- Description {Necessary}
- Now you can drag it from the top.
- Click on add
- After setting this all click save and deploy.
Now we can access the website or content of war file from the tomcat-url.
Instead of manually building the project we can also deploy this project by setting up upstream and downstream project. Foe example after creating war file we can trigger the another project to build.
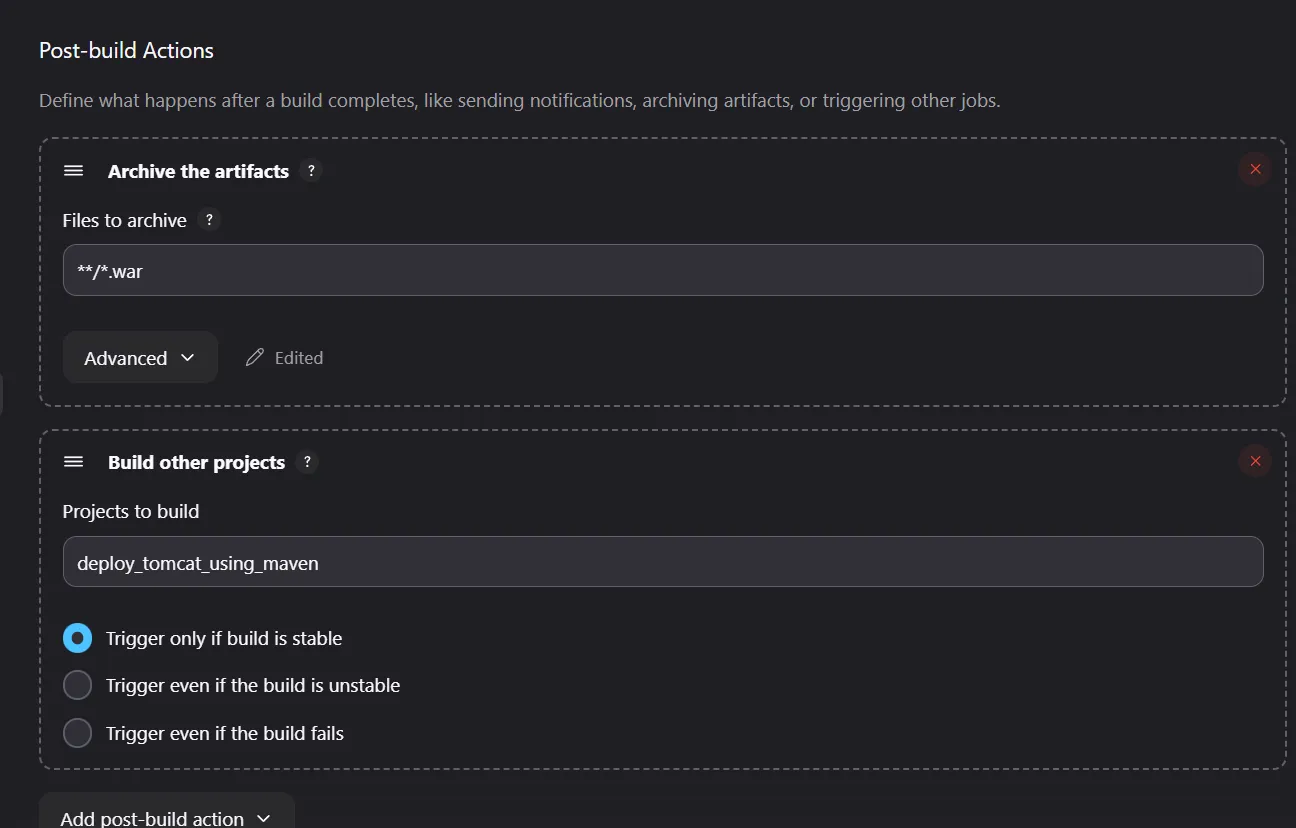
We need to add this post-build action in the project in which we have build .war file and archive that artifact.
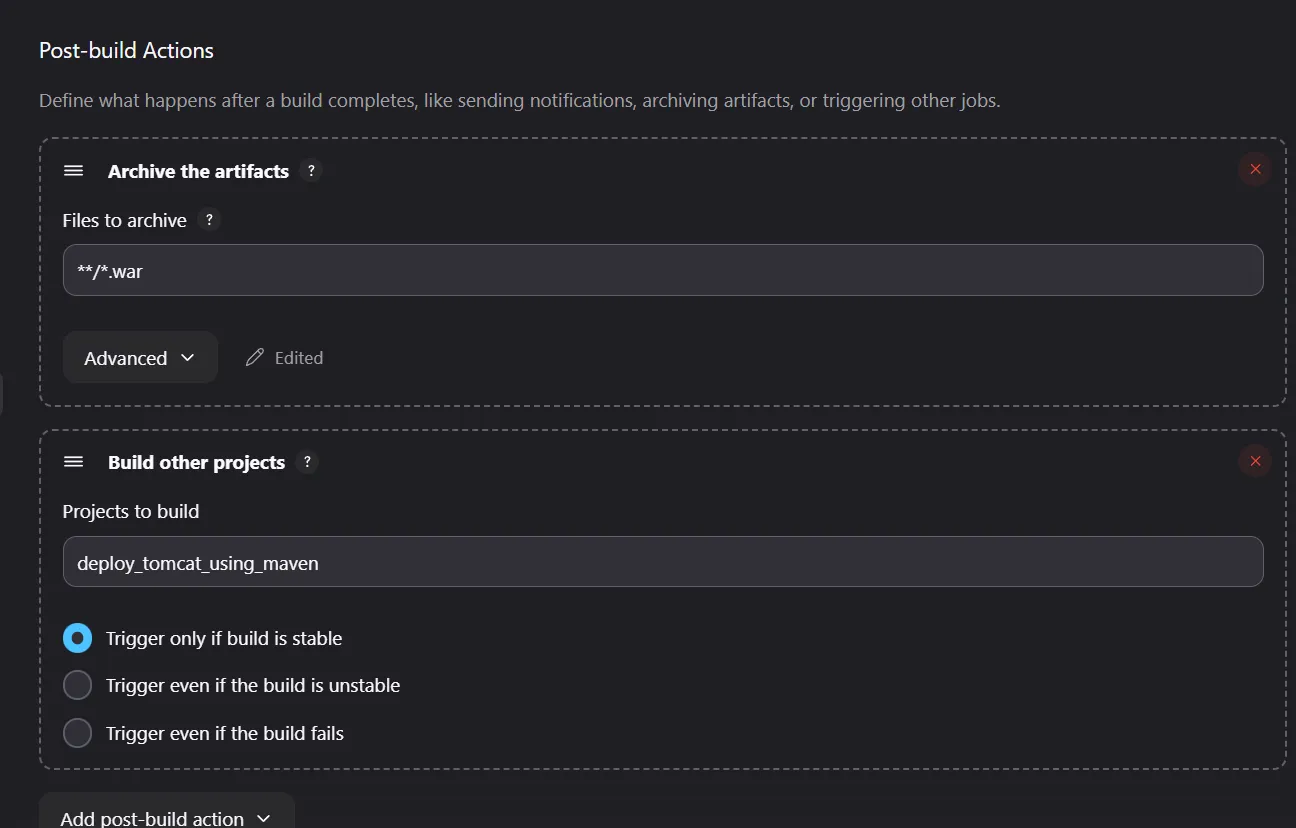
Now it will trigger the deployment project after the build is stable.
If we want to Deploy the project manually then we can use Build pipeline plugin.
- First install the Build pipeline plugin.
- In post build action we can use Build another project [Manual step].
- So after adding this downstream job will be added but if we want to build this project we need to build it manually.
- It will not trigger automatically.
Using pipeline
Keep reading
- Github Hooks in Jenkins
🚀 Step 1: Install Required Jenkins Plugins Go to Jenkins Dashboard → Manage Jenkins → Manage Plugins. GitHub Integration GitHub Plugin Pipeline: GitHub (if not installed) Install and Restart…
- Distributed Build Example in Jenkins
Creating 2 VMs to know the concept of multistage distributed builds. Setting up Node in Jenkins master Setting label for Jenkins master Example 1: So first let’s run a simple pipeline in this node…
- GITHUB Actions
From Zero to Deploy: Building a MERN Stack CI/CD Pipeline with GitHub Actions Continuous Integration (CI) and Continuous Deployment (CD) have become essential pillars of modern software development…