SonarQube
Installation To install sonarqube you can simply use this script. After installing this you can simply browse this machine in the ip address of the machine and the port 9000. This is the home page of…

ON THIS PAGE
Installation
To install sonarqube you can simply use this script.
#!/bin/bash
set -e

echo "=== SonarQube Installation Started ==="

# Backup configs
cp /etc/sysctl.conf /root/sysctl.conf_backup
cp /etc/security/limits.conf /root/sec_limit.conf_backup

# Kernel tuning (no ulimit here)
cat <<EOT> /etc/sysctl.conf
vm.max_map_count=262144
fs.file-max=65536
EOT
sysctl -p

# User limits
cat <<EOT> /etc/security/limits.conf
sonarqube   -   nofile   65536
sonarqube   -   nproc    4096
EOT

# Install Java 17
apt-get update -y
apt-get install openjdk-17-jdk wget curl unzip -y

# Check Java
java -version

# Install PostgreSQL
wget -q https://www.postgresql.org/media/keys/ACCC4CF8.asc -O - | apt-key add -
sh -c 'echo "deb http://apt.postgresql.org/pub/repos/apt/ $(lsb_release -cs)-pgdg main" >> /etc/apt/sources.list.d/pgdg.list'
apt-get update -y
apt-get install postgresql postgresql-contrib -y
systemctl enable postgresql
systemctl start postgresql

# Configure PostgreSQL
sudo -u postgres psql -c "CREATE USER sonar WITH ENCRYPTED PASSWORD 'admin123';"
sudo -u postgres psql -c "CREATE DATABASE sonarqube OWNER sonar;"
sudo -u postgres psql -c "GRANT ALL PRIVILEGES ON DATABASE sonarqube TO sonar;"

# Install SonarQube
mkdir -p /opt
cd /opt
curl -O https://binaries.sonarsource.com/Distribution/sonarqube/sonarqube-25.9.0.112764.zip
unzip -o sonarqube-25.9.0.112764.zip
mv sonarqube-25.9.0.112764 sonarqube

# Create SonarQube user
groupadd sonar || true
useradd -c "SonarQube - User" -d /opt/sonarqube/ -g sonar sonar || true
chown -R sonar:sonar /opt/sonarqube

# Configure SonarQube DB connection
cp /opt/sonarqube/conf/sonar.properties /root/sonar.properties_backup
cat <<EOT> /opt/sonarqube/conf/sonar.properties
sonar.jdbc.username=sonar
sonar.jdbc.password=admin123
sonar.jdbc.url=jdbc:postgresql://localhost/sonarqube
sonar.web.host=0.0.0.0
sonar.web.port=9000
sonar.web.javaAdditionalOpts=-server
sonar.search.javaOpts=-Xmx512m -Xms512m -XX:+HeapDumpOnOutOfMemoryError
sonar.log.level=INFO
sonar.path.logs=logs
EOT

# Create systemd service
cat <<EOT> /etc/systemd/system/sonarqube.service
[Unit]
Description=SonarQube service
After=syslog.target network.target

[Service]
Type=simple
User=sonar
Group=sonar
ExecStart=/opt/sonarqube/bin/linux-x86-64/sonar.sh console
Restart=always
LimitNOFILE=65536
LimitNPROC=4096

[Install]
WantedBy=multi-user.target
EOT

systemctl daemon-reload
systemctl enable sonarqube
systemctl start sonarqube

# Wait until SonarQube is up
echo "=== Waiting for SonarQube to start (this may take 1–3 minutes) ==="
until curl -s http://127.0.0.1:9000 > /dev/null; do
  sleep 10
  echo "Still starting..."
done
echo "SonarQube is now running!"

# Install Nginx reverse proxy
apt-get install nginx -y
rm -f /etc/nginx/sites-enabled/default /etc/nginx/sites-available/default
cat <<EOT> /etc/nginx/sites-available/sonarqube
server {
    listen      80;
    server_name _;

    access_log  /var/log/nginx/sonar.access.log;
    error_log   /var/log/nginx/sonar.error.log;

    proxy_buffers 16 64k;
    proxy_buffer_size 128k;

    location / {
        proxy_pass  http://127.0.0.1:9000;
        proxy_next_upstream error timeout invalid_header http_500 http_502 http_503 http_504;
        proxy_redirect off;

        proxy_set_header    Host            \$host;
        proxy_set_header    X-Real-IP       \$remote_addr;
        proxy_set_header    X-Forwarded-For \$proxy_add_x_forwarded_for;
        proxy_set_header    X-Forwarded-Proto http;
    }
}
EOT

ln -s /etc/nginx/sites-available/sonarqube /etc/nginx/sites-enabled/sonarqube
systemctl enable nginx
systemctl restart nginx

# Firewall rules
ufw allow 80,9000,9001/tcp || true

# Get server IP
SERVER_IP=$(hostname -I | awk '{print $2}')

echo "======================================================"
echo " SonarQube installation completed successfully!"
echo " Access it via:  http://$SERVER_IP:9000/"
echo " Default login: admin / admin"
echo "======================================================"- After installing this you can simply browse this machine in the ip address of the machine and the port 9000.
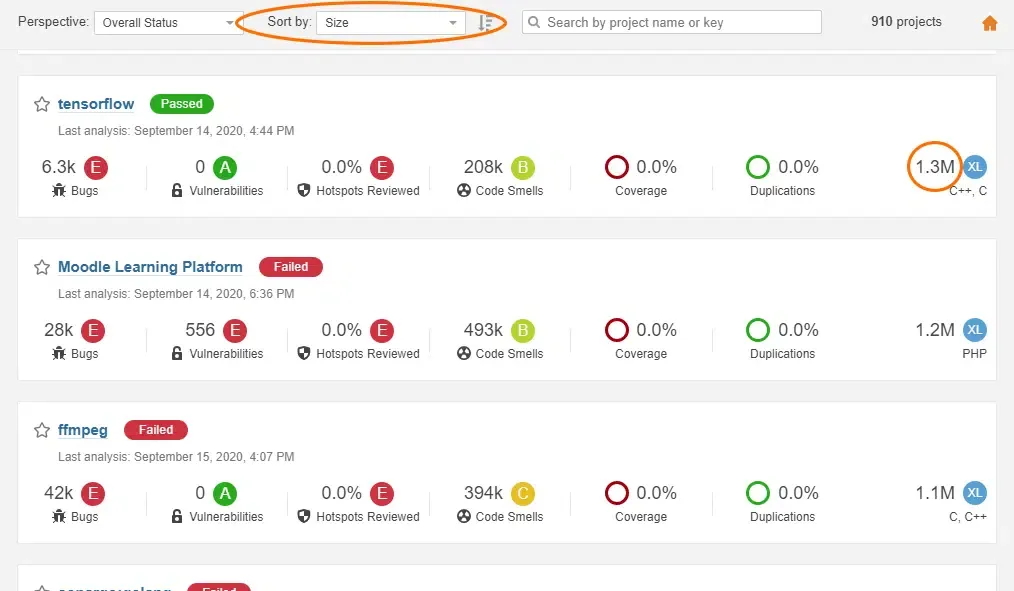
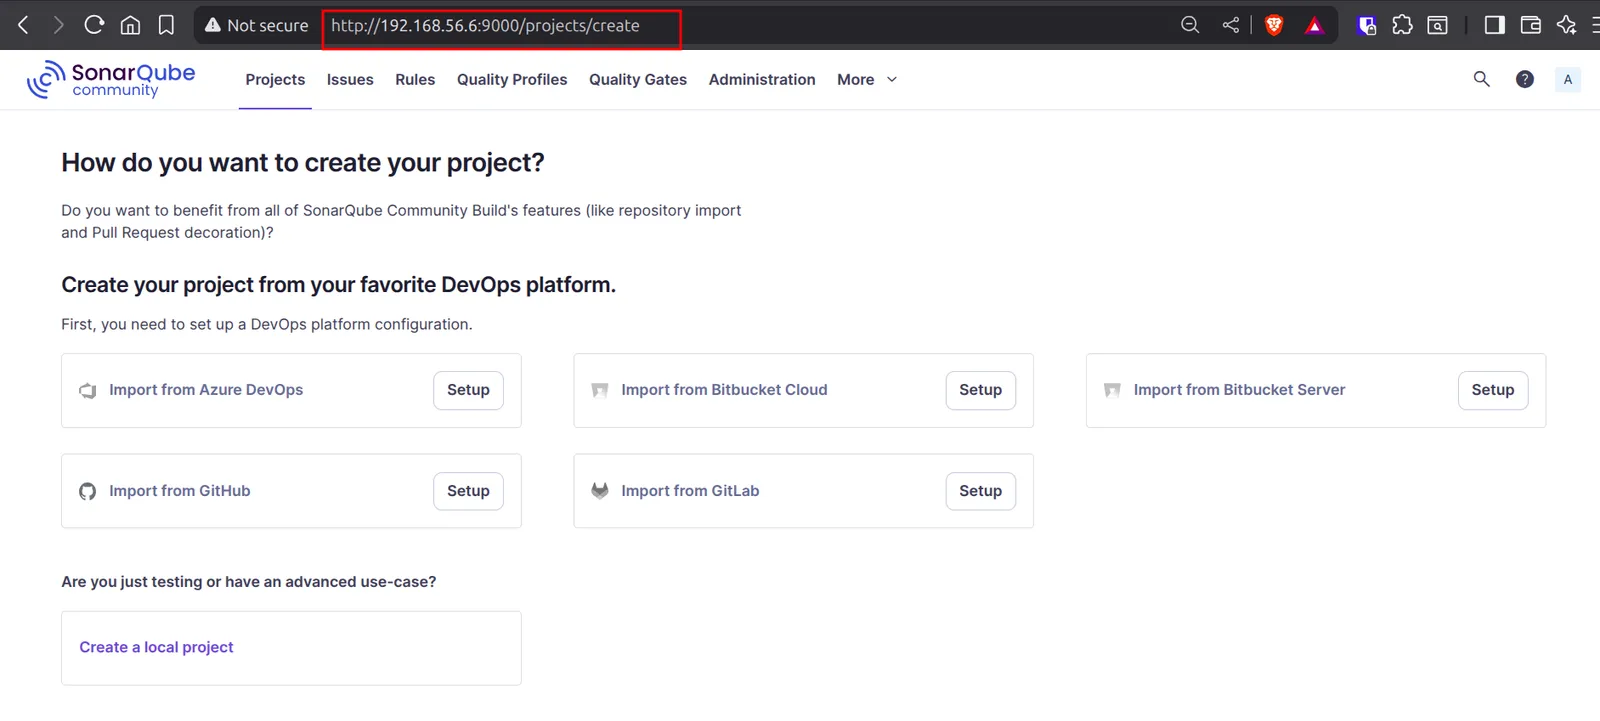
This is the home page of sonarqube server.
Quality Gates
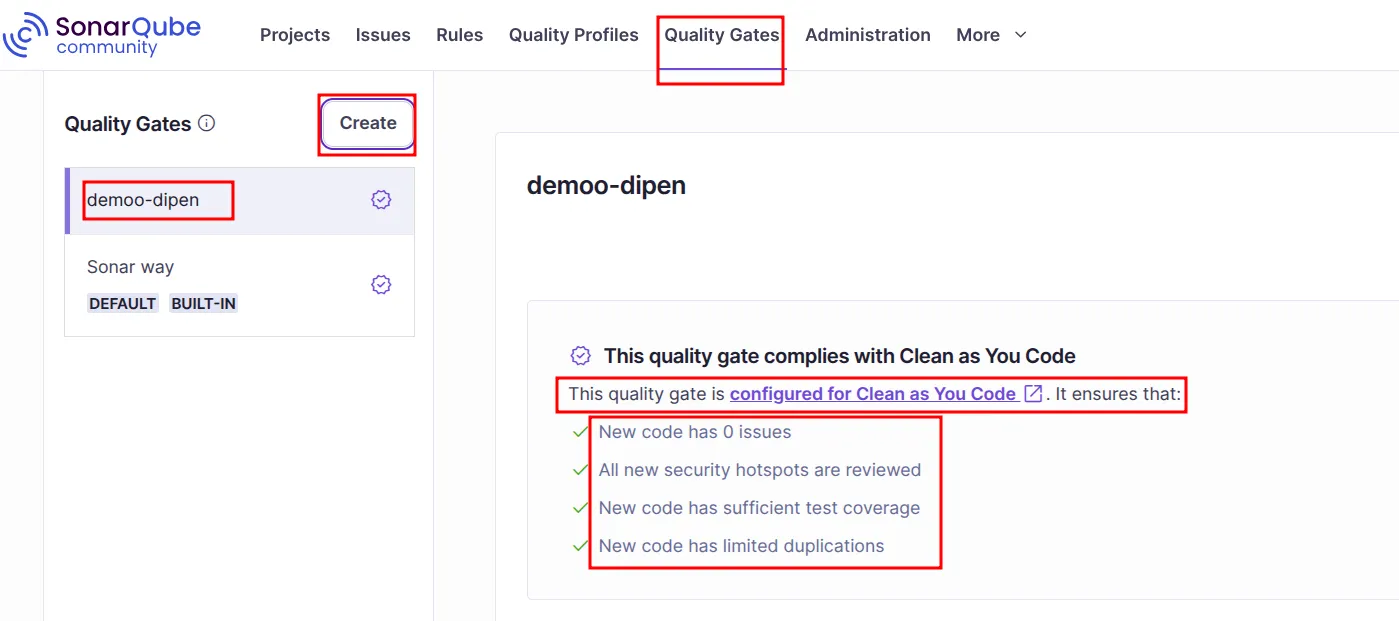
A Quality Gate is a set of conditions that determine whether your project’s code meets the defined quality standards. It acts as a checkpoint in the CI/CD pipeline: if the project fails the quality gate, it should not proceed to release.
✨ Key Parameters You Can Control
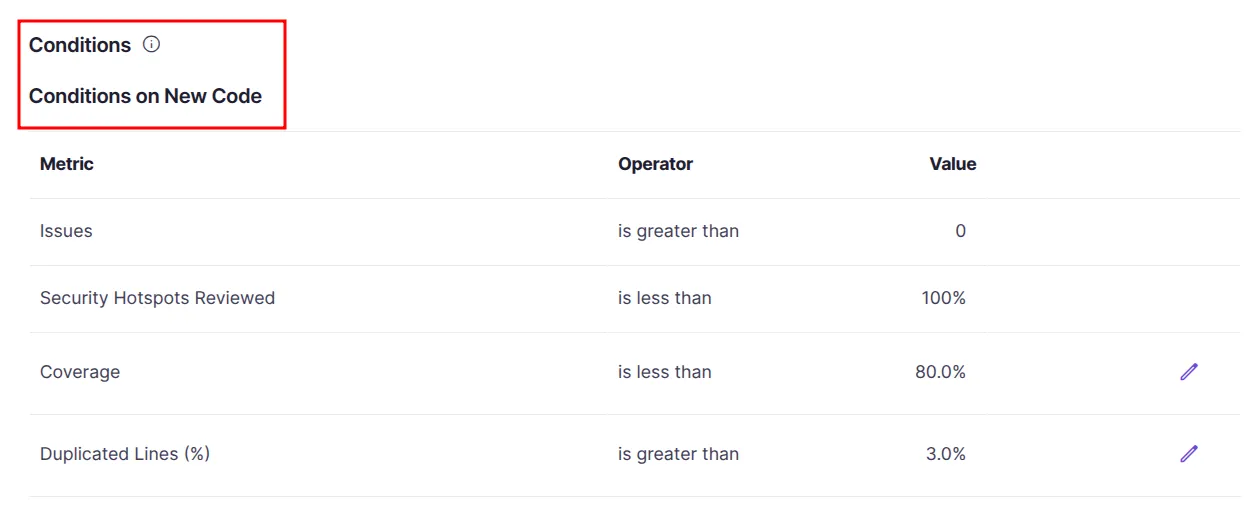
- Issues
- Bugs → Logic errors or code that could cause malfunction.
- Vulnerabilities → Security weaknesses that attackers can exploit.
- Code Smells → Maintainability issues that make code harder to read, modify, or extend.
- Security Hotspots
- Areas in the code that may not be vulnerabilities immediately but require manual review (e.g., authentication logic, data encryption, or SQL queries).
- Developers must confirm if they are safe or if changes are needed.
- Coverage
- Percentage of code covered by unit tests.
- Helps ensure critical logic is tested.
- Typical condition: “Coverage on New Code ≥ 80%”.
- Duplications
- Measures code duplication (copy-paste blocks).
- High duplication → harder maintenance and more bugs.
- Example condition: “Duplicated Lines on New Code ≤ 3%”.
- Maintainability Rating
- Ranks code quality from A (very good) → E (very poor).
- Based on code smells and technical debt.
- Reliability Rating
- Based on bugs detected.
- Example condition: “Reliability Rating on New Code = A”.
- Security Rating
- Based on vulnerabilities.
- Example condition: “Security Rating on New Code = A”.
🛠️ Customization of Quality Gates
- SonarQube ships with a default Quality Gate called Sonar way.
- Administrators can:
- Create custom gates for their organization.
- Set thresholds (e.g., “Code Coverage ≥ 70%” instead of 80%).
- Apply different gates to different projects.
- CI/CD pipelines can be configured to fail builds if the quality gate fails.
Administration
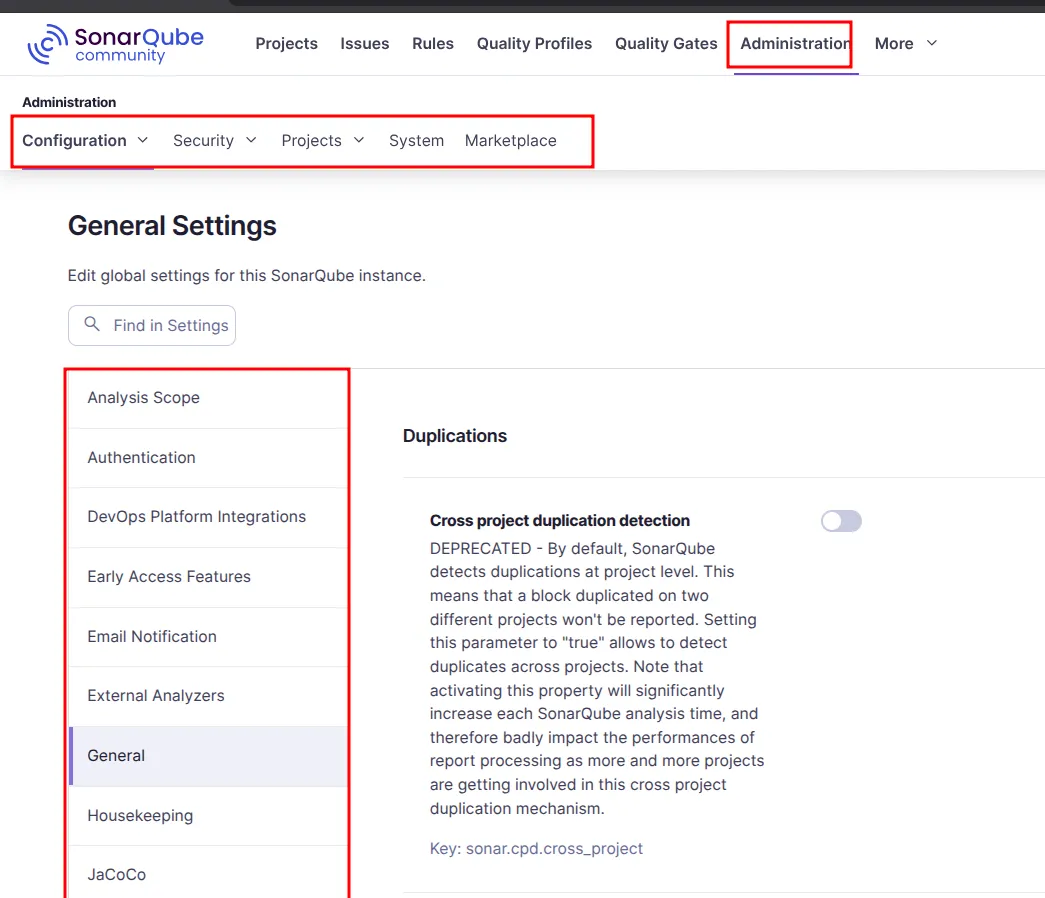
- Users & Security
- Create, edit, and delete users.
- Manage groups and assign roles (Admin, Project Admin, User).
- Configure authentication (LDAP, SAML, GitHub, GitLab, Azure AD, etc.).
- Permissions
- Fine-grained control over what different users/groups can access.
- Example: only specific groups can administer projects.
- Projects
- Configure project settings (visibility: public/private).
- Assign Quality Gates and Quality Profiles to projects.
- Manage project analysis history and clean up old data.
- Quality Gates
- Create and edit custom Quality Gates.
- Set a default gate for all projects.
- Apply different gates per project if required.
- Quality Profiles
- Define the set of rules used during analysis.
- For example, a Java project can use a stricter profile than a JavaScript project.
- Multiple profiles can exist per language.
- Plugins / Marketplace
- Extend SonarQube with new rules and integrations.
- Example: integration with Checkstyle, FindBugs, PMD, or commercial plugins.
- System Settings
- Database connections, logging level, memory settings.
- Email server configuration (SMTP) for notifications.
- Webhooks to notify CI/CD tools.
- Monitoring
- Access logs and system information.
- Track system health and background task performance.
- Useful for debugging failed analyses.
Integrating With Jenkins
We have two main things in sonarqube architecture
-
SonarQube Server
- The main application that hosts the web dashboard, stores analysis results, and applies quality gates.
- Runs as a service (with database + Elasticsearch).
- Provides the UI for viewing issues, coverage, duplications, and metrics.
- Acts as the central brain of the system.
- 👉 Think of it as the “control center” where all code quality data is stored and managed.
-
SonarQube Scanner
- A client tool used to analyze source code and send the results to the SonarQube Server.
- Runs during builds or CI/CD pipelines (e.g., Jenkins, GitLab, GitHub Actions).
- Scans code for issues, coverage, vulnerabilities → then uploads the report to the server.
- 👉 Think of it as the “agent” that inspects your code and reports back to the server.
-
HERE
- We are installing scanner in the machine where CI/CD build is done. For this we need to install a plugin first.
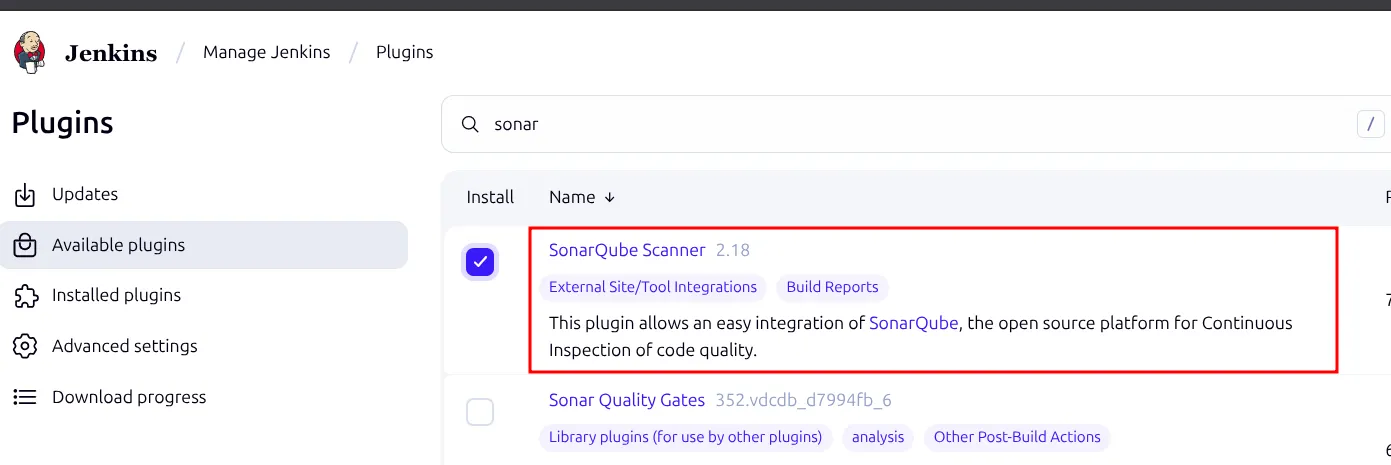
Now we need to configure tools. We are installing the sonarqube scanner with the help of jenkins. Fill the things as shown in the figure below. Apply and save the configuration.
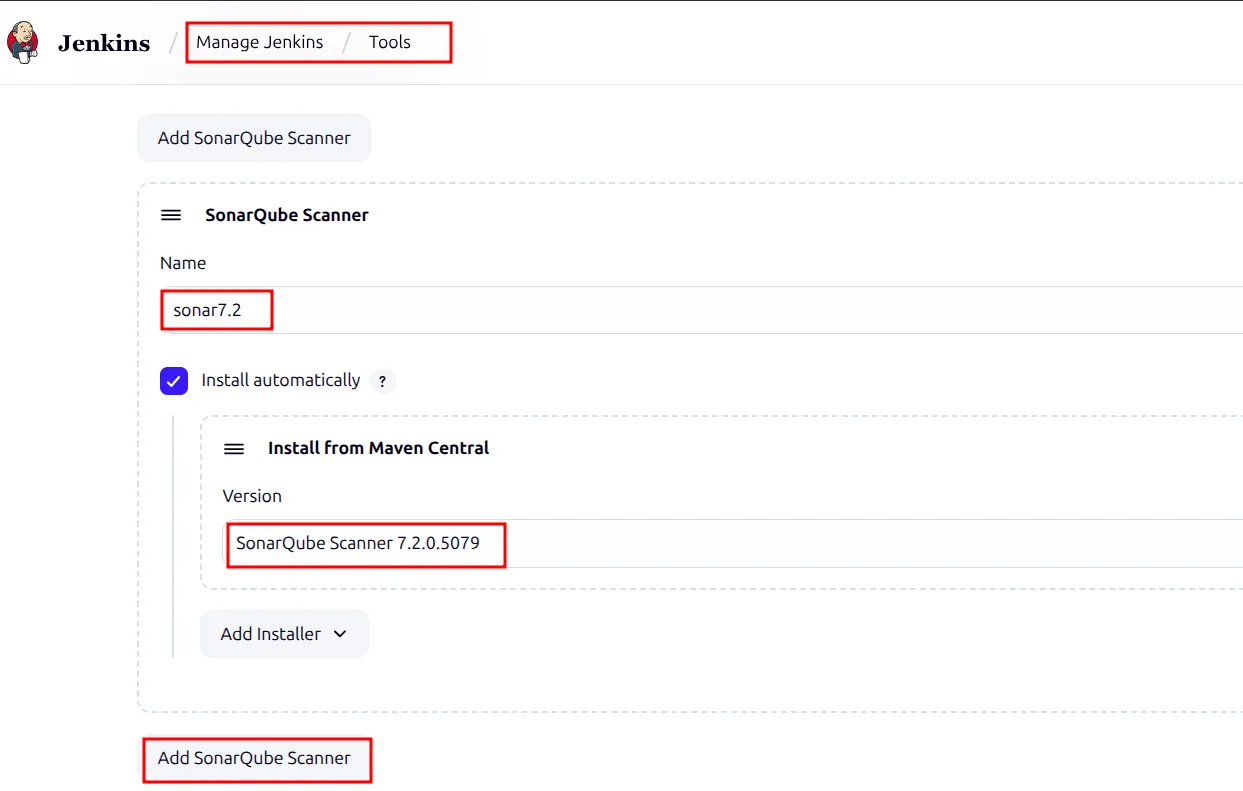
environment {
        scannerHome = tool 'sonar7.2' #Tool name that we are setting here is used in our pipeline like this
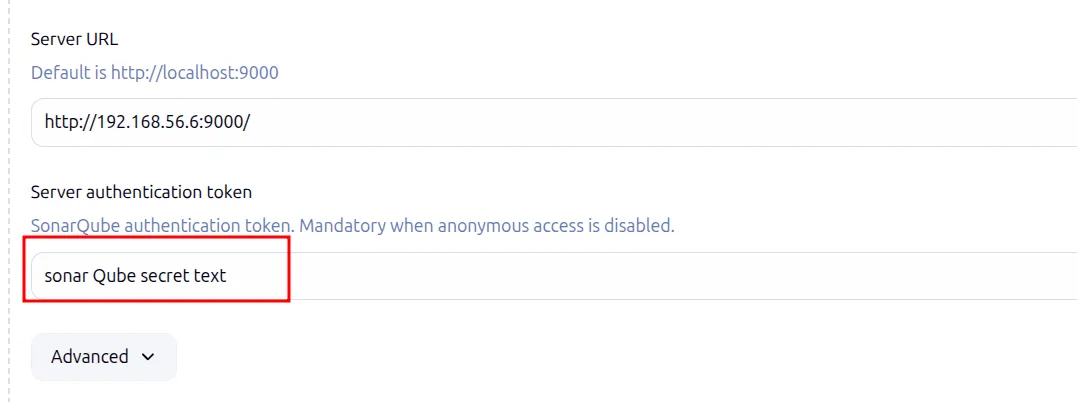
}Now we need to connect the scanner with the sonarqube server. Go to system and go to sonarqube servers.
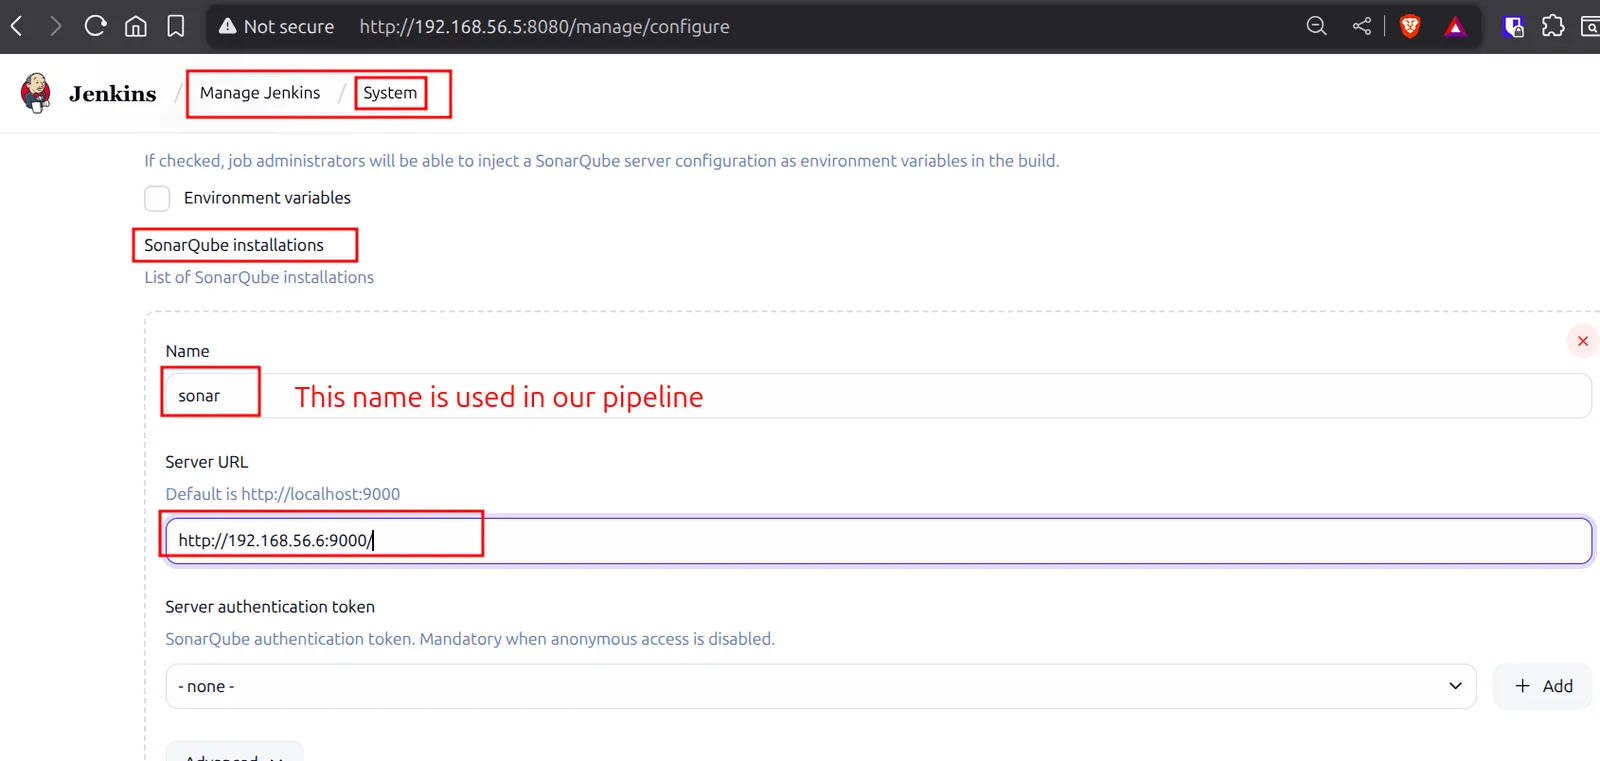
stage('Sonar Analysis') {
            steps {
withSonarQubeEnv('sonar') #This sonar name is used in system , SonarQube Installation {Now we need to add credentials here. We are adding a credentials. For this we need to generate token from sonarqube server.
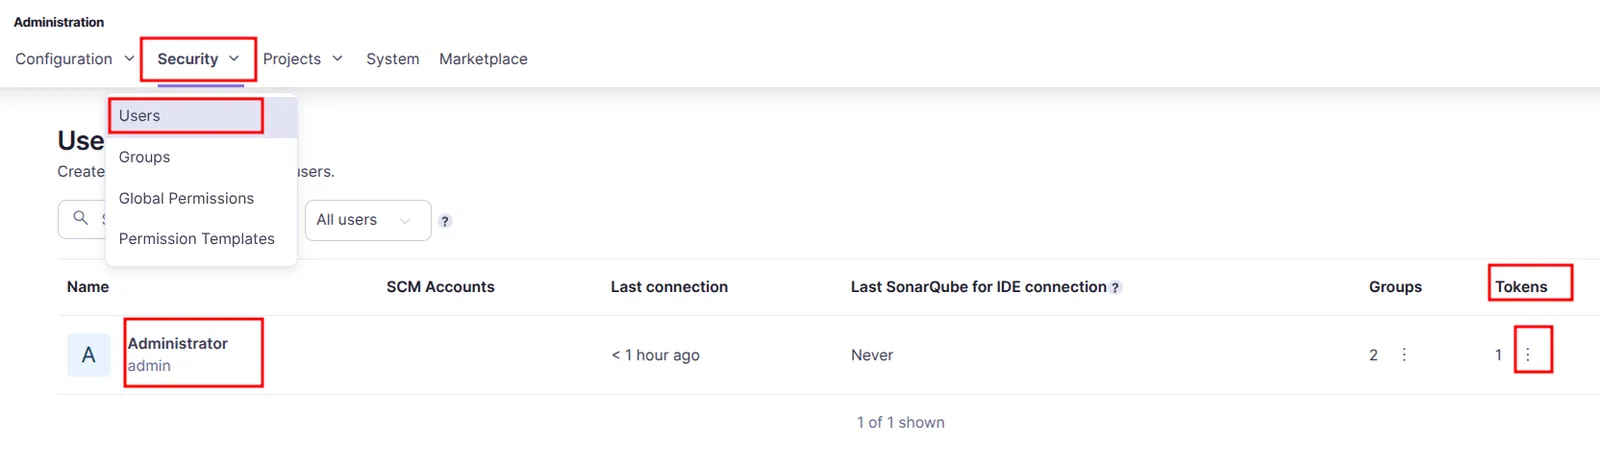
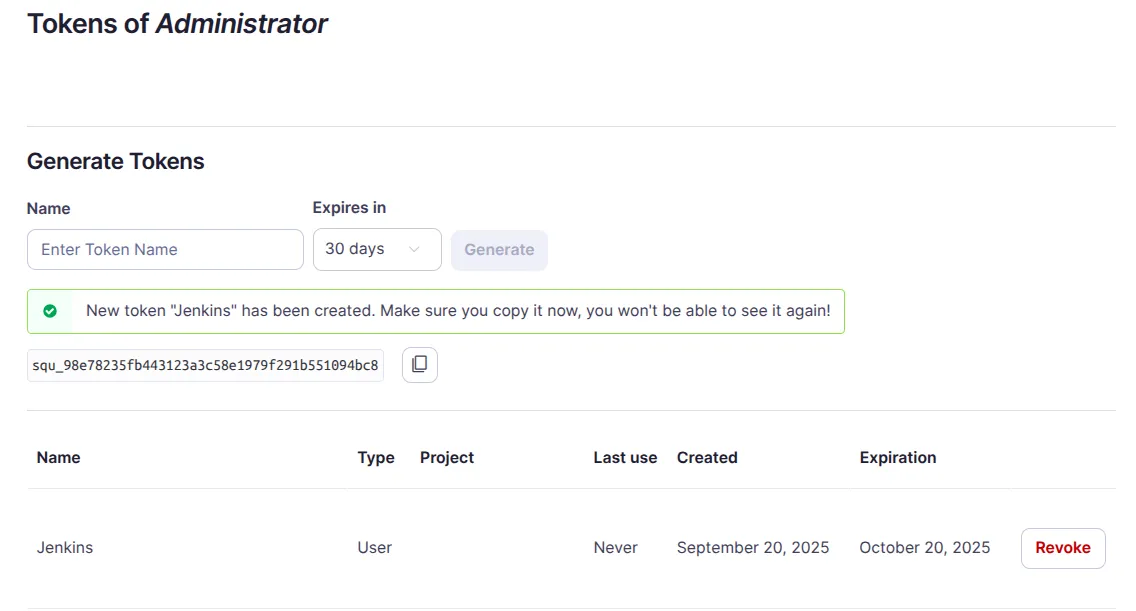
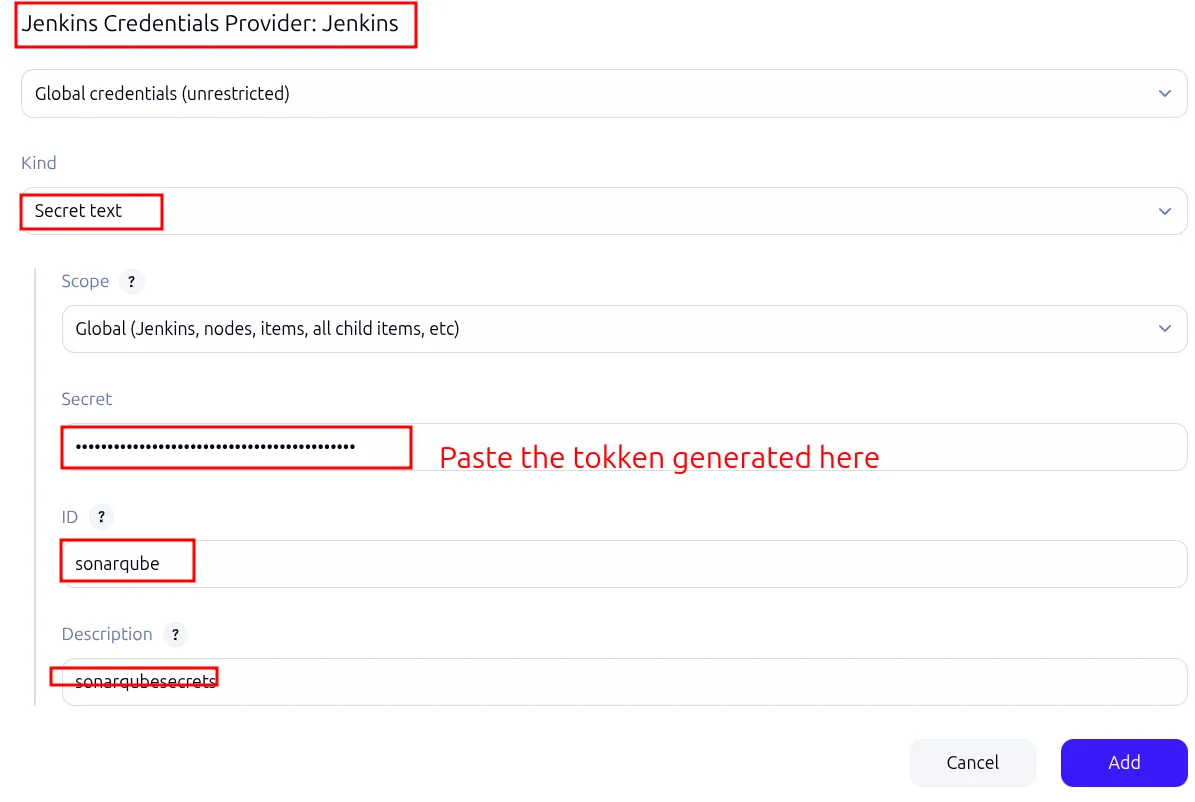
- Now you can see the credential in the drop down.
stage('Sonar Analysis') {
            steps {
                withSonarQubeEnv('sonar') #This sonar name is used in system , SonarQube Installation {
                    sh '''${scannerHome}/bin/sonar-scanner -Dsonar.projectKey=java-tomcat-sample \
                        -Dsonar.projectName=java-tomcat-sample \ #pom.xml filename
                        -Dsonar.projectVersion=4.0 \ #Project version is 4.0 now running.
                        -Dsonar.sources=src/ \ #path of source code
                        -Dsonar.junit.reportsPath=target/surefire-reports/ \
                        -Dsonar.jacoco.reportsPath=target/jacoco.exec \
                        -Dsonar.java.checkstyle.reportPaths=target/checkstyle-result.xml'''
}here:
- withSonarQubeEnv(‘sonar’): here sonar is the name that we have added in the system.
- manage jenkins/ System
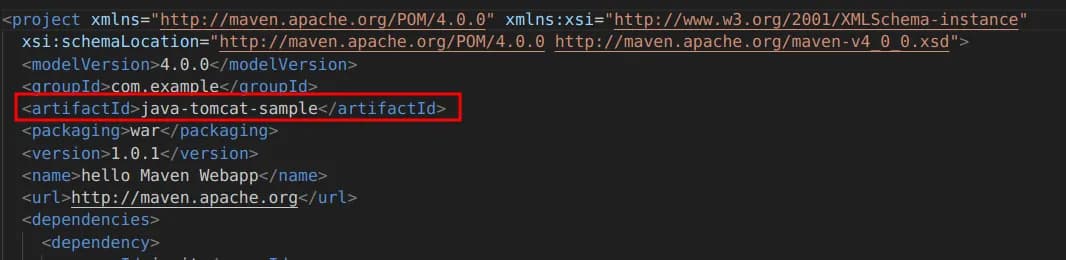
- -Dsonar.projectKey=java-tomcat-sample: This is the name ie; mentioned in the pom.xml file.
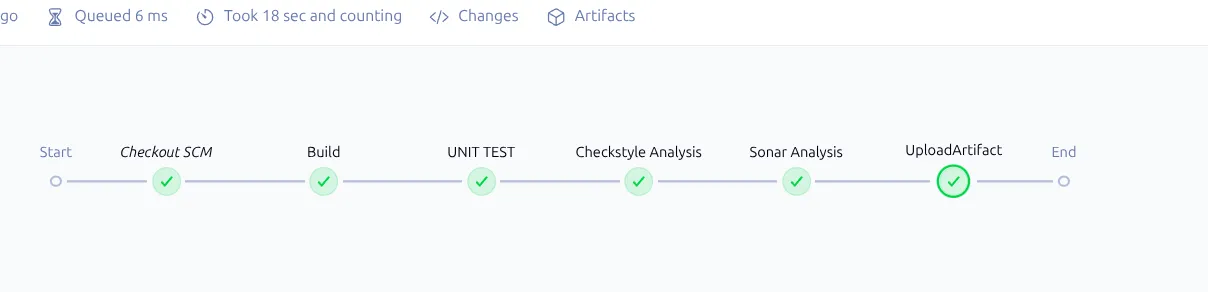
After configuring all this you can now run this pipeline. Now it is successful
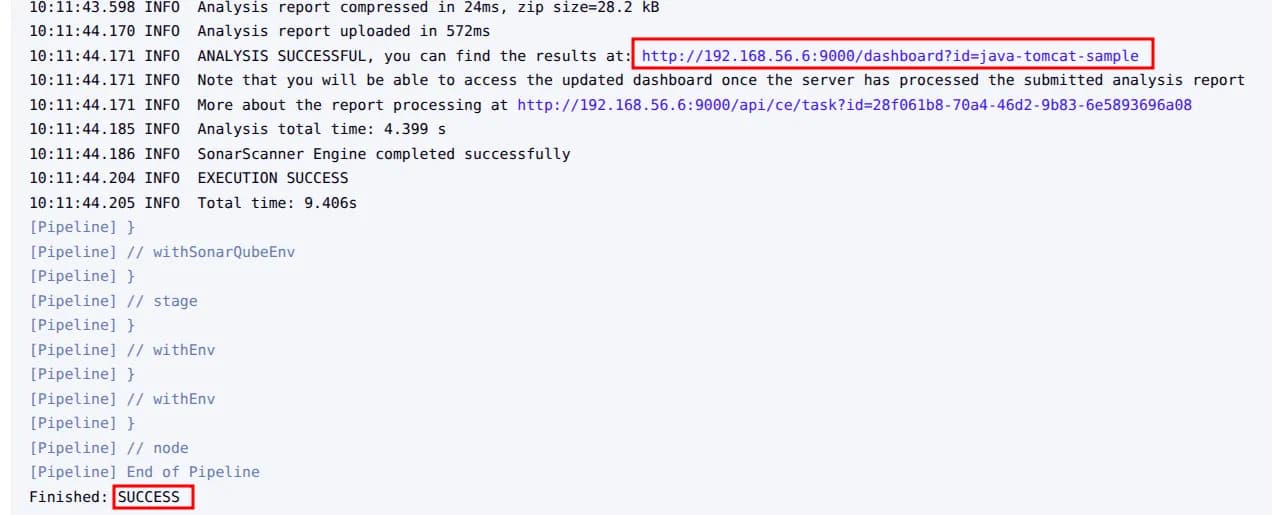
If you click on this link you can see in this link and you can see the status in the SonarQube server.
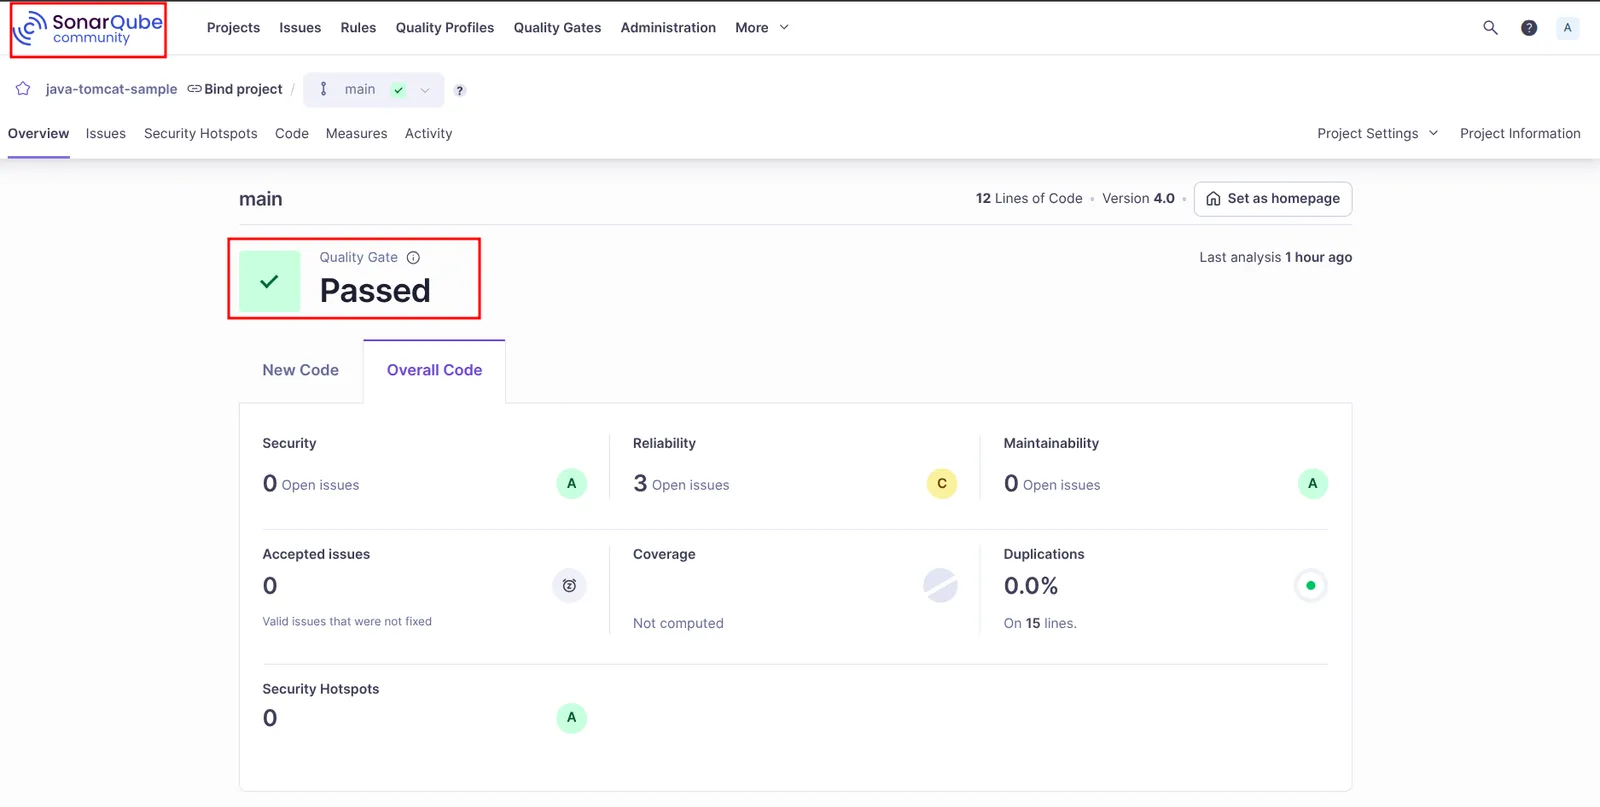
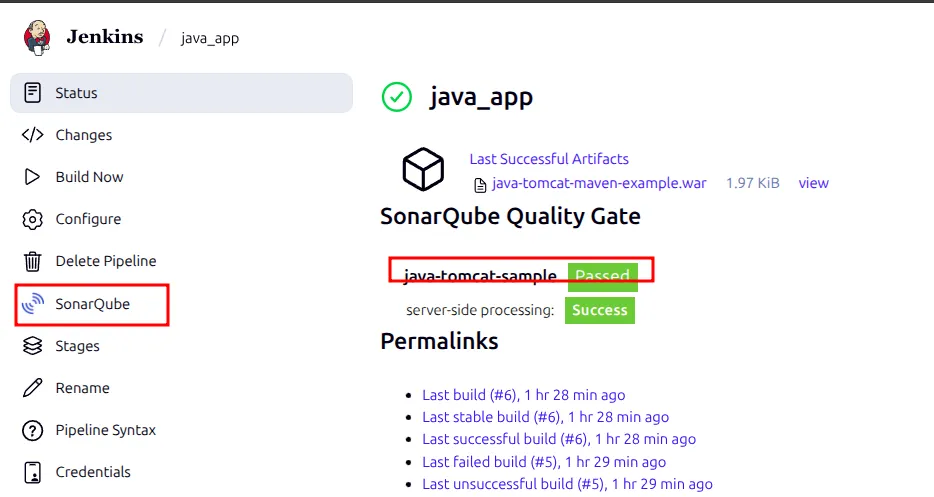
- Code coverage % should be more than 80%.
Code Artifactory
- To store the artifacts we need code artifactory.
- The backed environment is highly secure and nobody can access that thing. So the customer can access the artifacts we need code artifactory so that customer can access.
Some of the popular artifact servers
- JFrog Artifactory
- JFrog Artifactory is a leading, universal repository manager that supports over 30 different package types, from Docker and Maven to npm and PyPI. It’s designed for enterprise use, offering high availability, scalability, and robust security features, including integration with JFrog Xray for vulnerability scanning. Artifactory is a core component of the JFrog DevOps Platform and is known for its deep integration with CI/CD tools, making it a powerful solution for automating artifact management across diverse development environments.
- Apache Archiva
- Apache Archiva is an open-source, community-driven repository manager primarily focused on Maven artifacts. It serves as a central hub for managing dependencies within the Apache ecosystem and is a solid choice for Java-centric projects. Archiva allows teams to proxy remote repositories, cache artifacts locally, and enforce access controls, which helps improve build performance and consistency. It’s a free and flexible option for smaller teams or those heavily invested in the Maven ecosystem.
- Sonatype Nexus
- Sonatype Nexus is a versatile repository manager available in both open-source (Nexus Repository OSS) and commercial versions. It supports multiple formats, including Maven, Docker, and npm. The open-source version is widely used for dependency management and artifact storage, while the commercial version, Nexus Lifecycle, offers advanced security and policy enforcement features to manage risks in the software supply chain. Nexus is known for its ease of use and strong community support, making it a popular choice for teams of all sizes.
In this demo we are setting up sonatype nexus and integrating this in our pipeline.
Installation
#!/bin/bash

# Exit on error
set -e

# Define Nexus version and download URL
NEXUS_VERSION="3.84.1-01"
NEXUS_URL="https://download.sonatype.com/nexus/3/nexus-${NEXUS_VERSION}-linux-x86_64.tar.gz"
NEXUS_DIR="nexus-$NEXUS_VERSION"

echo "Starting Nexus installation..."

# Install dependencies
echo "Installing Java and dependencies..."
sudo apt update
sudo apt install openjdk-17-jdk wget -y

# Create directories
echo "Creating directories..."
sudo mkdir -p /opt/nexus/
sudo mkdir -p /tmp/nexus/

# Download and extract Nexus
echo "Downloading Nexus..."
cd /tmp/nexus/
sudo wget $NEXUS_URL -O nexus.tar.gz
echo "Extracting Nexus..."
sudo tar xzvf nexus.tar.gz
sudo rm -f /tmp/nexus/nexus.tar.gz

# Move Nexus to installation directory
echo "Installing Nexus to /opt/nexus/"
sudo rsync -avzh /tmp/nexus/ /opt/nexus/

# Create nexus user
echo "Creating nexus user..."
if id "nexus" &>/dev/null; then
    echo "User nexus already exists."
else
    sudo useradd nexus
fi

# Set ownership
echo "Setting permissions..."
sudo chown -R nexus:nexus /opt/nexus

# Create systemd service
echo "Creating systemd service..."
cat <<EOT | sudo tee /etc/systemd/system/nexus.service > /dev/null
[Unit]
Description=nexus service
After=network.target

[Service]
Type=forking
LimitNOFILE=65536
ExecStart=/opt/nexus/$NEXUS_DIR/bin/nexus start
ExecStop=/opt/nexus/$NEXUS_DIR/bin/nexus stop
User=nexus
Restart=on-abort

[Install]
WantedBy=multi-user.target
EOT

# Configure Nexus to run as nexus user
echo "Configuring Nexus..."
sudo sh -c "echo 'run_as_user=\"nexus\"' > /opt/nexus/$NEXUS_DIR/bin/nexus.rc"

# Enable and start Nexus service
echo "Starting Nexus service..."
sudo systemctl daemon-reload
sudo systemctl enable nexus
sudo systemctl start nexus

# Wait for Nexus to start
echo "Waiting for Nexus to start (this may take a few minutes)..."
sleep 30

# Check if Nexus is running
if systemctl is-active --quiet nexus; then
    # Get server IP address
    IP_ADDRESS=$(hostname -I | awk '{print $2}')

    echo "=================================================="
    echo "Nexus installation completed successfully!"
    echo "Nexus is now running on: http://$IP_ADDRESS:8081"
    echo "=================================================="
    echo "Default credentials:"
    echo "Username: admin"
    echo "Password: Check /opt/nexus/$NEXUS_DIR/sonatype-work/nexus3/admin.password"
    echo "=================================================="
else
    echo "Nexus service failed to start. Please check logs with: journalctl -u nexus.service -b"
    exit 1
fi

# Clean up
sudo rm -rf /tmp/nexus/- We need a bit higher spec machine to install and run nexus otherwise it will throw the error.
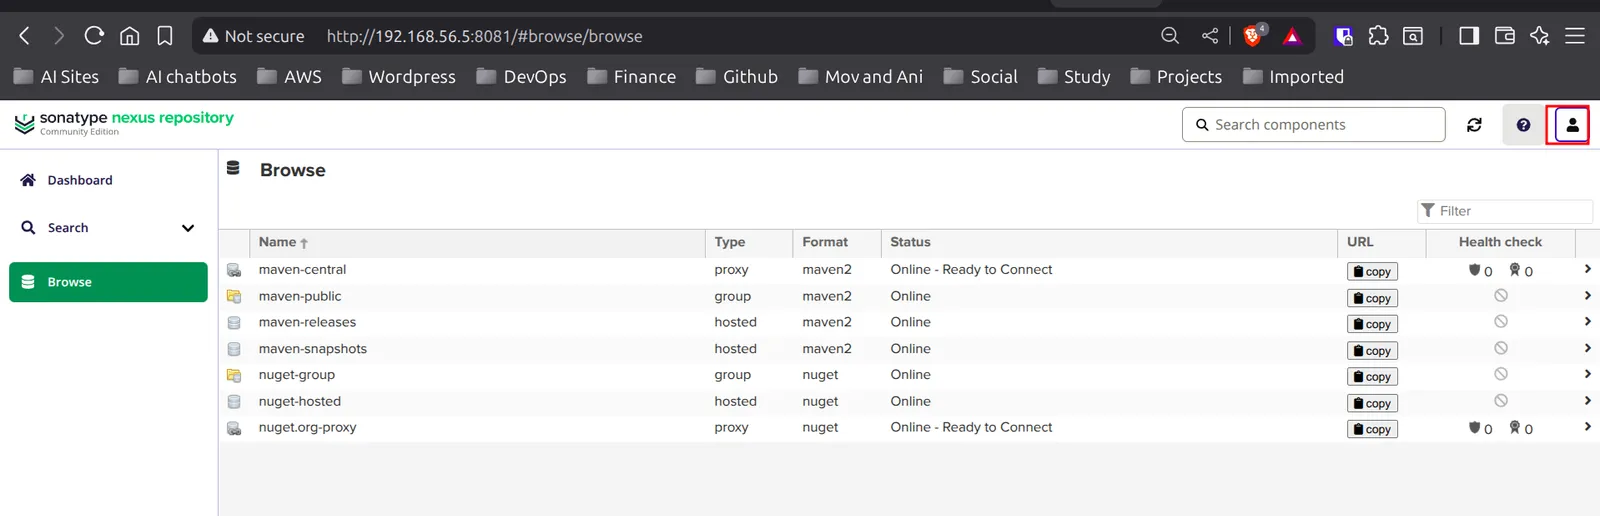
- After running this script you can login using this button.
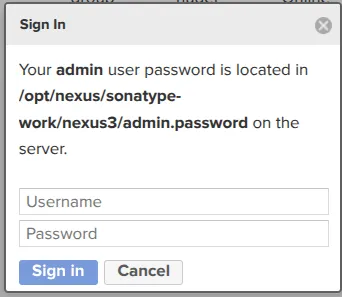
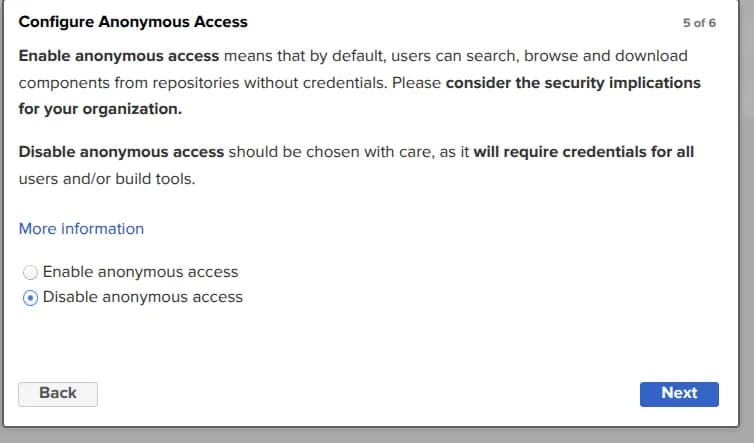
Here you can disable anoymous access.
- Now let’s create a new repo for maven
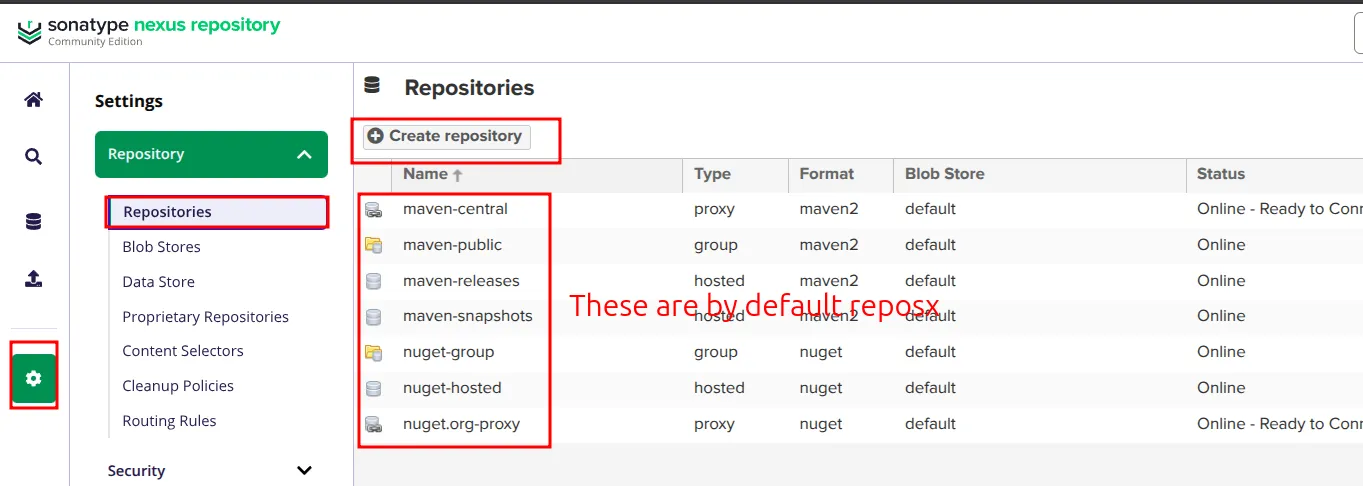
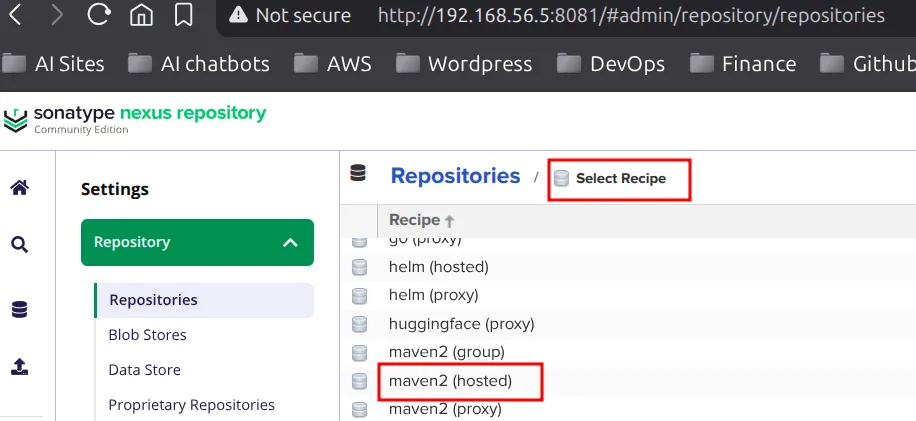
- Provide a name and create a repository.
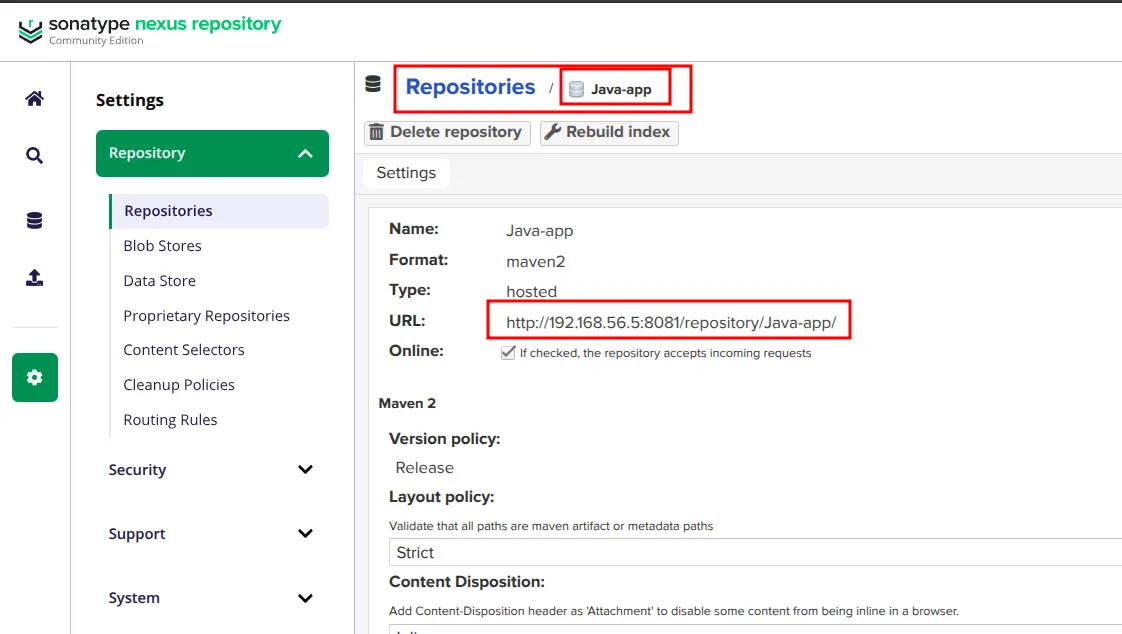
- Now in jenkins we need to setup jenkins so that it can push the artifact to jenkins.
stage("UploadArtifact") {
            steps {
                nexusArtifactUploader( #We need this artifact
                    nexusVersion: 'nexus3',
                    protocol: 'http',  #protocol that we are using, Currently we are running in http so .
                    nexusUrl: '192.168.56.5:8081/', #Ip of the machine in which nexus is running
                    groupId: 'QA',
                    version: "${env.BUILD_ID}-${env.BUILD_TIMESTAMP}", #Job build id and timestamp #If we don't use this all the artificats looks similar
                    repository: 'Java-app', #repo that we have created in the Nexus
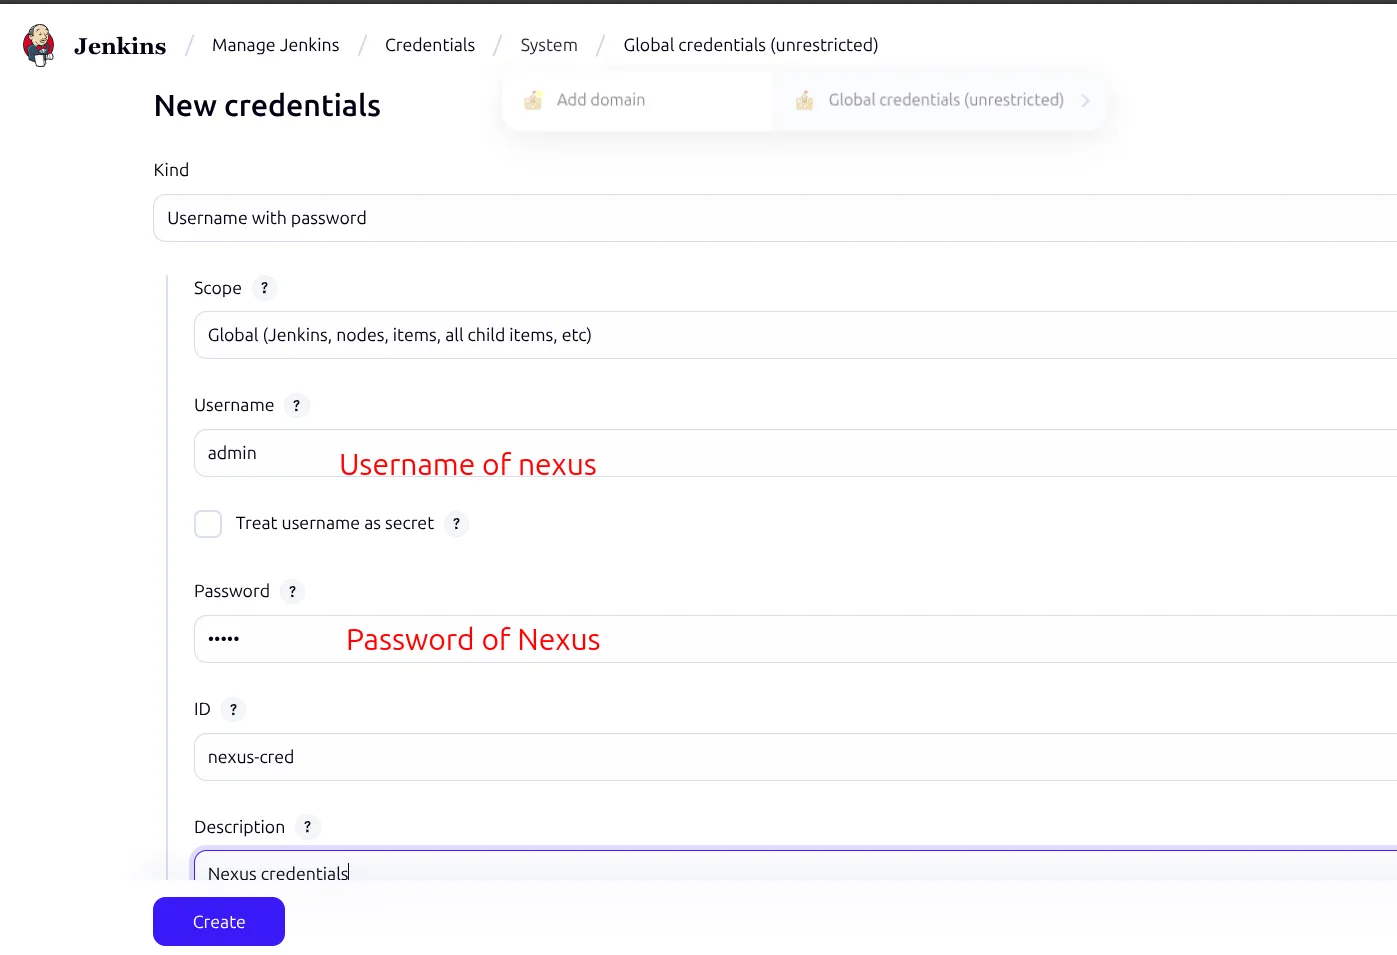
                    credentialsId: 'nexus-cred', #Need to add credentails so that it can connect with nexus
                    artifacts: [
                        [artifactId: 'java-tomcat-sample', #Name ie; in the pom.xml file
                         classifier: '',
                         file: 'target/java-tomcat-maven-example.war', #PATH TO The war file
                         type: 'war']
                    ]
                )
            }
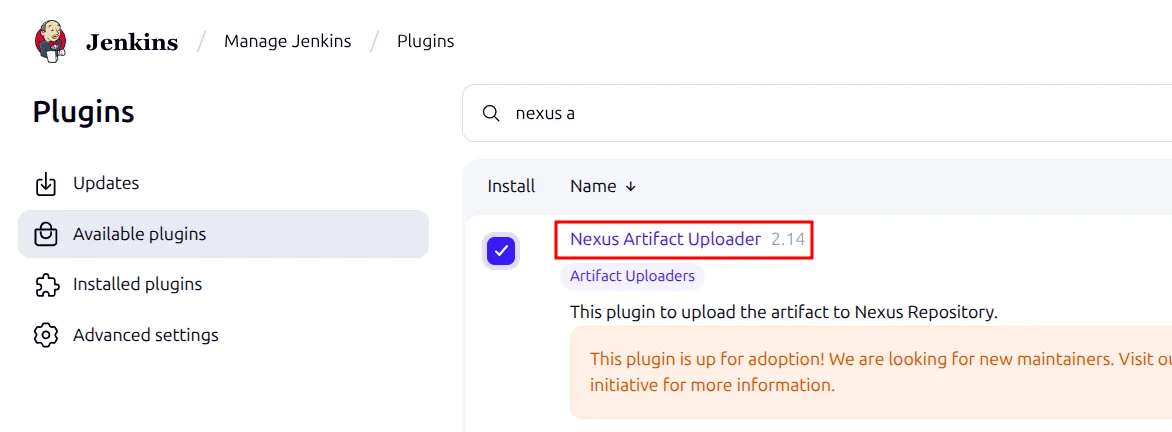
}- Let’s install plugins first
NExus artifact uploader
- Now add the credentials
- Provide username and password that we have used when logging in to the nexus machine.
After setting all this and running pipeline we can see it is successful.
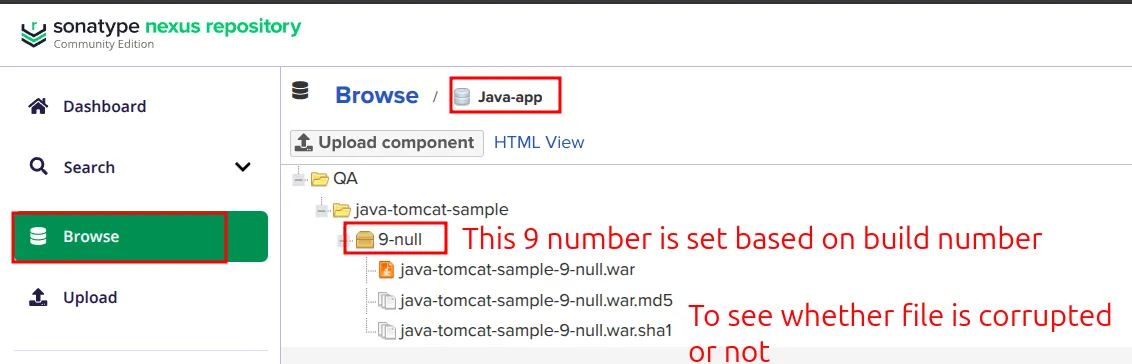
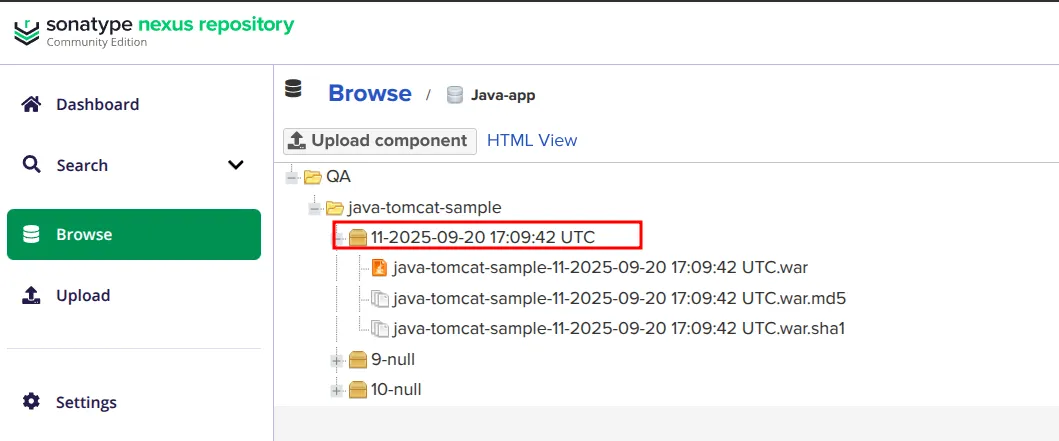
Now we can see the war file is successfully uploaded to the nexus.
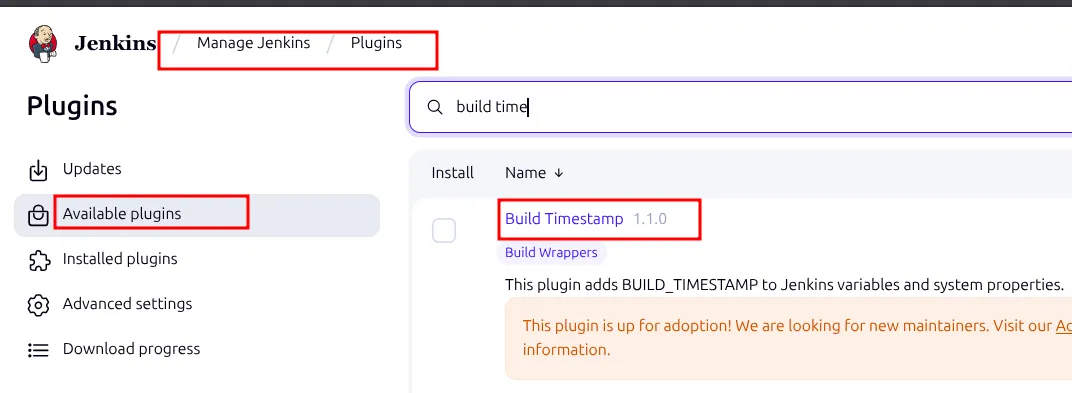
- Here we are seeing null because In our code we are also using Timestamp but not installed the plugin yet. SO for this we need to install another plugin called build Timestamp.
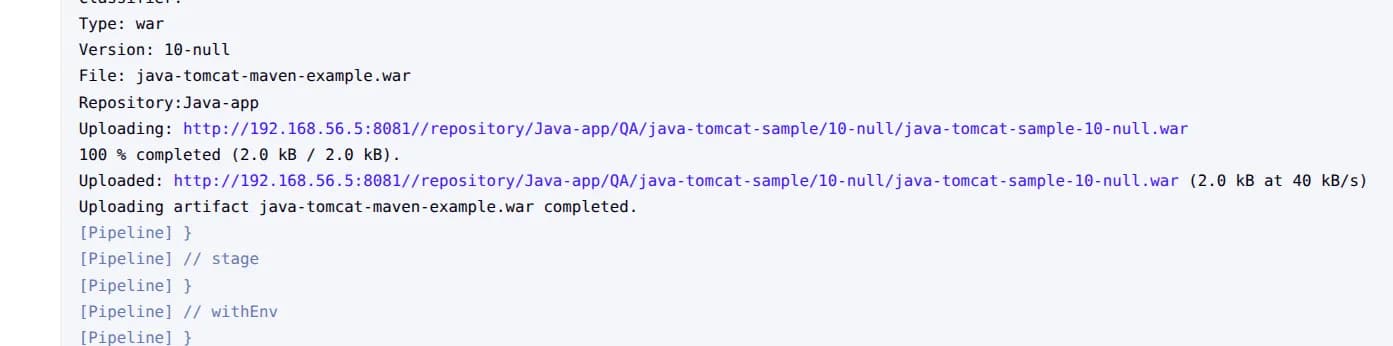
- Now we can see the url after the build.
After this now we can see the timestamp in artifactory also.
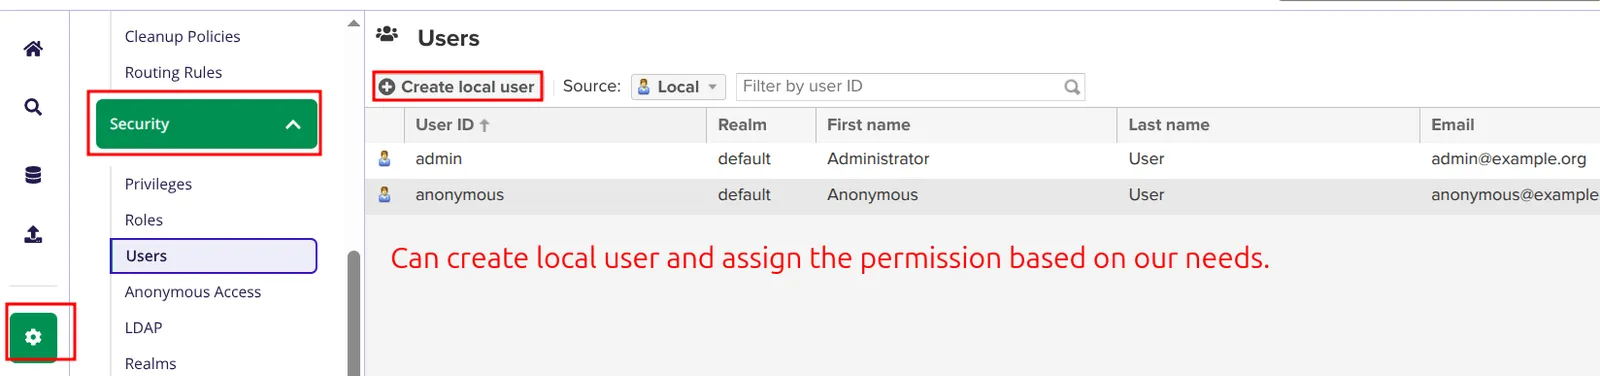
- To add users.
Keep reading
- GITHUB Actions
From Zero to Deploy: Building a MERN Stack CI/CD Pipeline with GitHub Actions Continuous Integration (CI) and Continuous Deployment (CD) have become essential pillars of modern software development…
- Github Hooks in Jenkins
🚀 Step 1: Install Required Jenkins Plugins Go to Jenkins Dashboard → Manage Jenkins → Manage Plugins. GitHub Integration GitHub Plugin Pipeline: GitHub (if not installed) Install and Restart…
- Distributed Build Example in Jenkins
Creating 2 VMs to know the concept of multistage distributed builds. Setting up Node in Jenkins master Setting label for Jenkins master Example 1: So first let’s run a simple pipeline in this node…