AWS Developer Tools
Why Developer tools Host code and quickly and effectively build, test, and deploy your applications with AWS developer tools. Leverage core tools like software development kits (SDKs), code editors…

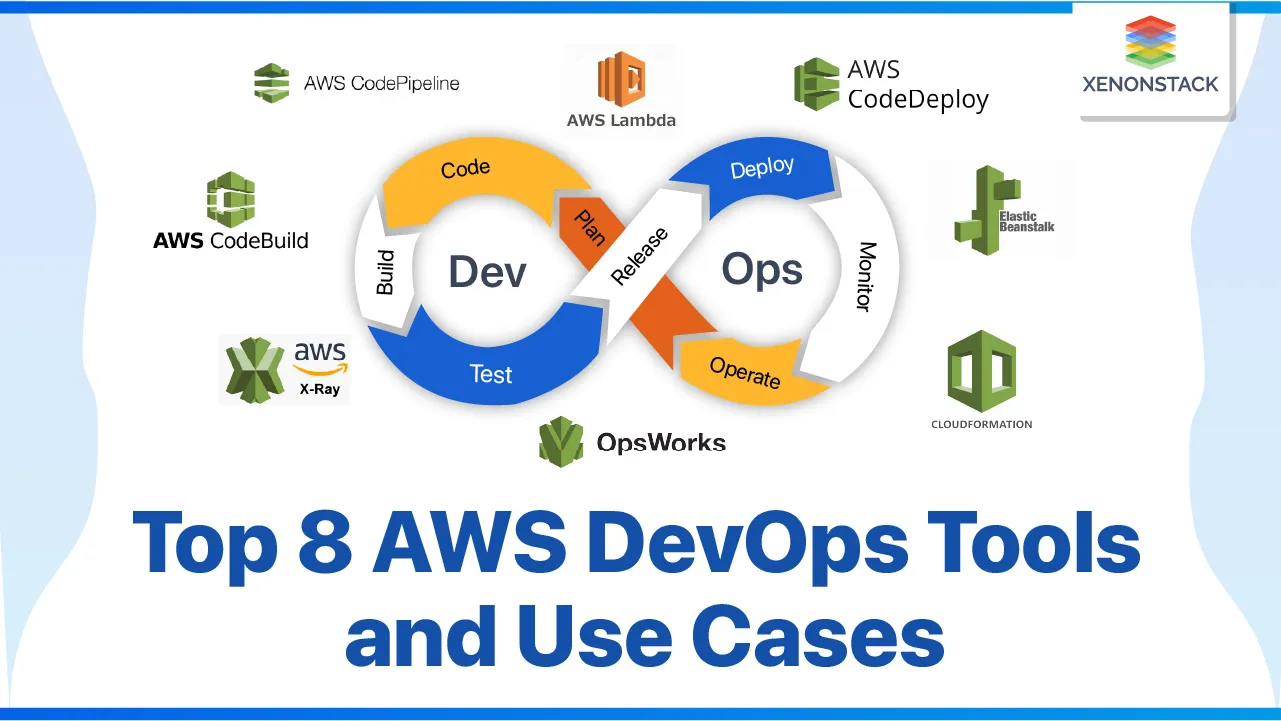
ON THIS PAGE
Why Developer tools
Host code and quickly and effectively build, test, and deploy your applications with AWS developer tools. Leverage core tools like software development kits (SDKs), code editors, and continuous integration and delivery (CI/CD) services for DevOps software development. Use machine learning (ML)–guided best practices and abstractions to improve agility, security, velocity, and code quality.
Benefits
- Release software faster
- Implement CI/CD with the AWS developer tools to accelerate your software development and release cycle.
- Easily integrate with AWS
- AWS developer tools are built to work with AWS, making it easier for your team to get set up and be productive.
- Simplify the development process
- Define application infrastructure in familiar, easy-to-use programming languages.
- Apply machine learning
- Use ML and big data to identify issues and suggest solutions based on Amazon best practices.
Services
- Continuous Integration
- Continuous Delivery
- Microservices
- Infrastructure as Code
- Monitoring and Logging
- DevOps Tools
- Communication and Collaboration
TOOLS
AWS code Commit
AWS CodeCommit is a fully-managed source control service that hosts secure Git-based repositories. It makes it easy for teams to collaborate on code in a secure and highly scalable ecosystem. CodeCommit eliminates the need to operate your own source control system or worry about scaling its infrastructure. You can use CodeCommit to securely store anything from source code to binaries, and it works seamlessly with your existing Git tools.
This is the github but the managed by the AWS. Propriority version of Github. It is fully managed by AWS. It hosts the github repo. It will make collabration among teams. Secure and scallable. Highly available.
Benefits
- Fully managed
- AWS CodeCommit eliminates the need to host, maintain, back up, and scale your own source control servers. The service automatically scales to meet the growing needs of your project.
- Secure
- AWS CodeCommit automatically encrypts your files in transit and at rest. CodeCommit is integrated with AWS Identity and Access Management (IAM) allowing you to assign user-specific permissions to your repositories.
- High availability
- AWS CodeCommit has a highly scalable, redundant, and durable architecture. The service is designed to keep your repositories highly available and accessible.
- Store Anything
- AWS CodeCommit allows you to store any type of file, and there are no repository size limits. This allows you to store and version application assets, like images and libraries, along with your code.
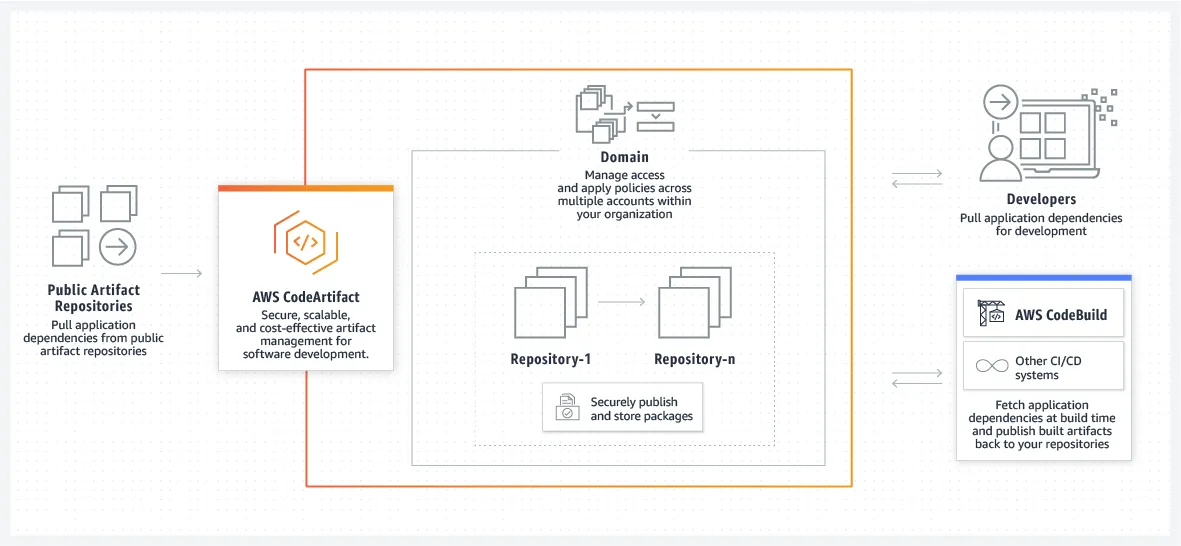
AWS CodeArtifact
- Similar to creating war or jar file that we have done in the case of jenkins or using maven.
Benefits
- Use common package managers and build tools
- CodeArtifact works with commonly used package managers and build tools like Maven, Gradle, npm, Yarn, Twine, and pip, making it easy to integrate into existing development workflows.
- Securely store and share artifacts
- CodeArtifact integrates with AWS Key Management Service (KMS) to provide encrypted storage. CodeArtifact supports AWS IAM, so IT leaders can grant the appropriate level of access to different teams across their AWS accounts.
- Reduce operational overhead
- CodeArtifact is a fully managed service, eliminating the need to set up and operate the infrastructure required to manage artifact repositories. CodeArtifact is highly available and scales to meet the needs of organizations of all sizes.
- Pay as you go
- With CodeArtifact, there are no upfront fees or licensing costs for features that you don’t use. You pay only for the software packages stored, the number of requests made, and the data transferred out of an AWS Region.
AWS Code Built
With AWS CodeBuild, you don’t need to provision, manage, and scale your own build servers. You just specify the location of your source code and choose your build settings, and CodeBuild will run your build scripts for compiling, testing, and packaging your code.
Benefits
- No setup or maintenance
- Avoid having to set up, manage, or patch your own build servers.
- Learn more
- Scale capacity
- Automatically scale capacity, so builds aren’t waiting in a queue to run.
- Learn more
- Pay by use
- Pay only for the build minutes that you use.
- Learn more
- Prepackaged build environments
- Use prepackaged build environments or your own, and encrypt artifacts with your own keys.
Use Cases
- Minimize downtime
- Build highly available applications on a resilient cloud infrastructure and help your teams respond, adapt, and quickly recover from unexpected events.
- Automate CI/CD pipelines
- Remove error-prone manual processes and remove the need to babysit software releases. Use software release pipelines that encompass building, testing, and deploying.
- Increase developer productivity
- Manage services, provision resources, and automate development tasks without switching context or leaving your editor.
- Monitor operations
- Build an observability dashboard to gain instant and continual insight into your system’s operations.
- Test and automate infrastructure
- Combine infrastructure as code (IaC) with version control and automated, continuous integration to bring scalability and consistency to provisioning and management.
- Build source code hosted on GitHub
- Automatically initiate software builds using an existing GitHub repository and post the results back to GitHub
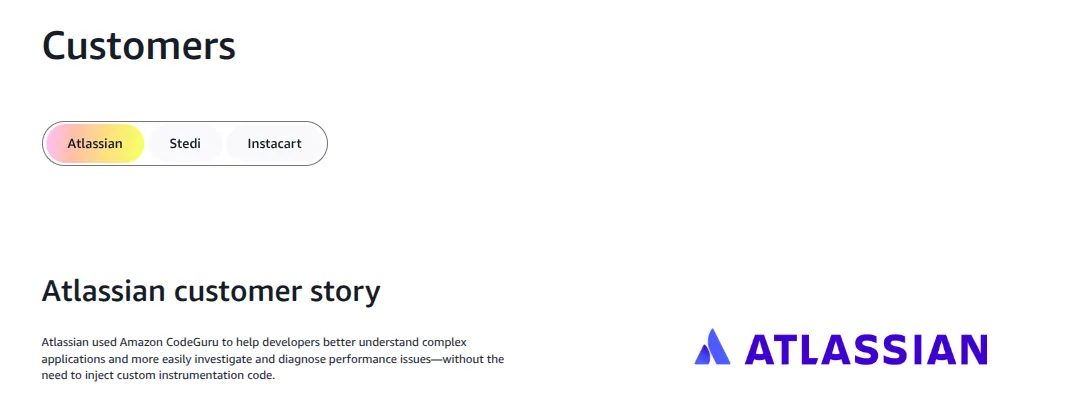
- Atlassian is a huge company.
- Bit bucket: Version control system
- Jira: Ticket management system
Now let’s create a simple build in AWS
So in the case of code build me mainly focus on building the code in to artifact. This is the part of CI.
- Provide a name for the project.
- select deafult project to build from scratch
- Source
- Now in this case
- There are multiple sources
- No source
- In jenkins similar to freestyle job
- We have run linux command in jenkins shell
- we can clone the code from the script.
- GitHub
- GitHub Enterprise Server
- Bitbucket
- GitLab
- GitLab Self Managed
- Amazon S3
- AWS CodeCommit
- No source
- For now let’s use GITHUB.
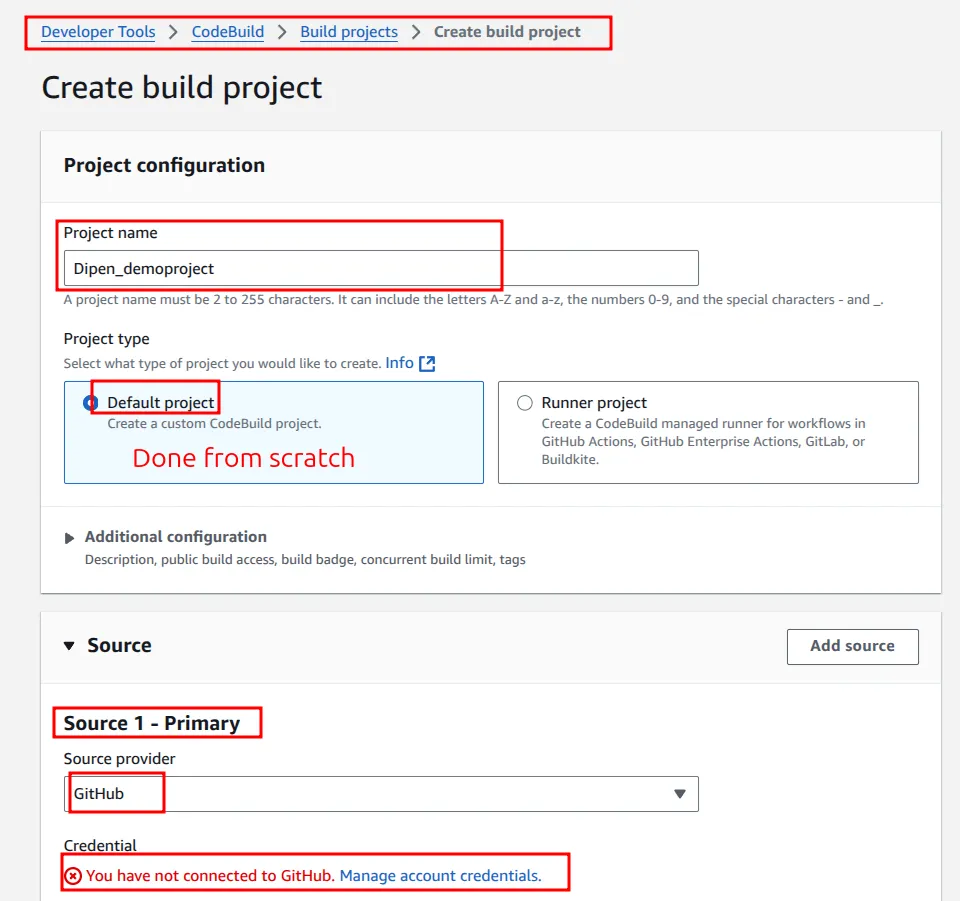
- Now we need to give access of the github to the aws account. Here we can see this error.
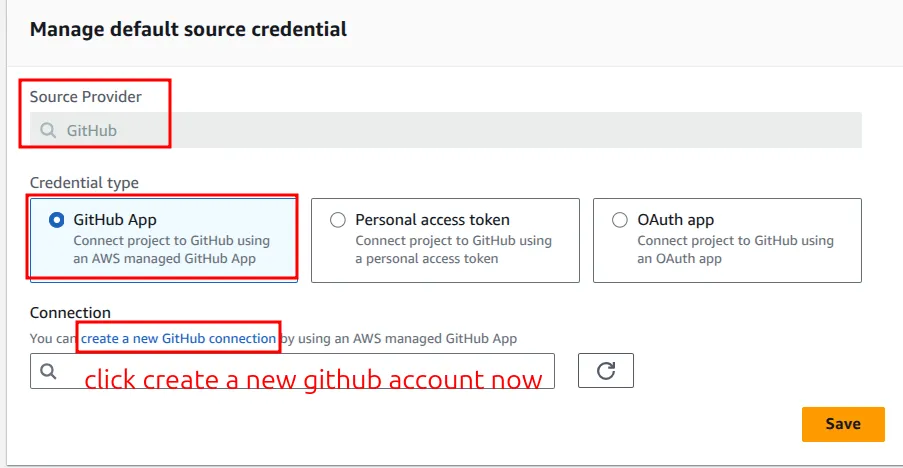
- Now you will be redirected to the github page.
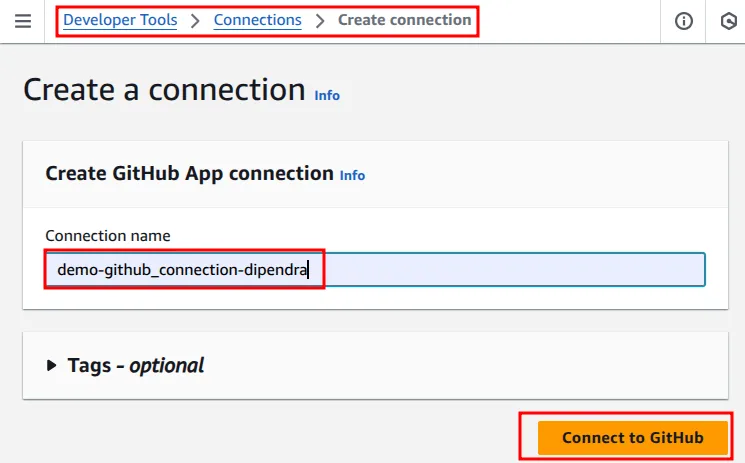
- Now we need to authorize our github
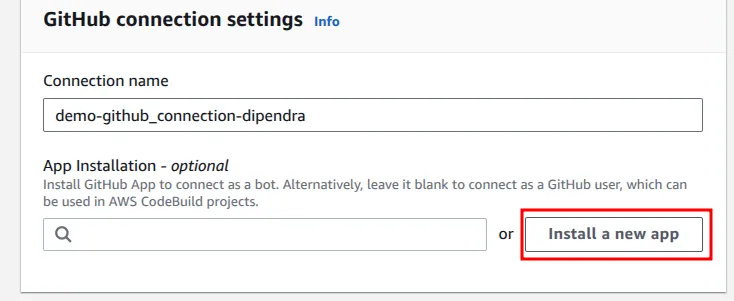
- This will now redirect us to the github. For now i don’t have access to these things that’s why i am using sometimes my lecturer screenshot to explain these topics.
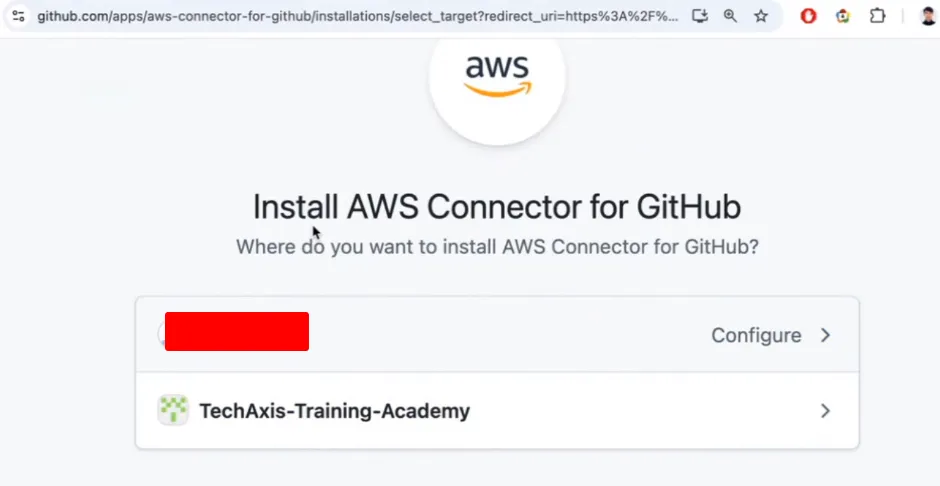
- After that you will see this page. Click on configure and then authorize the account if there is MFA. After that you can see the aws is connected to github.
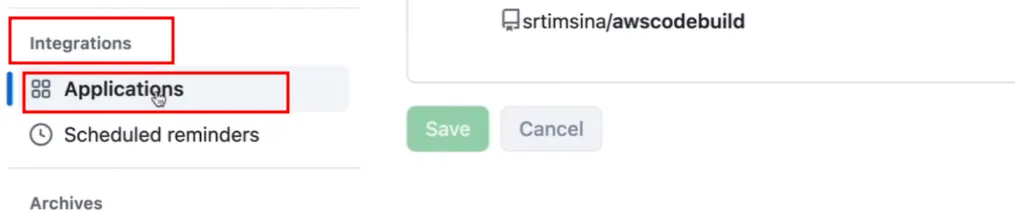
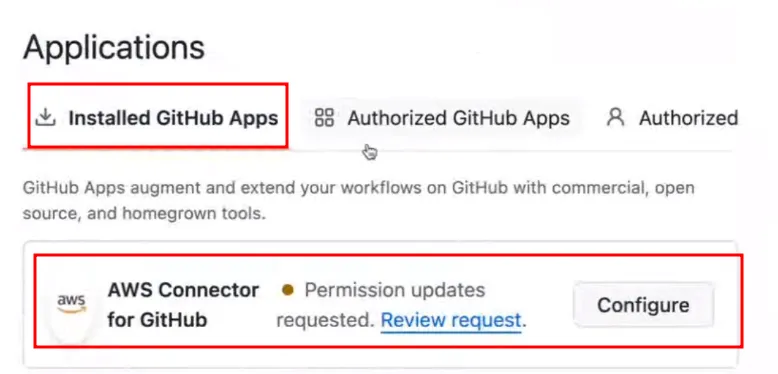
- Now you can select the reporities to which you want to give access to the account and after that you can connect the AWS with the repo.

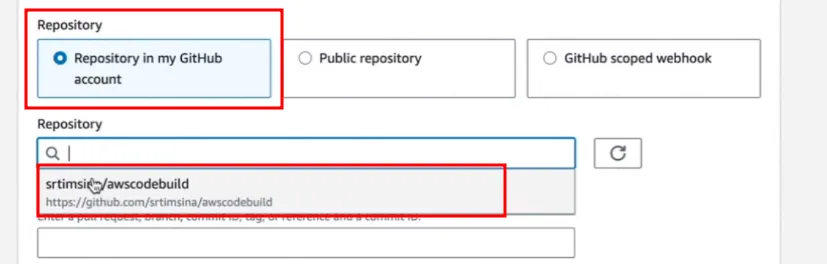
- After that in configuration yo can see the repository listed here.
- public repository: In this case we can place URL here same as in jenkins.
- Source version: you can also do this by using specific source code, commit id also.
- Provide branch name here from which you want to build.
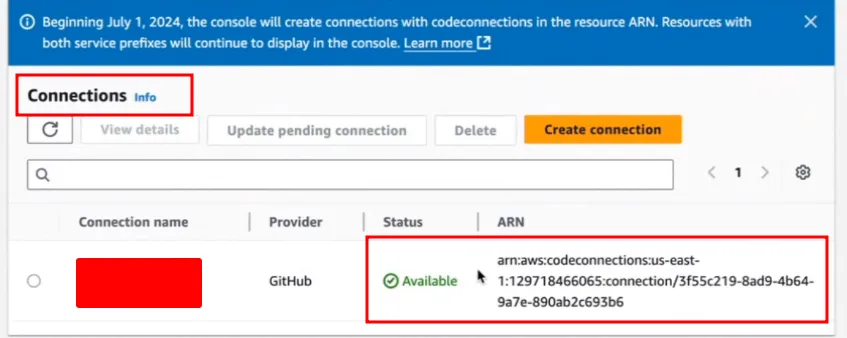
- You can see the configuration like after creating a connection.
For this we have used a simple code. ie; a simple code of C++ this is in the repo awscodebuild.
This is the main code that you will print hello devops.
hello.cpp //filename

#include <iostream>

int main()
{
  std::cout << "Hello, DevOps!\n";
}In the case of the AWS we need buildspec.yml. In the case of jenkins we write jenkinsfile so in the case of aws we will write this.
Environment
this menu is used to define the environment.
- Provisioning model
- When you want to build and how you want to build
- Good practice is on-demand.
- Environment image
- What you want to use
- Manged by aws
- or your own image
- For now i will use managed by aws.
- Compute
- Ec2 or lambda
- For now i will use EC2
- Ec2 or lambda
- Running mode
- container / instance
- for now i am using container
- container / instance
- Operating system
- Ubuntu //can pick from here.
- Runtime
- standard
- Image
- use the latest version for this
- Use GPU-enhanced compute
- For now i am not using this
- Service role
- We need this role when we want service to communicate with another service then we need role. If we want one service to commn with other other then we create IAM roles.
- GO TO IAM
- Then roles
- create role here
- Provide rolename here then it will it automatically create role and assign permission
- here code build now can build instances in EC2.
- We need this role when we want service to communicate with another service then we need role. If we want one service to commn with other other then we create IAM roles.
Build spec
- Build spec
- You can write code here or can use buildspec file also. similar to jenkins inline commands or jenkins file system.
- If in different path provide path and if different name then provide name also.
- Let’s talk about this file ie; buildspec file
for c++ application build spec file
version: 0.2  # FIrst we need to define this

phases:   #Different process that need to run
  install: #Install prequistic in this phase required to                   .            run program
    commands:
      - rm -f /usr/share/keyrings/corretto-keyring.gpg
      - wget -O - https://apt.corretto.aws/corretto.key | gpg --dearmor -o /etc/apt/trusted.gpg.d/corretto-keyring.gpg
      - apt-get update -y
      - apt-get install -y build-essential
  build:       #Here we place commands
    commands:
      - echo Build started on `date`
      - echo Compiling the C++ code...
      - g++ hello.cpp -o hello.out
  post_build:   #After build phase
    commands:
      - echo Build completed on `date`
artifacts:  #aRCHIEVING THE ARTIFACT
  files:
- hello.outfor nodejs application buildspec file
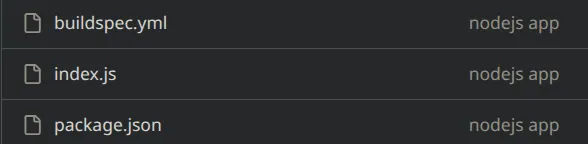
buildspec.yml
version: 0.2

phases:
  install:
    commands:
      - echo Installing dependencies...
      - npm install  #Install node packages ie; .                   .                      package.json dependencies
  build:
    commands:
      - echo Running tests...
      - npm test
      - echo Packaging application...
      - zip -r app.zip .    #Zip file
artifacts:  #Archieve the artifact
  files:
    - app.zip #Now we can store this in s3.


index.js  //simply print this
console.log("Hello from AWS CodeBuild!");

package.json
{
    "name": "codebuild-demo",
    "version": "1.0.0",
    "scripts": {
      "test": "echo \"Running tests...\" && exit 0"
    }
}TO DOCKERIZE THE ABOVE NODEJS APPLICATION
Dockerfile

FROM node:18-alpine
WORKDIR /app
COPY package*.json ./
RUN npm install
COPY . .
CMD ["node", "index.js"]


buildspec.yml

version: 0.2

env:
  parameter-store:
    DOCKERHUB_USERNAME: "DOCKERHUB_USERNAME"
    DOCKERHUB_PASSWORD: "DOCKERHUB_PASSWORD" //variablize
  variables:
    IMAGE_REPO_NAME: "suryaraj/node-app-aws"
    AWS_REGION: "us-east-1"

phases:
  pre_build:
    commands:
      - echo Logging in to Docker Hub...
      - echo $DOCKERHUB_PASSWORD | docker login -u $DOCKERHUB_USERNAME --password-stdin
      - COMMIT_HASH=$(echo $CODEBUILD_RESOLVED_SOURCE_VERSION | cut -c 1-7)
      - IMAGE_TAG=${COMMIT_HASH:=latest}
  build:
    commands:
      - echo Building the Docker image...
      - docker build -t $IMAGE_REPO_NAME:$IMAGE_TAG .
  post_build:
    commands:
      - echo Pushing the Docker image to Docker Hub...
      - docker push $IMAGE_REPO_NAME:$IMAGE_TAG
      - echo Writing image definitions file...
      - printf '[{"name":"nodejs-app","imageUri":"%s"}]' $IMAGE_REPO_NAME:$IMAGE_TAG > imagedefinitions.json
artifacts:
  files: imagedefinitions.json

imagedefinitions.json
If you want to deploy in EKS then you will need this file.Here we are pushing the image in the ECR also but need to pay extra money for this so to reduce cost we are using docker hub to reduce the cost. In this example we are using dockerhub to reduce the cost.
ECR
Amazon Elastic Container Registry (ECR) is a fully managed container registry that makes it easy to store, manage, share and deploy your container images and artifacts anywhere.
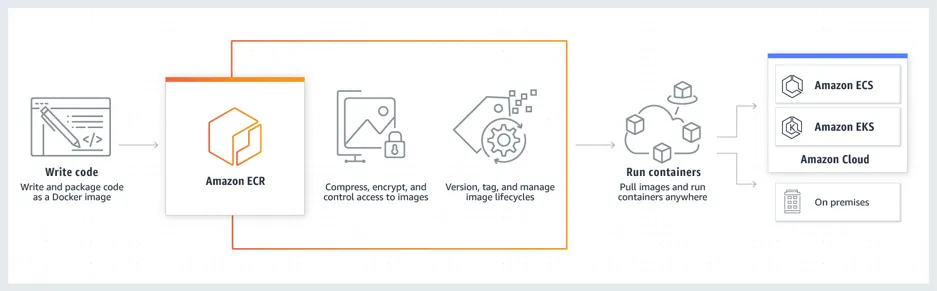
- Can store secrets, credentials and variable in these places
- AWS Secrets Manager
- Can store secrets here but need to pay extra charges
- SSM
- Can store here but need to pay extra charges
- Github
- In secrets and variable options we can add here in git which is fetched during build time.
- AWS Secrets Manager
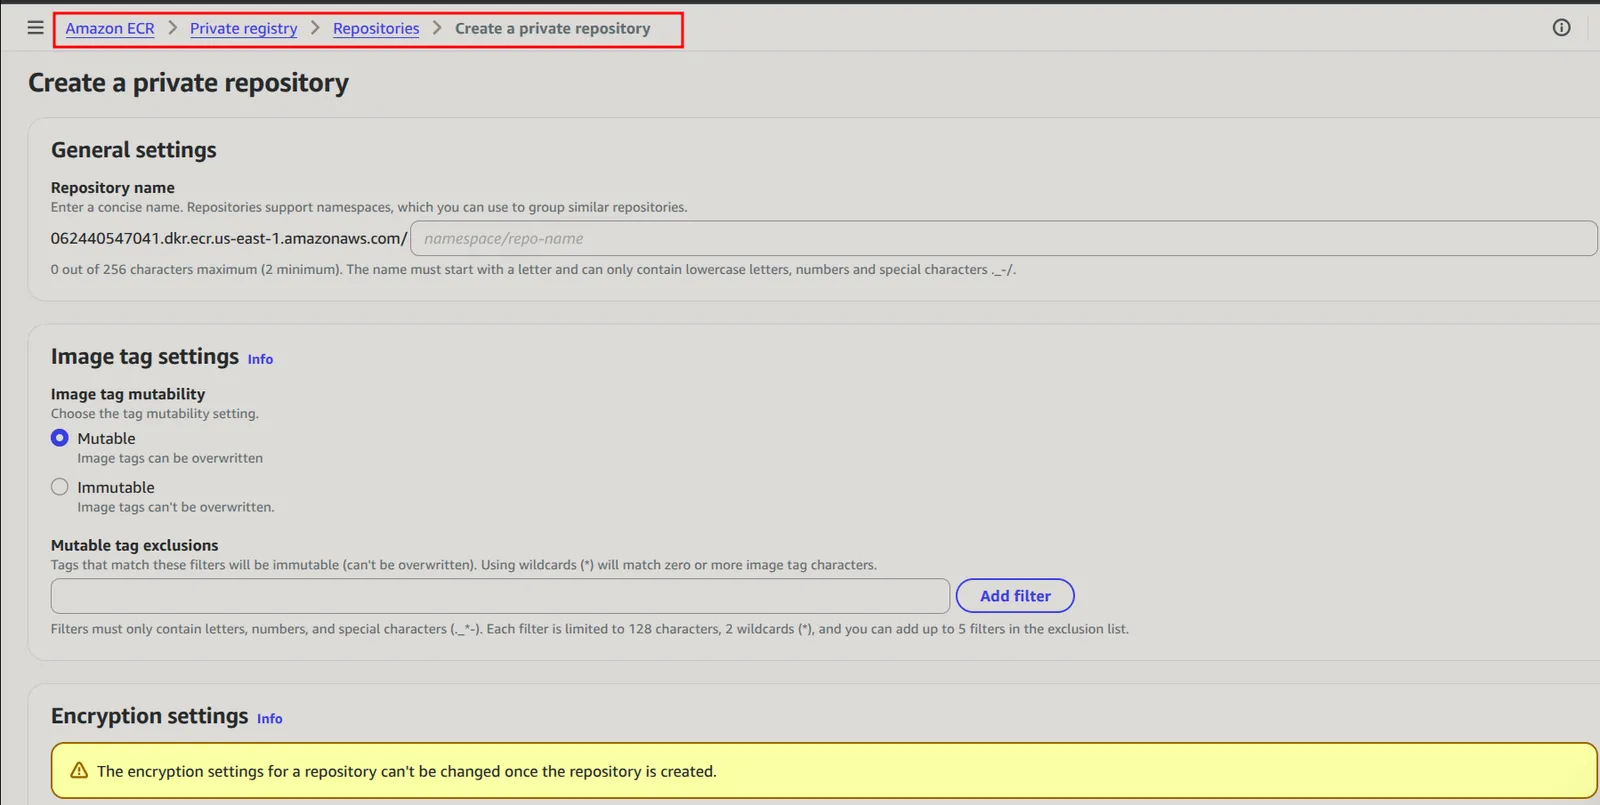
Interface for creating registry
- Artifact
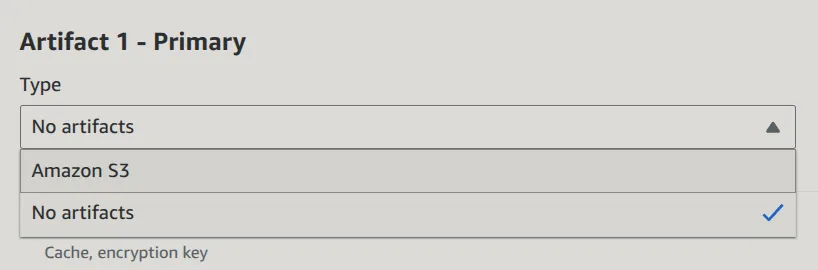
- Now we can store the artifact in s3.
- Now in s3 create a bucket and provide a name
- We can provide multiple artifact here
- Bucket name: provide bucker name here
- Name: To provide folder name inside bucket
- For now i am not providing name
- Can do versioning
- For now i am not doing versioning
- Artifacts packaging
- can place the artifact in zip format
- I want to store in zip format for now.
Here the permission is attached by directly ie; get object, put objects like these policies we need to attach and also for connections.
Logs
- Can enable cloud watch to see logs
now create build project
Now after this you can see the build project have been successfully created. We can setup post build actions ie; similar to sending build success notification in jenkins.
Can create trigger also here.
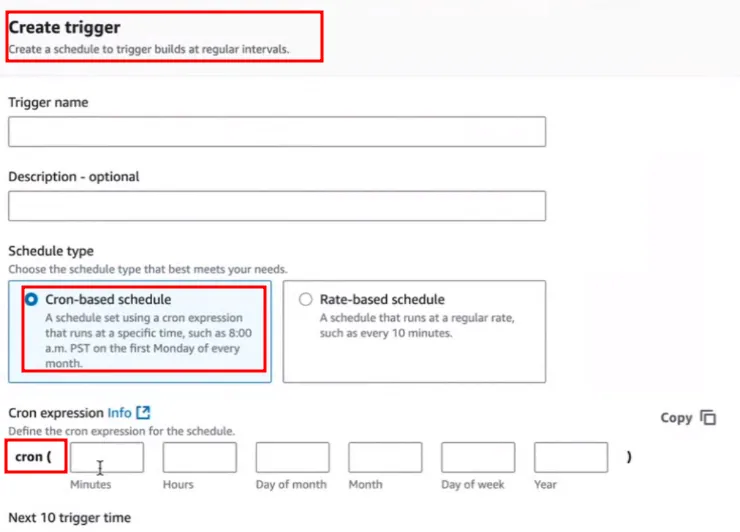
- Now need to click on the start build option. Then we can see the build have been successfully created.
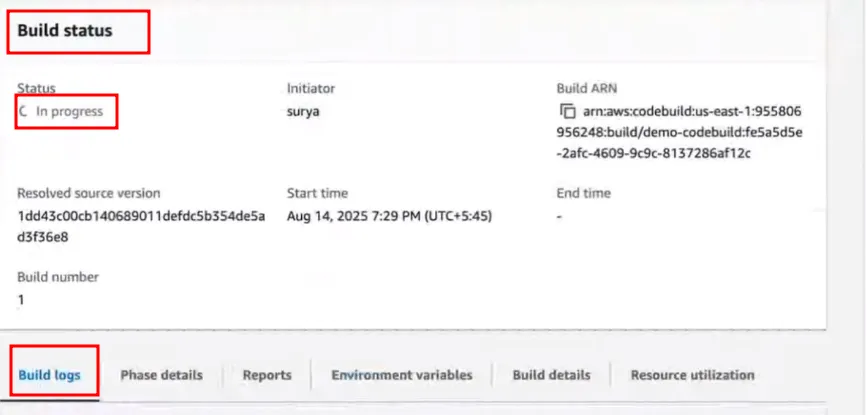
We can also see the logs of what is happening here
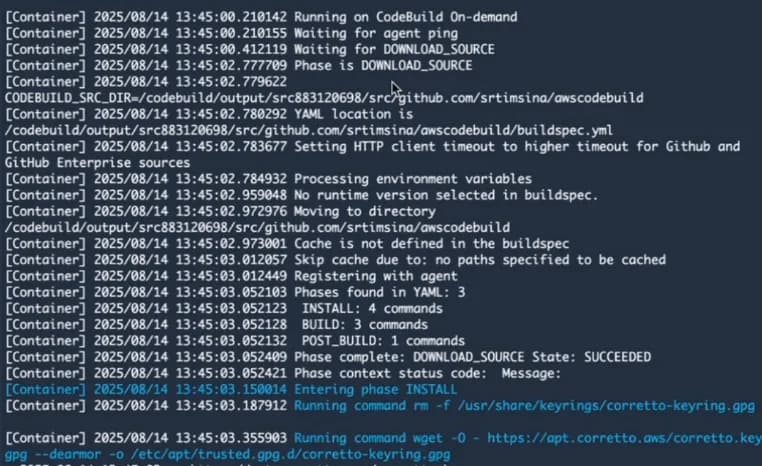
- This logs shows the logs of build spec file. Like what we have defined there.
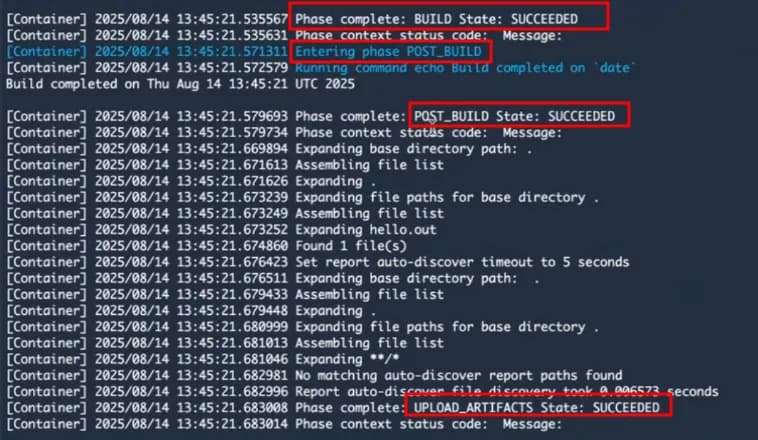
- Here in logs we can see the code build is now completed successfully. For detailed log we can see the logs in cloud watch also.
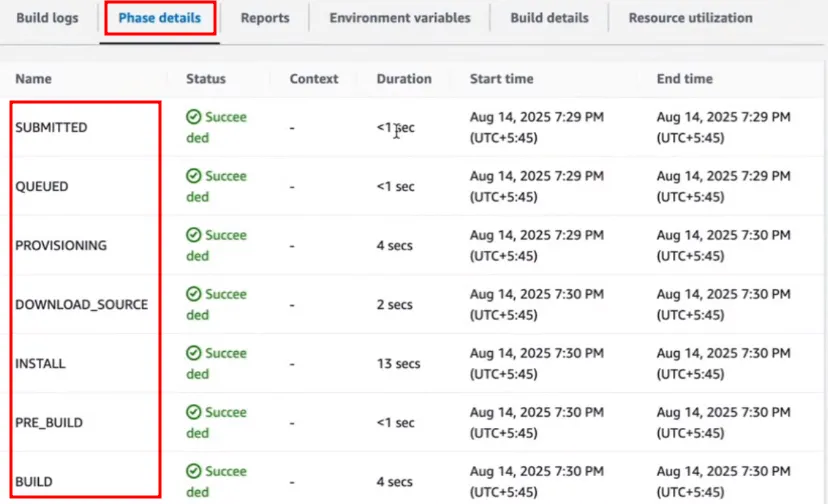
phase details
Reports
can also see the reports here.
Notifications
- Can send notification also based on the build status
- Build, success etc.
- Create target
- In which medium you want to send
- Teams, slack etc.
- In which medium you want to send
- Cna create SNS topic from here also.

- In edit option we can edit the project.
Clone
- To clone the same project and create do modifications in the cloned.
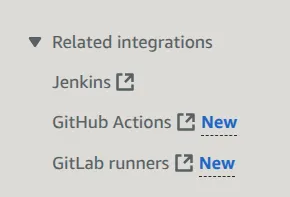
Further we can also integrate the our build with these software also
Code Deploy
If we built code from other method we can also deploy them here.
AWS CodeDeploy is a fully managed deployment service that automates software deployments to compute services such as Amazon EC2, AWS Lambda and your on-premises servers. AWS CodeDeploy makes it easier for you to rapidly release new features, helps you avoid downtime during application deployment and handles the complexity of updating your applications.
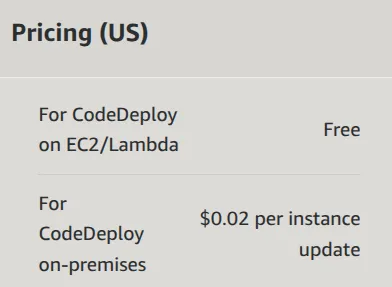
- Here we don’t need to pay for creating pipeline but we need to pay money for the EC2 instance that is a different thing.
For this we also need application code. We can place the code here or we can place in the git also .
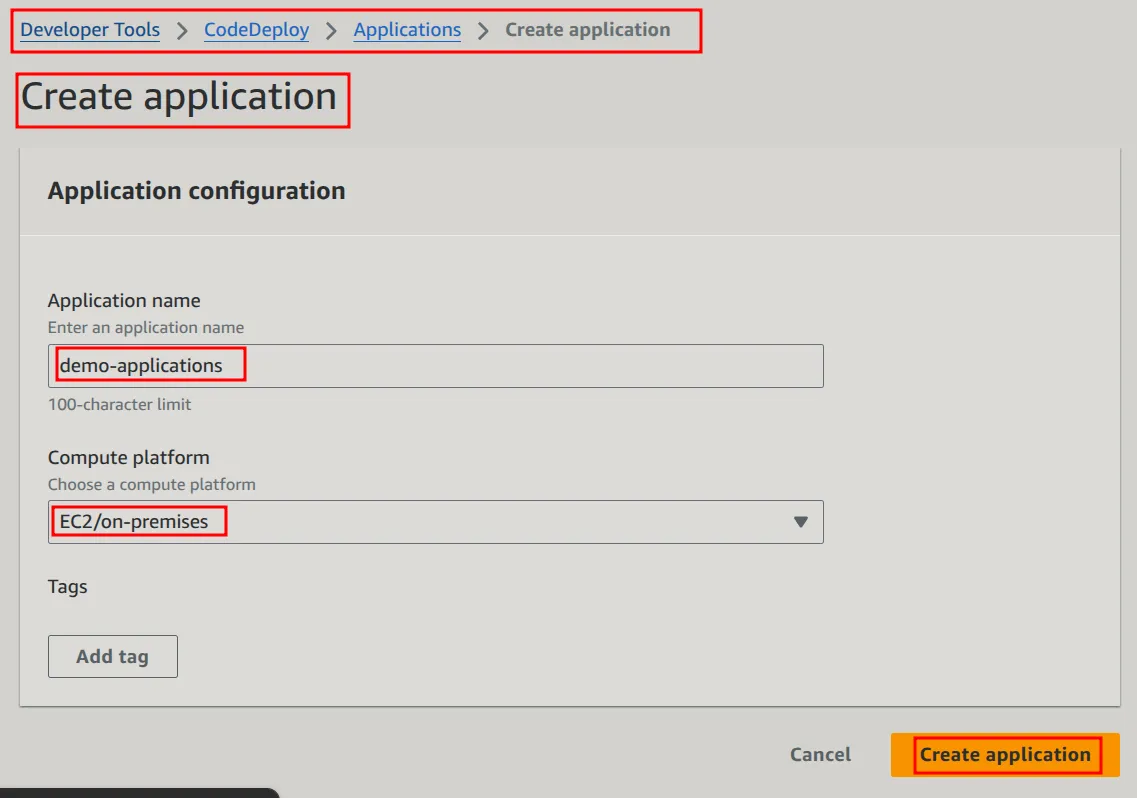
After that we need to create deployments groups from this menu after creating an application.
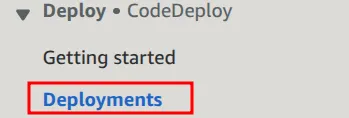
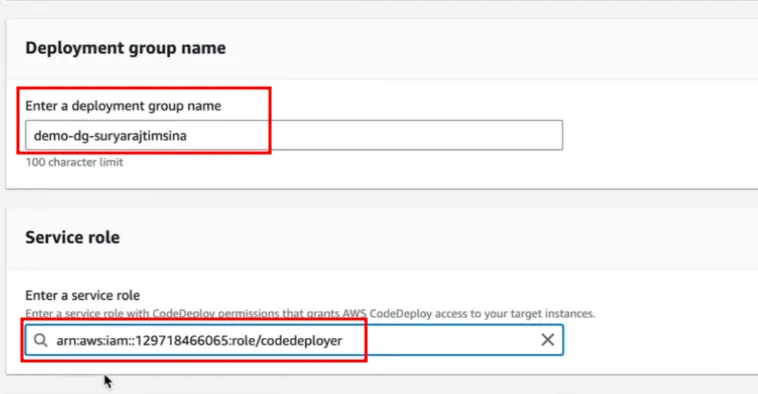
- Now provide the name of deployment group.
- name
- Service role
- Need to provide options
- If we want to deploy in EC2 then it will need EC2 permission
- If in EKS then EKS permission
- If in firegate then it will need its permission.
- For this we need to go to the IAM and then ROle.
- Trusted entity type
- AWS service
- Allow AWS services like EC2, Lambda, or others to perform actions in this account.
- AWS service
- Use cases
- Trusted entity type
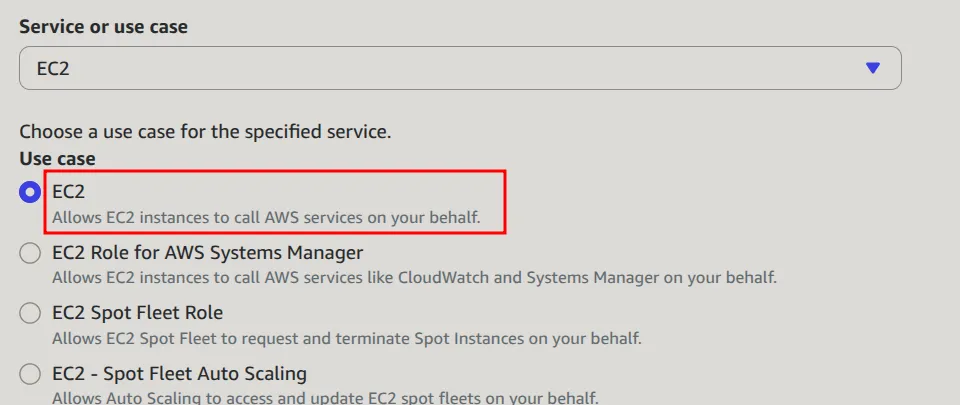
- Now click on next.
- Add permissions
- Now click next
- provide name and review the permissions.
- Now the role is created successfully.
Now we need to create another role for deployerer.
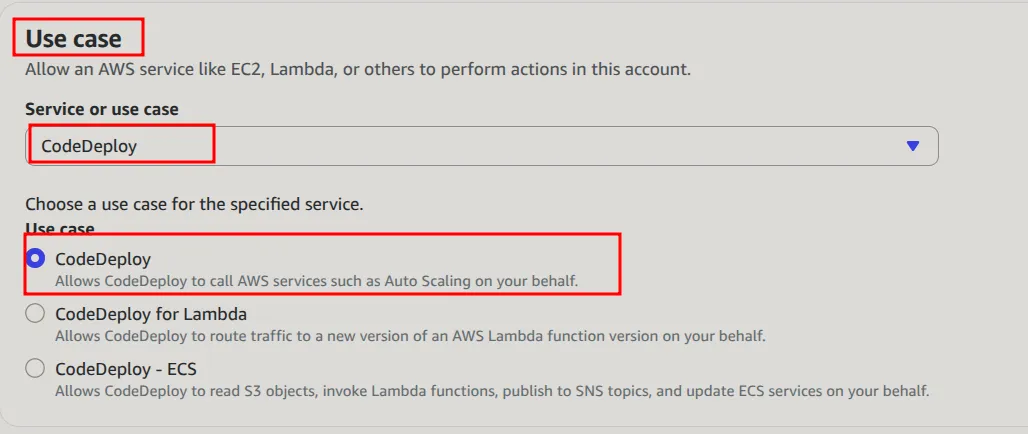
- Now provide the name and create another role here
- name is codedeployer
Now you can select the role in service role option of deployment group.
- Now in deployment type
- In-place or Blue/green
- For now we will select In-place
- Few popular deployment strategies are
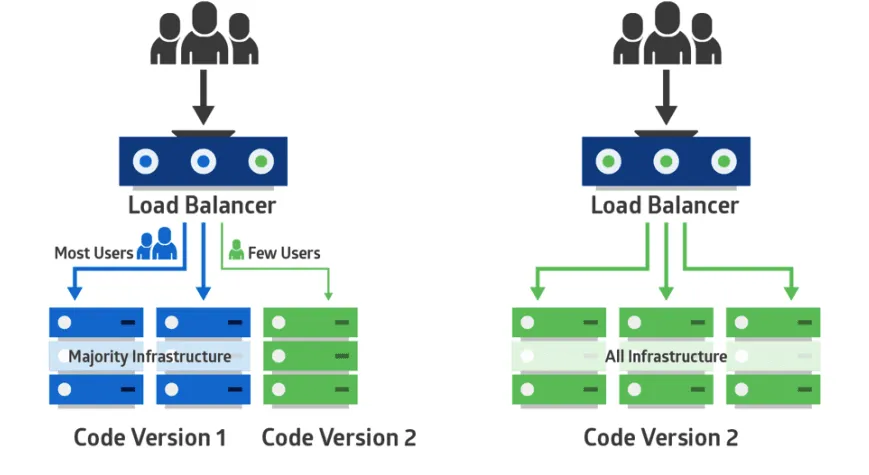
- Canary deploymentt
- Blue/green deployment
- In-place deployment //Similar to recreate strategy.
- Deploying the same machine.
Deployment strategies //Important in the case of DevOps
Blue/green deployment
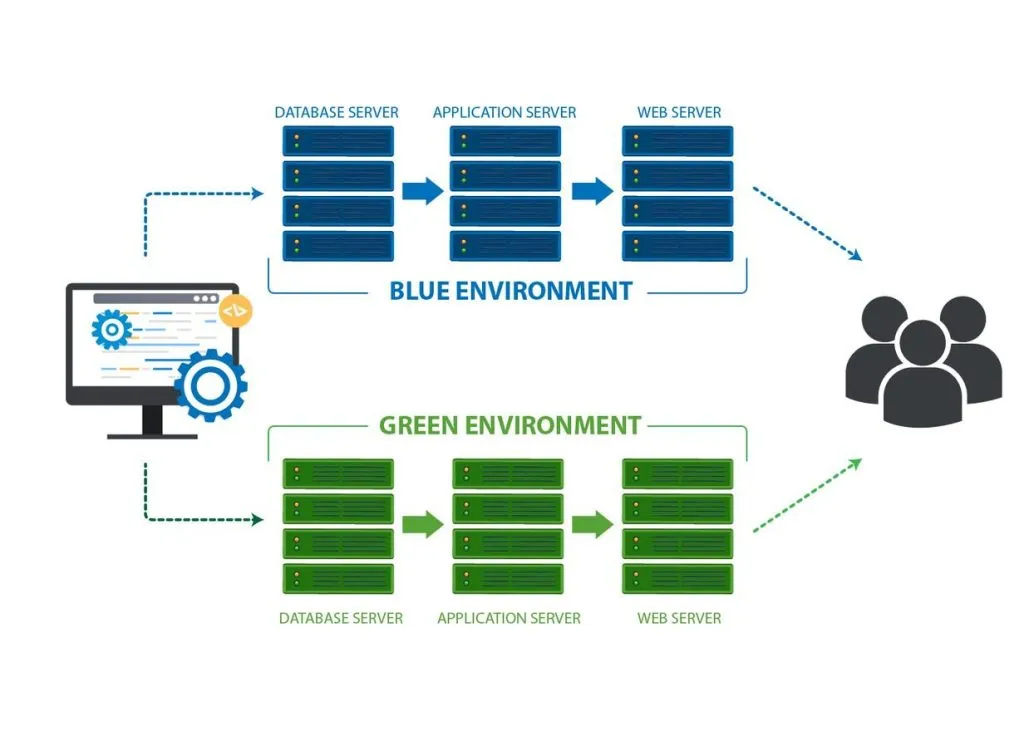
We will have a two different environment in this type of deployment. One is blue in which the service is currently running and another is green environment. Suppose we are running an application v1.0.0 in blue environment but now we want to upgrade this to v1.0.1. For this we will create a new environment called green environment and in this environment we will create, run, test our new version. If the new version is successful and has no error then we will now point out the DNS server to the green screen which was initially host blue environment. Simply we can say this as traffic switching.
Importance:
– Reduces downtime.
– Will not affect customer experience
Disadvantages:
– Expensive
Recreate deployment strategy
The Recreate deployment strategy in Kubernetes involves terminating all existing pods of a deployment before creating new ones with updated configurations. This “all-or-nothing” approach ensures a clean transition but causes downtime during the update process because no pods are running while the old ones are being terminated and the new ones are being created.
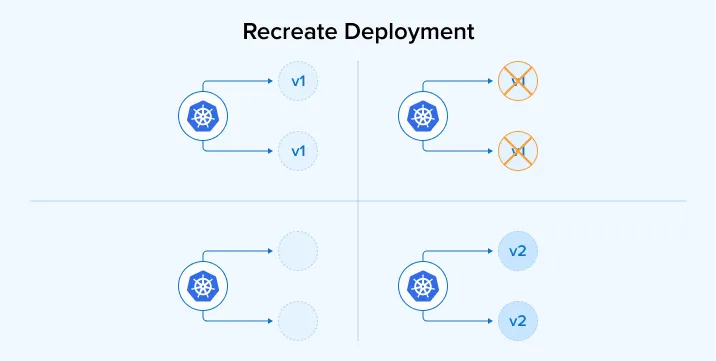
Used for non-critical applications.
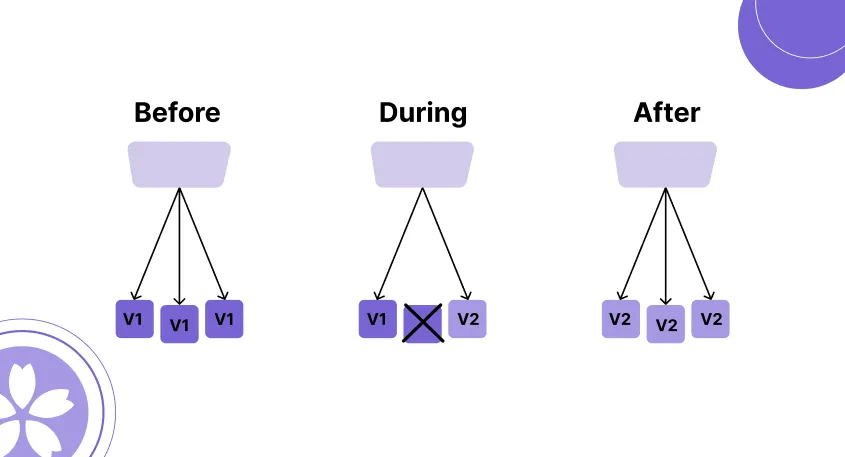
Rolling Updates strategy
A rolling update, also known as a rolling deployment, is a software deployment strategy that gradually replaces older versions of an application with newer ones, minimizing downtime and risk. Instead of updating all instances simultaneously, a rolling update incrementally replaces a small portion of the application at a time. This approach ensures that some instances are always running the previous version, maintaining service availability while the update process is underway.
Canary deployment strategy
Large no of customer and they are distributed in large geographical regions. The customer site is large and is in different geographical location. for example in the case of facebook. In this case new servers are created and only deployed among the selected customer only. ie; only few selected customers traffic will be redirected to the new instances.
For example when there is update on the facebook initially the features are firstly allocated in certain area like in the regions of usa. If it is stable then it will be redirected to other regions.
- Environment configuration
- Amazon Ec2 auto scaling groups
- can select auto scaling groups
- can use template and launch using auto scaling groups also
- Amazon EC2 instances
- can deploy directly in EC2 instances
- On-premises instances
- In our on-premise instance
- For now we will deploy directly in EC2 instance.
- Amazon Ec2 auto scaling groups
- Aws configuration with AWS system manager
- we can install this agent
- We can select never.
- Deployment
-
For example:
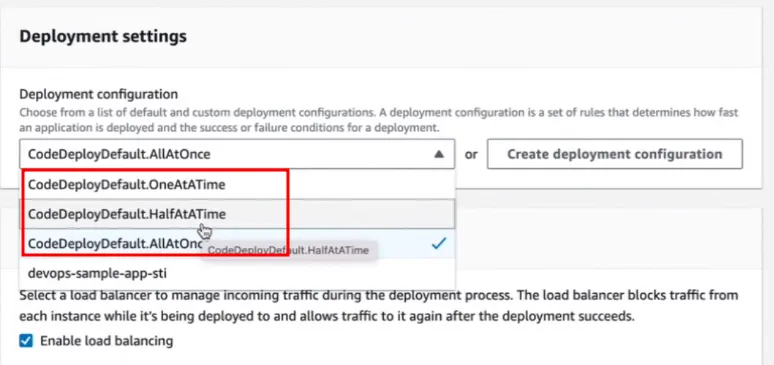
- Auto scaling group ma desired stated 3, max 4 and desired 3. So there are 3 instances running right so we can configure how we want to deploy in them.
- While deploying in what type we want to deploy
- Like all at once
- Half at time
- or one at time
-
Load balancer
- Can create load balancer also
For this i am using simple application code repo name; aws code codedeploy but i think this code is not complete for now so let’s deploy another code for the other code link look below.
appspec.yml
similar to build spec we need to write the file to define the deployment process.
Here;

version: 0.0    //version
os: linux       //os for deploy is linux
files:
  - source: /
    destination: /var/www/html/  //copy to this path
hooks:
  BeforeInstall:
    - location: scripts/install_dependencies  //run this                                                script

      timeout: 300
      runas: root
    - location: scripts/start_server
      timeout: 300
      runas: root
  ApplicationStop:
    - location: scripts/stop_server
      timeout: 300
runas: rootOther files.
install_dependencies

#!/bin/bash
apt-get install -y nginx

echo "<h1>Server Details</h1><p><strong>Hostname:</strong> $(hostname)</p><p><strong>IP Address:</strong> $(hostname -I | cut -d" " -f1)</p>" > /var/www/html/index.html

start_server   //TO start the server

#!/bin/bash
service nginx start

stop_server      //To stop nginx server
#!/bin/bash
isExistApp = `pgrep nginx`
if [[ -n  $isExistApp ]]; then
    service nginx stop
fi- Now need to create a load balancer
- Application load balancer
- Name ;provide a name
- ipv4
- vpc
- default vpc
- Availabilty zones
- can select all or specific availability zones
- Security group
- HTTP access allow
- anywhere ipv4
- HTTP access allow
- Now assign target group
- create target group.
- Deploy 2 instances and add them to the target group.
- select target group after creating them and create the load balancer.
- create launch template also.
- can attach key pair or can attach later
- NOTE: It is better to attach key pair because of this we can login to the machine and that will help us to troubleshoot.
- security group
- can select now or later
- Advanced details
- Need to attach codedeploy role that we have created earlier
- can attach key pair or can attach later

User data – optional ; Add this code here in the place of user data.
#!/bin/bash
sudo apt-get update -y
sudo apt-get install ruby -y
sudo apt-get install wget -y
cd /home/ubuntu
wget https://aws-codedeploy-us-east-1.s3.amazonaws.com/latest/install
chmod +x ./install
sudo ./install auto
service codedeploy-agent start
rm install- Now create the launch template.
Now using this template create the auto scaling group.
- provide name
- select launch template
- select versionb
- default version
- select the vpc
- select availability zones
- can select specific or all based on your need
- Load balancing
- Select the load balancer that we have created earlier.
- Congifure group size and scaling
- Desired capacity 2
- minimum 1
- maximum 2
- Can add notification also but for now i am not adding this
- review and create this auto scaling groups.
After that the auto scaling group will now launch the templates.
- Now download this code using git clone and zip the code .
- After that upload that zip file in the s3 bucket.
Now create deployment group
- Name: provide a name
- Enter a service role
- Enter a service role with CodeDeploy permissions that grants AWS CodeDeploy access to your target instances.
- service role that we have created earlier . Attach that role here
- Deployment type
- In-place
- Environment configuration
- Amazon EC2 Auto Scaling groups
- Select the auto scaling group that you have created earlier.
- Deployment settings
- Half at a time
- Load balancer
- Enable load balancing
- Load balancer type
- Application load balancer
- Choose target group
- Need to choose the target group that we have created earlier.
- Create deployment group
Now after creating deployment group we can see the option of create deployment. so now it’s time to create deployment.
- Deployment group
- Show the name of deployment group here
- revision type
- Our code in s3 so need to provide path
- Go to s3 click the bucket and then copy the s3 URI.
- s3://… this format
- file type
- .zip /If it is not zip format.
After doing this for now create deployment. Now you can see the details what is happening by clicking on view Events.
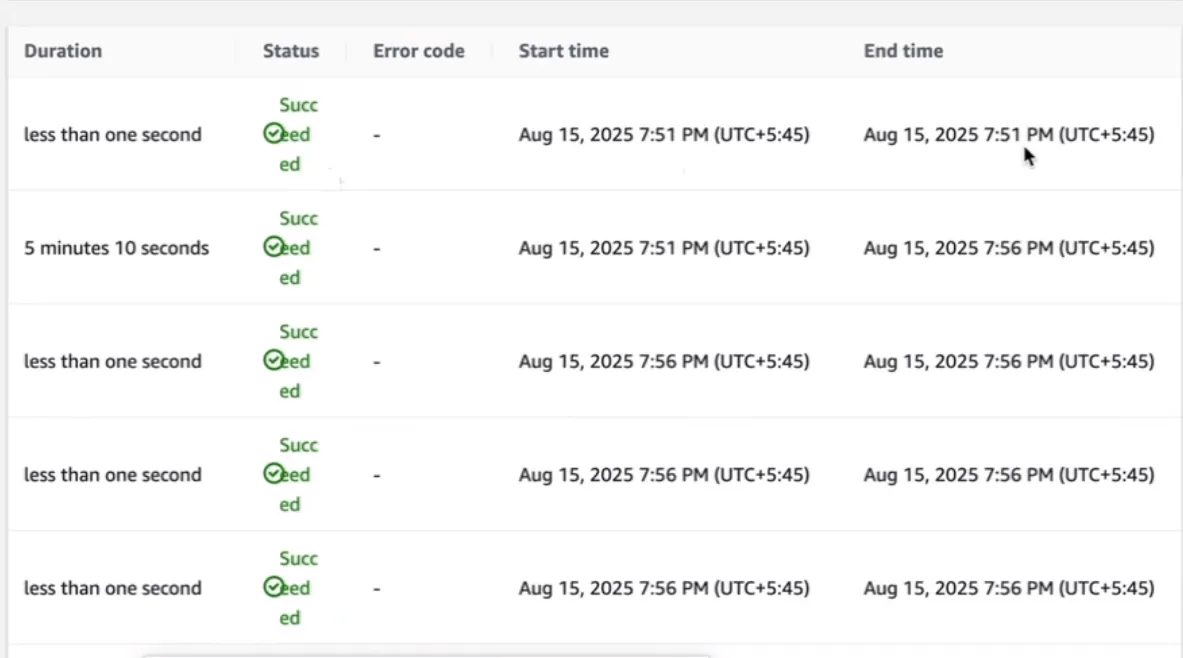
- Now we can see the events here like what is happening in detail.
- Now if we browse the load balancer IP or the IP of the instance then we can see the application is running successfully.
- http://ip_of_machine. or you can browse through the load balancer also.
- If we want to upload the new changes to the site then we can do when we upload the changes to s3.
Now we can stop deployment and also can do rollback also.
Code pipeline
From here we can set the complete the pipeline from here.
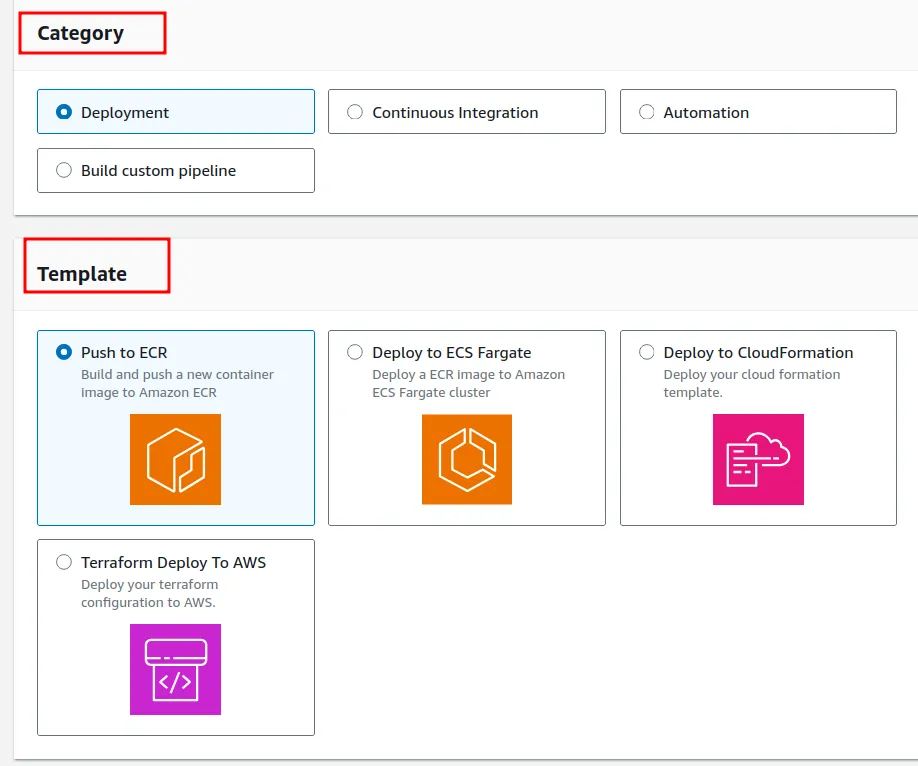
- Now let’s select build custom pipeline
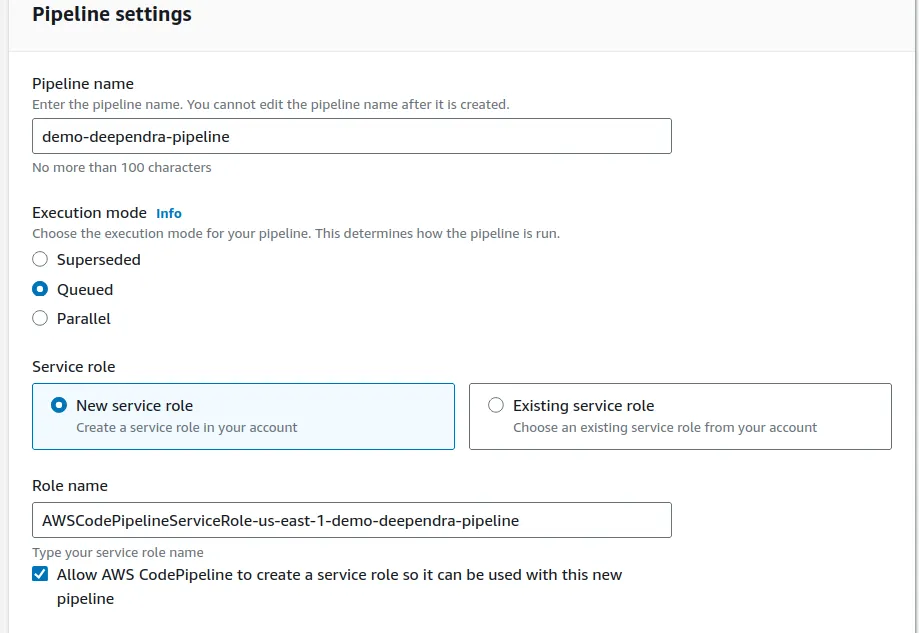
- Provide name of the pipeline
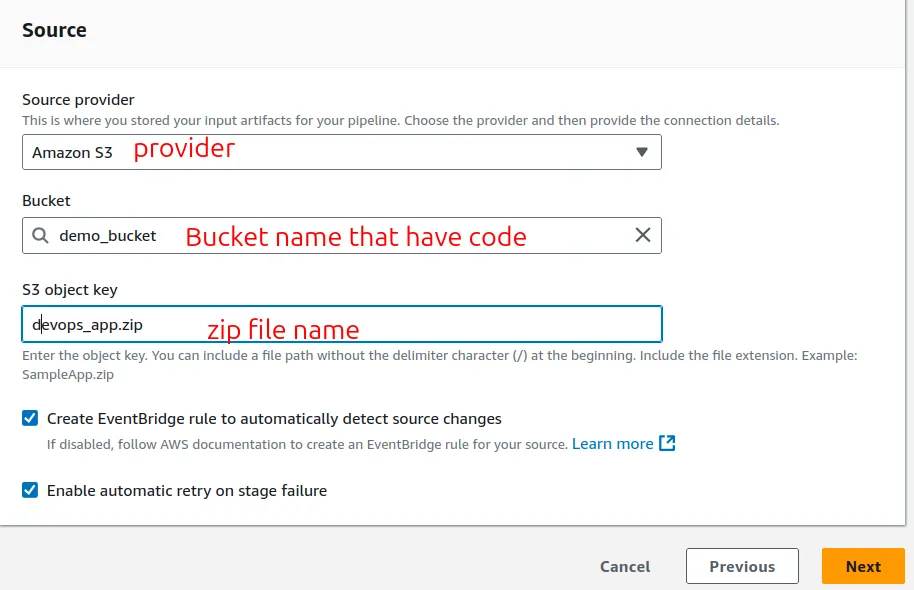
Note: here if we are doing from s3 bucket and setting up pipeline then we need to Enable bucket versioning in s3.
- Create EventBridge rule to automatically detect source changes
- Untick this option for now
- Build – optional
- For now we can skip this phase if we don’t have to build
- Test stage
- Test provider
- Choose how you want to test your application or content. Choose the provider, and then provide the configuration details for that provider.
- can integrate many things
- can skip this phase also
- Add deploy stage
- select code deployment if you are practicing on that
- there are other several options also
- Application name
- Select application name from lise
- Deployment group
- Select deployment group from here
- Now if you click in create pipeline.
- You can do all these things in the pipeline
- All the steps and stages.
- In the case of fail we can rerun the specific stage also.
You can further do modifications based on you preferences.
Keep reading
- AWS Global Infrastructure cert
AWS Global Infrastructure Overview The AWS Global Infrastructure is designed and built to deliver a flexible, reliable, scalable, and secure cloud computing environment with high-quality global…
- Cloud Computing Economics
Fundamentals of pricing AWS Pricing Model Three fundamental drivers of cost with AWS There are three fundamental drivers of cost with AWS: compute, storage, and outbound data transfer. These…
- VPC
VPC We can isolate resources from other resources and also isolate it from other resources.Amazon Virtual Private Cloud (VPC) is an Amazon Web Services (AWS) service that allows you to launch AWS…