Amazon EC2 Hands-On: Launch, Scale and Monitor Instances
Launch an EC2 instance and connect over SSH, then add a launch template, an Auto Scaling group, an Application Load Balancer and a CloudWatch alarm, with fixes for common errors.

ON THIS PAGE
Amazon EC2 is where most AWS workloads begin, and its building blocks (key pairs, security groups, AMIs, load balancers) reappear in almost every other AWS service. This guide launches an Ubuntu instance, secures it with a security group and connects over SSH. It then scales the workload behind an Application Load Balancer with an Auto Scaling group, adds a CloudWatch alarm that emails you and stops a busy instance, and closes with the errors you are most likely to meet.
Prerequisites
- An AWS account with permission to manage EC2, CloudWatch and SNS resources.
- An SSH client (OpenSSH on Linux, macOS or Windows 10 and later).
- Familiarity with creating a VM in VirtualBox or VMware helps, but is not required.
On-prem VM vs EC2 instance
Amazon EC2 (Elastic Compute Cloud) provides virtual servers, called instances, on demand. Creating one follows the same steps as creating a VM in VirtualBox. The difference is who performs each step:
| Step | On-prem VM (VirtualBox, VMware) | Amazon EC2 |
|---|---|---|
| Hypervisor | You install and manage it | AWS manages it |
| Name | VM name | Name tag |
| Operating system | Attach an ISO and install it | Pick an AMI with the OS already installed |
| CPU and RAM | Set cores and memory by hand | Pick an instance type, for example t3.micro |
| Login | Create a user and password | Key pair (SSH key) |
| Network | NAT, bridged, port forwarding | VPC, subnet, public IP, security group |
| Disk | Virtual disk file | EBS volume |
| Provisioning | Install packages after first boot | User data script runs at first boot |
An AMI (Amazon Machine Image) is a template that holds the OS and, optionally, installed software. It works like an exported VirtualBox appliance: many identical machines launch from it, and launching is fast because nothing needs installing. You can also create your own AMI from a configured instance and keep it private or share it.
EC2 instance families
An instance type name such as t3.micro has three parts: the family (t), the generation (3) and the size (micro). A g after the generation, as in m6g or c7g, indicates an ARM-based AWS Graviton processor.
| Family | Good at | Typical use | Example types |
|---|---|---|---|
| General purpose | Balanced CPU, memory and network; t types can burst CPU when needed | Blogs, small web apps, dev and test servers | t3, t4g, m5, m6i, m6g |
| Compute optimized | Fast CPUs for compute-heavy work | Video transcoding, busy API servers, simulations | c5, c5n, c6g, c6i, c7g |
| Memory optimized | High RAM per vCPU | Redis or Memcached, in-memory analytics, large databases | r5, r6g, r6i, x1e, x2idn, u- |
| Accelerated computing | GPUs or FPGAs | Machine learning training and inference, 3D rendering | p3, p4, g4dn, g5, f1 |
| Storage optimized | Fast local NVMe or dense HDD storage | NoSQL databases, log indexing, data staging | i3, i3en, d2, d3en, im4gn, is4gen |
| HPC optimized | Many nodes with low-latency networking | Weather models, molecular dynamics, fluid simulations | hpc6a, hpc7g |
The full list is on the Amazon EC2 instance types page. This lab uses t3.micro (2 vCPU, 1 GiB memory).
Launch the first instance
Name, AMI and architecture
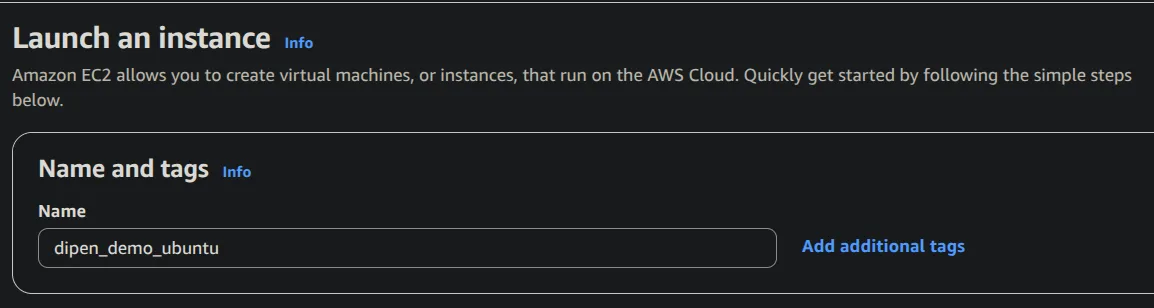
Open EC2 → Instances → Launch instances and give the instance a Name tag. Tags make resources easy to find, filter and track in billing, so tag every resource you create.
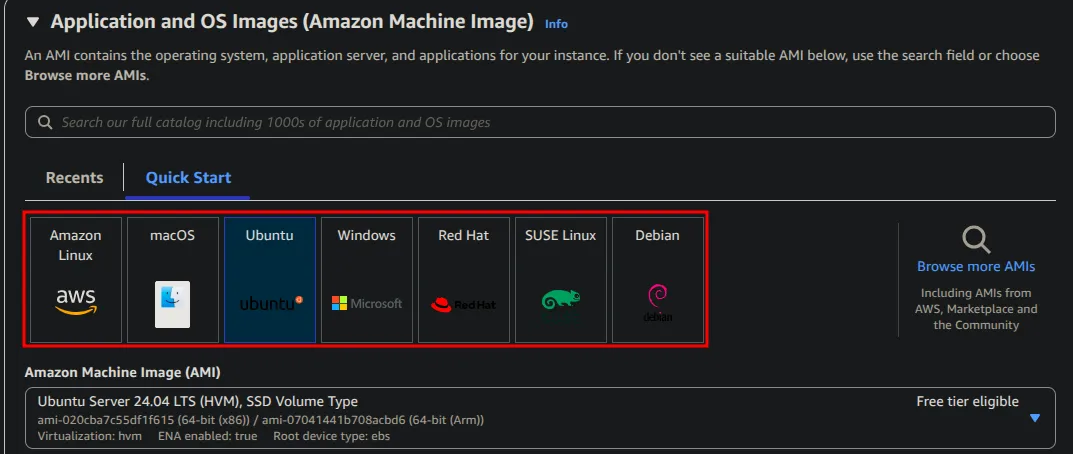
Next, pick the AMI. This lab uses Ubuntu Server 24.04 LTS from the Quick Start list.
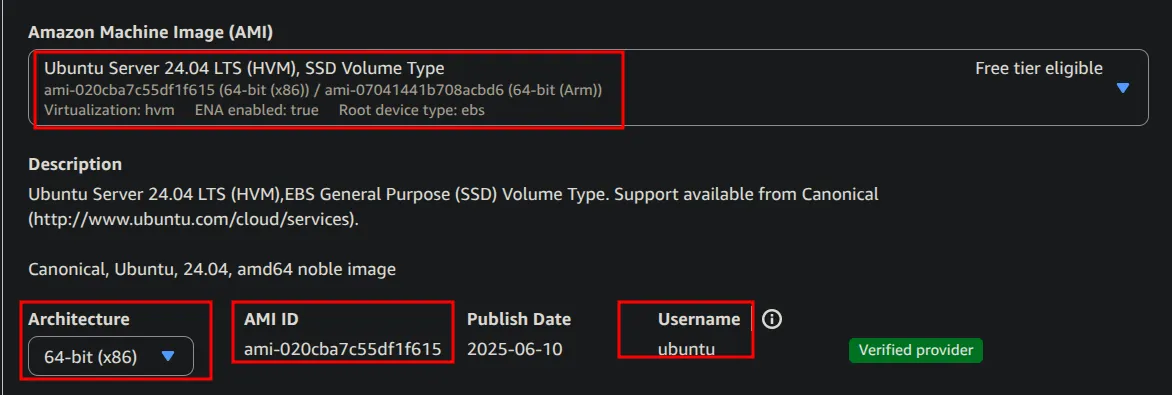
The AMI details show three values to note:
- Architecture: x86 or Arm. This lab uses 64-bit x86.
- AMI ID: the same image has a different AMI ID in each Region.
- Username: the default login user. It is
ubuntufor Ubuntu AMIs andec2-userfor Amazon Linux.
Key pair
Linux AMIs use SSH key login by default, with password login disabled. (Windows instances use an Administrator password, which you decrypt with the key pair.) There are two options:
- Create the key pair in AWS and download the private key.
- Import your own public key generated locally. AWS needs only the public key, never the private key.
To import a key, generate it locally and use Key Pairs → Actions → Import key pair:
$ ssh-keygen -t rsa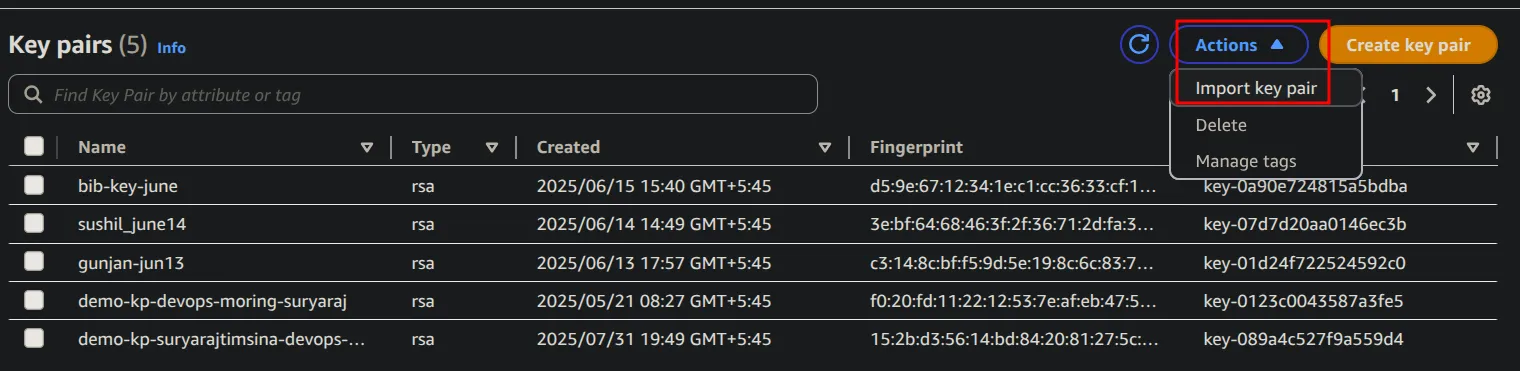
This lab creates the key in AWS. Choose .pem for OpenSSH (Linux, macOS, Windows 10 and later), and .ppk only for PuTTY on Windows.
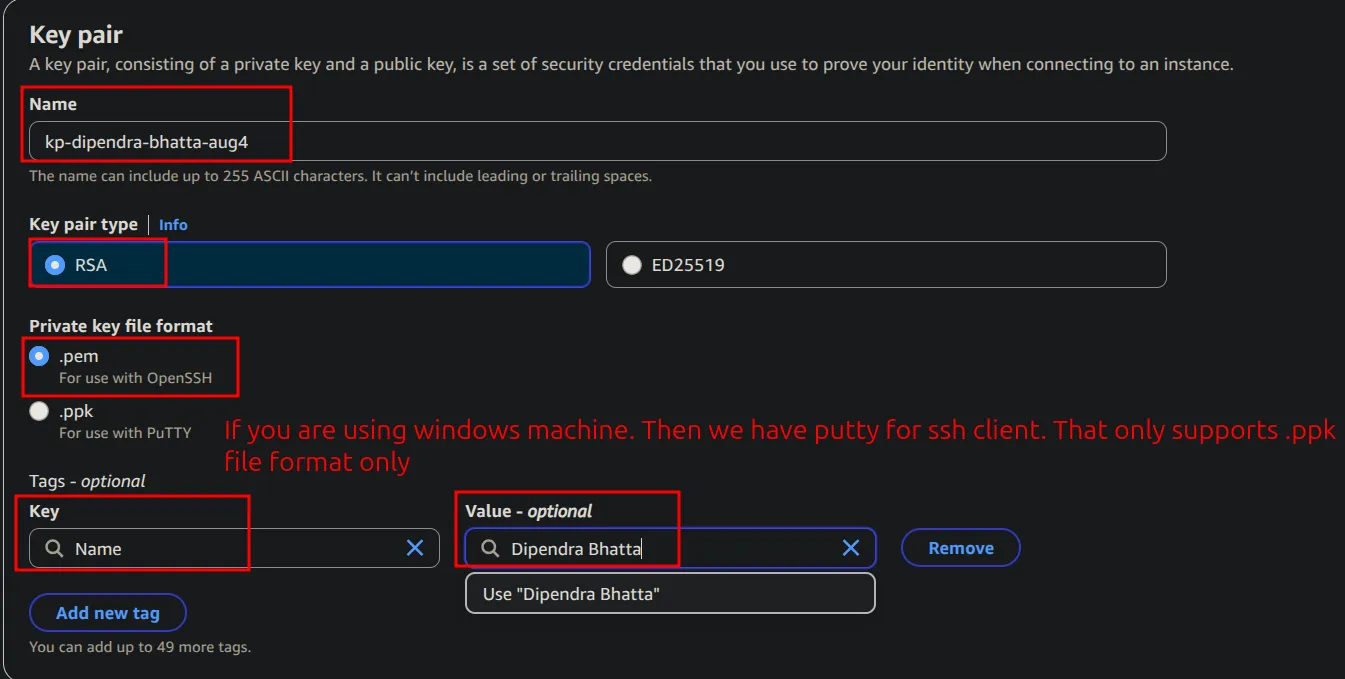
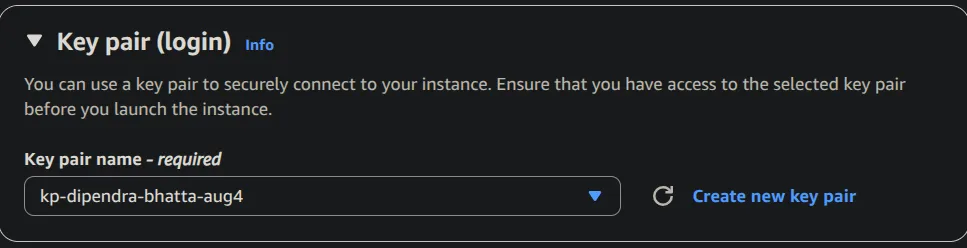
The browser downloads the private key file once. AWS does not keep a copy, so a lost key cannot be downloaded again; you must create a new key pair. The new key then appears in the launch wizard dropdown.
Network settings and the security group
The default VPC is sufficient for a first instance. A custom VPC is built in the VPC part of this series.
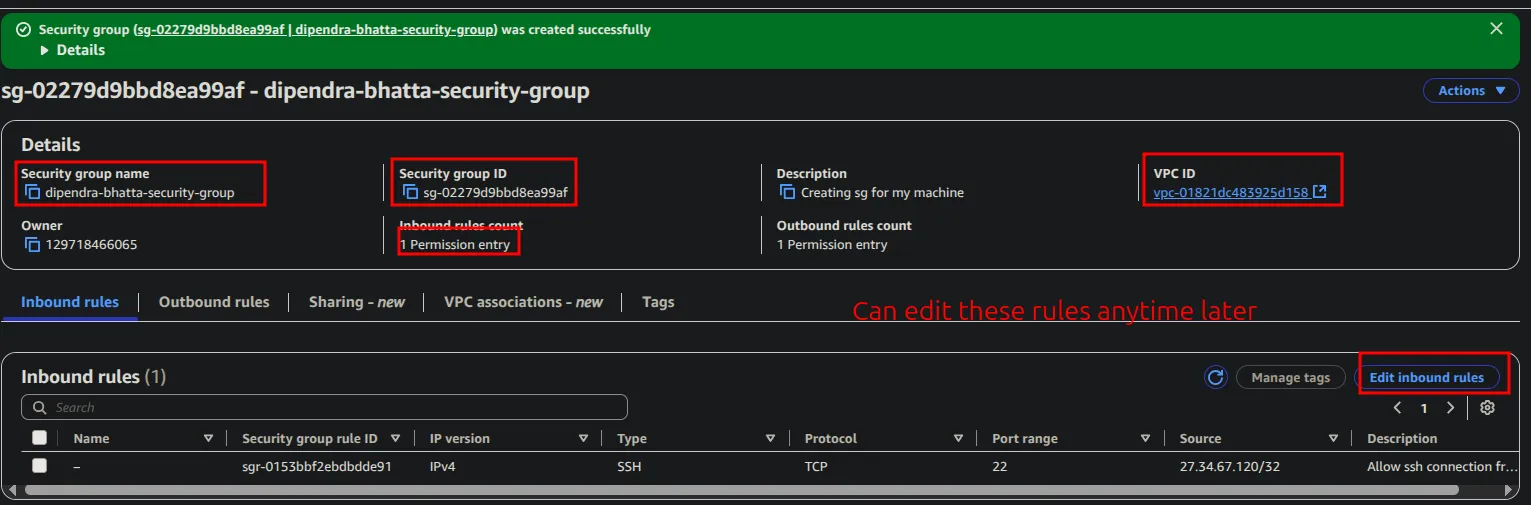
A security group is a virtual firewall attached to the instance. Its rules control which traffic may reach the instance (inbound) and leave it (outbound), by source IP or network, protocol (SSH, HTTP, HTTPS, FTP) and port. Create one from Network & Security → Security Groups → Create security group:
- Inbound: SSH, TCP port 22, source My IP, so only your current public IP (a
/32) can connect. - Outbound: all traffic, which is the default.
- Tag:
ownerwith your name.
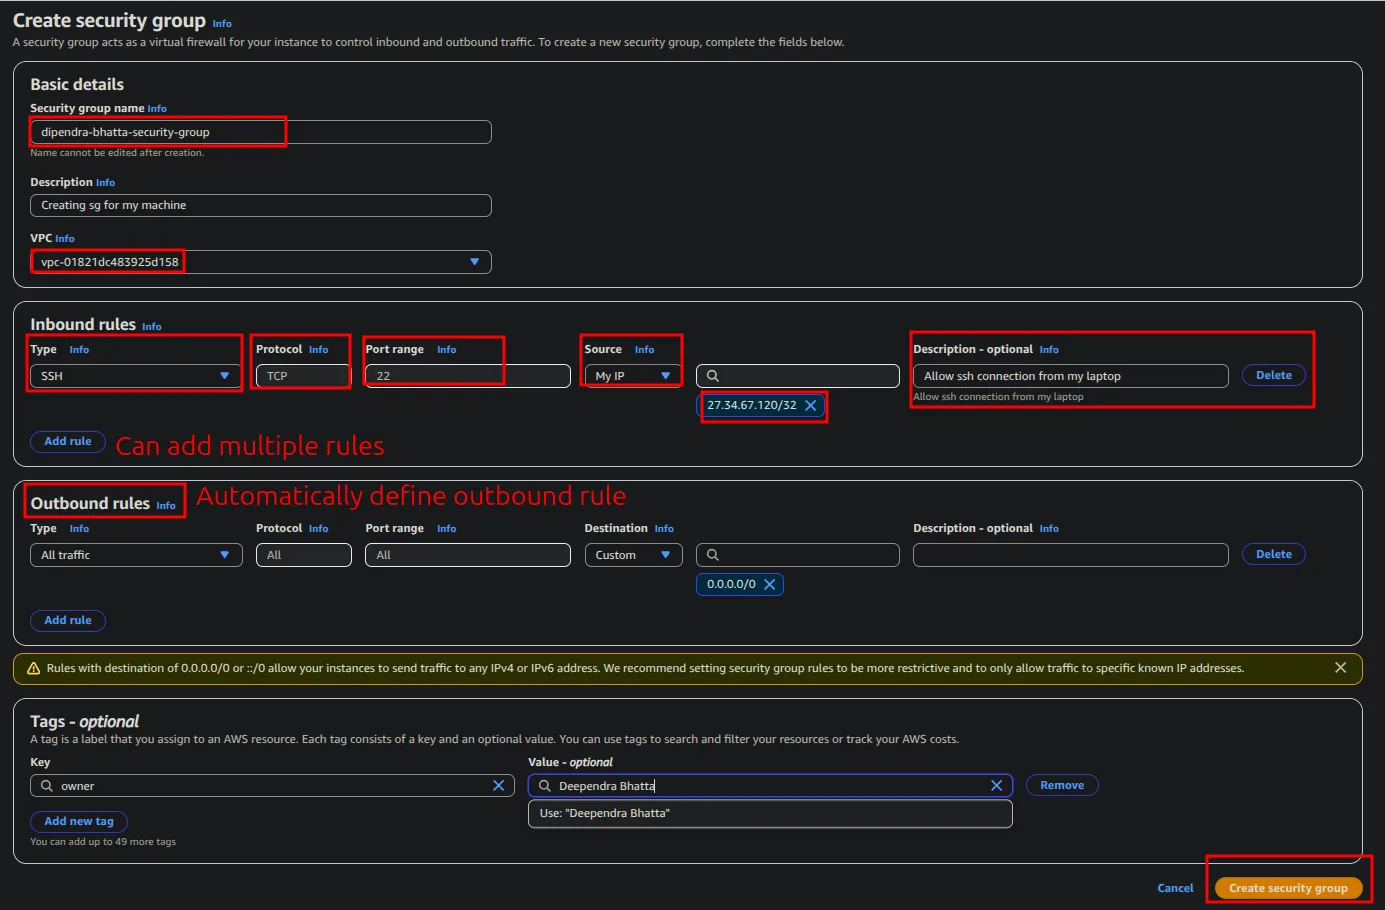
Rules can be edited at any time after creation; the name cannot.
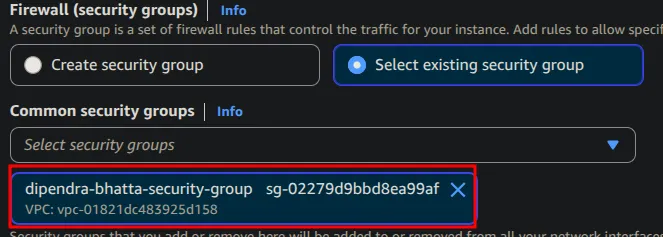
Back in the launch wizard, choose Select existing security group and pick the new group.
Security groups vs network ACLs
Every connection has two directions. During an SSH session, the instance receives inbound SSH traffic and sends its replies back as outbound traffic. Security groups and network ACLs (NACLs) handle those replies differently:
- Security groups are stateful. They track connections. If an inbound rule allows a request, the reply is allowed out automatically, with no outbound rule required. For example, allow inbound HTTP on port 80 and the web server's responses leave without an extra rule.
- Network ACLs are stateless. They evaluate every packet on its own, in each direction. If a NACL allows inbound HTTP on port 80, the reply also needs an outbound rule. The reply goes to the client's temporary (ephemeral) port, usually in the range 1024-65535, not to port 80.
| Security group | Network ACL | |
|---|---|---|
| Attached to | Instance (its network interface) | Subnet |
| State | Stateful: replies are allowed automatically | Stateless: replies need their own rule |
| Rule types | Allow only | Allow and deny |
| How rules are checked | All rules together | In number order; the first match wins |
| Default | New group: no inbound, all outbound | Default NACL: all inbound and outbound allowed |
Advanced details and user data
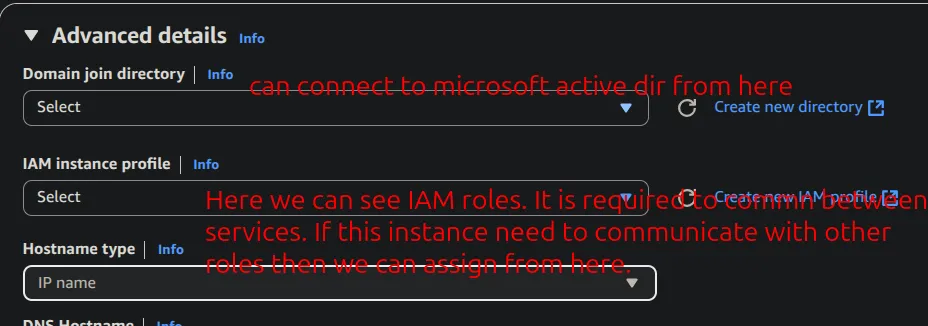
The Advanced details section contains several settings that matter in production:
- IAM instance profile: attach an IAM role when the instance needs to call other AWS services, for example to write to S3. The instance receives temporary credentials, so no access keys are stored on it. See the IAM part of this series.
- Domain join directory: joins the instance to an AWS Directory Service (Microsoft Active Directory) domain.
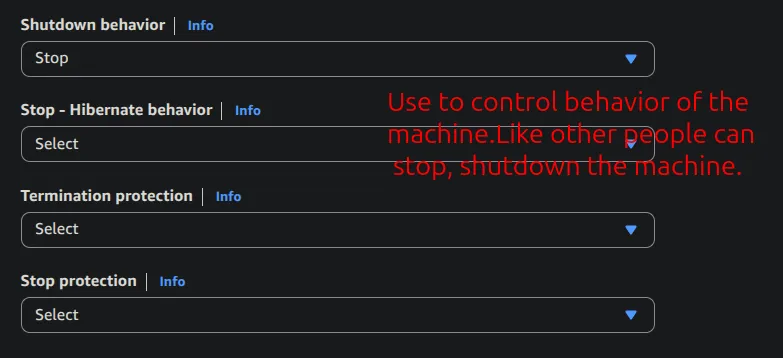
- Shutdown behavior: whether a shutdown from inside the OS stops or terminates the instance.
- Termination protection and stop protection: block accidental termination or stop from the console or API.
User data is a script that runs once, as root, on the first boot, similar to provisioning in Vagrant. This script installs Apache and writes a test page:
#!/bin/bash
apt update
apt install -y apache2
echo "Hello from ubuntu aws" > /var/www/html/index.htmlClick Launch instance. The instance reaches the running state within about a minute.
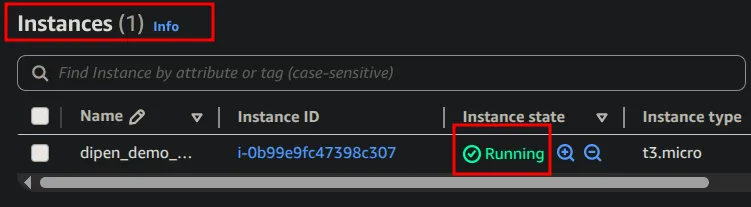
Click the instance ID to see its details: the public IP and public DNS name assigned by AWS, the private IP, status checks and monitoring graphs.
Connect with SSH
From the directory that holds the key, restrict the key's permissions and connect:
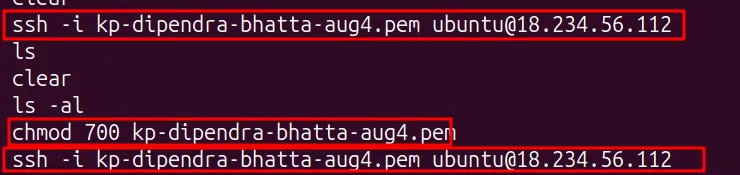
$ chmod 400 kp-dipendra-bhatta-aug4.pem
$ ssh -i kp-dipendra-bhatta-aug4.pem ubuntu@18.234.56.112ssh refuses a private key that other users can read. AWS recommends chmod 400 (read-only for the owner). chmod 700 also works, because group and others still get no access.
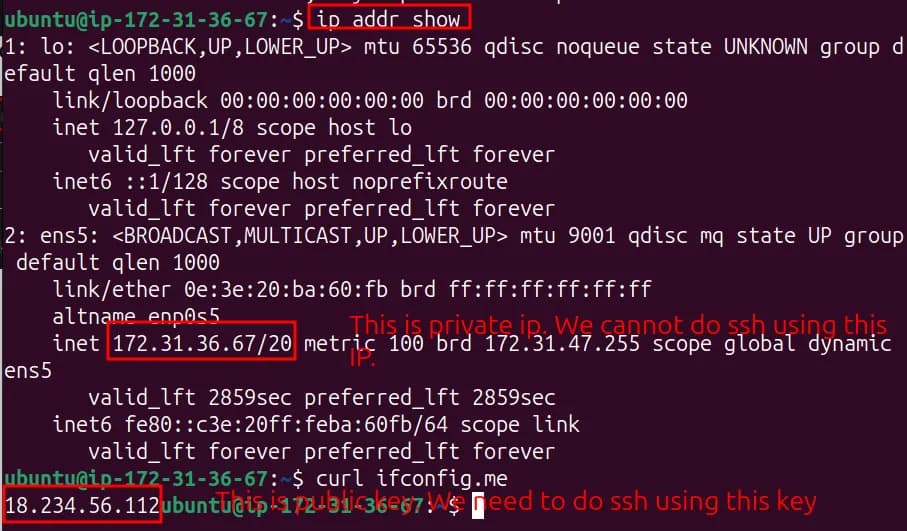
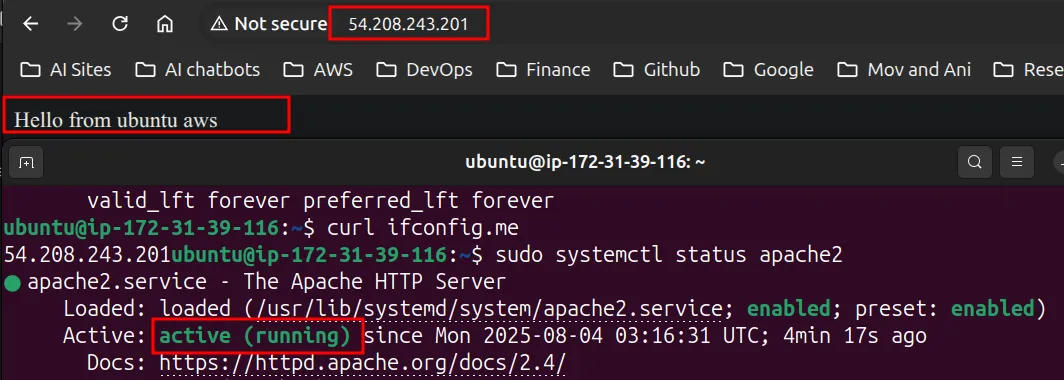
Inside the instance, ip addr show lists only the private IP (172.31.36.67). The public IP is not on any network interface; AWS maps it to the private IP at the internet gateway. curl ifconfig.me returns the public IP, which is the address to use for SSH from outside.
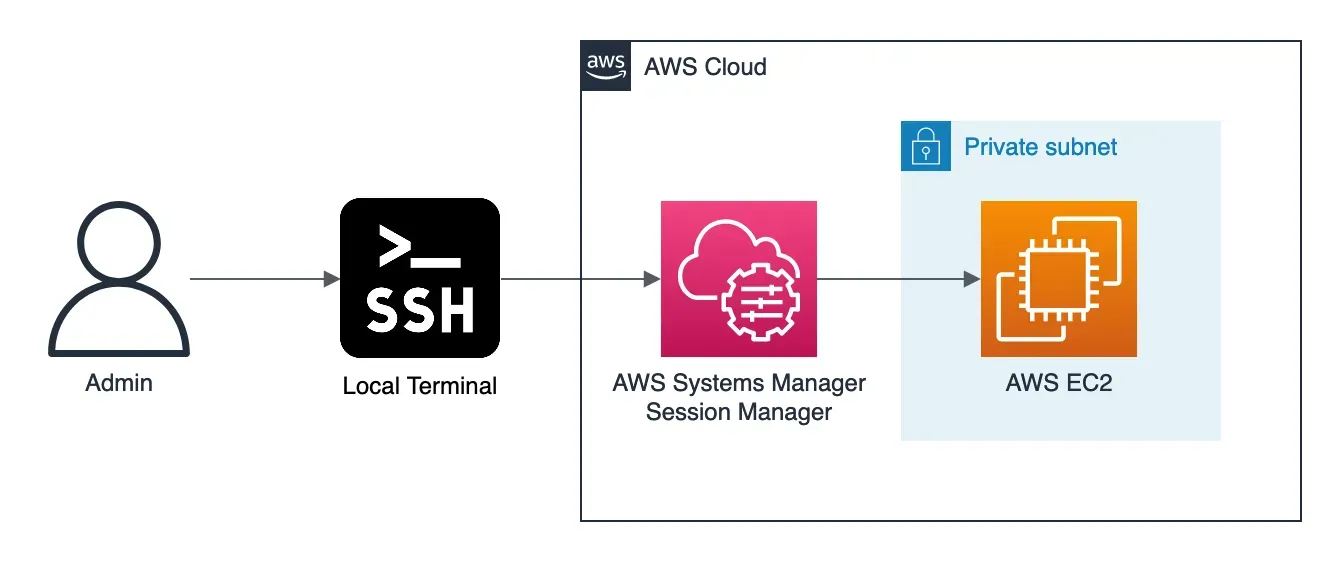
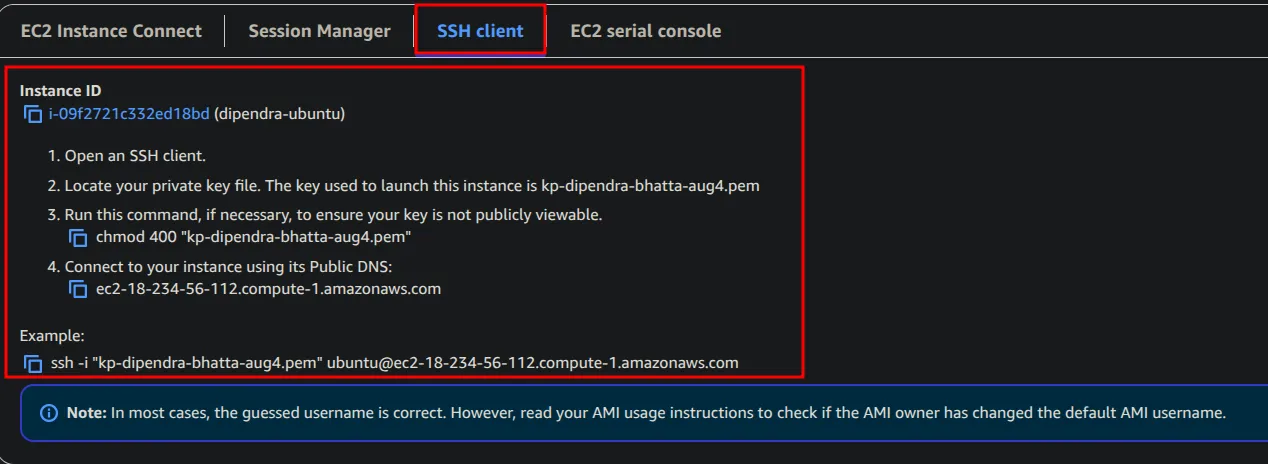
The instance's Connect page has an SSH client tab with the exact commands. The other tabs (EC2 Instance Connect, Session Manager, EC2 serial console) open a session from the browser.
Open HTTP for Apache
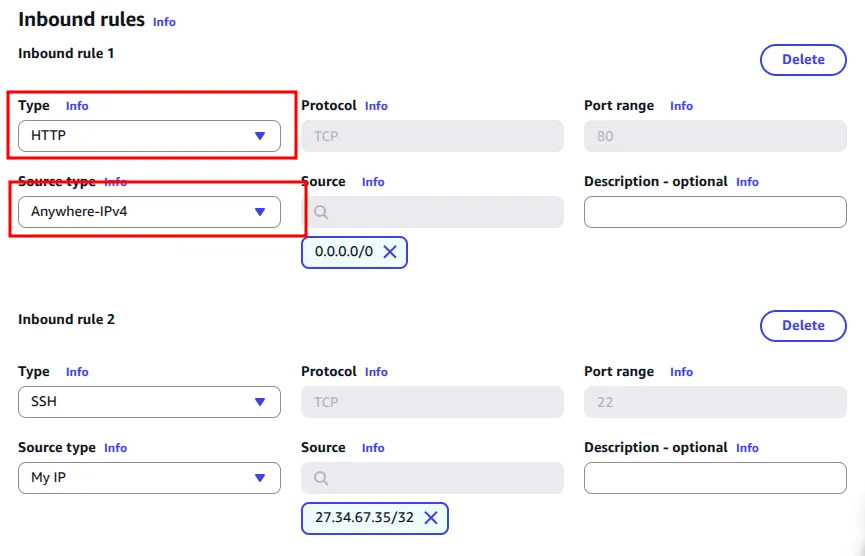
User data installed Apache, but the browser cannot reach it yet, because the security group allows only SSH. Add an inbound rule for HTTP on port 80 from your IP:

After you save the rule, the page loads and systemctl status apache2 shows the service running.
Elastic IP addresses
An auto-assigned public IP is released when the instance stops, and a new one is assigned when it starts again. A reboot keeps the same IP. A changing IP breaks DNS records and saved SSH commands.
An Elastic IP is a static public IPv4 address that you allocate to your account and associate with an instance. It persists across stop and start. The default limit is 5 Elastic IPs per Region, and AWS can raise it on request. Like all public IPv4 addresses, an Elastic IP is charged, including when it is not attached to anything, so release unused ones.
AMIs and launch templates
Once an instance has the required software and configuration, it can become a template. Actions → Image and templates → Create image builds an AMI from the instance, and any number of identical machines can launch from that AMI.
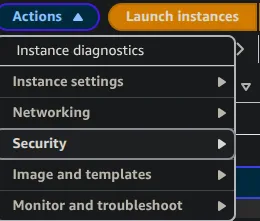
A launch template goes one step further. It stores all launch settings: AMI, instance type, key pair, security group and user data. Templates are versioned, and Auto Scaling groups use them to launch instances. The Auto Scaling section below creates one.
Dedicated hosts
A host is the physical server, and instances are the VMs that run on it. In VirtualBox terms, the laptop is the host and the VMs are the instances. By default, EC2 instances from different AWS customers can share a physical host, isolated by the hypervisor.
- Dedicated Host: a whole physical server reserved for your account. Its sockets and cores are visible, and you control instance placement. This matters for software licensed per socket or per core (bring your own license) and for some compliance requirements.
- Dedicated Instance: instances run on hardware used only by your account, without control over the physical host.
Both cost more than the default shared tenancy.
Auto Scaling groups
Scaling changes capacity as load changes:
- Vertical scaling: make one machine bigger. The IP stays the same, but EC2 requires a stop to change the instance type.
- Horizontal scaling: add or remove machines. Each new instance has its own IP and DNS name, so a load balancer is required to give users one address.
An Auto Scaling group (ASG) performs horizontal scaling. It launches or terminates instances to keep the count within three bounds:
- Minimum: the group never goes below this count, even under low load.
- Desired capacity: the number of instances it keeps running under normal conditions.
- Maximum: the group never goes above this count, even under heavy load.
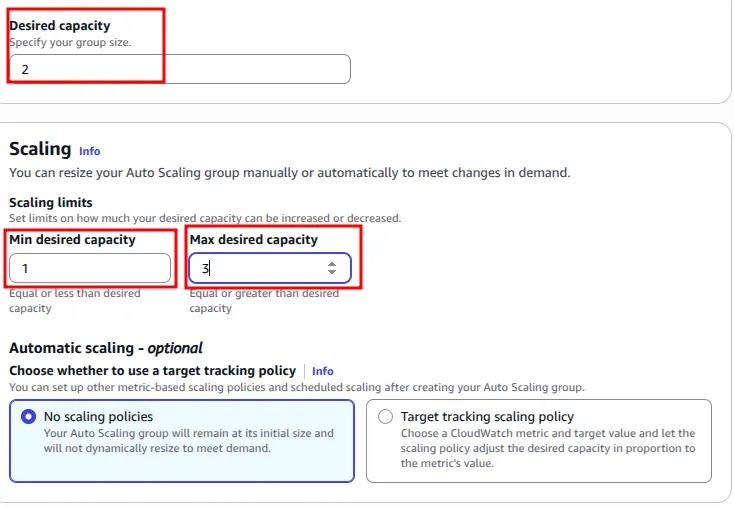
With minimum 1, desired 2 and maximum 3, the group normally runs 2 instances, and a scaling policy can shrink it to 1 or grow it to 3. If an instance fails a health check or is terminated, the ASG launches a replacement. ASGs can also spread instances across Availability Zones, mix instance types, and perform rolling replacements with instance refresh.
Spot Instances suit ASGs well. Consider a restaurant: a reserved table is held for you, while a walk-in guest may get a table, but nothing is guaranteed.
- On-Demand: pay by the second, with no commitment.
- Reserved Instances and Savings Plans: commit to 1 or 3 years for a lower price, like reserving the table.
- Spot Instances: spare EC2 capacity at a large discount. AWS can reclaim it with a two-minute warning when it needs the capacity, like the walk-in table. There is no bidding any more; you pay the current Spot price.
An ASG replaces reclaimed Spot Instances automatically.
The Amazon EC2 Auto Scaling user guide covers every option. ASGs can be created from the console, the AWS CLI, CloudFormation, Terraform or Ansible.
Create the launch template
When Number of instances is above 1 in the launch wizard, AWS suggests EC2 Auto Scaling. The link opens the launch template form.
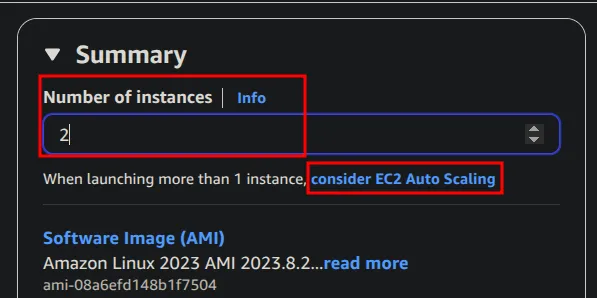
The form has the same fields as an instance launch: AMI, instance type, key pair, security group and user data. Subnets are chosen later, when you create the ASG. The template's user data writes each server's hostname and private IP into the page, which identifies the instance that served a request:
#!/bin/bash
apt update
apt install -y apache2

cat > /var/www/html/index.html <<EOF
<h1>Server Details</h1>
<p><strong>Hostname:</strong> $(hostname)</p>
<p><strong>IP Address:</strong> $(hostname -I | cut -d ' ' -f1)</p>
EOF

systemctl restart apache2User data runs as root, so the script needs no sudo. After you save it, the template appears under Instances → Launch Templates.

To change a template, use Actions → Modify template (Create new version). Each change creates a new version.
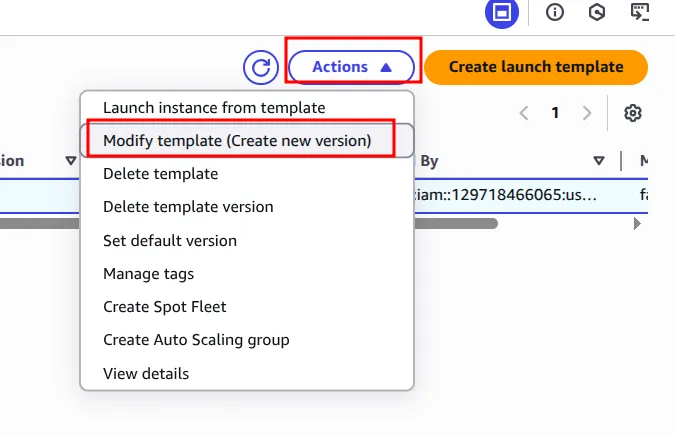
A new version does not affect running instances. The ASG uses the version it is configured with (Default, Latest or a fixed number), so first promote the new version with Set default version. Then start an instance refresh on the ASG to replace the old instances.
Create the Auto Scaling group
Open EC2 → Auto Scaling groups → Create Auto Scaling group. The wizard has seven steps.
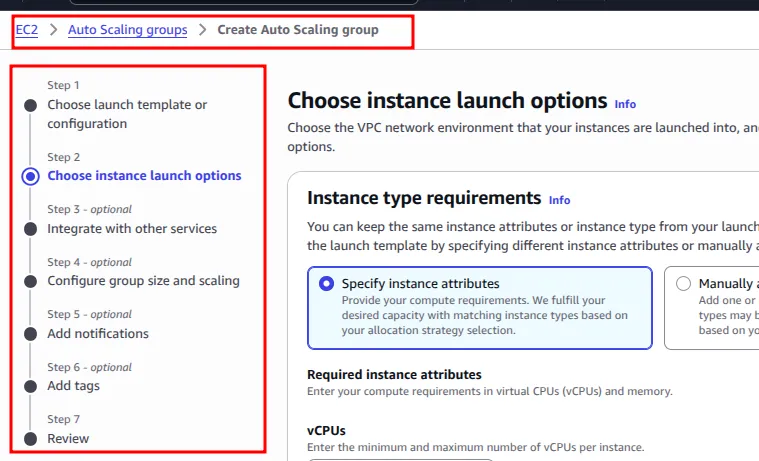
- Launch template: name the group, then choose the template and version.
- Instance launch options: keep the instance type from the template, select all Availability Zones, and choose Balanced best effort distribution.
- Integrate with other services: optionally attach a load balancer and turn on its health checks.
- Group size and scaling: desired 2, minimum 1, maximum 3, no scaling policy. Leave the instance maintenance policy at No policy and skip the additional settings.
- Notifications: skip.
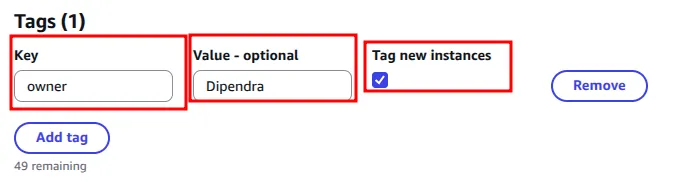
- Tags: add an
ownertag with Tag new instances checked, so every instance the group launches inherits it. - Review, then create.
The group launches instances immediately to reach the desired capacity of 2.

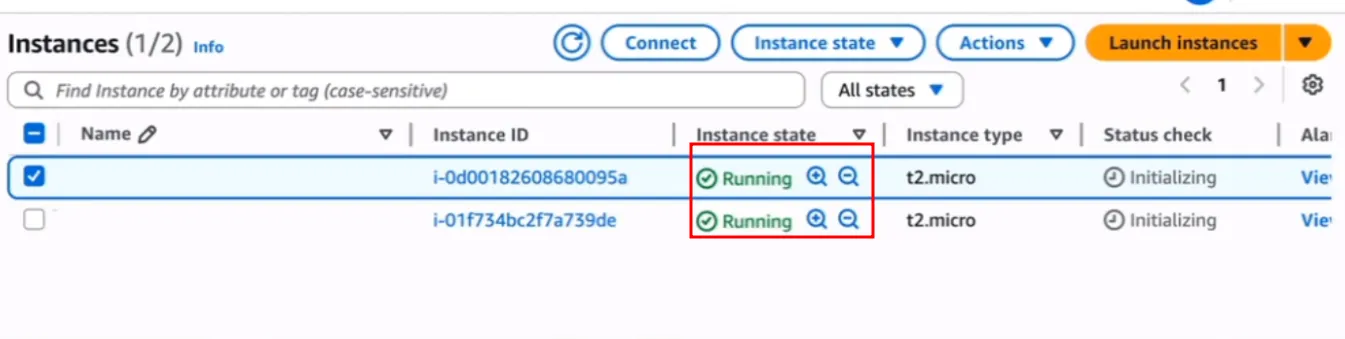
The instance tags identify the ASG that launched them. To test self-healing, terminate one instance: the ASG detects that only one remains and launches a replacement to restore the count to two.
Application Load Balancer
With several instances behind an ASG, users still need a single address. Elastic Load Balancing distributes incoming traffic across targets (instances, containers or IP addresses) in one or more Availability Zones. It checks the health of each target, routes traffic only to healthy ones, and scales itself as traffic changes. Instances can be added or removed without users noticing.
An ALB provides a DNS name, not a fixed IP. Its IP addresses can change, so always point DNS records at the name.
| Type | Works at | Use it for |
|---|---|---|
| Application Load Balancer (ALB) | Layer 7: HTTP and HTTPS | Web apps, routing by path or host name, microservices, containers |
| Network Load Balancer (NLB) | Layer 4: TCP, UDP, TLS | High performance, a static IP per Availability Zone |
| Gateway Load Balancer (GWLB) | Layer 3: IP packets (GENEVE) | Third-party firewalls and traffic inspection appliances |
| Classic Load Balancer | Layers 4 and 7 | Previous generation; do not use for new setups |
The Elastic Load Balancing user guide compares them in detail.
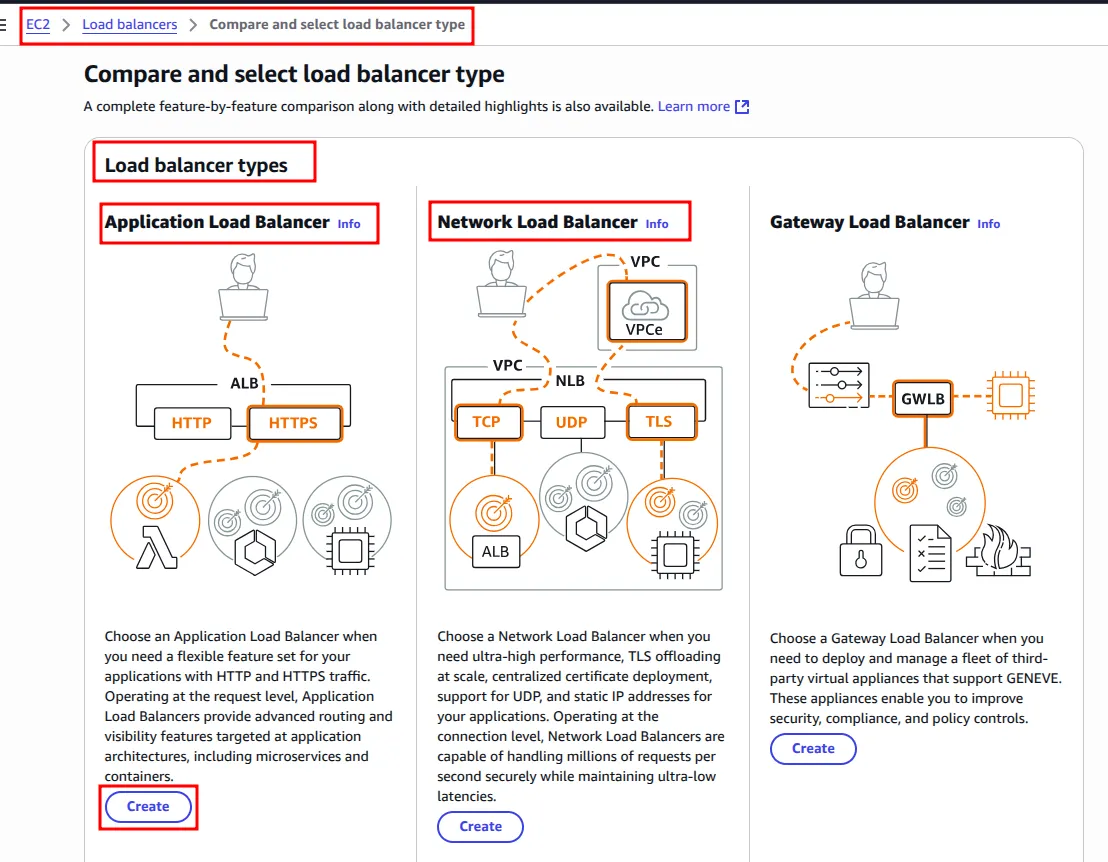
Create the ALB
Open EC2 → Load Balancers → Create load balancer → Application Load Balancer and set:
- Name: a unique name.
- Scheme: Internet-facing for public traffic, or Internal for traffic inside the VPC only. This lab uses internet-facing.
- IP address type: IPv4. Dualstack adds IPv6.
- Network mapping: the default VPC and all Availability Zones. An ALB requires subnets in at least two Availability Zones.
- Security group: must allow HTTP on port 80 from anywhere so users can reach it.
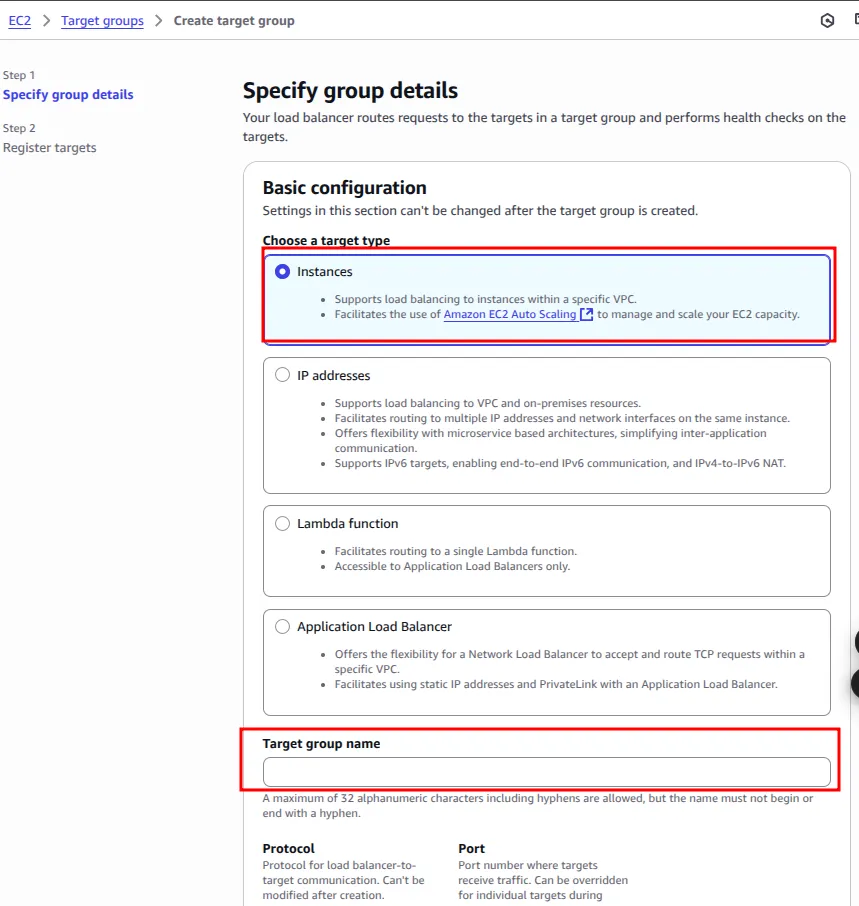
Next, create a target group, the set of targets that receive the traffic, with Instances as the target type.
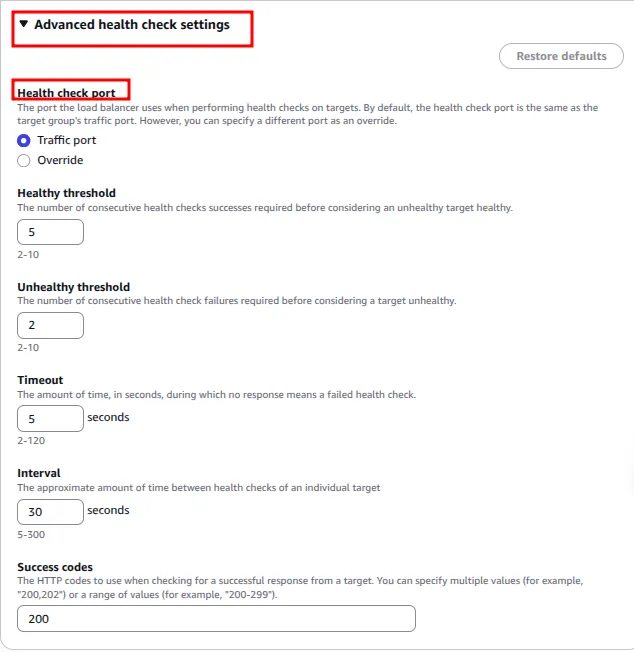
The health check settings determine when a target counts as healthy or unhealthy. The defaults are sufficient for this lab.
Back in the ALB form, set the HTTP port 80 listener to forward to the target group.
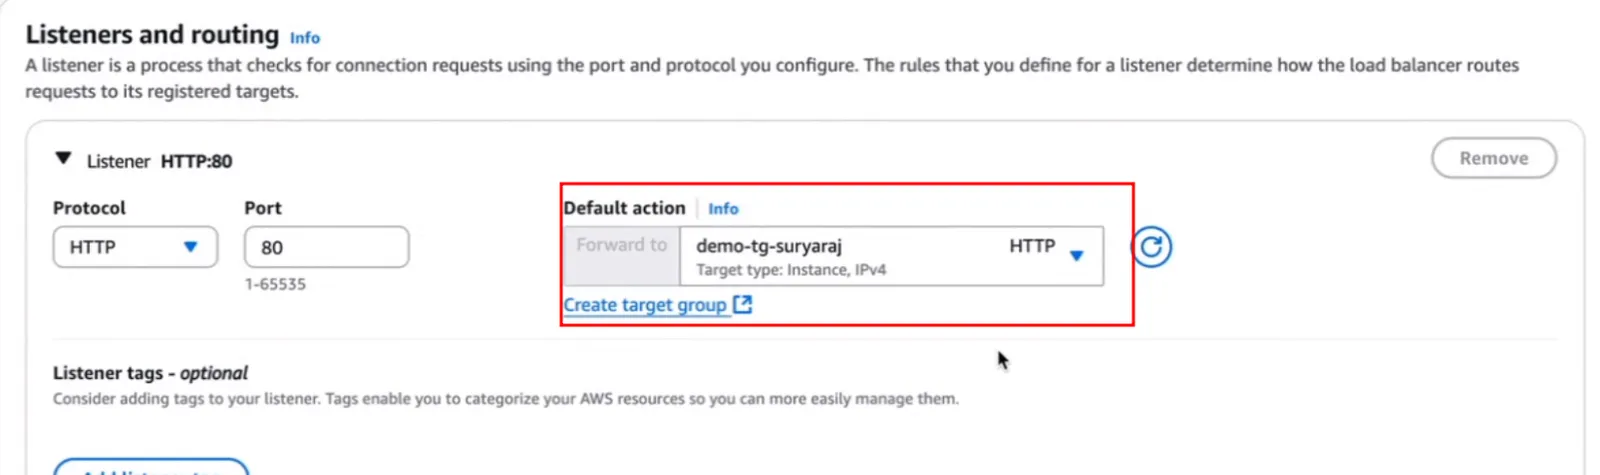
After creation, the ALB shows its ARN (Amazon Resource Name, its unique ID in AWS) and its DNS name.

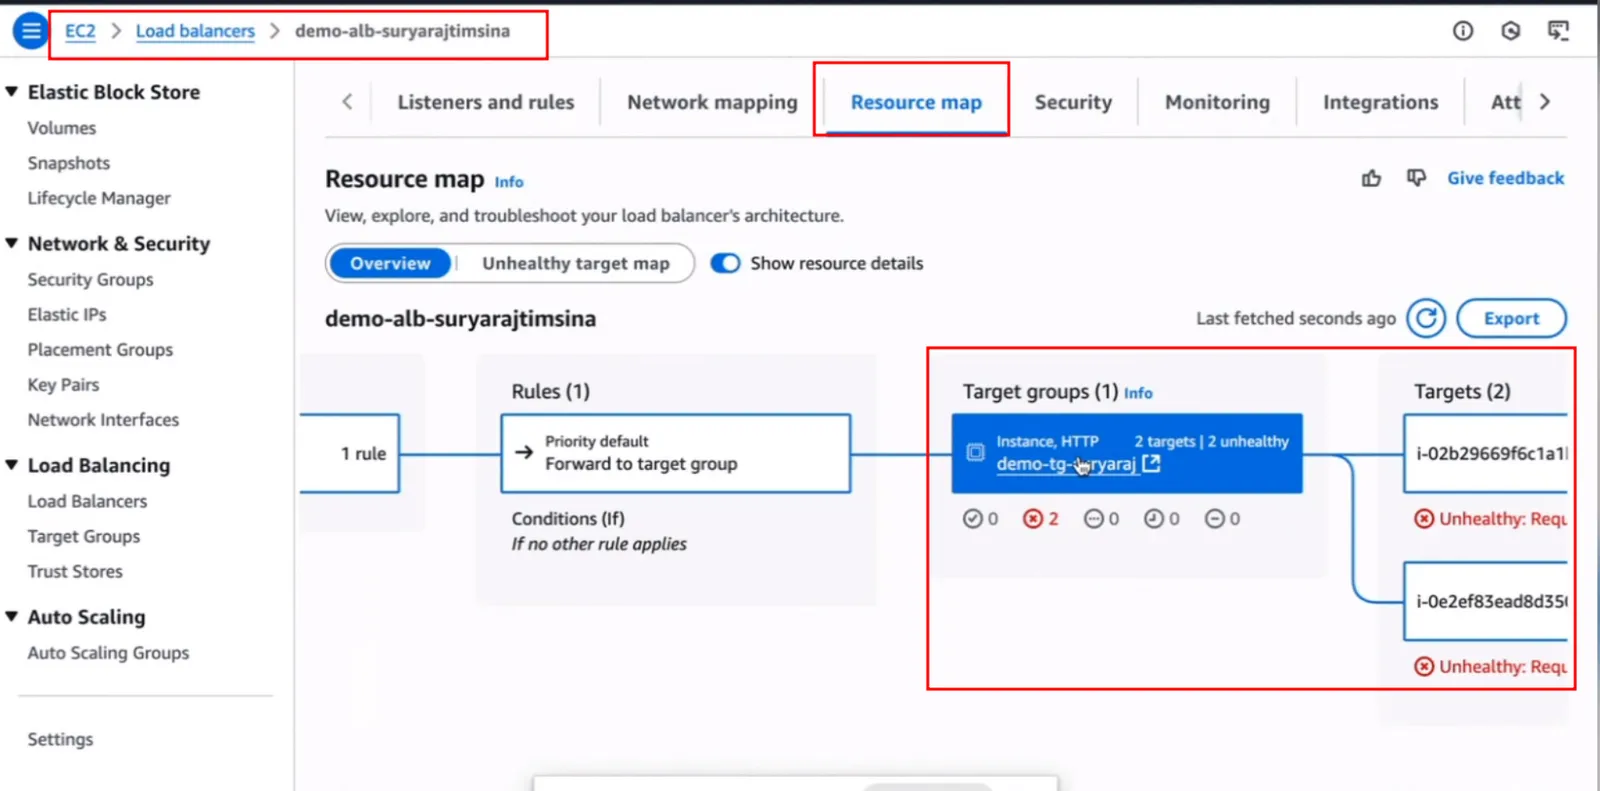
The Resource map tab is the fastest place to troubleshoot. In my lab, both targets were unhealthy at first. Unhealthy targets almost always trace back to security group rules, so check those first.
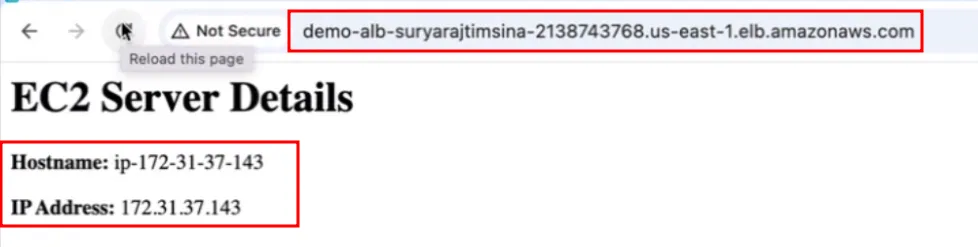
Once the targets are healthy, the DNS name serves the page. Each refresh can land on a different instance, as the hostname and IP on the page show.
Whether new instances join the load balancer automatically depends on how they were launched:
- Instances launched by hand are not added. Register them in the target group yourself.
- Instances launched by an ASG are registered automatically, provided the ASG is attached to the target group (step 3 of the ASG wizard).
CloudWatch alarm that stops a busy instance
Amazon CloudWatch collects metrics and logs from AWS resources and provides dashboards and alarms. An alarm watches one metric and acts when the metric crosses a threshold. See the CloudWatch user guide.
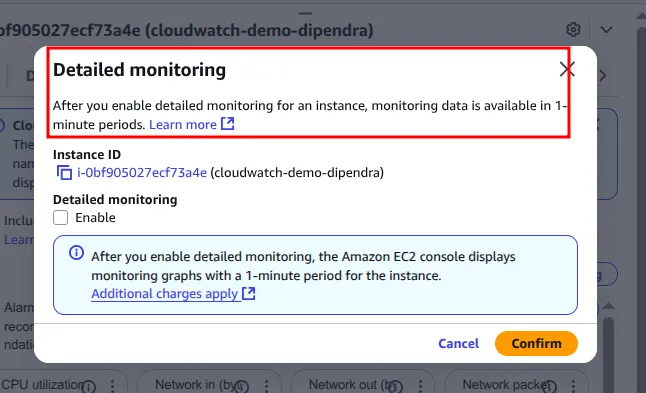
By default, EC2 sends metrics to CloudWatch every 5 minutes at no cost (basic monitoring). Detailed monitoring sends them every minute and costs extra.
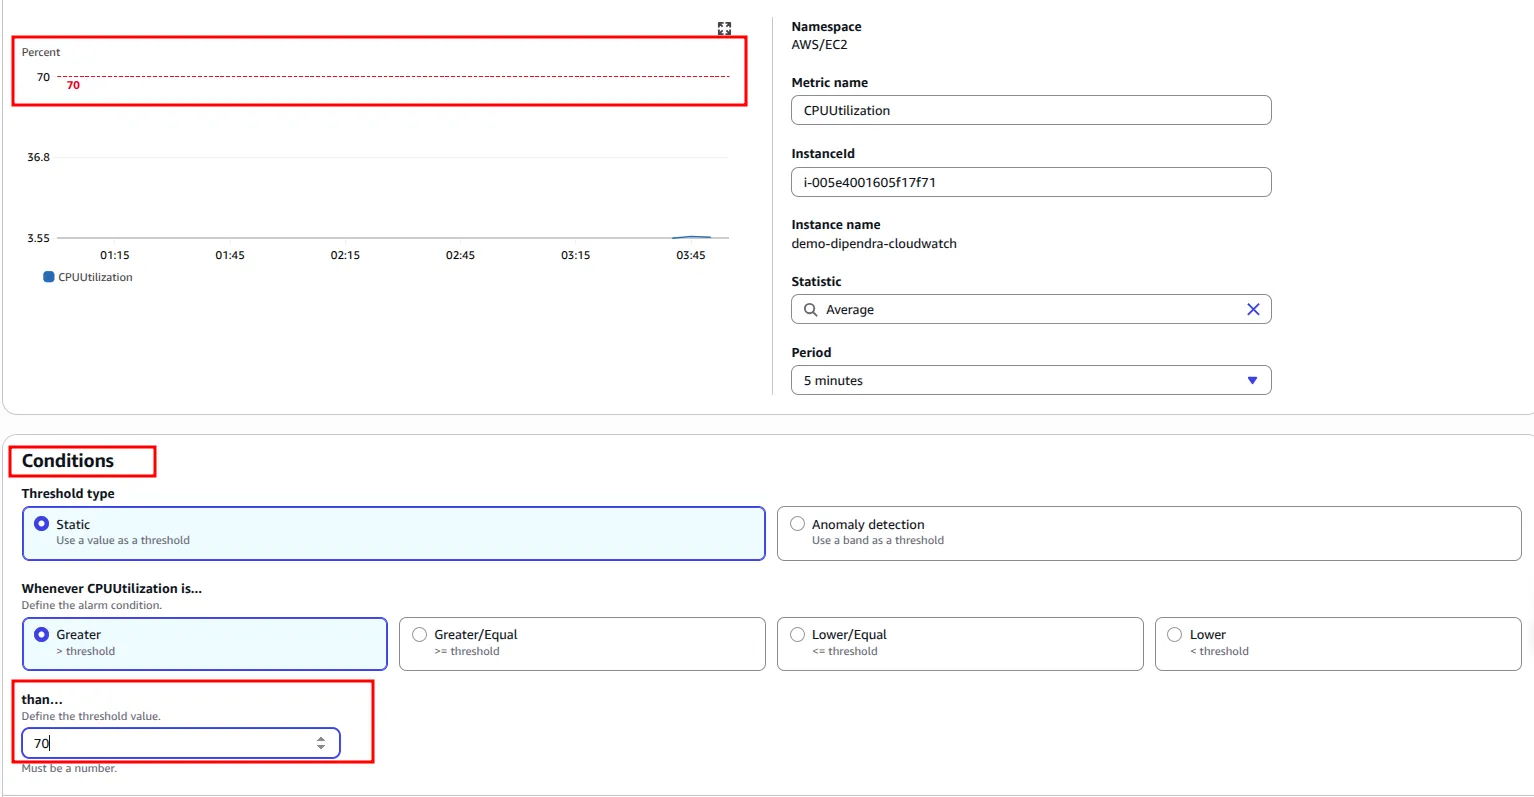
The goal: when CPU utilization exceeds 70%, send an email and stop the instance.
Select the metric and condition
-
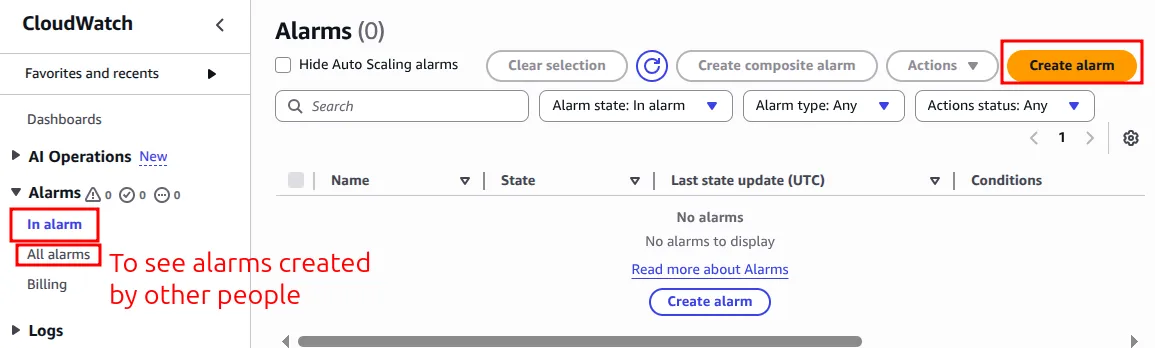
Open CloudWatch → Alarms → Create alarm. The All alarms view also lists alarms created by other users in the account.
-
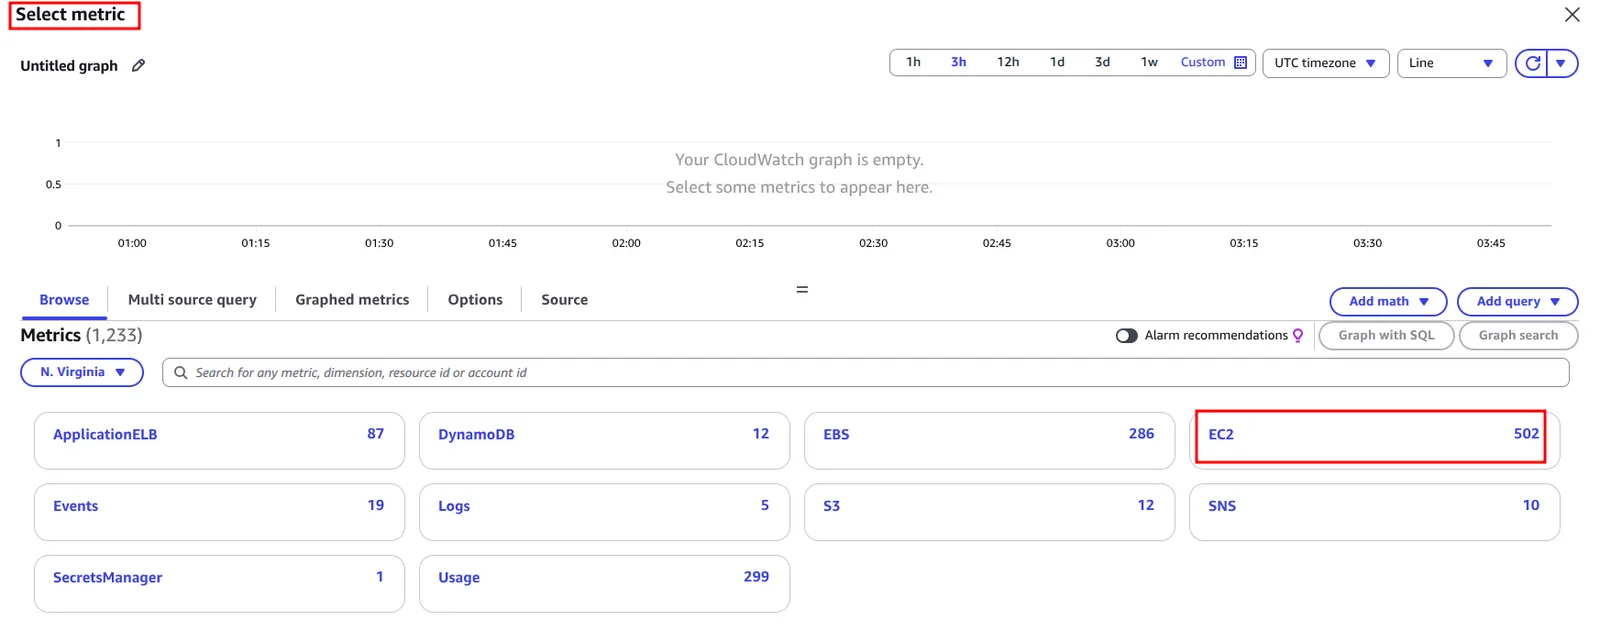
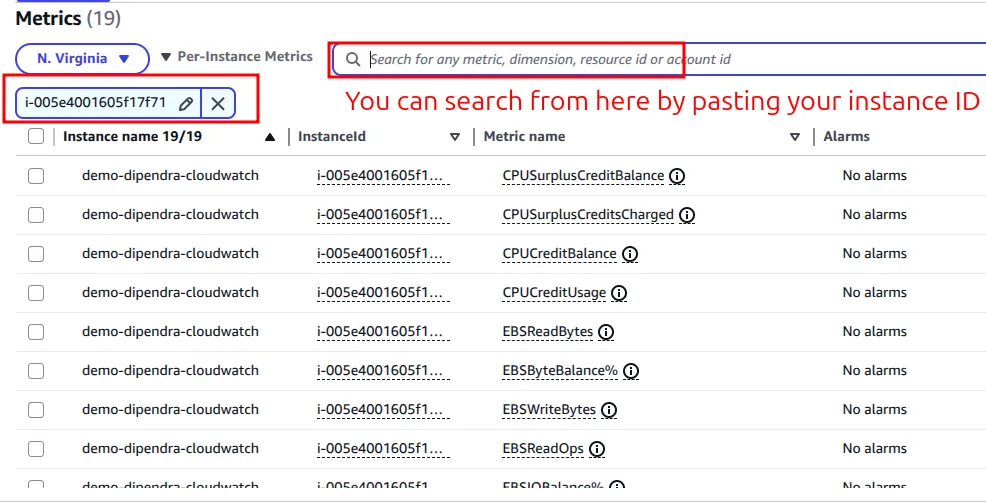
Choose Select metric → EC2 → Per-Instance Metrics, then paste the instance ID into the search box to filter.
-
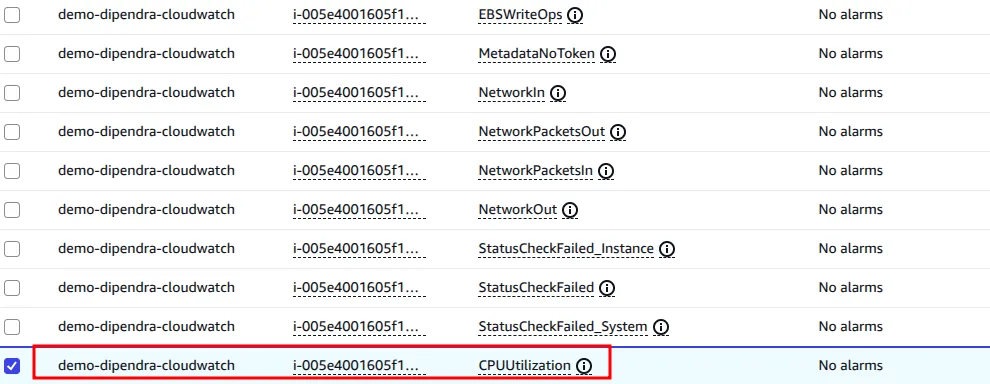
Select CPUUtilization.
-
Set the condition: static threshold, Greater than 70, using the average over 5 minutes.
Email notification with Amazon SNS
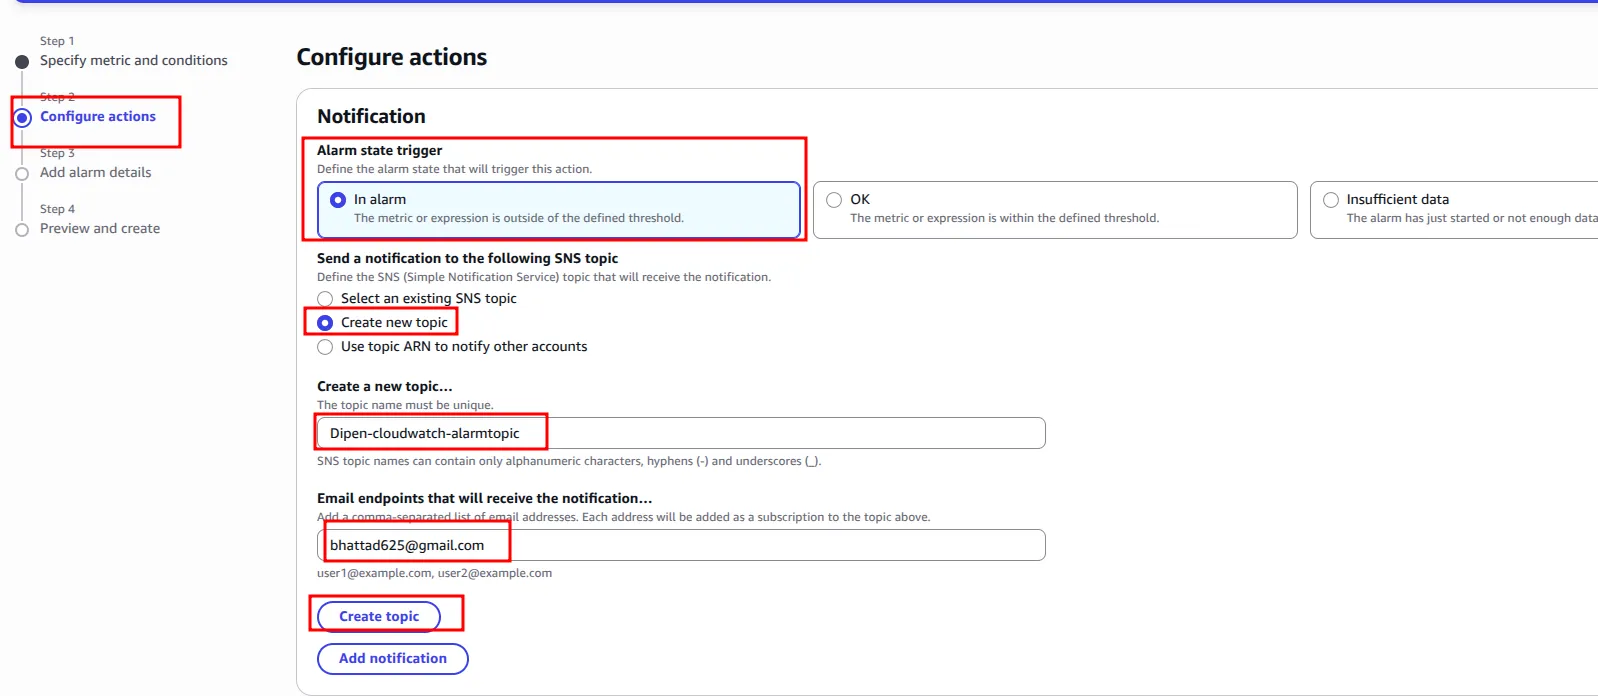
CloudWatch sends notifications through Amazon SNS (Simple Notification Service). The alarm publishes a message to an SNS topic, and SNS delivers it to every subscriber of that topic, in this case an email address. For the In alarm state, choose Create new topic, enter your email and click Create topic.
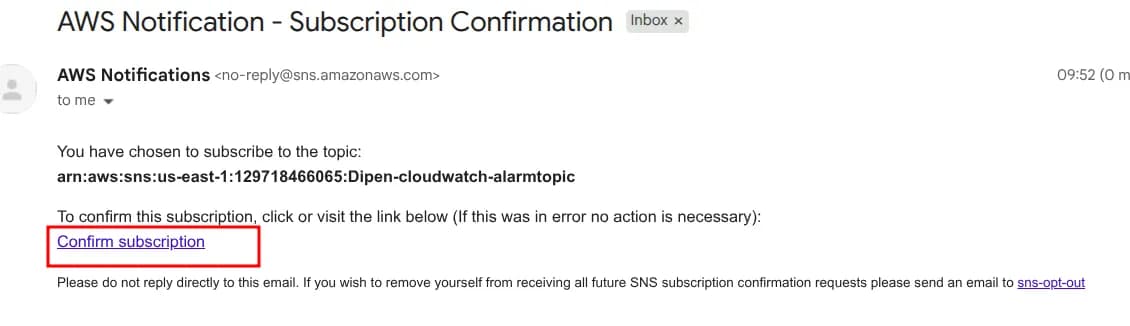
SNS then sends a confirmation email. No alarm emails arrive until you click Confirm subscription, and the SNS console shows the subscription as pending until then.
EC2 action
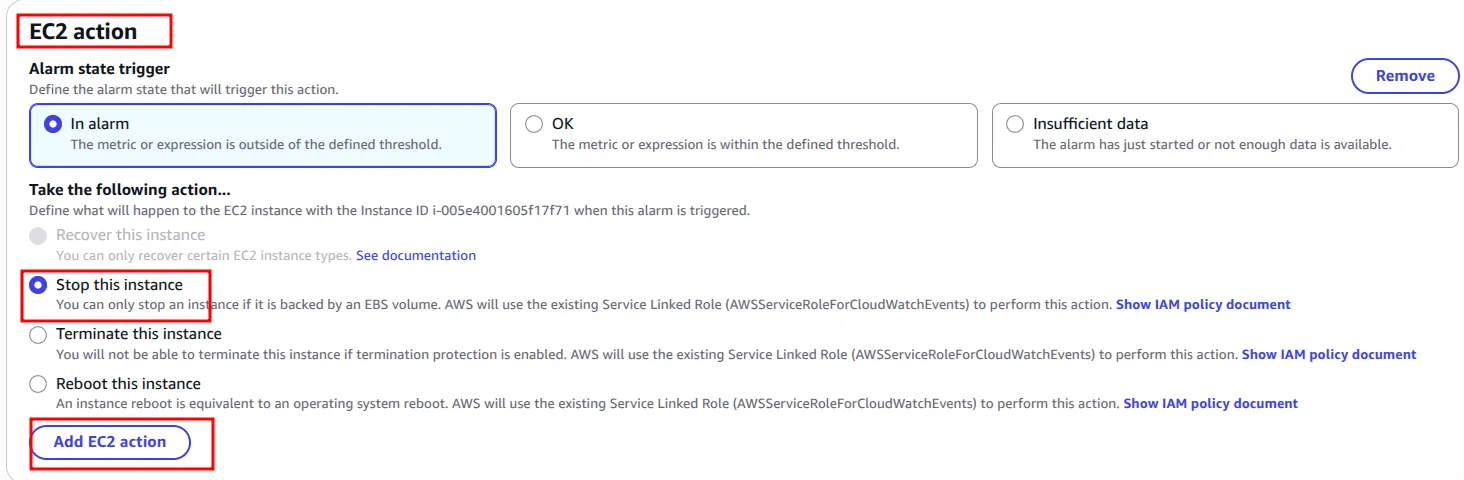
In the same step, choose Add EC2 action with Stop this instance for the In alarm state. Then name the alarm and create it.
Test with stress
To drive CPU usage up, install stress on the instance. -c 4 starts four CPU workers and -t 300 stops them after 300 seconds:
$ sudo apt update
$ sudo apt install stress
$ nohup stress -c 4 -t 300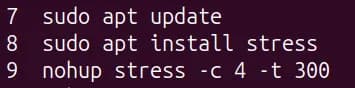
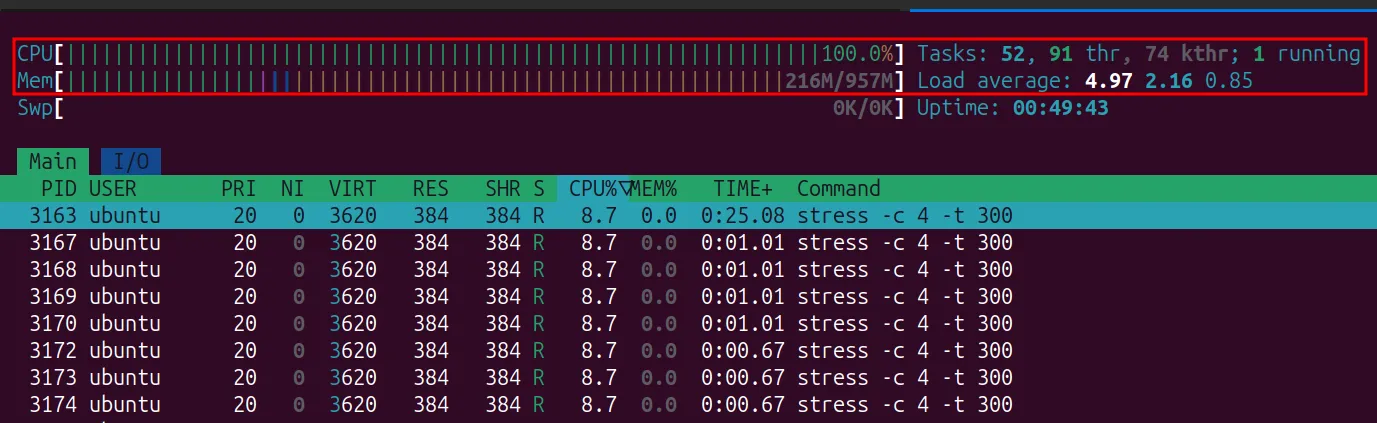
htop shows the CPU at 100%.
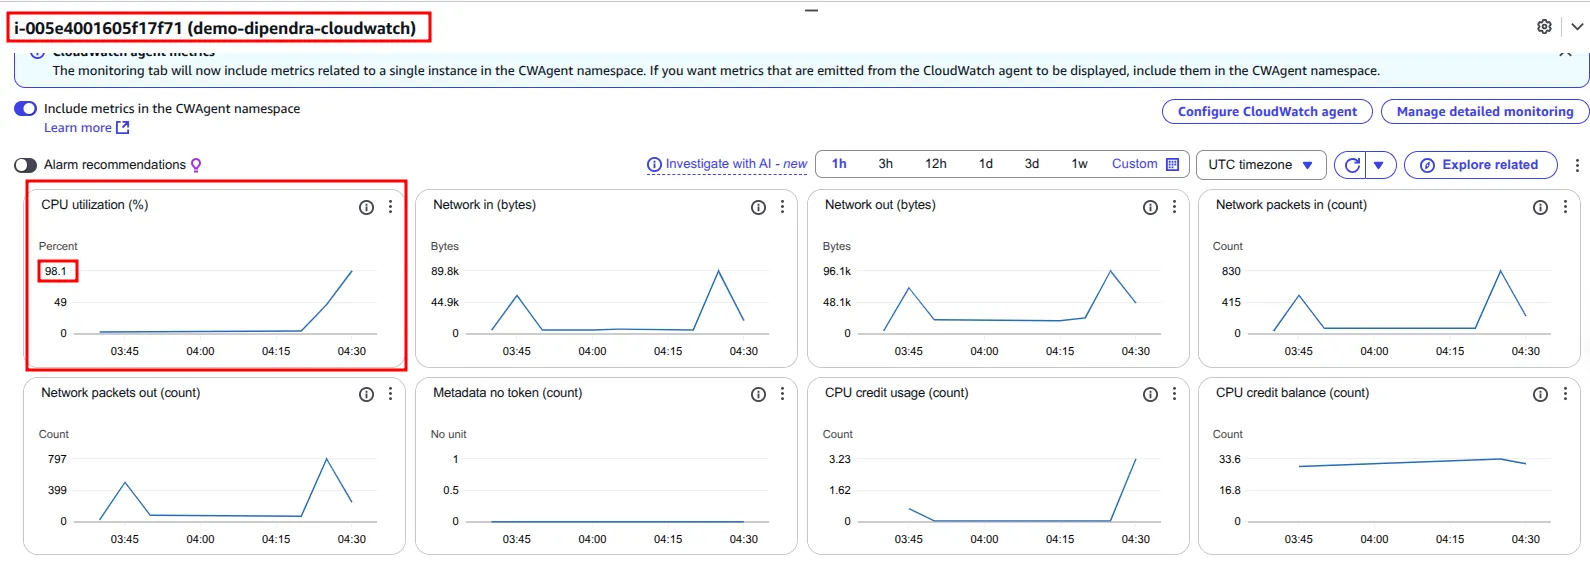
CloudWatch records the spike, with CPU utilization reaching 98.1%.
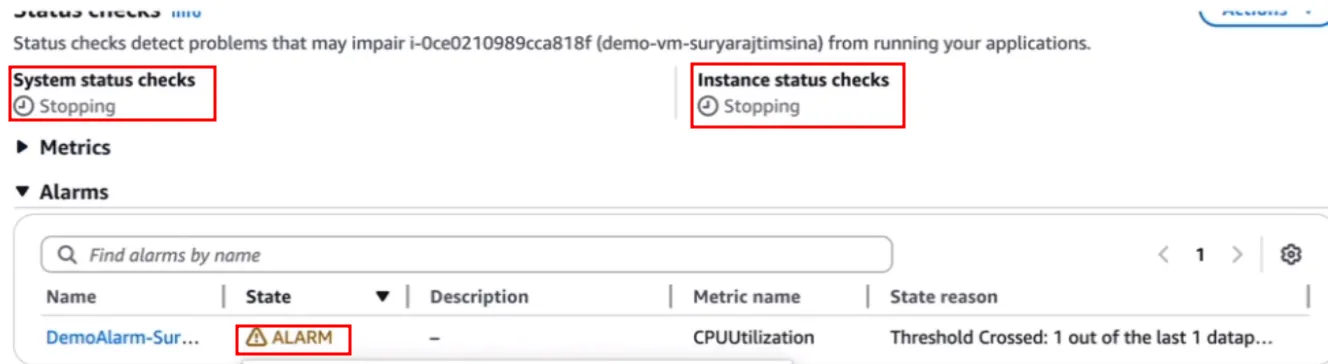
The alarm enters the ALARM state, the email arrives, and the instance begins stopping.
EBS volumes and snapshots
EBS (Elastic Block Store) is network-attached block storage for EC2. Every instance gets a root volume at launch, and more volumes can be added as data grows. A volume must be in the same Availability Zone as the instance it attaches to.
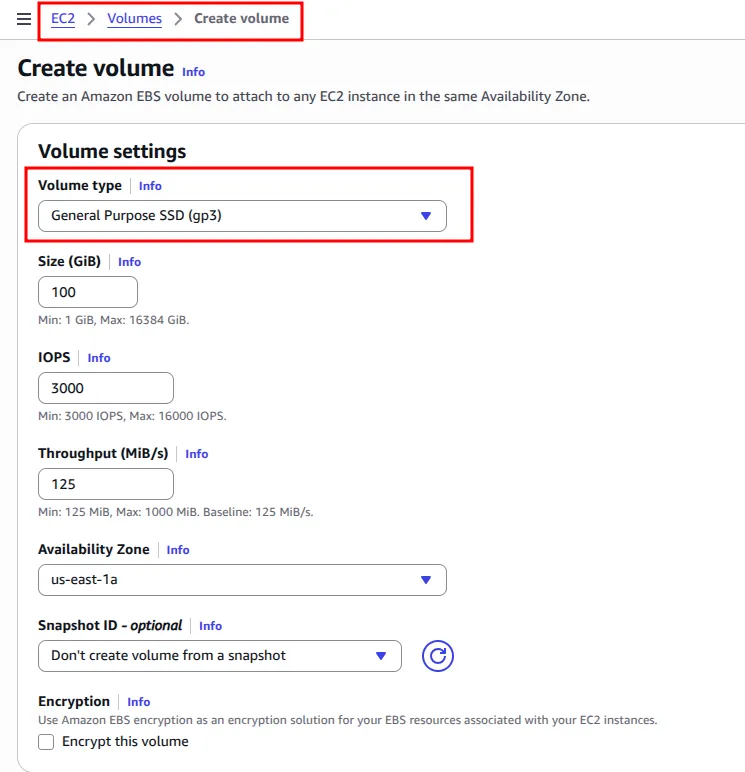
gp3 is the current general-purpose SSD type. It sets IOPS and throughput independently of size. The other types are listed in Amazon EBS volume types. After Actions → Attach volume, the new disk must still be formatted and mounted inside Linux; the Linux LVM guide covers disk management.
A snapshot is a point-in-time backup of a volume. Snapshots are incremental: after the first one, only changed blocks are saved. A snapshot can restore to a new volume, even in another Availability Zone, or be copied to another Region.
Troubleshooting
ERR_CONNECTION_TIMED_OUT (SSH or browser)
The request never reached the server because a firewall dropped it. In my lab, SSH timed out the day after setup: the home public IP had changed, and the security group still allowed only the old /32. Fix: edit the inbound rule and set the source to My IP again.
A timeout can also indicate a missing route to the internet gateway or a network ACL blocking traffic. See the VPC part.
ERR_CONNECTION_REFUSED
The request passed the firewall and reached the server, but nothing was listening on that port. Stopping Apache and browsing to the instance reproduces the error.

Fix: start the service and enable it at boot.
$ sudo systemctl enable --now apache2SSH rejects the key file
If ssh warns about an unprotected private key file, the .pem file is readable by other users. Run chmod 400 on it and retry.
Instance type does not support the AMI
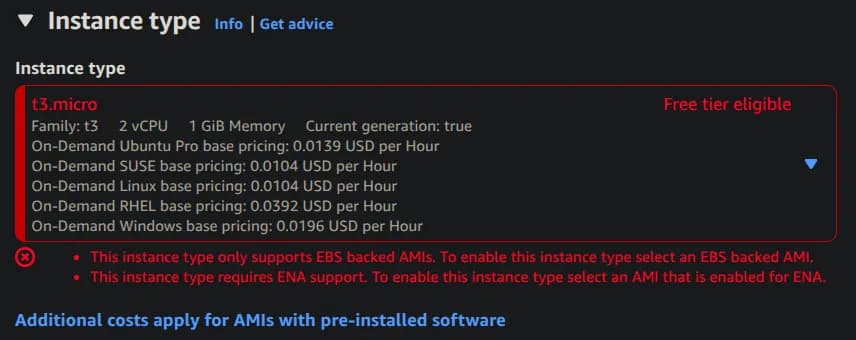
While creating the launch template, t3.micro reported two errors: it supports only EBS-backed AMIs, and it requires an AMI with ENA (Elastic Network Adapter) support. Fix: pick a different AMI. Current Amazon Linux and Ubuntu AMIs meet both requirements.
Load balancer targets unhealthy
The health check is failing. Check, in this order:
- The instance security group allows HTTP from the load balancer.
- The web server is running on the instance.
- The health check path returns HTTP
200.
502, 503 and 504 from the load balancer
| Error | What happened | Where to look |
|---|---|---|
502 Bad Gateway | The request went from the load balancer to the server, but no valid response came back | Web server crashed or restarting; check its logs |
503 Service Unavailable | The request reached the load balancer, but it had no target to send it to | Target group: are targets registered and healthy? |
504 Gateway Timeout | The target did not answer in time | Slow application, or a security group or NACL silently dropping traffic between the load balancer and the target |
Key takeaways
- Security groups are stateful, allow-only and attached to instances; network ACLs are stateless and attached to subnets.
- Most connection failures trace back to security group rules: a timeout means traffic is blocked, and a refusal means no service is listening.
- An auto-assigned public IP changes on stop and start. Use an Elastic IP for a fixed address, and budget for every public IPv4 address.
- A launch template plus an Auto Scaling group keeps the desired number of instances running and replaces any that fail.
- Attach the Auto Scaling group to the load balancer's target group so new instances register automatically.
- CloudWatch alarms notify through SNS and can act on the instance itself, for example by stopping it.
Next in this series: Amazon S3
Keep reading
- AWS CodeBuild, CodeDeploy and CodePipeline Hands-On
Build code with AWS CodeBuild and a buildspec.yml, deploy it to an Auto Scaling group with CodeDeploy, and connect both into a pipeline with AWS CodePipeline.
- Build a Custom AWS VPC with Public and Private Subnets
Build a custom VPC step by step with an internet gateway, public and private subnets and a route table, then launch an EC2 instance and confirm what makes a subnet public.
- AWS Global Infrastructure and Core Services
How AWS Regions, Availability Zones and edge locations fit together, which services are global or regional, the main storage types, and the shared responsibility model.