Logical Volume Management (LVM) in Linux
Add a disk to a VirtualBox VM and take it through every LVM layer: partition, physical volume, volume group and logical volume, then an ext4 mount in fstab.

ON THIS PAGE
A file system that outgrows its partition normally means downtime: unmount, back up, repartition, restore. LVM (Logical Volume Manager) removes that constraint by placing a pool of storage between the disks and the file systems, so volumes can grow while they are mounted. This guide adds a new disk to an Ubuntu VirtualBox VM and takes it through every LVM layer to a mounted ext4 file system that survives a reboot.
Prerequisites
- An Ubuntu VM in VirtualBox (mine was created with Vagrant) and root access.
- The
lvm2package, which Ubuntu Server installs by default.
The problem with standard partitions
With standard partitions, each file system lives on a fixed slice of one disk. When /mnt/backup on a partition of /dev/sdb runs out of space, free space elsewhere does not help. Growing it requires unmounting the file system, backing up the data, recreating the partitions, restoring the data and mounting it again, with downtime and risk at every step.
How LVM works
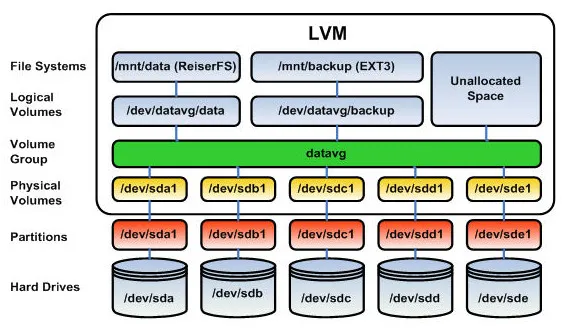
LVM adds three layers between the disks and the file systems:
| Layer | What it is | Commands |
|---|---|---|
| Physical volume (PV) | A disk or partition prepared for LVM | pvcreate, pvs, pvdisplay |
| Volume group (VG) | A pool of storage made from one or more PVs | vgcreate, vgextend, vgs |
| Logical volume (LV) | A "virtual partition" cut from the VG; this is what you format and mount | lvcreate, lvextend, lvs |
Adding capacity later follows a fixed sequence:
- Add a new disk.
- Create a partition on it (optional; LVM can also use the whole disk).
- Turn it into a physical volume with
pvcreate. - Add it to the volume group with
vgextend. - Grow the logical volume with
lvextend. - Grow the file system on it.
Every step runs while the file system stays mounted and in use.
Add a disk and create a logical volume
1. Check the current disks
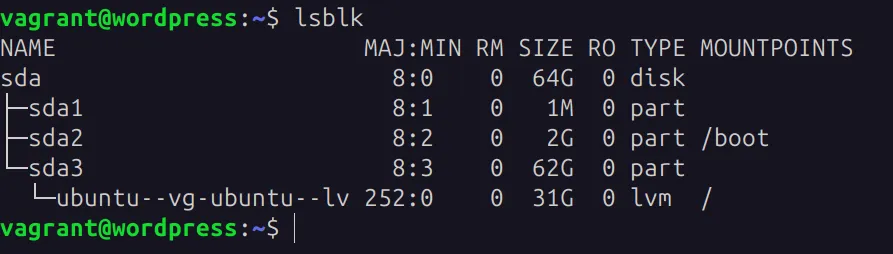
Run lsblk to see the starting layout. In my lab the VM had one 64 GB disk, and the Ubuntu installer had already placed the root file system on LVM (ubuntu--vg-ubuntu--lv):
2. Attach a new disk in VirtualBox
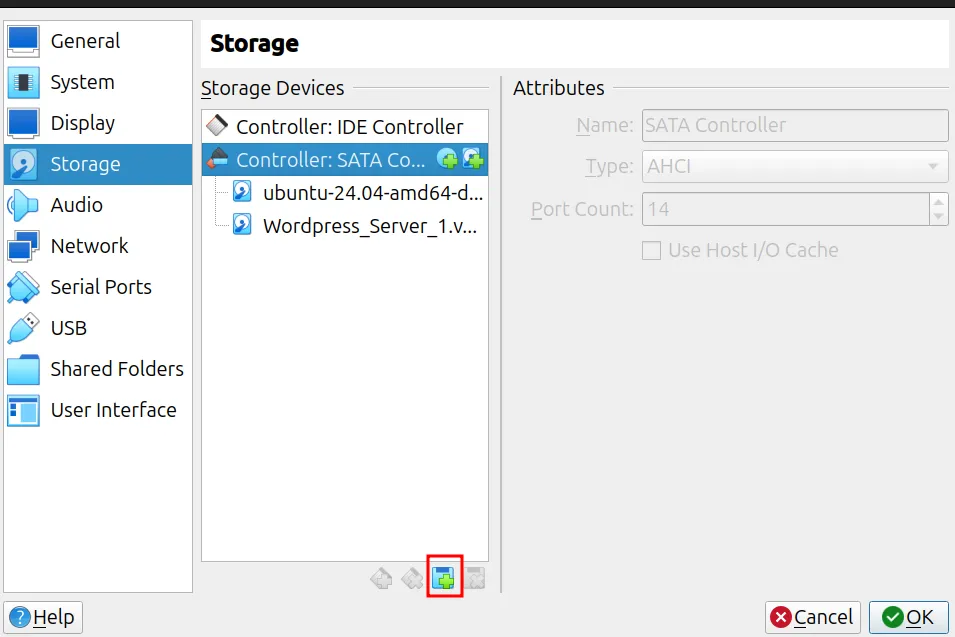
Open the VM's Settings > Storage, select the SATA controller, and click the add hard disk icon:
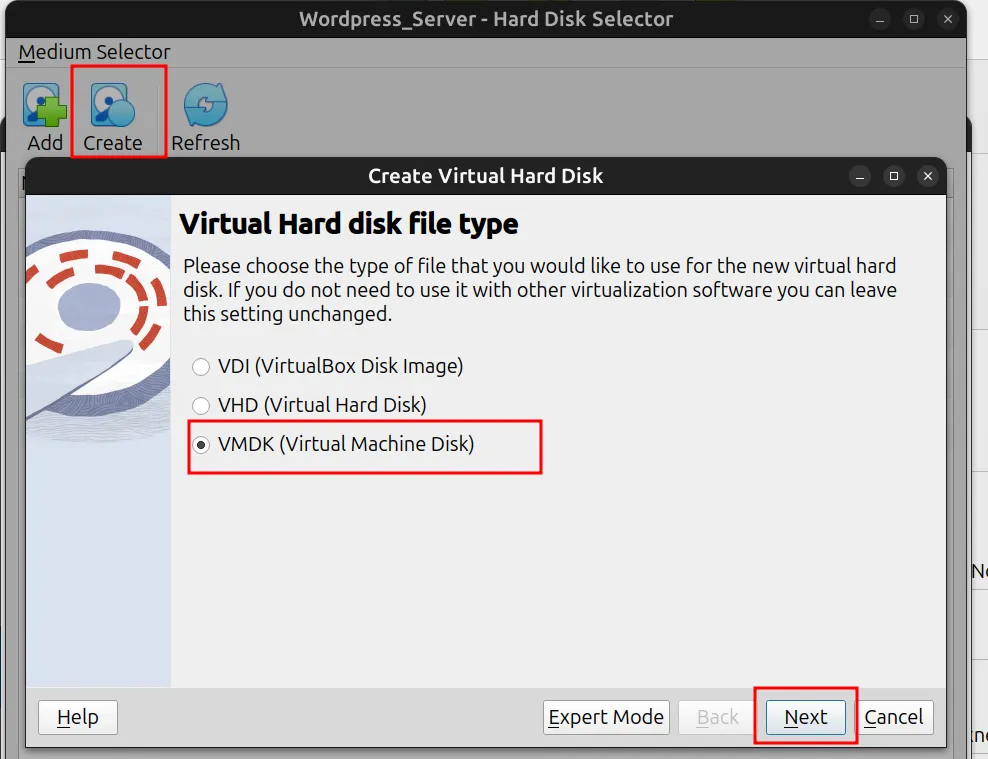
In the Hard Disk Selector, click Create, choose a disk file type (VMDK here), keep the default options, set a size, and attach the disk:
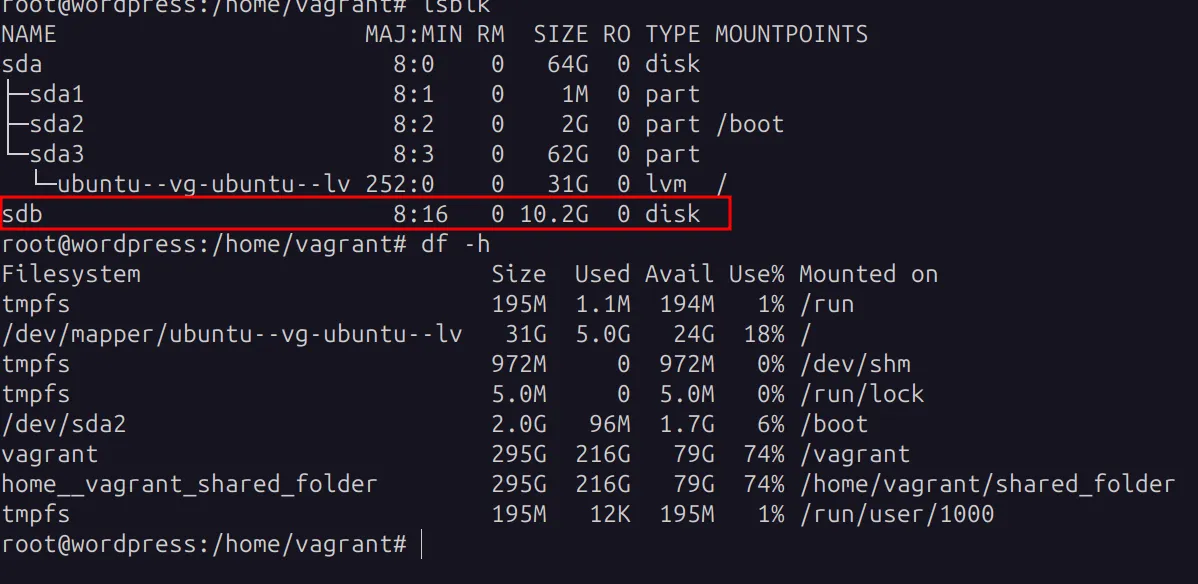
After boot, the new disk appears as sdb in lsblk. It is absent from df -h because it has no file system and is not mounted:
3. Create a partition with fdisk
Open a root shell with sudo -i (the remaining commands run as root), then open the disk in fdisk:
$ fdisk /dev/sdbfdisk is interactive: m shows help, p prints the partition table, n creates a partition, t changes its type, and w writes the changes to disk. Create one 4 GB primary partition:
Command (m for help): p
Disk /dev/sdb: 10.19 GiB, 10943545344 bytes, 21374112 sectors
Disk model: VBOX HARDDISK
Units: sectors of 1 * 512 = 512 bytes
Sector size (logical/physical): 512 bytes / 512 bytes
I/O size (minimum/optimal): 512 bytes / 512 bytes
Disklabel type: dos
Disk identifier: 0xc79cf7d5

Command (m for help): n
Partition type
   p   primary (0 primary, 0 extended, 4 free)
   e   extended (container for logical partitions)
Select (default p): p
Partition number (1-4, default 1): 1
First sector (2048-21374111, default 2048): 2048
Last sector, +/-sectors or +/-size{K,M,G,T,P} (2048-21374111, default 21374111): +4G

Created a new partition 1 of type 'Linux' and of size 4 GiB.

Device     Boot Start     End Sectors Size Id Type
/dev/sdb1 2048 8390655 8388608 4G 83 LinuxPress t to change the partition type. L lists all type codes; 8e is Linux LVM:
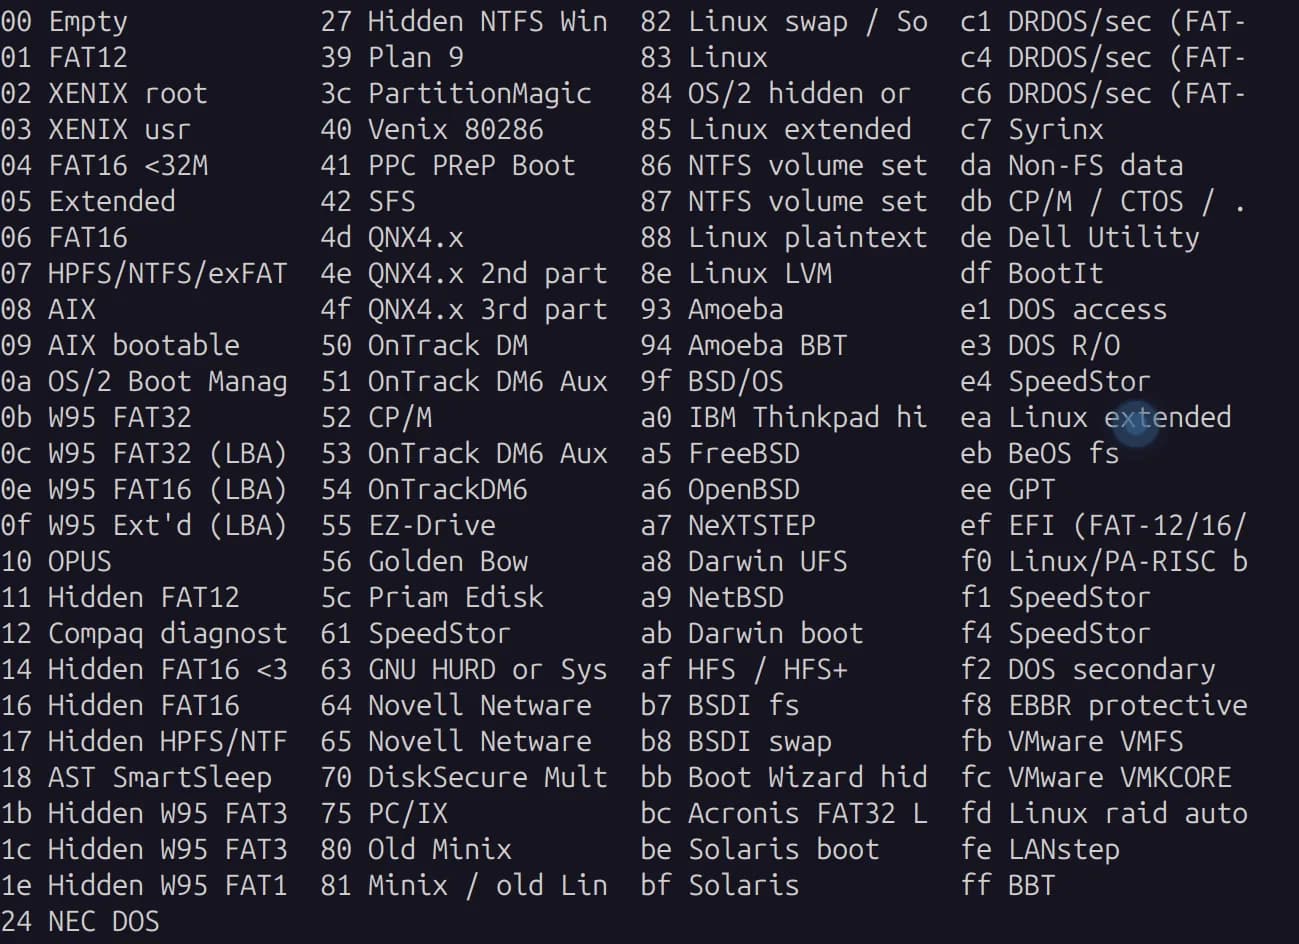
Hex code or alias (type L to list all): 8e
Changed type of partition 'Empty' to 'Linux LVM'.

Device     Boot Start     End Sectors Size Id Type
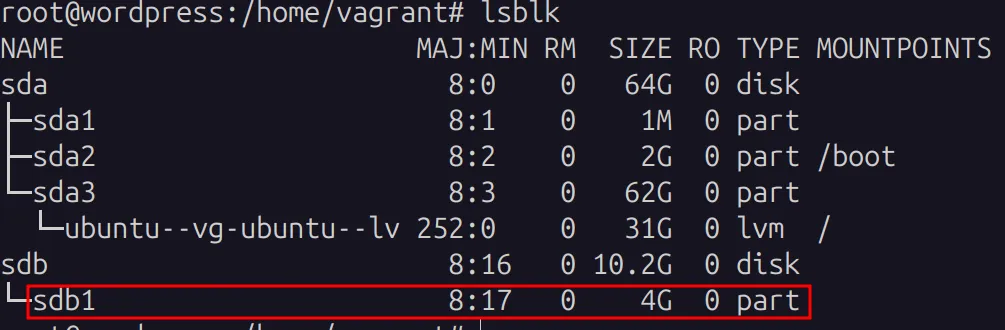
/dev/sdb1 2048 8390655 8388608 4G 8e Linux LVMPress w to write the table. lsblk now lists the partition sdb1:
4. Create the physical volume
$ pvcreate /dev/sdb1
  Physical volume "/dev/sdb1" successfully created.
$ pvs
  PV         VG        Fmt  Attr PSize   PFree
  /dev/sda3  ubuntu-vg lvm2 a--  <62.00g 31.00g
/dev/sdb1 lvm2 --- 4.00g 4.00g/dev/sdb1 is a PV now, but it does not belong to a volume group yet.
5. Create the volume group
$ vgcreate vg0 /dev/sdb1
  Volume group "vg0" successfully created
$ vgs
  VG        #PV #LV #SN Attr   VSize   VFree
  ubuntu-vg   1   1   0 wz--n- <62.00g 31.00g
vg0 1 0 0 wz--n- <4.00g <4.00g6. Create the logical volume
$ lvcreate -L 3.8G -n lv0 vg0
  Rounding up size to full physical extent 3.80 GiB
  Logical volume "lv0" created.
$ lvs
  LV        VG        Attr       LSize   Pool Origin Data%  Meta%  Move Log Cpy%Sync Convert
  ubuntu-lv ubuntu-vg -wi-ao---- <31.00g
lv0 vg0 -wi-a----- 3.80g-L sets the size, -n names the new LV, and vg0 is the volume group that supplies the space. A leading + in the size (-L +3.8G) belongs with lvextend, where it means "add this much".
$ lsblk
NAME                      MAJ:MIN RM  SIZE RO TYPE MOUNTPOINTS
sda                         8:0    0   64G  0 disk
├─sda1                      8:1    0    1M  0 part
├─sda2                      8:2    0    2G  0 part /boot
└─sda3                      8:3    0   62G  0 part
  └─ubuntu--vg-ubuntu--lv 252:0    0   31G  0 lvm  /
sdb                         8:16   0 10.2G  0 disk
└─sdb1                      8:17   0    4G  0 part
└─vg0-lv0 252:1 0 3.8G 0 lvm7. Create a file system
A logical volume behaves like an empty partition and needs a file system before it can be mounted. ext4 and XFS are the usual choices on Linux.
$ mkfs -t ext4 /dev/vg0/lv0
mke2fs 1.47.0 (5-Feb-2023)
Creating filesystem with 996352 4k blocks and 249488 inodes
Filesystem UUID: 3bd870c2-3150-421d-8c12-04f4690f2e39
...
Writing superblocks and filesystem accounting information: done8. Mount the volume
$ mkdir /data
$ mount /dev/vg0/lv0 /dataThe sdb part of lsblk now shows the logical volume mounted on /data:
sdb                         8:16   0 10.2G  0 disk
└─sdb1                      8:17   0    4G  0 part
└─vg0-lv0 252:1 0 3.8G 0 lvm /data9. Make the mount permanent
A manual mount does not survive a reboot. Add the volume to /etc/fstab to mount it at every boot:
/dev/vg0/lv0 /data ext4 defaults 0 0| Field | Value | Meaning |
|---|---|---|
| 1 | /dev/vg0/lv0 | The device (a path, or UUID=... from blkid) |
| 2 | /data | Mount point |
| 3 | ext4 | File system type |
| 4 | defaults | Mount options, such as ro, rw or noexec |
| 5 | 0 | Whether the old dump backup tool should back it up (normally 0) |
| 6 | 0 | fsck check order at boot: 0 never, 1 the root file system, 2 other file systems |
Extend the volume
vg0 has only about 0.2 GB free, while sdb still has about 6 GB unpartitioned. To add that space, create /dev/sdb2 with fdisk (type 8e), then run:
$ pvcreate /dev/sdb2
$ vgextend vg0 /dev/sdb2
$ lvextend -r -L +5G /dev/vg0/lv0-r (--resizefs) grows the ext4 file system together with the logical volume, while /data stays mounted.
Useful commands
| Command | What it shows |
|---|---|
lsblk | Disks, partitions and LVs as a tree, with mount points |
df -h | Mounted file systems and their usage |
fdisk -l | Partition tables of all disks |
blkid | UUIDs and file system types |
pvs, vgs, lvs | Short summaries of PVs, VGs and LVs |
pvdisplay, vgdisplay, lvdisplay | Detailed information |
Key takeaways
- LVM stacks three layers: physical volumes, a volume group pool, and logical volumes you format and mount.
- The flow for a new disk is: partition (type
8e),pvcreate,vgcreateorvgextend,lvcreate,mkfs,mount. - A mount is temporary until it is in
/etc/fstab; test every fstab change withmount -a. - With
vgextendandlvextend -r, you can grow a file system without unmounting it.
Keep reading
- Introduction to Linux: Kernel, Shell, File System and SSH Login
The Linux foundations behind DevOps work: kernel and shell, distributions, the directory layout, the seven file types, and SSH login to a VirtualBox VM.
- tmux Cheat Sheet: Sessions, Windows, Panes and Copy Mode
A tmux reference for remote work: sessions that survive SSH drops, windows, split panes, copy mode, synchronized panes, and a minimal tmux.conf.
- Apache Web Server on Ubuntu: Install and Host a Static Site
Install Apache on Ubuntu, learn how /etc/apache2 is organised, and serve a static HTML template from /srv through a dedicated virtual host.