Kubernetes in AWS
In this topic we will learn how kubeadm is used to used to setup cluster. ECS is not recommended while setting up cluster. We are doing example of EKS in this blog. In complex scenarios, highly…

ON THIS PAGE
In this topic we will learn how kubeadm is used to used to setup cluster.
ECS is not recommended while setting up cluster. We are doing example of EKS in this blog.
In complex scenarios, highly scalable and available scenarios then the API gateways is run in different instances. Each and every component is also run in different machines also. For now we are going two setup 3 machines only 1 is master and 2 is worker. This is the simplest scenario to understand.
How to setup cluster.
pre-requistics
- Should have more than 1 machine.
- Minimum 2 GB RAM in each machine.
- At least 2 cpus in control plane.
- Full network connectivity among the machines. ie; inside the cluster. Suppose we are making 3 machines they need to connect to each other.
- Unique hostname, MAC address, and product_uuid for every node.
- Certain ports are open on your machines. See here for more details.
Swap configuration
The default behavior of a kubelet is to fail to start if swap memory is detected on a node. This means that swap should either be disabled or tolerated by kubelet.
- To tolerate swap, add
failSwapOn: falseto kubelet configuration or as a command line argument. Note: even iffailSwapOn: falseis provided, workloads wouldn’t have swap access by default. This can be changed by setting aswapBehavior, again in the kubelet configuration file. To use swap, set aswapBehaviorother than the defaultNoSwapsetting. See Swap memory management for more details. - To disable swap,
sudo swapoff -acan be used to disable swapping temporarily. To make this change persistent across reboots, make sure swap is disabled in config files like/etc/fstab,systemd.swap, depending how it was configured on your system
Installing a container runtime
To run containers in Pods, Kubernetes uses a container runtime.
By default, Kubernetes uses the Container Runtime Interface (CRI) to interface with your chosen container runtime.
If you don’t specify a runtime, kubeadm automatically tries to detect an installed container runtime by scanning through a list of known endpoints.
Note:
Docker Engine does not implement the CRI which is a requirement for a container runtime to work with Kubernetes. For that reason, an additional service cri-dockerd has to be installed. cri-dockerd is a project based on the legacy built-in Docker Engine support that was removed from the kubelet in version 1.24.First create EC2 in AWS
- First create 2 EC2 instances in AWS.
- Create key pair
- security group
- only ssh connection for now
- all the configurations of are similar while creating EC2.
- Control node: t2.medium //to meet cpus requirement
- worker node: t2.micro
- Name should be unique for both of the node
- Connect the machine from your terminal and then change the hostname of the machines.
- sudo hostnamectl set-hostname k8s-controlplane
- sudo hostnamectl set-hostname k8s-worker
Verify the MAC address and product_uuid are unique for every node
- check mac address of each machine whether they are same or not. They must be different.
- ip addr show
- The product_uuid can be checked by using the command
sudo cat /sys/class/dmi/id/product_uuid
Check Connectivity
- Initially if you want to ping one machine with another machine then you cannot.
- NOW setup full network connectivity.
- Now to establish the connectivity go to AWS then select any one of the instance
- If they are in same security group.
- Allow
- All traffic
- custom security group id.
- Now all the machines can communicate with each other easily.
- Allow
- Now the machines in this SG all of them can communicate easily.
- Another way is to go to the individual machine, copy the ip of another machine and add the ip to the machine security group manually.
- all traffic
- custom
- specific ip of the machine.
- Now the machine can communicate with each other.
- custom
- But this is the lengthy process.
- all traffic
- If they are in same security group.
Now we can use ping the machines with the help of IPs but we cannot ping with the help of name. We can ping with the help of private ipv4DNS provided by AWS. Now we can ping the machine. Select the instance you will see the private ipv4DNS below the ip of the machine.
But to add DNS services for now we can add add ip address and hostname of the machine. We need to use private ip. If we use the private ip of the machine then we don’t need to setup the machines all time because provate ip doesn’t changes same as public ip.
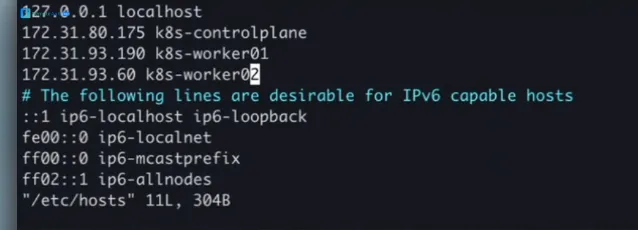
- Now we can ping all the machines with the IP address and the names also.
Now we need to run specific commands in the all machines. ie;
1. Make sure, overlay network and bridge netfilter turned on

cat <<EOF | sudo tee /etc/modules-load.d/k8s.conf
overlay
br_netfilter
EOF

sudo modprobe overlay
sudo modprobe br_netfilter2. Make sure swap is turned off //temporary
Immediately turn off swap - until reboot
sudo swapoff -a
use step no 3 for now.3. Turn off swap after restart //permanent
sudo sed -i 's|^/swap.img|#/swap.img|g' /etc/fstab
I am using this for now.- If you are doing this make sure to restart your machine before moving further..
4. You need to make sure kubernetes can do IPv4 forwarding.


cat <<EOF | sudo tee /etc/sysctl.d/k8s.conf
net.bridge.bridge-nf-call-iptables  = 1
net.bridge.bridge-nf-call-ip6tables = 1
net.ipv4.ip_forward                 = 1
EOF5. Reboot sysctl //TO reflect the changes in current session. we should see 1 here.
sudo sysctl --systemNow we need to select the container runtime.
- Docker
- In the case of docker it is not officially supporte.
- Initially the docker support the k8 but after that other container runtime came. For this the k8 implemented CRI. The docker won’t work without CRI.
- TO connect the docker to k8 we need to install CRI in docker.
- Note: Docker Engine does not implement the CRI which is a requirement for a container runtime to work with Kubernetes. For that reason, an additional service cri-dockerd has to be installed. cri-dockerd is a project based on the legacy built-in Docker Engine support that was removed from the kubelet in version 1.24.
- containerd
- Containerd is supported natively by kubernetes
- crio
- rkt
How to install containerd
- Here all the steps are same but you need to only install containerd and don’t install other things.
While installing docker containerd is installed by default. we can also follow the docker document
1.

# Add Docker's official GPG key:
sudo apt-get update
sudo apt-get install ca-certificates curl
sudo install -m 0755 -d /etc/apt/keyrings
sudo curl -fsSL https://download.docker.com/linux/ubuntu/gpg -o /etc/apt/keyrings/docker.asc
sudo chmod a+r /etc/apt/keyrings/docker.asc

# Add the repository to Apt sources:
echo \
  "deb [arch=$(dpkg --print-architecture) signed-by=/etc/apt/keyrings/docker.asc] https://download.docker.com/linux/ubuntu \
  $(. /etc/os-release && echo "${UBUNTU_CODENAME:-$VERSION_CODENAME}") stable" | \
  sudo tee /etc/apt/sources.list.d/docker.list > /dev/null
sudo apt-get update

3.
sudo apt-get install containerd.io- Now check the status of containerd
sudo systemctl status containerd - Make this file and directory
sudo mkdir -p /etc/containerd

sudo containerd config default | sudo tee /etc/containerd/config.toml- Now see the container runtimes .
- Container runtime le kun driver use gareko xa need to cinfigure that.
- ie; cgroupfs or systemd
- We need to keep the driver same otherwise it will cause error
sudo sed -i 's/SystemdCgroup \= false/SystemdCgroup \= true/g' /etc/containerd/config.tomlNow restart the services
- sudo systemctl restart containerd
- sudo systemctl enable containerd
Installing kubeadm, kubelet and kubectl
You will install these packages on all of your machines:
kubeadm: the command to bootstrap the cluster.kubelet: the component that runs on all of the machines in your cluster and does things like starting pods and containers.kubectl: the command line util to talk to your cluster.- Follow the link below to install
- Update the
aptpackage index and install packages needed to use the Kubernetesaptrepository
sudo apt-get update
# apt-transport-https may be a dummy package; if so, you can skip that package
sudo apt-get install -y apt-transport-https ca-certificates curl gpg- Download the public signing key for the Kubernetes package repositories. The same signing key is used for all repositories so you can disregard the version in the URL:
# If the directory `/etc/apt/keyrings` does not exist, it should be created before the curl command, read the note below.
# sudo mkdir -p -m 755 /etc/apt/keyrings
curl -fsSL https://pkgs.k8s.io/core:/stable:/v1.33/deb/Release.key | sudo gpg --dearmor -o /etc/apt/keyrings/kubernetes-apt-keyring.gpg- Add the appropriate Kubernetes
aptrepository. Please note that this repository have packages only for Kubernetes 1.33; for other Kubernetes minor versions, you need to change the Kubernetes minor version in the URL to match your desired minor version (you should also check that you are reading the documentation for the version of Kubernetes that you plan to install).
# This overwrites any existing configuration in /etc/apt/sources.list.d/kubernetes.list
echo 'deb [signed-by=/etc/apt/keyrings/kubernetes-apt-keyring.gpg] https://pkgs.k8s.io/core:/stable:/v1.33/deb/ /' | sudo tee /etc/apt/sources.list.d/kubernetes.list- Update the
aptpackage index, install kubelet, kubeadm and kubectl, and pin their version:
sudo apt-get update
sudo apt-get install -y kubelet kubeadm kubectl
sudo apt-mark hold kubelet kubeadm kubectl- Enable the kubelet service before running kubeadm:
sudo systemctl enable --now kubeletNow we need to initialize the cluster.
Now run the following on control plane only
sudo kubeadm init --pod-network-cidr 192.168.0.0/16
when using flannel the cidr block should be like this
sudo kubeadm init --pod-network-cidr 10.244.0.0/16
#Otherwise flannel will crash immediately and it will be hard to installl.

#--cri-socket unix:///var/run/cri-dockerd.sock : Use this when you need to explicitly define a sokcer otherwise it will use containerd socket.
--cri-socket this is used when we have multiple container runtime to specify the specific one.- kubeadm le control plane ko components haru theyo sabai lai install garne, establish connectivity. These all things are done by kubeadm tool.
Run following as a normal user
exit sudo mode if you are running above command in sudo mode.
exit

mkdir -p $HOME/.kube
sudo cp -i /etc/kubernetes/admin.conf $HOME/.kube/config
sudo chown $(id -u):$(id -g) $HOME/.kube/configYou will see the join while installing kubeadm and use that token to join worker node. Need to run this command as sudo privilege in worker node. ie need to use sudo before this command.

Now run this in worker node to join the cluster.
You can see now all the worker node have joined the cluster
kubectl get nodes

Now need to install network driver in control plane.
To use flannel
this command should also be run with non-root user if the permission are set correctly.
kubectl apply -f https://github.com/flannel-io/flannel/releases/latest/download/kube-flannel.ymlERROR I faced here
| Error Type | Description | Resolution |
|---|---|---|
| Pod CIDR Mismatch | You initialized the cluster with one Pod Network range (--pod-network-cidr 192.168.0.0/16), but the default Flannel CNI manifest was hardcoded to expect a different range (10.244.0.0/16). | The Flannel Pod crashed immediately, preventing CoreDNS from starting and workers from joining. |
| Final Fix | We reset the cluster and re-initialized it using the standard --pod-network-cidr 10.244.0.0/16. This aligned the kubeadm configuration with the Flannel CNI’s expectation, allowing the networking to start successfully. |
To use calico
Install calico

kubectl apply -f https://docs.projectcalico.org/manifests/calico.yamlFor now i am using flannel
Calico is Highly Favored in Production
While Flannel is excellent for simple, smaller, or testing environments (like your Vagrant setup), Calico is often preferred for large-scale, production, and secure clusters.1
| Feature | Calico | Flannel |
|---|---|---|
| Primary Goal | Network Policy & Security | Simple Connectivity (Overlay) |
| Networking Model | Layer 3 (BGP) with optional Overlay (VXLAN) | Layer 2 (VXLAN/UDP Overlay) |
| Network Policy | Native and highly advanced enforcement via iptables/eBPF. | Requires a separate component (like the Kubernetes default policy engine). |
| Performance | Generally faster (especially using BGP/eBPF) due to less overhead. | Good, but VXLAN tunneling adds some overhead. |
| Scalability | Excellent. Can scale to thousands of nodes using BGP. | Good for small to medium clusters. |
Some of the commands of K8s
- kubectl get pods :To list the pods
- kubectl get ns: To list the namespaces
- kubectl get pods -n kube-system: To list the pods in certains namespaces.
Major differences between containerd, EKS and ECS.
containerd:
- Kubernetes Role: containerd is a Container Runtime Interface (CRI)-compatible runtime, making it the default container runtime for Kubernetes clusters in Amazon EKS (since Kubernetes 1.24, replacing Docker’s dockershim). It handles low-level tasks like pulling images, starting/stopping containers, and managing networking/storage.
- No Orchestration: containerd does not provide Kubernetes orchestration features (e.g., pods, deployments); it only executes containers as instructed by Kubernetes.
- Use in EKS: EKS uses containerd as its default runtime to run containers within Kubernetes pods, ensuring high performance and compatibility with Kubernetes standards.
Amazon ECS:
- Kubernetes Relationship: ECS has no direct integration with Kubernetes. It is a proprietary AWS orchestration platform that competes with Kubernetes, designed for simplicity and deep AWS integration.
- Alternative to Kubernetes: ECS is an alternative for users who don’t want to manage Kubernetes complexity but still need container orchestration. It cannot run Kubernetes workloads or use Kubernetes tools like kubectl.
- Runtime: ECS historically used Docker as its runtime but can integrate with containerd in specific configurations, though this is not Kubernetes-related.
- We can use the ECS in the case of docker.
Amazon EKS:
- Kubernetes Role: EKS is a fully managed Kubernetes service, providing a Kubernetes control plane and supporting all Kubernetes features (pods, services, deployments, namespaces, etc.). It uses containerd as its default runtime to execute containers within Kubernetes pods.
- Flexibility: EKS supports the full Kubernetes ecosystem, including tools like Helm, Prometheus, and Istio, making it suitable for complex, portable, and Kubernetes-native workloads.
- AWS Integration: While EKS is Kubernetes-based, it integrates with AWS services (e.g., IAM, CloudWatch, ALB) and uses AWS VPC CNI for networking, aligning Kubernetes with AWS infrastructure.
- In the case of kubernetes.
Registries
Amazon ECR (Elastic Container Registry)
- What it is: A fully managed Docker container registry provided by AWS.
- Key Features:
- Tightly integrated with AWS services like ECS, EKS, and IAM for authentication and access control.
- Supports private and public repositories (public via ECR Public).
- Automatic image scanning for vulnerabilities.
- Lifecycle policies to manage image versions and reduce storage costs.
- Regional availability for low-latency access.
- Use Case: Ideal for AWS-based workloads, especially with ECS and EKS, for storing and deploying container images securely.
- Kubernetes Integration: EKS clusters can pull images from ECR using AWS IAM roles for authentication.
- Pricing: Pay for storage and data transfer; no additional charge for the registry service itself.
Azure Container Registry (ACR)
- What it is: A managed Docker container registry provided by Microsoft Azure.
- Key Features:
- Integrates with Azure services like Azure Kubernetes Service (AKS) and Azure DevOps.
- Supports private repositories with role-based access control (RBAC) via Azure Active Directory.
- Offers geo-replication for global distribution of images.
- Built-in security scanning and Helm chart storage.
- Supports webhooks for automation (e.g., triggering CI/CD pipelines).
- Use Case: Best for Azure-based container workflows, particularly with AKS or Azure-native CI/CD pipelines.
- Kubernetes Integration: AKS clusters can pull images from ACR using Azure AD or service principal authentication.
- Pricing: Tiered pricing based on storage, features (e.g., geo-replication), and data transfer.
Google Container Registry (GCR)
Pricing: Based on storage and network egress costs; no separate registry fee.
What it is: A managed Docker container registry provided by Google Cloud Platform (GCP). Note: GCP now emphasizes Artifact Registry as its primary registry, but GCR is still supported.
Key Features:
-
Integrates with Google Kubernetes Engine (GKE) and other GCP services.
-
Stores Docker images and supports private repositories with IAM-based access control.
-
Regional storage for low-latency access.
-
Basic vulnerability scanning (via integration with Google Cloud Security).
-
Legacy service; Google recommends migrating to Artifact Registry for additional features like Helm and non-container artifacts.
-
Use Case: Suited for GCP-based workloads, especially with GKE, but less feature-rich compared to Artifact Registry.
-
Kubernetes Integration: GKE clusters can pull images from GCR using GCP IAM credentials.
EKS in detail
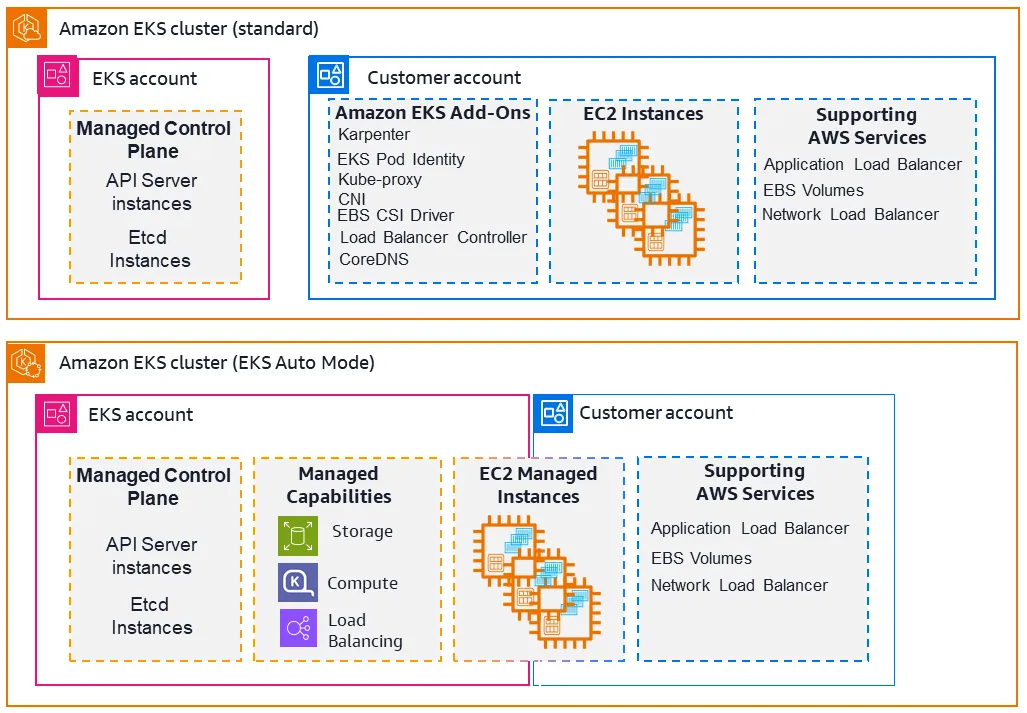
Elastic kubernetes service. It is managed by AWS. We cannot access controller machine via ssh. It is managed by AWS. You can define worker node. You can connect into the machine and do a lot of stuff in worker node. We can interact with control plane but cannot login/ssh into the control machine. It is all done by the AWS.
Amazon Elastic Kubernetes Service (Amazon EKS) is a fully managed Kubernetes service that enables you to run Kubernetes seamlessly in both AWS Cloud and on-premises data centers. In the cloud, Amazon EKS automates Kubernetes cluster infrastructure management. This is essential for scheduling containers, managing application availability, dynamically scaling resources, optimizing compute, storing cluster data, and performing other critical functions. With Amazon EKS, you can leverage the robust performance, scalability, reliability, and availability of AWS infrastructure, as well as natively integrate with AWS networking, security, and storage services. To simplify running Kubernetes in on-premises environments, you can use the same Amazon EKS clusters, features, and tools to run nodes on AWS Outposts or your own infrastructure, or you can use Amazon EKS Anywhere for self-contained, air-gapped environments.
Create Cluster in EKS from management console
Prerequisites
- An existing VPC and subnets that meet Amazon EKS requirements. Before you deploy a cluster for production use, we recommend that you have a thorough understanding of the VPC and subnet requirements. If you don’t have a VPC and subnets, you can create them using an Amazon EKS provided AWS CloudFormation template.
- The
kubectlcommand line tool is installed on your device or AWS CloudShell. The version can be the same as or up to one minor version earlier or later than the Kubernetes version of your cluster. To install or upgradekubectl, see Set up kubectl and eksctl. - Version
2.12.3or later or version1.27.160or later of the AWS Command Line Interface (AWS CLI) installed and configured on your device or AWS CloudShell. To check your current version, useaws --version | cut -d / -f2 | cut -d ' ' -f1. Package managers suchyum,apt-get, or Homebrew for macOS are often several versions behind the latest version of the AWS CLI. To install the latest version, see Installing and Quick configuration with aws configure in the AWS Command Line Interface User Guide. The AWS CLI version that is installed in AWS CloudShell might also be several versions behind the latest version. To update it, see Installing AWS CLI to your home directory in the AWS CloudShell User Guide. - An IAM principal with permissions to
createanddescribean Amazon EKS cluster. For more information, see Create a local Kubernetes cluster on an Outpost and List or describe all clusters.
Now go to EKS in AWS and create cluster.
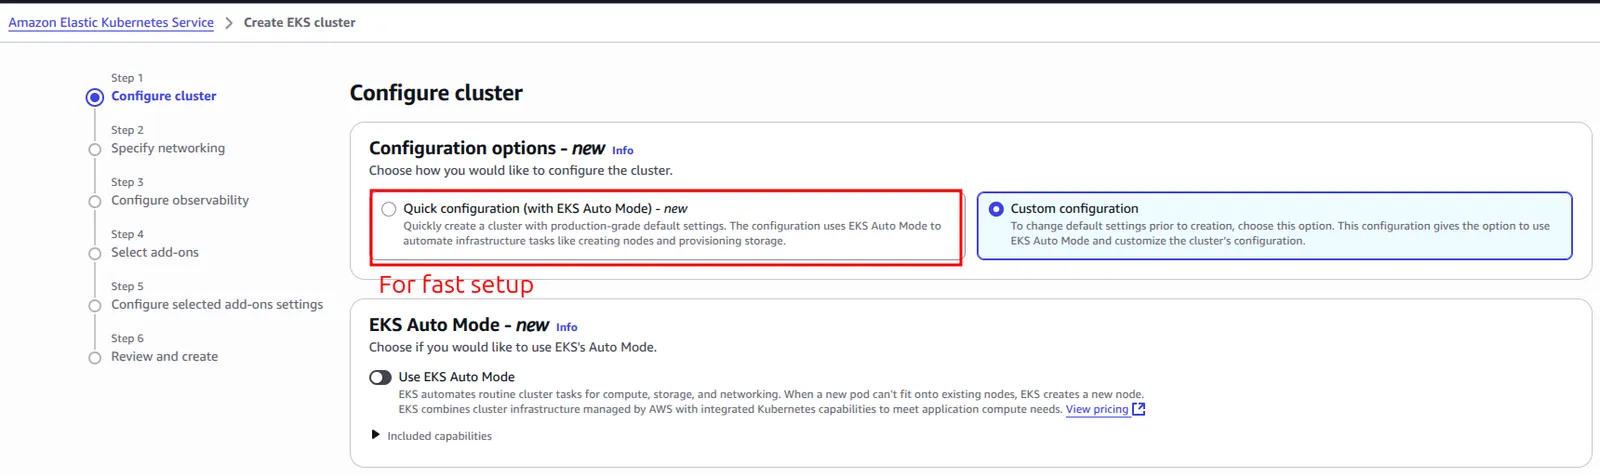
- EKS auto mode
- Turn off this feature
- Cluster configuration
- Name
- Provide a name for cluster
- Cluster IAM role
- Create the IAM role for the cluster.
- Name

- Follow the screen prompt and create the policy.
- It will automatically attach the based based on the needs.
- Kubernetes version Info
- Select latest version here
- Upgrade policy
- standard
- Auto mode compute
- DOn’t enable this
- Cluster access
- Allow cluster administrator access .//to do bootstrap
- cluster authentication mode
- EKS API
- Envelope encryption
- default
- ARC zonal shift
- default
- Deletion protection
- default
Specifying network
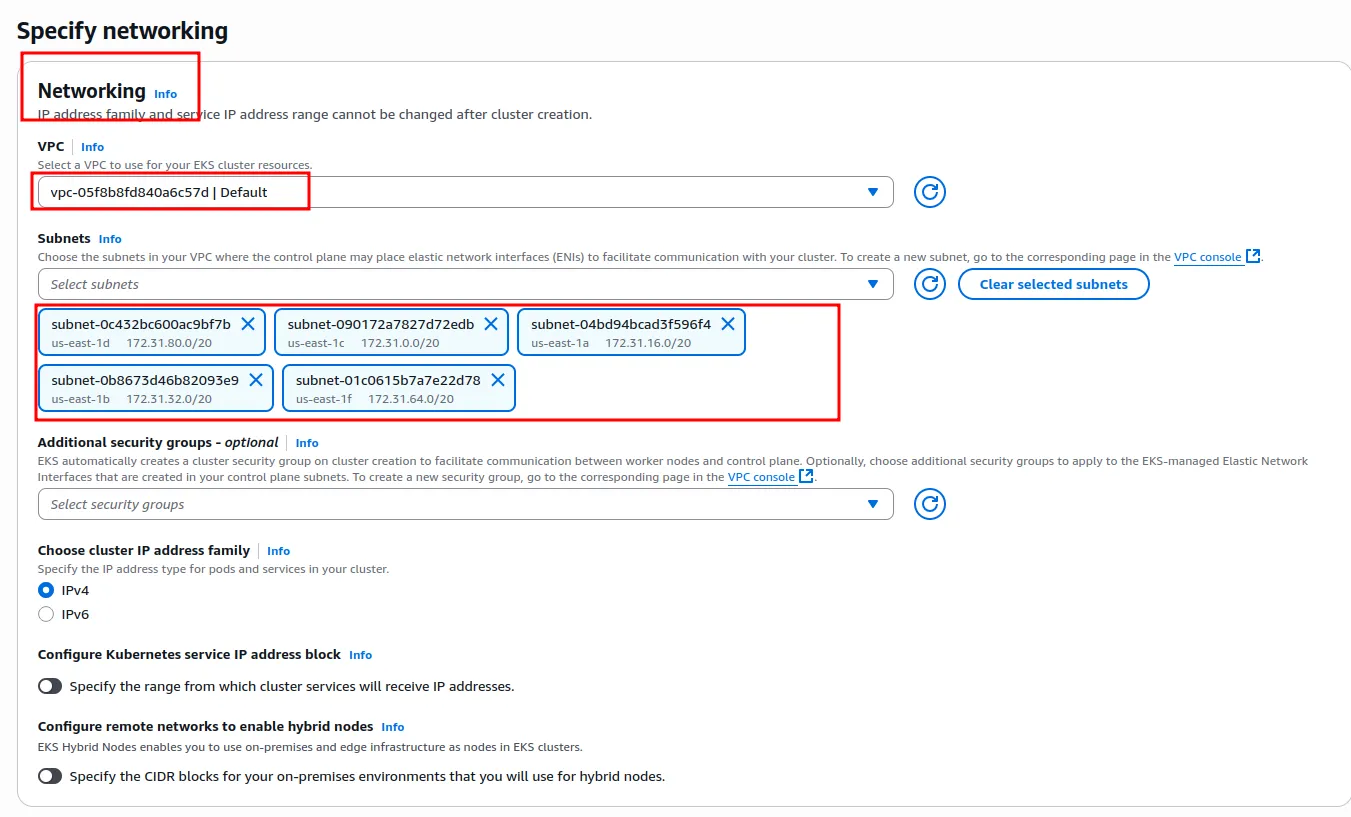
Cluster endpoint access
- Configure access to the Kubernetes API server endpoint
- Public and private
- Default
Configure observability
- default
Select add-ons
- default
Configure selected add-ons settings
- default
Now review and create the cluster. It will take few time to create the cluster. It will take upto 8-10 minutes and if there is any issue it will take 20-25 minutes.
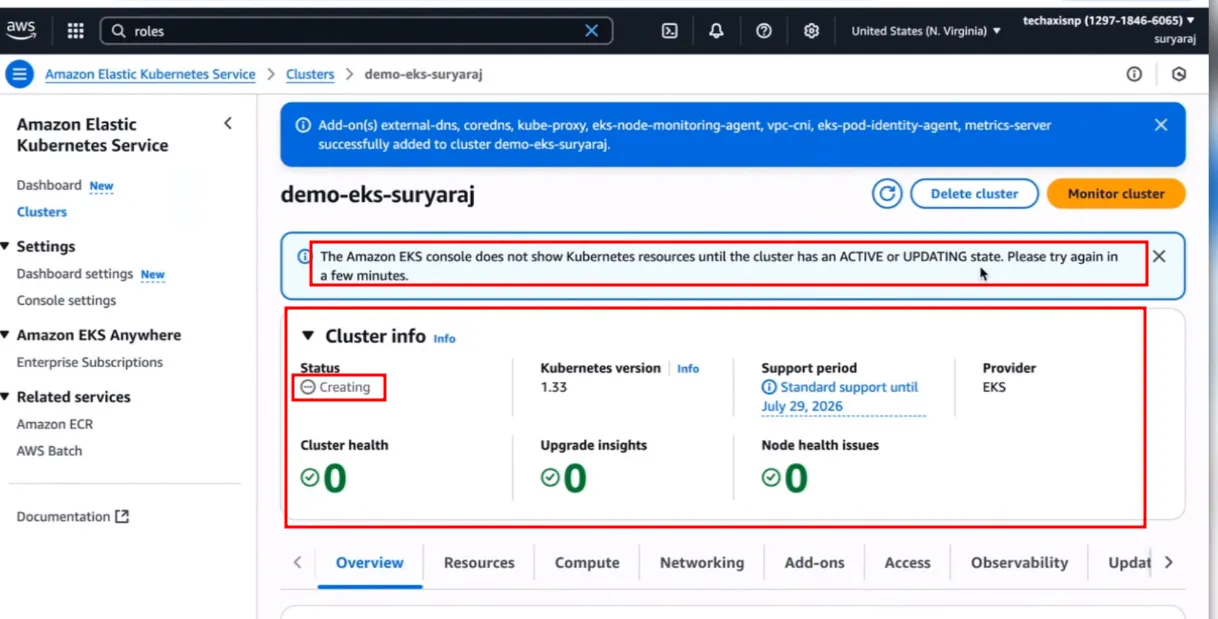
- Overview: to see overall overview of the cluster
- Resources: can see pods
- Compute: can see node groups here
Install AWS CLI
Follow this link to install aws cli.
TO CHECK THE STATUS OF AWS CLI THEN
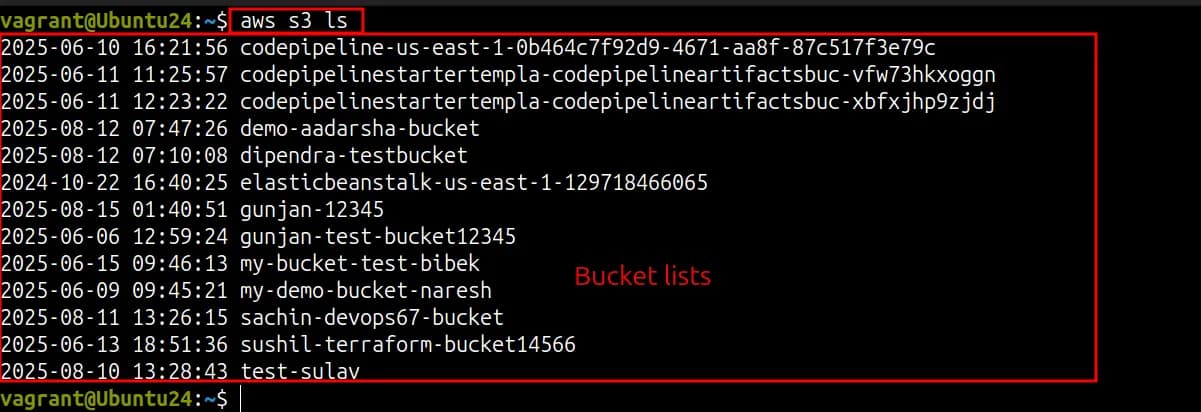
- Here in this example i have listed the buckets available using aws cli.
To see the status of the cluster from the CLI you can run this command.
- aws eks –region us-east-1 describe cluster –name –query cluster.status
For interaction we need to install kubectl.
- Refer to this document to install kubectl.
Now to interact with the cluster we need to download the config of the cluster.
aws eks --region us-east-1 update-kubeconfig --name <cluster_name>- You can see the message like added new context to /home/vagrant/.kube/config.
Now you see the .kube in the home directory and config file in that directory. If you cat the config file you can see the details of cluster.
or you can see this details using
kubectl config view
- cluster certificate
- server url
- contexts
- currently active context
- users information
To see the details.
Kubectl get svc
kubectl get nodes
kubectl get pods
kubectl get namespacesNow we need to add node group in the cluster
- Configure Node group
- Name
- Name of the node group
- Node IAM role
- Create the recommended the role
- follow the prompt and create the node role.
- create role
- select trusted
- AWS service
- select trusted
- Use case
- EC2
- permission
- AMAZONEKS WORKERNODEPOLICy
- AMAZONEC2REGISTRYREADONLY //wrong in official doc
- AmazonEKS_CNI_policy
- attach these policies
- create role
- Provide name for the policy
- for example : EKS_nodegroup_dipendra_policy
- Now the policy has been created and attach the policy in the cluster
- Launch template
- If you want to use then you can but for now i am using
- Let all the things as it is and click on next
- Name
- Select computing and scaling configuration
- AMI type
- For now you can select this and let it be as it is
- Capacity type
- on-demand
- Instance types
- t3.medium or you can use any other
- Disk size
- 20 GB
- Node group scaling configuration
- Desired state
- 2
- minimum
- 1
- maximum
- 3
- Desired state
- Node group update confifuration
- Maximum unavailable number
- Number
- value: 1
- update strategy
- default
- Node auto repair configuration
- let it be as default
- AMI type
- Specify networking
- subnets
- can select all subnet or specific based on need
- configure remote access to the node
- This will increase security risk and need to attach key pair and security groups.
- For now let it be as it is.
- subnets
- Now review and create the node group.
- It will now create the node group.
- You can see it will creates nodes.
- You can see the instances in the EC2.
- It will do various configuration based on our behalf.
- We can access the nodes but we cannot control the cluster.
- Now to see from the command line
- kubectl get nodes
- You will see the nodes are at the ready state./h
- kubectl get nodes
Now we need to deploy the application in the cluster
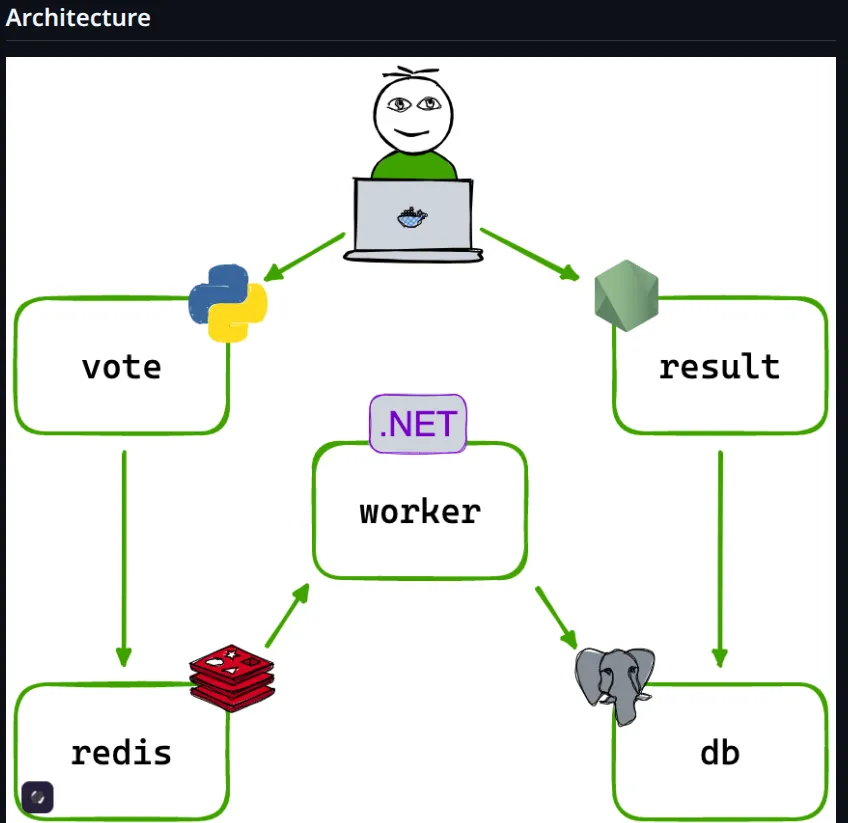
This is the architecture of the code that we are trying to deploy. This is the multi tier application. This is the simple vote casting application. Here as a user we can select whether we can select the cat and dog for voting.
-
A front-end web app in Python which lets you vote between two options
- cat and dog.
-
A Redis which collects new votes
-
A .NET worker which consumes votes and stores them in…
-
A Postgres database backed by a Docker volume
-
A Node.js web app which shows the results of the voting in real time
- To see the results of the votes.
-
Here for vote and result we should use loadbalancer service type because we need to access them over the internet.
-
for all other service communication we need to use cluster IP.
-
Basic service types are
- node port
- clusterip
- loadbalancer
- external ip
vote_deployment.yaml
apiVersion: apps/v1
kind: Deployment
metadata:
  labels:
    app: vote
  name: vote
#This spec is for the deployment object
spec:
  replicas: 1
  selector:
    matchLabels:
      app: vote
  template:
    metadata:
      labels:
        app: vote
#This is for the pod
    spec:
      containers:
      - image: dockersamples/examplevotingapp_vote #Using docker sample image
      #We can use the build option here also
        name: vote
        ports:
        - containerPort: 80
name: votevote_service.yaml
apiVersion: v1
#Here we need load balancer instead of service because we #accessing this service from the internet.
kind: Service
metadata:
  labels:
    app: vote
  name: vote
spec:
  type: NodePort
  ports:
  - name: "vote-service"
#Here the port is 8080 in recording video but in git 5000 #a bit confused here.
#service port
    port: 5000
#application kun port ma listen garirako xa; here nginx
#run in port 80 so
#In simple terms the listening port of the pod.
    targetPort: 80
#nodeport; Node ko kun port ma service pathaune
#30000-32767. Within this range we can assign any value.
    nodePort: 31000
  selector:
    app: vote

#Here out of these three ports only port value is #mandatory among all these three. Need to assign this-
Now the modification we need to do is
-
vim vote-service.yaml
- type: Nodeport
- replace with
- type: LoadBalancer
-
vim result-service.yaml
-
type: Nodeport
-
replace with
- type: LoadBalancer
-
Now we need to apply these files
- kubectl apply -f k8s-specifications
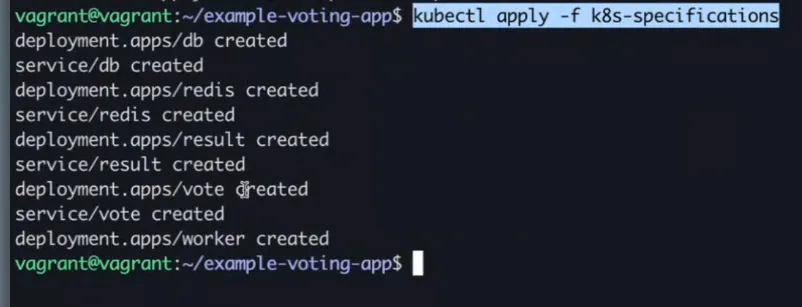
- kubectl get deployment: To see all the deployments
- kubectl get svs: To see all the services
- kubectl get pods: To see the running pods
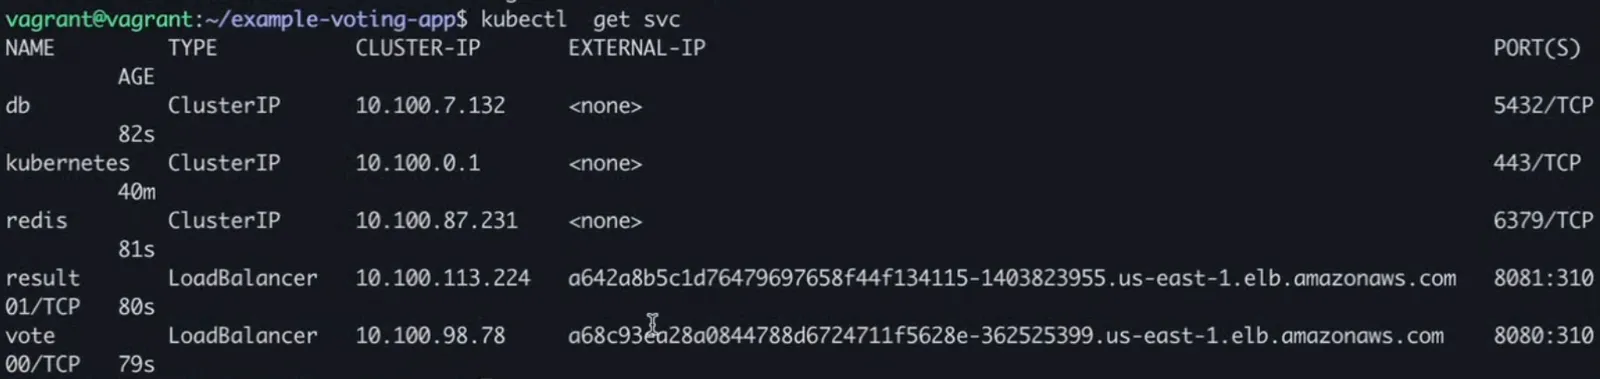
After that delete the cluster
- Delete the node group
- It will delete EC2 instances when we delete instances
- Now we can delete the cluster
- Check all the services that it have created like load balancer and other also.
Some of the advance topics in K8S.
This concept is advance and important for interview and exam. How will you prevent the critical pod from deploying in specific node?
In this case we can use concept of taint and tolerance
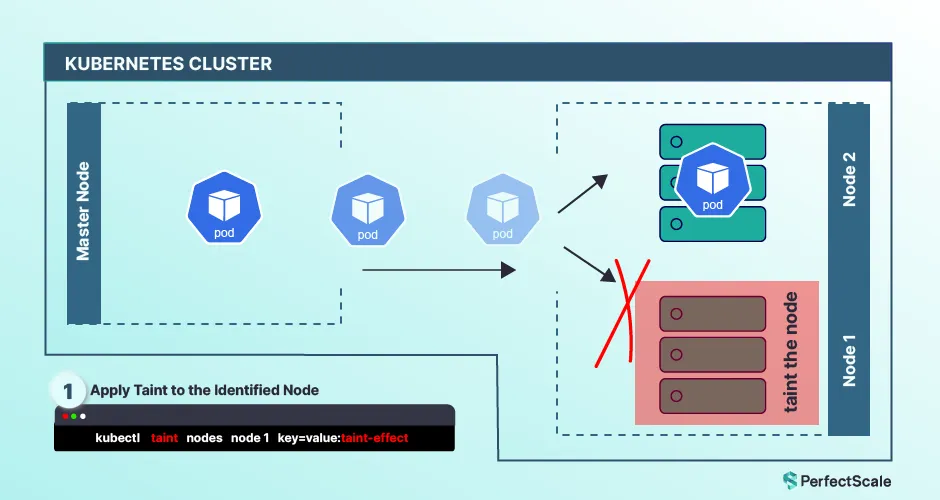
- Taint:
- If we don’t use net or mosquito nets then mosquito can ove freely. If we using mosquito repellent like nets, dhup etc. then the mosquito cannot go there
- Here mosquito is pod and room is node. The pod cannot go to that node because we have used taint concept. To avoid pod in node
- Tolerations: If we use mosquito nets or any other replicants . After some time they become familiar and can tolerate that repellent. This concept is know as tolerance concept.
- We can define toleration in pod so that the pod can deploy in that node.
- Taint: Done in node
- Tolerations: Defined in pod defination file
- In master or control node by default it has tent.
- Example:If there is a sensitive container running then we can use the concept of tent and tolerance in this case.
- Yo node ma jau hai
- If there is taint then the toleration file will allow the pod to deploy where there is done taint.
- For example:
- certain level ko file or node lai allow gar hai vanne type ko.
- Simple example
- Suppose we have 2 worker nodes. Suppose we want to deploy pod in any one of it.
- So in both of the nodes suppose there are pods running.
- If we don’t want the pod to deploy in the node we can add taunt.
Node Affinity
Argo Cd
Helm charts
- Other important topics
Storage in K8s
Use shared/cloud storage and mount that storage from all the node.
- Important topics
- pvc
- pv
Scaling
Hpa vs vpa vs keda
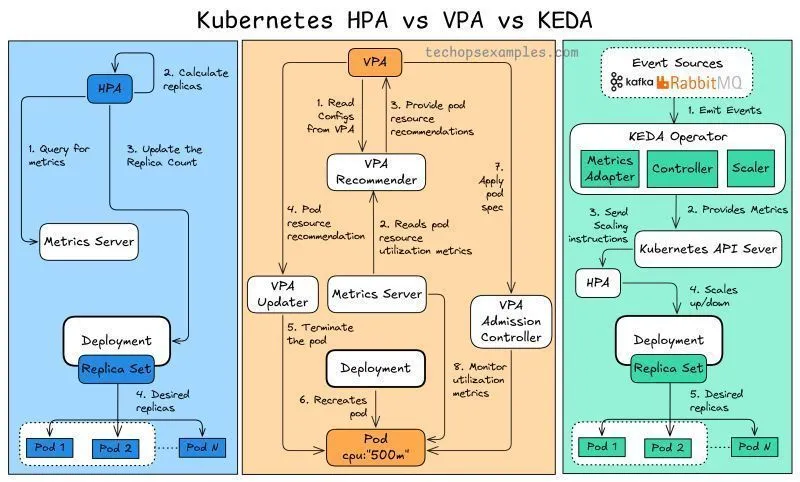
1. Horizontal Pod Autoscaler (HPA)
- What: Scales the number of pod replicas based on CPU/memory or custom metrics.
- How: Adds/removes pods to maintain target resource usage (e.g., 60% CPU).
- Real-Life Example: An e-commerce website during Black Friday. HPA adds more web server pods when traffic spikes to handle increased user requests, then reduces pods when traffic drops.
- Pros: Fast scaling, ideal for stateless apps, built into Kubernetes.
- Cons: Not for stateful apps, limited by node capacity.
- Use Case: Web apps with variable traffic (e.g., online stores).
2. Vertical Pod Autoscaler (VPA)
- What: Adjusts CPU/memory requests/limits for individual pods based on usage.
- How: Analyzes pod resource needs and updates allocations, often requiring pod restarts.
- Real-Life Example: A machine learning job processing large datasets. VPA increases memory for pods when data size grows, ensuring efficient resource use without manual tuning.
- Pros: Optimizes resource usage, great for stateful or batch jobs.
- Cons: Pod restarts cause downtime, limited by node resources.
- Use Case: Data processing or stateful apps with unpredictable resource needs.
3. Kubernetes Event-Driven Autoscaling (KEDA)
- What: Scales pods based on external events (e.g., queue length, HTTP requests).
- How: Uses event triggers (e.g., Kafka, RabbitMQ) to scale pods, including to zero when idle.
- Real-Life Example: A food delivery app processing order messages from a queue. KEDA scales pods up when orders pile up in RabbitMQ and scales to zero when no orders are pending, saving costs.
- Pros: Flexible for event-driven apps, supports scale-to-zero.
- Cons: Complex setup, requires external event sources.
- Use Case: Event-driven apps like message queue processing or IoT.
When certain application is running in k8 but we want to upgrade this then there will be complicated. Study this part in detail
Label are very very important in the case of K8s.
SETTING UP kubeadm in virtual box
THESE steps are same as above so make sure you run these steps from above
This guide covers the necessary steps to set up your Control Plane and Worker Nodes, ensuring stability and addressing common errors like certificate issues and CNI failures.
📝 Prerequisites & System Setup (All Nodes)
These steps must be run on all nodes (control-plane, worker1, and worker2) before initialization.
1. Disable Swap & Set Kernel Parameters 🛠️
| Action | Command | Purpose |
|---|---|---|
| Disable Swap | sudo swapoff -a | Kubelet cannot run with swap enabled. |
| Enable IP Forwarding | sudo sysctl net.ipv4.ip_forward=1 sudo sysctl -p | Critical for node-to-node Pod networking. |
2. Install Container Runtime (Containerd)
| Action | Command | Purpose |
|---|---|---|
| Install/Update | sudo apt update && sudo apt install -y containerd | Install the runtime package. |
| Enable/Start | sudo systemctl enable containerd --now | Ensure Containerd is running and starts on boot. |
3. Install Kubernetes Components
| Action | Command | Purpose |
|---|---|---|
| Install Tools | sudo apt install -y kubelet kubeadm kubectl | Installs Kubernetes tools. |
| Hold Packages | sudo apt-mark hold kubelet kubeadm kubectl | Prevents accidental upgrades. |
| Stop Kubelet | sudo systemctl stop kubelet | Crucial: Kubelet must be stopped and unconfigured. |
THESE are the things you need to know
💻 Control Plane Initialization
This section is run only on the control-plane node (192.168.56.49).
1. Initialize the Cluster (Critical: Certs & IP Fix)
This command fixes the certificate validation errors by explicitly including your private IP in the API server’s TLS certificate.
Bash
sudo kubeadm init \
    --pod-network-cidr 10.244.0.0/16 \
    --apiserver-advertise-address 192.168.56.49 \
--apiserver-cert-extra-sans 192.168.56.492. Set up kubectl Access (Fixes “Unknown Authority” Error)
Bash
mkdir -p $HOME/.kube
sudo cp -i /etc/kubernetes/admin.conf $HOME/.kube/config
sudo chown $(id -u):$(id -g) $HOME/.kube/config3. Install the CNI Plugin (Flannel)
This is the required network overlay for Pod communication (fixes the NotReady status).
Bash
kubectl apply -f https://github.com/flannel-io/flannel/releases/latest/download/kube-flannel.yml4. Generate/Retrieve the Join Token 🔑
If your original join token has expired (default: 24 hours), run this command on the Control Plane to generate a new, valid token and print the full join command.
Bash
sudo kubeadm token create --print-join-command👷 Worker Node Setup
This section is run on worker1 and worker2.
1. Configure the Container Runtime Endpoint (Fixes Pre-flight Hang)
This tells the Kubelet where to find the Containerd socket, resolving communication issues during pre-flight checks.
Bash
# Execute this on workerX:
echo 'KUBELET_EXTRA_ARGS=--container-runtime-endpoint=unix:///run/containerd/containerd.sock' | sudo tee /etc/default/kubelet2. Clean State and Stop Kubelet
Ensure Kubelet is clean and inactive before attempting the join to prevent the config file crash-loop.
Bash
# Execute this on workerX:
sudo kubeadm reset --force
sudo rm -rf /var/lib/kubelet/* /etc/cni/net.d/*
sudo systemctl daemon-reload
sudo systemctl stop kubelet3. Join the Cluster
Use the full join command generated in Step 4 of the Control Plane setup.
Bash
# Execute this on workerX:
sudo kubeadm join 192.168.56.49:6443 --token <your-new-token> \
--discovery-token-ca-cert-hash sha256:<your-hash>✅ Final Verification
Once the join commands are complete, return to your control-plane node to verify the cluster status.
| Check | Command | Expected Result |
|---|---|---|
| Node Status | kubectl get nodes | All nodes should show Ready status. |
| Network Pods | kubectl get pods -n kube-flannel | All Flannel Pods should be Running. |
Keep reading
- KUbernetes
Introduction kubernetes is similar to docker swarm. Kubernetes is also a container orchestration tool. We can run kubernetes in every environment example laptop, dev, production, cloud. So if there…
- kubectl Cheat Sheet (With Clear Categories & Uses)
📌 1. Basic Cluster & Node Info Command Use kubectl version –short Check client & server versions kubectl cluster-info Display cluster master & services kubectl get nodes List nodes kubectl describe…
- minikube
How to install minikube in linux You can download the minikube from the above link for different OS. For now i will explain steps to setup in linux environment. Run this in your terminal and it will…