LVM in linux
Problems with standard partation There are some problems when working with hard disks and standard aprtiations. Consider a system with a small and a large hard disk drive, partioned. Suppose the…

ON THIS PAGE
Problems with standard partation
There are some problems when working with hard disks and standard aprtiations. Consider a system with a small and a large hard disk drive, partioned.
Suppose the first disk /dev/sda is partiation in two and the second disk /dev/sdb has two partations and some empty space.
In the example above, consider the option when you want to enlarge the space available for /mnt/backup. What can you do? The solution will always force you to unmount the file system, take a backup of the datqa, remove and recreate partitions, and then resotre the data and remount the file system.
Solution with LVM
Using LVM will create a virtual layer between the mounted file system and the hardware devices. This virtual layer will allow for an administrator to enlarge a mounted file system in use. When LVM is properly used, then there is no need to unmount the file system to enlarge it.
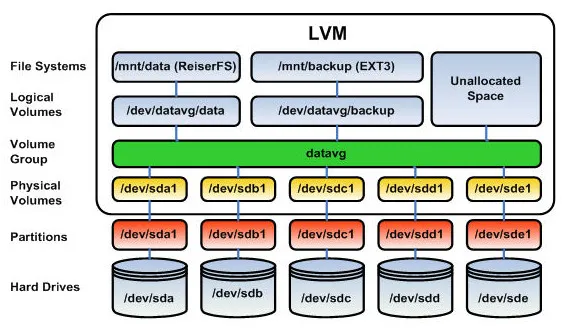
We can split the partiation to physical volume group and then group that physical volumes to volume group. So next time if we want to add more storage we can add new hard disk then create the new partiations and then physical volumes which we will mount to the volume group. And at the end we can mount or attach the logical volume to any file system.
This is where LVM becomes powerful.
If you want more storage in the future:
- Add a new hard disk.
- Create partitions on it.
- Create Physical Volumes from those partitions.
- Extend your Volume Group using
vgextend. - Extend your Logical Volume using
lvextend. - Resize the filesystem.
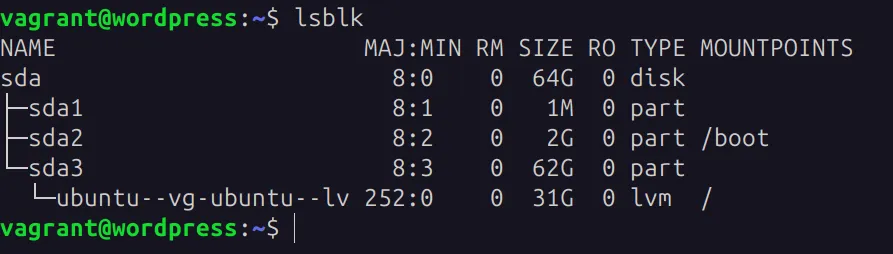
Initially we have these kind of partiations in our virtual machine. We can see this by using command lsblk
Example
Let’s do all the things manually.
First let’s attach a new disk
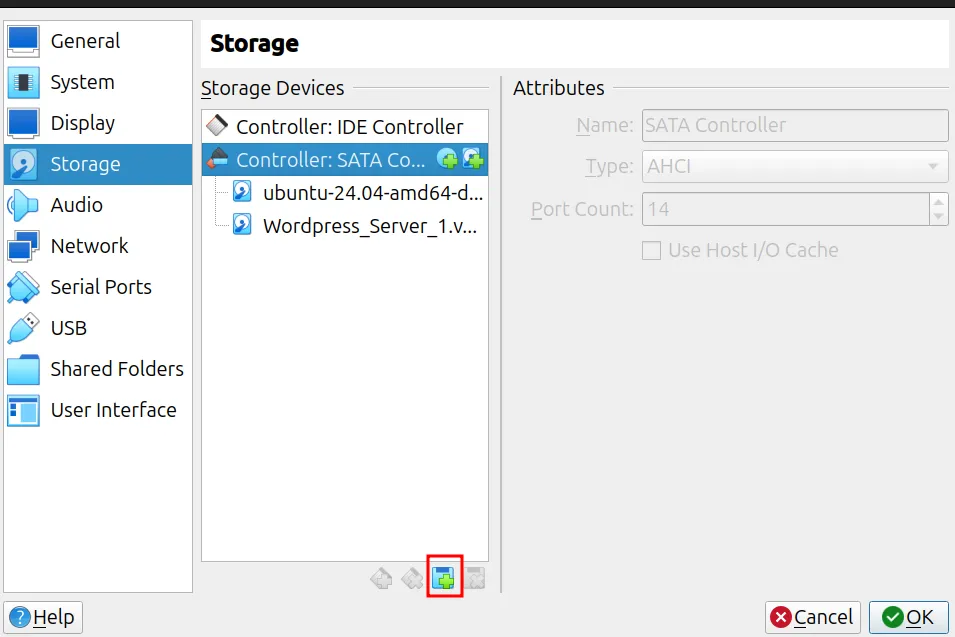
After that select disk
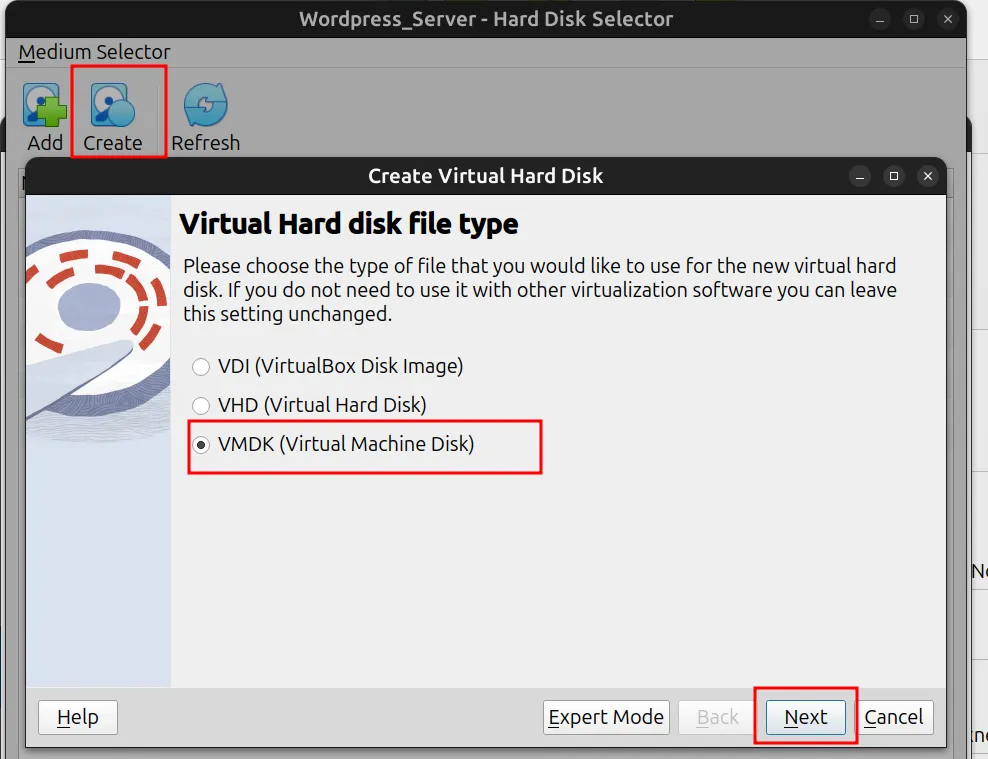
Now click next and don’t select any option and allocate space that you want to create and attach that disk to the machine. Now we can see it using lsblk but it is not mounted yet so we cannot see in df -h.
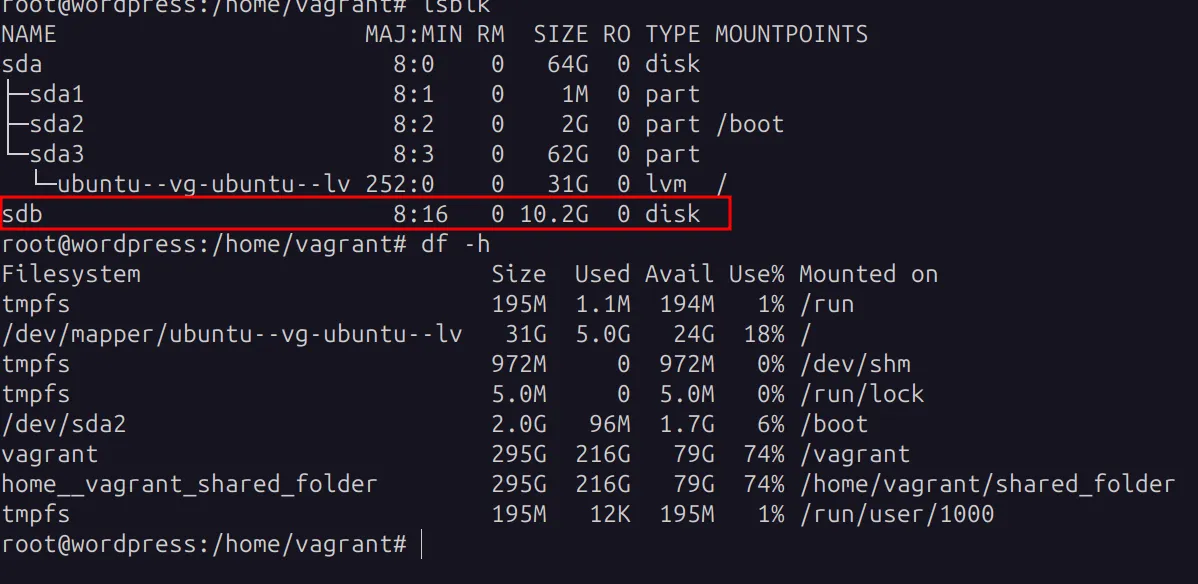
Now let’s create partiation of sdb
Command (m for help): p //List partition
Disk /dev/sdb: 10.19 GiB, 10943545344 bytes, 21374112 sectors
Disk model: VBOX HARDDISK
Units: sectors of 1 * 512 = 512 bytes
Sector size (logical/physical): 512 bytes / 512 bytes
I/O size (minimum/optimal): 512 bytes / 512 bytes
Disklabel type: dos
Disk identifier: 0xc79cf7d5

Command (m for help): n //creates new partition
Partition type
   p   primary (0 primary, 0 extended, 4 free)
   e   extended (container for logical partitions)
Select (default p): p
Partition number (1-4, default 1): 1
First sector (2048-21374111, default 2048): 2048
Last sector, +/-sectors or +/-size{K,M,G,T,P} (2048-21374111, default 21374111): +4G //Size of the partiation

Created a new partition 1 of type 'Linux' and of size 4 GiB.

Device     Boot Start     End Sectors Size Id Type
/dev/sdb1 2048 8390655 8388608 4G 83 LinuxOther commands
Command (m for help): m

Help:

  DOS (MBR)
   a   toggle a bootable flag
   b   edit nested BSD disklabel
c toggle the dos compatibility flagWe can use t to change partiation.
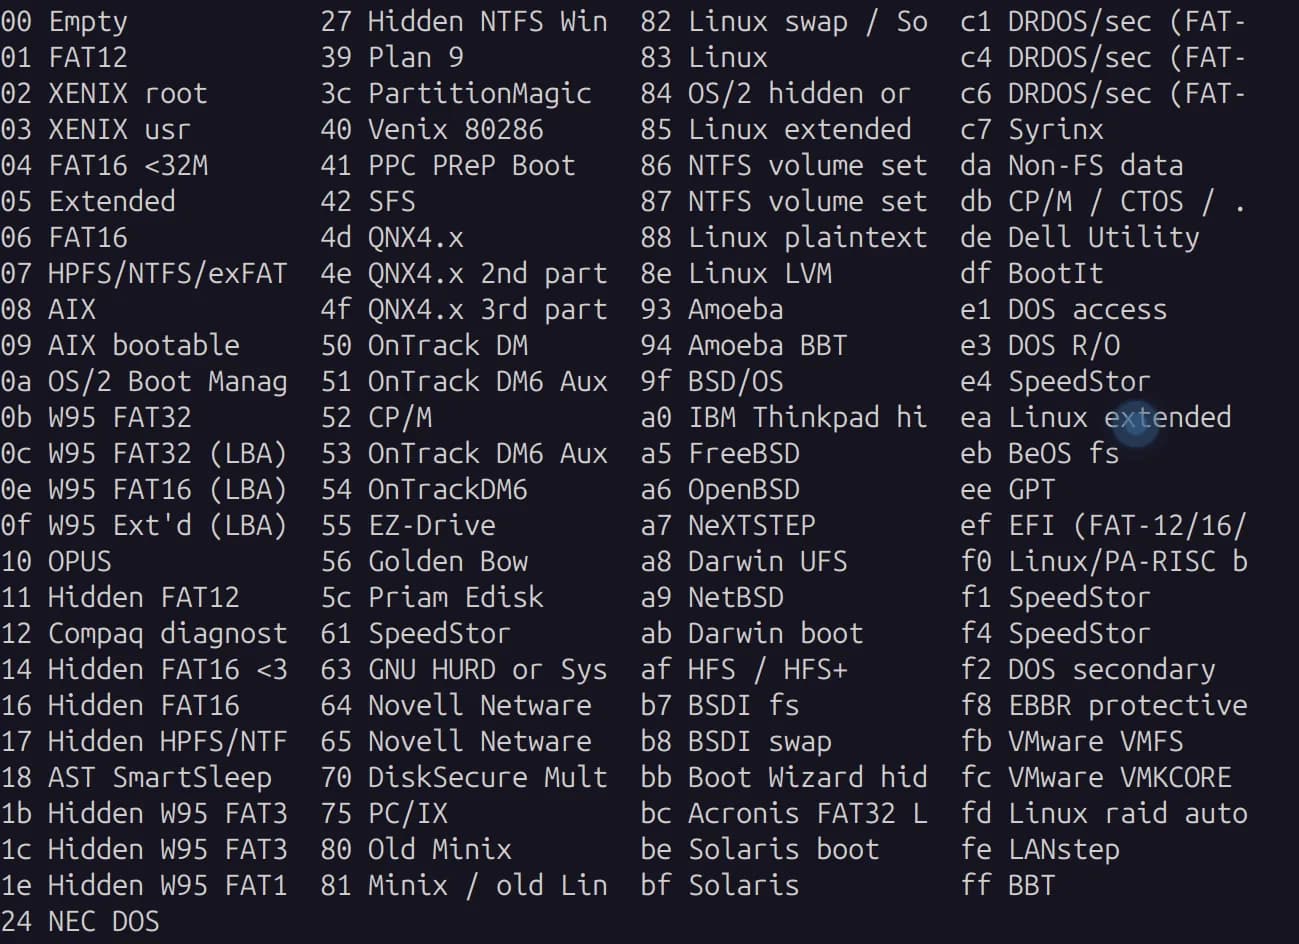
Here we can see 8e for linux lvm and need to change the partiation type to that.
Hex code or alias (type L to list all): 8e
Changed type of partition 'Empty' to 'Linux LVM'.

Command (m for help):Now we can see it’s type is change to linux LVM.
Device     Boot Start     End Sectors Size Id Type
/dev/sdb1 2048 8390655 8388608 4G 8e Linux LVMNow let’s write this by pressing w which we can see in the help command.
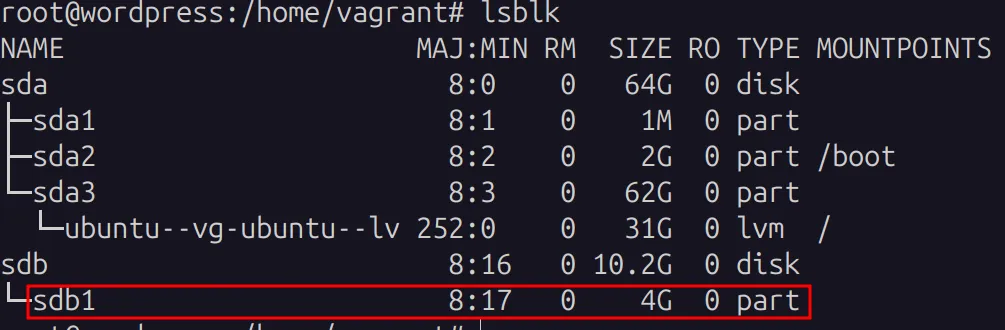
Now let’s create a physical volume using command pvcreate command.
root@wordpress:/home/vagrant# pvcreate /dev/sdb1
  Physical volume "/dev/sdb1" successfully created.
root@wordpress:/home/vagrant# pvs //List physical volumes
  PV         VG        Fmt  Attr PSize   PFree
  /dev/sda3  ubuntu-vg lvm2 a--  <62.00g 31.00g
  /dev/sdb1            lvm2 ---    4.00g  4.00g
root@wordpress:/home/vagrant#Now let’s create a volume groups.
root@wordpress:/home/vagrant# vg
vgcfgbackup    vgck           vgdisplay      vgimport       vgmknodes      vgrename       vgsplit
vgcfgrestore   vgconvert      vgexport       vgimportclone  vgreduce       vgs
vgchange       vgcreate       vgextend       vgmerge        vgremove       vgscan


root@wordpress:/home/vagrant# vgcreate vg0 /dev/sdb1
  Volume group "vg0" successfully created
root@wordpress:/home/vagrant# vgs
  VG        #PV #LV #SN Attr   VSize   VFree
  ubuntu-vg   1   1   0 wz--n- <62.00g 31.00g
  vg0         1   0   0 wz--n-  <4.00g <4.00g
root@wordpress:/home/vagrant#Now it is the time to create a logical volume:
root@wordpress:/home/vagrant# lv
lvchange     lvcreate     lvextend     lvmconfig    lvmdump      lvmsadc      lvreduce     lvrename     lvs
lvconvert    lvdisplay    lvm          lvmdiskscan  lvmpolld     lvmsar       lvremove     lvresize     lvscan

root@wordpress:/home/vagrant# lvcreate -L +3.8G vg0 -n lv0
Here -L is used to provide size, vg0 is name of volume group that we have create earlier and lv0 is logical volume name.
  Rounding up size to full physical extent 3.80 GiB
  Logical volume "lv0" created.
root@wordpress:/home/vagrant#Here we can new lvs that we have created.
root@wordpress:/home/vagrant# lvs
  LV        VG        Attr       LSize   Pool Origin Data%  Meta%  Move Log Cpy%Sync Convert
  ubuntu-lv ubuntu-vg -wi-ao---- <31.00g
lv0 vg0 -wi-a----- 3.80groot@wordpress:/home/vagrant# lsblk
NAME MAJ:MIN RM SIZE RO TYPE MOUNTPOINTS
sda 8:0 0 64G 0 disk
├─sda1 8:1 0 1M 0 part
├─sda2 8:2 0 2G 0 part /boot
└─sda3 8:3 0 62G 0 part
└─ubuntu--vg-ubuntu--lv 252:0 0 31G 0 lvm /
sdb 8:16 0 10.2G 0 disk
└─sdb1 8:17 0 4G 0 part
└─vg0-lv0 252:1 0 3.8G 0 lvmNow we need to change this to the file system before mouting this
root@wordpress:/home/vagrant# mkfs -t ext4 /dev/vg0/lv0
mke2fs 1.47.0 (5-Feb-2023)
Creating filesystem with 996352 4k blocks and 249488 inodes
Filesystem UUID: 3bd870c2-3150-421d-8c12-04f4690f2e39
Superblock backups stored on blocks:
	32768, 98304, 163840, 229376, 294912, 819200, 884736

Allocating group tables: done
Writing inode tables: done
Creating journal (16384 blocks): done
Writing superblocks and filesystem accounting information: doneNow let’s mount this to the directory. ie;
mkdir /data
mount /dev/vg0/lv0 /data
sdb                         8:16   0 10.2G  0 disk
└─sdb1                      8:17   0    4G  0 part
  └─vg0-lv0               252:1    0  3.8G  0 lvm  /data

//Here we can see we have successfully mounted this to the /data.NOTE: To mount we need to format file first to ext4 or NTFS based on our need.
This is temporarily modified which will get lost while system is reboot. So to make it permanent we can change in this file
vim /etc/fstab
- 1st field: It represents which block device it is or which file system it is
- 2nd field: Which mount path. ie; path or directory
- 3rd field: Type of file system
- 4th field: Mount option ie; read write write only this type
- 5th field: Do we want to dump or not
- 6th field: while booting do we want to check disk integrity
- 0 means don’t check and 1 means check disk.
Now let’s add entry in /etc/fstab file. While modifying this file we need to check finely cause if we make a single mistake then we won’t be able to boot the system.
/dev/vg0/lv0 /data ext4 defaults 0 0Now if we reboot the system then it will automatically mount after reboot.
We have created this logic volume. We can further expand this or create new logical volumes and can do many more things.
COMMANDS
- df -h
- fdisk -l
- lsblk
- blkid
Keep reading
- TMUX Complete Cheatsheet
Session Commands Command / Shortcut Description tmux Start a new session. tmux new -s [name] Create new session. tmux attach Attach to latest session. tmux detach Detach session. tmux a -t [name]…
- Apache web server
The Apache HTTP server, commonly known as Apache is a free and open-source web server, that delivers web content through the internet. As open-source software, its original source code is freely…
- Shell Scripting
It is a way to automate tasks by writing a series of commands in a text file called script that Linux shell can execute. It’s like creating a ‘to do list’ for your computer to follow step by step…