minikube
How to install minikube in linux You can download the minikube from the above link for different OS. For now i will explain steps to setup in linux environment. Run this in your terminal and it will…

ON THIS PAGE
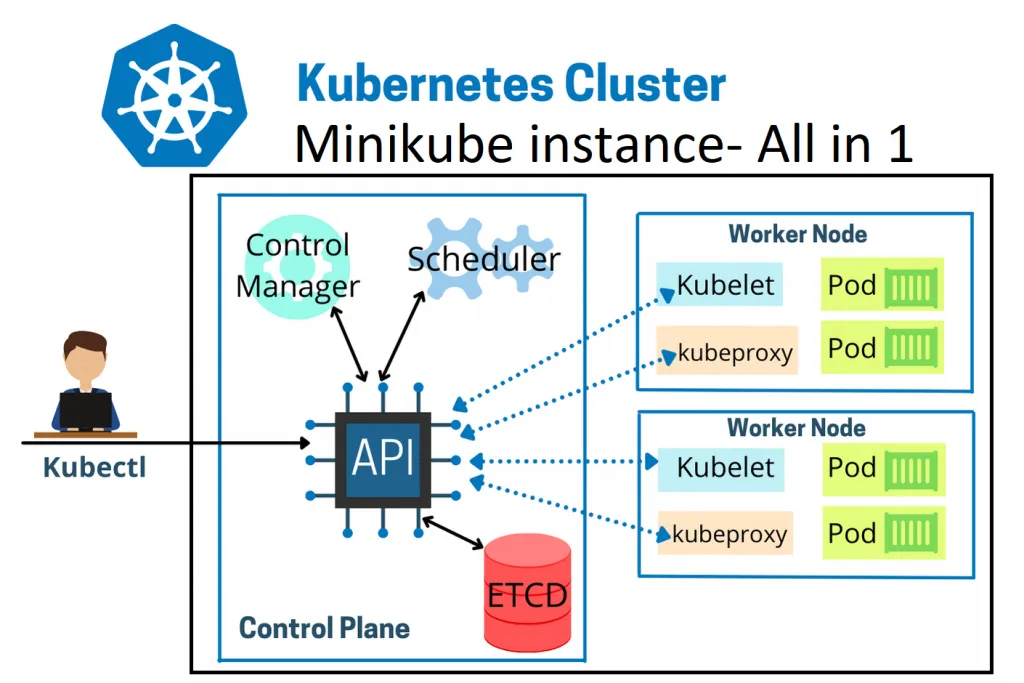
How to install minikube in linux
- You can download the minikube from the above link for different OS.
- For now i will explain steps to setup in linux environment.
curl -LO https://github.com/kubernetes/minikube/releases/latest/download/minikube-linux-amd64
sudo install minikube-linux-amd64 /usr/local/bin/minikube && rm minikube-linux-amd64-
Run this in your terminal and it will install minikube in your desktop.
-
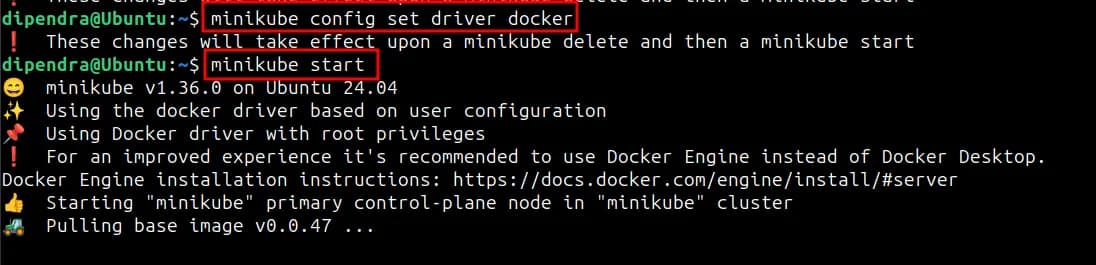
To start the cluster we run the command minikube start but before that let’s setup the driver.
-
You can setup different drivers like virtual_box, docker desktop etc.
-
For now i am using docker desktop as a driver and for this we need to install docker desktop first and after that we can run this commads.
-
Start a cluster using the docker driver:
**`minikube start --driver=virtualbox`**To make docker the default driver:
**minikube config set driver ``**`virtualbox`**``** -
NOTE: If you run minikube start without specifying any driver then it will take by virtual box by default.
- Now we need to setup kubectl. For this you can refer to the official document for it’s installation.
Commands
- minikube status: To see the status
- minikube start: To start the minikube
- minikube start –driver : To start with specific driver
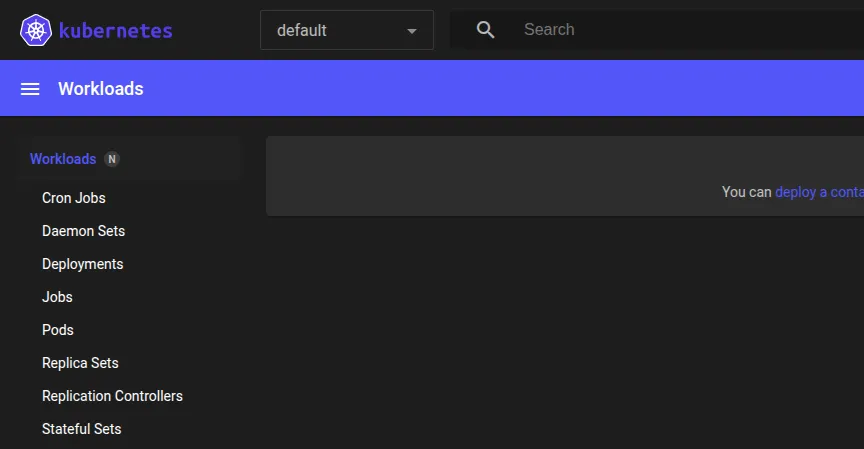
- minikube dashboard : To launch mninikube dashboard. After running this command you will get a url to access the minikube from web.
What is kubectl?
kubectlis just a command-line tool used to interact with a Kubernetes cluster.- It does not create or run the cluster itself. It only connects to it.
- It is also known as kube control. Now let’s explore the kubectl commands.
We can use this commands in eks[elastic kubernetes service], aks[azure kubernetes service] or any cluster management then we can use these commands.
- kubectl get nodes: To list all the available nodes
- kubectl cluster-info: To get the cluster info
Kubernetes control plane is running at https://192.168.59.101:8443

CoreDNS is running at https://192.168.59.101:8443/api/v1/namespaces/kube-system/services/kube-dns:dns/proxy- kubectl get pods: To show the pods in the default namespaces
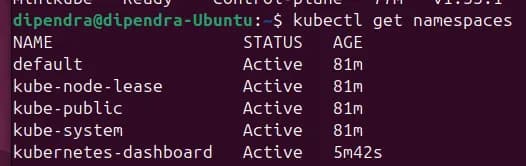
- kubectl get namespaces: To see the name spaces available in the machine.
- kubectl get pods -n kube-system: To view the pods in the kube-system name space
Kubectl Ad-Hoc Commands
Commands
- kubectl run –image:nginx –port:80: To run the pod with nginx image and port 80.
- kubectl run mynginx –image:nginx –port:80
- kubectl describe pod : To see details about the pod. Similar to docker inspect command
- kubectl delete pod : TO delete the existing pods
- kubectl get pods: To list all the pods in the machine
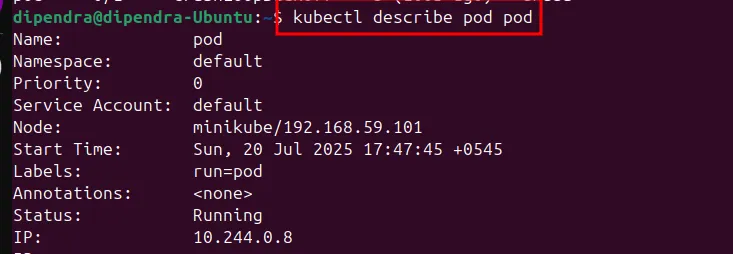
- kubectl get pods -o wide: To see the pod and node of the machine

OBJECTS in K8
In Kubernetes, objects are persistent entities that represent the desired state of your cluster. They describe what containerized applications are running, on which nodes, the resources allocated to them, and the policies governing their behavior.
- Pods: The smallest deployable units of computing that can contain one or more containers. Pods are ephemeral and can be created, destroyed, and recreated dynamically.
- Deployments: Manage the lifecycle of stateless applications by declaratively managing ReplicaSets and Pods to ensure a specified number of replicas.
- ReplicaSets: Ensure a stable set of pod replicas are running at all times.
- Services: Define logical sets of pods and policies to access them, typically for networking and load balancing.
- StatefulSets: Manage stateful applications and provide guarantees about the ordering and uniqueness of pods.
- DaemonSets: Ensure that all (or some) nodes run a copy of a pod, typically for system-level or monitoring tasks.
- ConfigMaps and Secrets: Manage configuration data and sensitive information respectively.
- Namespaces: Provide a method to divide cluster resources between multiple users.
- Volumes: Manage storage attached to pods.
Detailed explain of each topic is described below along with examples.
What is a pod?
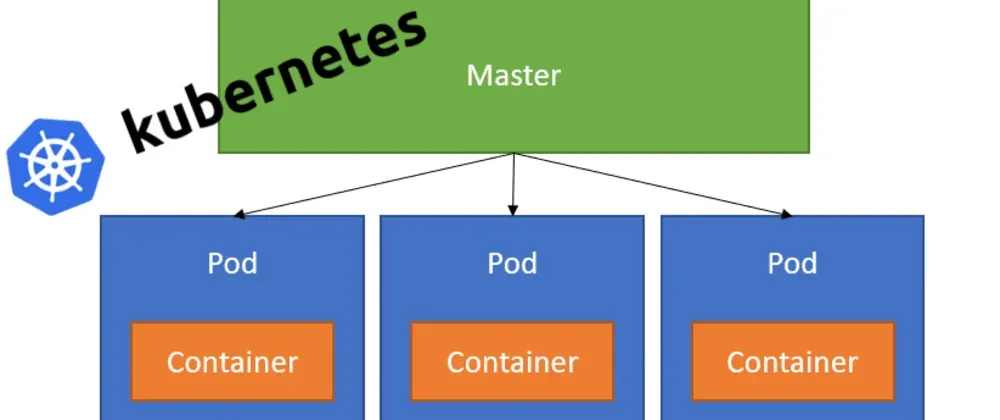
Pods are the smallest deployable units of computing that you can create and manage in Kubernetes. A Pod (as in a pod of whales or pea pod) is a group of one or more containers, with shared storage and network resources, and a specification for how to run the containers. It contains one or more application containers which are relatively tightly coupled.
As well as application containers, a Pod can contain init containers that run during Pod startup. You can also inject ephemeral containers for debugging a running Pod.
Pods in a Kubernetes cluster are used in two main ways:
- Pods that run a single container. The “one-container-per-Pod” model is the most common Kubernetes use case; in this case, you can think of a Pod as a wrapper around a single container; Kubernetes manages Pods rather than managing the containers directly.
- Pods that run multiple containers that need to work together. A Pod can encapsulate an application composed of multiple co-located containers that are tightly coupled and need to share resources. These co-located containers form a single cohesive unit.
- This approach is used when we need a helper container.
- In this we use different containers to help the main container.
YAML based kubectl file
While writing a YAML file in kubernetes we need to know mainly four things. id;
- api version: Every object have different versions.
- V1: pod, service
- apps/v1: replicaset, deployment
- How to find this detail in the machine where you have installed pod
- kubectl explain pod
- kubectl explain service
- kubectl explain replicaset
- kubectl explain deployment
- kubectl explain configmap
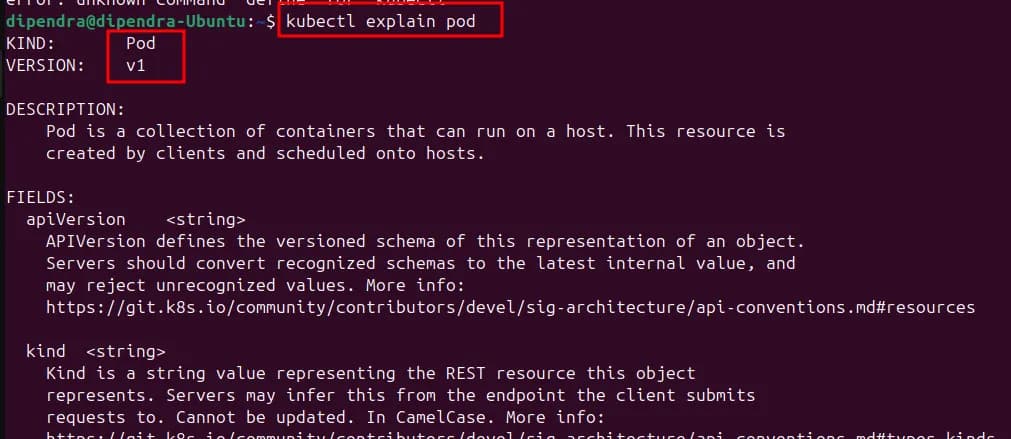
- kind: Which kind like it is service or pod or what ?
- based on this kind we need to mention version
- metadata: data about data
- we can write anything inside label
- here name and labels are standard and all other things are custom
- spec: We define how this object should be
- like container image
- app type like java/python or ?
- ports
- arguments
Let’s write a simple file to create pods.
apiVersion: v1
kind: Pod
metadata:
  name: myapp
  labels:
    owner: frontend
    app: myapp
spec:
  containers:
    - name: mynginx-app
      image: nginx
      ports:
- containerPort: 80- kubectl create -f kubectl.yaml : To create pod.
- After running this the pod is created successfully
| create | Apply |
|---|---|
| If we are creating the pod for the first time then we can use create If we run create command for next time then it will throw error. | If we have make changes then we need to use apply command. |
Note: To ignore the issue related create and apply we can simply use the apply command for all of the cases like during creating for the first time or updating after making some changes in the file.
- kubectl get -f : To get pod create by this file
- kubectl delete -f : Delete with the help of file
Replication controller
A ReplicationController ensures that a specified number of pod replicas are running at any one time. In other words, a ReplicationController makes sure that a pod or a homogeneous set of pods is always up and available.
If there are too many pods, the ReplicationController terminates the extra pods. If there are too few, the ReplicationController starts more pods. Unlike manually created pods, the pods maintained by a ReplicationController are automatically replaced if they fail, are deleted, or are terminated.
This is the traditional approach and not used in nowadays kubernetes management. So based on today use cases let’s discuss about ReplicaSet.
Replicaset
A ReplicaSet’s purpose is to maintain a stable set of replica Pods running at any given time. Usually, you define a Deployment and let that Deployment manage ReplicaSets automatically.
A ReplicaSet is defined with fields, including a selector that specifies how to identify Pods it can acquire, a number of replicas indicating how many Pods it should be maintaining, and a pod template specifying the data of new Pods it should create to meet the number of replicas criteria. A ReplicaSet then fulfills its purpose by creating and deleting Pods as needed to reach the desired number. When a ReplicaSet needs to create new Pods, it uses its Pod template.
A ReplicaSet is linked to its Pods via the Pods’ metadata.ownerReferences field, which specifies what resource the current object is owned by. All Pods acquired by a ReplicaSet have their owning ReplicaSet’s identifying information within their ownerReferences field. It’s through this link that the ReplicaSet knows of the state of the Pods it is maintaining and plans accordingly.
A ReplicaSet identifies new Pods to acquire by using its selector. If there is a Pod that has no OwnerReference or the OwnerReference is not a Controller and it matches a ReplicaSet’s selector, it will be immediately acquired by said ReplicaSet.
Note: There are not so many differences between the ReplicationController and ReplicaSet.
Now let’s create a simple file for replicaset
- Need to use template when we are deploying using replicaset.
- WHY we need to use template?
- Suppose we are running 5 replicas. So due to some errors / faults we one of our replicase become down. In this case the replicaset creates a new pod to fulfill the requirement. So to create new pod it needs some details like what the pod should look like, its specifications, etc. So these things are defined in a template. Based on the tablet it will create new pods.
apiVersion: apps/v1
kind: ReplicaSet
metadata:  #This is the metadata for the replicaset
  name: myappreplicaset
  labels:   #This label and template label should match
    app: myappnew
    type: dev
    owner: dipendra
spec:
  replicas: 5 #Now this will create 5 replicas using       template
  selector:
    matchLabels:
      owner: dipendra #Manage all the pods with owner: dipendra
  template:
    metadata:  #This is the metadata for the pod/template
      labels:
        owner: dipendra
        app: myappnew
        type: dev
    spec:    #Spec for the pod
      containers:
        - name: mynewnginxapp
          image: nginx
          ports:
- containerPort: 80Here replias is used to
- kubectl get replicaset: To list all the replicaset
- kubectl get rs: To list all the replicaset
- kubectl create -f replicaset.yaml: Create pods with file
- kubectl delete -f replcaset.yaml: To delete the replicaset
- kubectl describe rs myappreplicaset: To describe replicaset
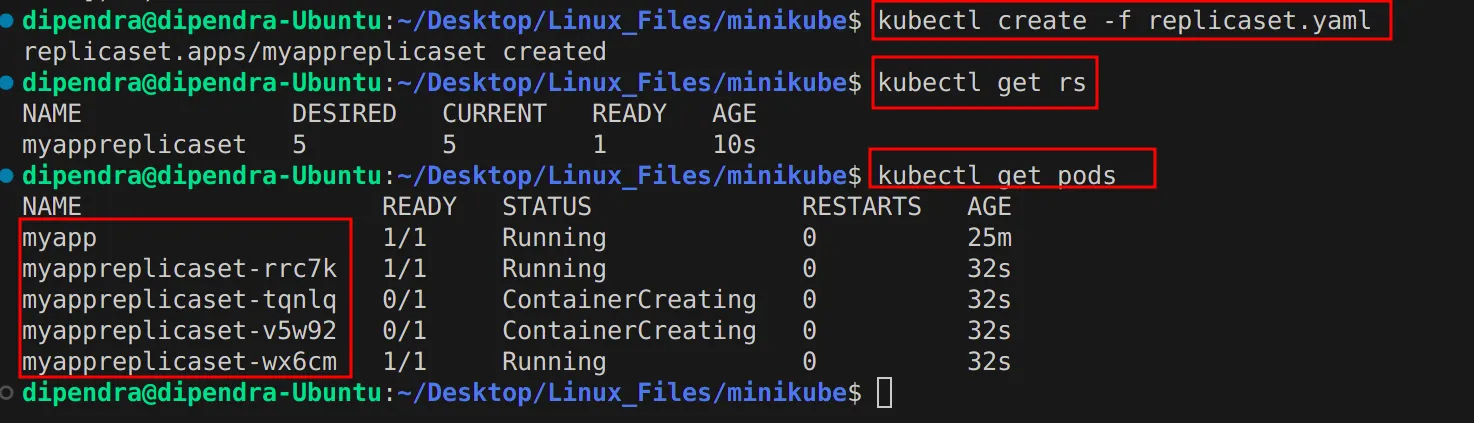
- Here as we can see the replicaset that we have defined is successfuly created. But we have defined the 5 replicas it has created only one. why?
- Because the label “owner: dipendra” is same for replicaset and myapp. As we have mentioned this in our .yaml file to manage the pod with label: dipendra it is automatically taking it as it’s 5th pod.
Now to extend replicas we can make changes to the file and replicas:

After changing this we will see this warning. For now we can we simply ignore this warning. To do scaling we need to do with yaml file. This is considered as best practice to do scaling up and down using .yaml file.
During testing we can run these commands in CLI .
- kubectl scale –replicas=9 replicaset myappreplicaset: With the help of rs name
- Output: replicaset.apps/myappreplicaset scaled
- kubectl scale replicas=9 -f replicaset.yaml: With the help of file
- kubectl edit replicaset: To edit the configuration using vi editor from terminal
- Output: replicaset.apps/myappreplicaset edited
NOTE: Don’t Use this practice. It is not good for documentation and you will forgot it after sometime and while working in a time this approach will cause disaster.
To lock these types of Ad-Hoc commands we can use the RBAC strategy.
Deployments
A Deployment provides declarative updates for Pods and ReplicaSets.
You describe a desired state in a Deployment, and the Deployment Controller changes the actual state to the desired state at a controlled rate. You can define Deployments to create new ReplicaSets, or to remove existing Deployments and adopt all their resources with new Deployments.
Use Case
- Create a Deployment to rollout a ReplicaSet: To update the replicas of the replicaset,
- Declare the new state of the Pods by updating the PodTemplateSpec of the Deployment.
- Rollback to an earlier Deployment revision if the current state of the Deployment is not stable.
- Scale up the Deployment to facilitate more load.
- Pause the rollout of a Deployment to apply multiple fixes to its PodTemplateSpec and then resume it to start a new rollout.
- Use the status of the Deployment as an indicator that a rollout has stuck.
- Clean up older ReplicaSets that you don’t need anymore.
NOTE: If we are using deployment then we don’t need to use the Replicaset because we are defining the replicaset in the deployment. So we don’t need to use replicaset.
Example 1
Let’s create a simple .yaml file to do demo for deployment.
apiVersion: apps/v1
kind: Deployment
metadata:  #This is the metadata for the replicaset
  name: myapp-deployment
  labels:   #This label and template label should match
    app: myappnew
    type: dev
    owner: dipendra
spec:
  replicas: 5 #Now this will create 5 replicas using template
  selector:
    matchLabels:
      owner: dipendra #Manage all the pods with owner: dipendra
  template:
    metadata:  #This is the metadata for the pod/template
      labels:
        owner: dipendra
        app: myappnew
        type: dev
    spec:    #Spec for the pod
      containers:
        - name: mynewnginxapp
          image: nginx
          ports:
- containerPort: 80- kubectl get deployments: To list all the deployments
- kubectl create -f deployment.yaml: Create deployment with file
- kubectl delete -f deployment.yaml: To delete the deployment
- kubectl describe deployment myapp-deployment: To describe deployment
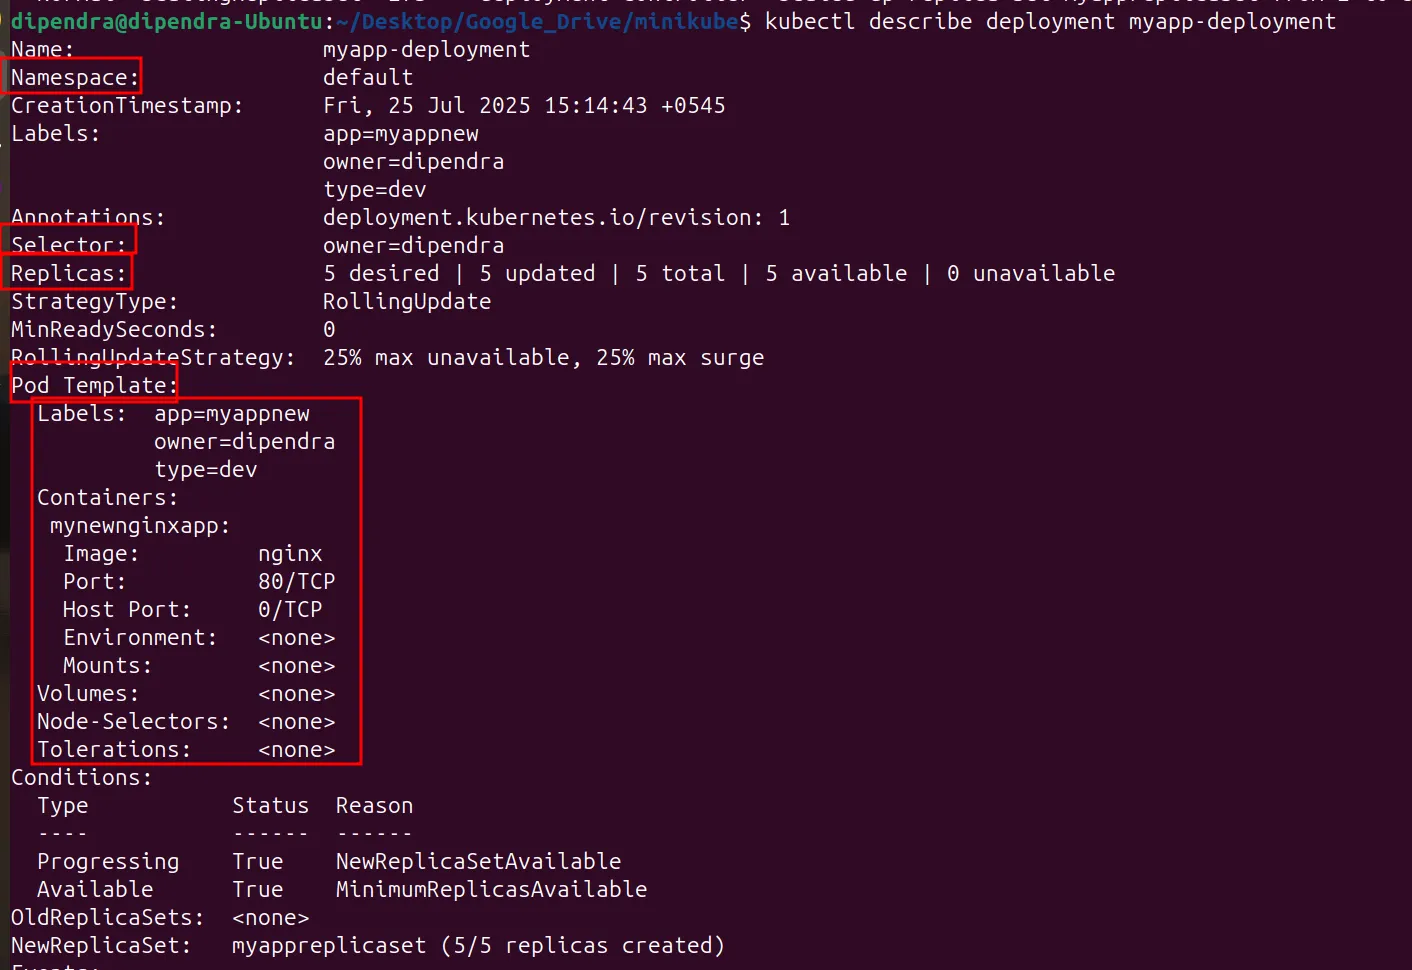
- Here we are seeing Tolerations so let’s have a quick example what is it with an example.
This concept is advance and important for interview and exam. How will you prevent the critical pod from deploying in specific node?
In this case we can use concept of taint and tolerance
- Taint:
- If we don’t use net or mosquito nets then mosquito can ove freely. If we using mosquito repellent like nets, dhup etc. then the mosquito cannot go there
- Here mosquito is pod and room is node. The pod cannot go to that node because we have used taint concept. To avoid pod in node
- Tolerations: If we use mosquito nets or any other replicants . After some time they become familiar and can tolerate that repellent. This concept is know as tolerance concept.
- We can define toleration in pod so that the pod can deploy in that node.
- Tent: Done in node
- Tolerations: Defined in pod defination file
- In master or control node by default it has tent.
- Example:If there is a sensitive container running then we can use the concept of tent and tolerance in this case.
Node affinity
If we want to attract any pod to the node then we can use this concept.
Exec
- Now let’s exec in to the pod
- kubectl exec –stdin –tty myappreplicaset-2jxm8 — /bin/bash
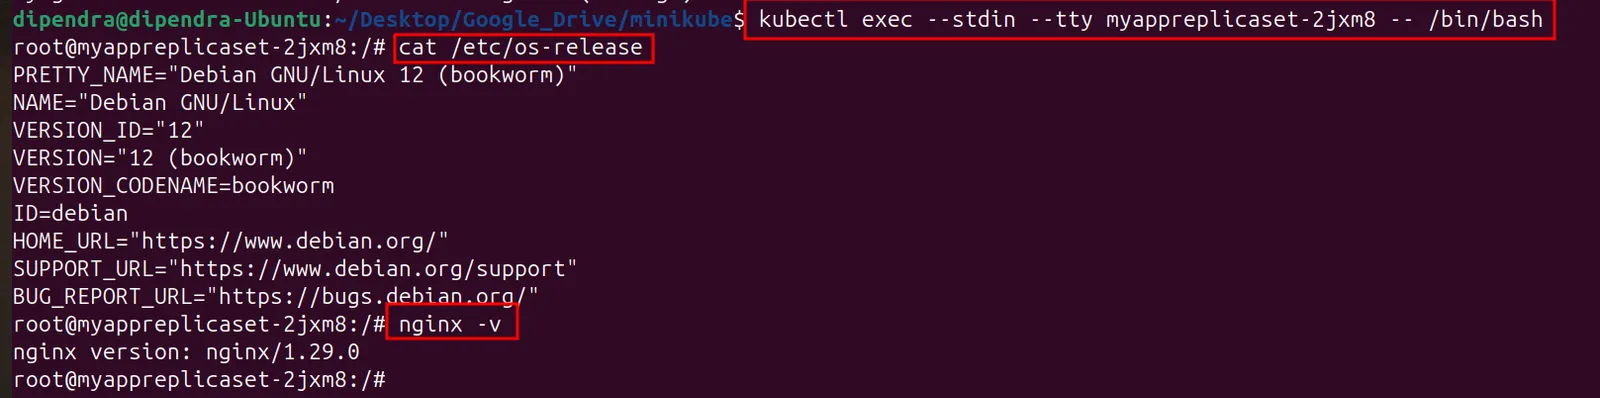
- To see from the shell without logging into it.
- kubectl exec –stdin –tty myappreplicaset-2jxm8 — nginx -v

Example 2
Now let’s do a scenario of rollback and rollout updates
For now let’s change the image verision in the code
image: nginx:1.28.0After this create the deployment and check deployment status.
kubectl rollout status deployment myapp-deployment
Output:
deployment "myapp-deployment" successfully rolled outNow again delete the deployment and apply again.
kubectl delete -f filename
kubectl apply -f filename
kubectl rollout status deployment myapp-deployment
- kubectl rollout history deployment myapp-deployment: To see how many times we have done rollout

Rolling Strategy
If we are updating to the new browser there might be the users that are accessing services. So if the whole service goes down it won’t be fruitful so to overcome this we have rolling update. In this service it won’t all the pods at a time. It will update one pod at a time and switch the traffic to another pod. So it won;t affect service and also there won’t be any downtime. 25% in the context of rolling update means at a time only 25% of the services can go down.
Default strategy is this and is used in most of the scenarios.
How to see how this strategy actually works ?
- Change the version of the image in the .yaml file. [This is the best practice so it will be better to follow this]
image: nginx:1.29.0 #Again updating image- Here we can see how it working using status command
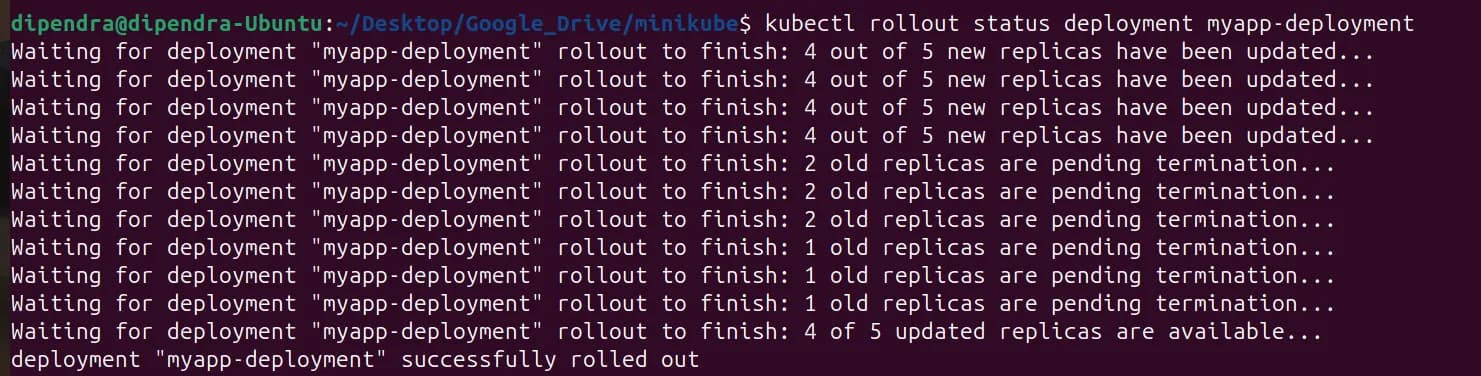
Using describe command we can see actually how it shutting one and updating one in detail.
kubectl describe deployment myapp-deployment
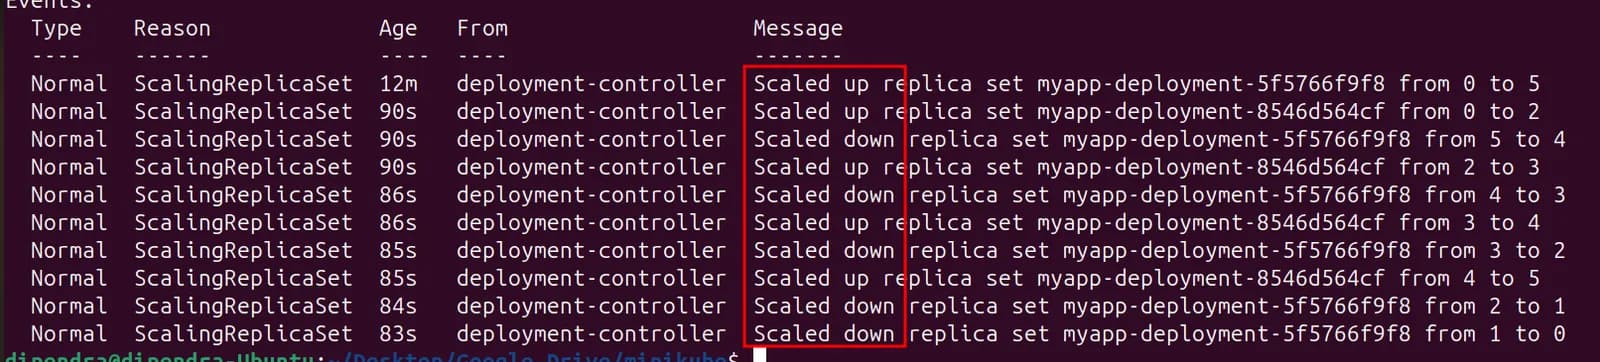
Now to rollback this update we can use
kubectl rollout undo deployment myapp-deployment: To rollback to previous version

- Now the version is successfully rolled out.
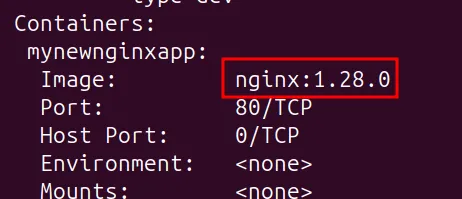
Recreate strategy
It will shut down the whole application and create a whole new application. This will cause downtime of the application that will cause loss in business.
NOTE: Rolling update down one application and create a new pod and in recreate stratedy it will destroy all recreate a new one.
Service
In Kubernetes, a Service is a method for exposing a network application that is running as one or more Pods in your cluster.
A key aim of Services in Kubernetes is that you don’t need to modify your existing application to use an unfamiliar service discovery mechanism. You can run code in Pods, whether this is a code designed for a cloud-native world, or an older app you’ve containerized. You use a Service to make that set of Pods available on the network so that clients can interact with it.
We can use AD-Hoc commands or can write in yaml file .
NOTE: Can’t we simply do port forwarding in the case of deployment:+?
No we cannot do this. Pods are mortal. They can be easily created and destroyed. There is no any assurance that the pod will always be the same. We deploy the pods with the help of deployment. The deployment will dynakmically creates and destroy the pods. So it is not possible to know which new pods in recently created and which one is recently deleted. Doe to this nature we cannot directly forward ports.
Types of services
ClusterIP: Exposes the Service on a cluster-internal IP. Choosing this value makes the Service only reachable from within the cluster. This is the default that is used if you don’t explicitly specify a type for a Service. You can expose the Service to the public internet using an Ingress or a Gateway.
If we don’t want to expose our containers to the outside world but want the one container to communicate with another container then we can use the concept of cluster IP. For example if we want are running tomcat application and want to communicate the tomcat service with the mysql service then we can use the concept of cluster IP.
**NodePort**: Exposes the Service on each Node’s IP at a static port (the NodePort). To make the node port available, Kubernetes sets up a cluster IP address, the same as if you had requested a Service of type: ClusterIP.
[Something like Port mapping in docker container ie; -p 80:8080 similar to this]. This is not usually done in production environment we can only use this in testing environment.
**LoadBalancer**: Exposes the Service externally using an external load balancer. Kubernetes does not directly offer a load balancing component; you must provide one, or you can integrate your Kubernetes cluster with a cloud provider.
If we want to explore the application outside the cluster then we can use this. Like if we want to access the service from the internet. If we are doing locally then we can use NGINX to setup load balancers. But generally we will setup in cloud using the cloud load balancers like network, application and gateway load balancers.
**ExternalName**: Maps the Service to the contents of the externalName field (for example, to the hostname api.foo.bar.example). The mapping configures your cluster’s DNS server to return a CNAME record with that external hostname value. No proxying of any kind is set up.
Example
Creating NodePort service
apiVersion: v1
kind: Service
metadata:
  name: demo-ser
spec:
  type: NodePort
  selector:
    owner: dipendra
  ports:
    - port: 80
#Particular service kun port ma listen gareko xa tw

      targetPort: 80
#Pod bhitra kun port ma application listen gareko xa. #That i have shown in below picture this is the port of #the container.

      nodePort: 30007
# will allocate a port from a range (default: 30000-32767)

#Here pod is different, node is different and service is different.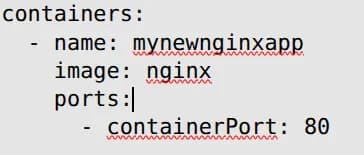
Now to create a node service:
-
kubectl apply -f service.yaml: To create he service.
-
kubectl get services: To see whether the service is created or not.

If we don’t declare the node port then it will assign the port randomly. For example if we remove the nodePort line from the above code then it will assign node port randomly. Here i have also changed name from service to svc. This is only for practice only.

This random port is the node port.
- minikube service svc –url: To generate the url for the service that we have created.

If we browse to this service then we can access to the nginx container that we are running using deployment.
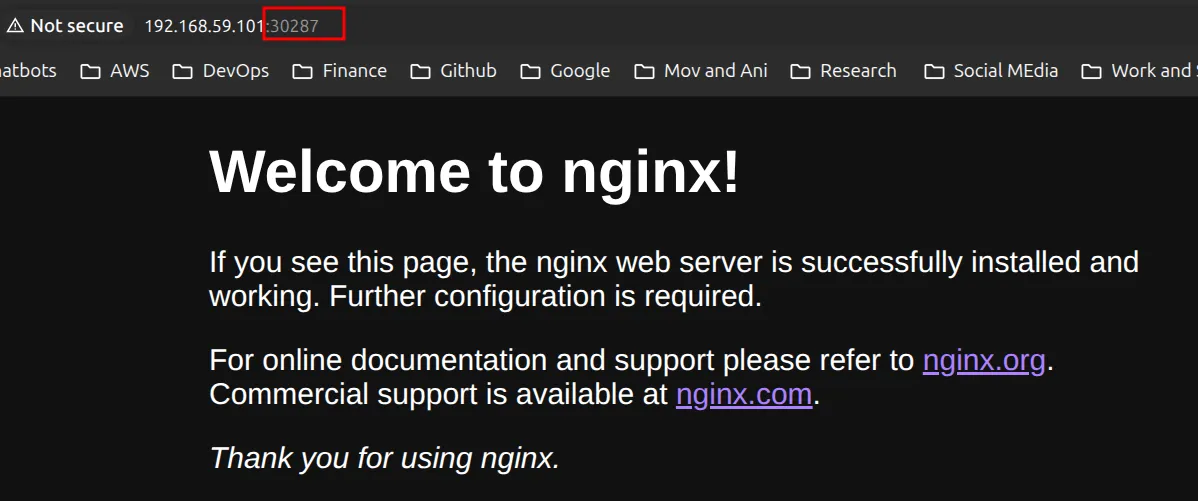
Here we can see the port number is same as the node port.
Creating ClusterIP service
For cluster IP then we will simply change the part of the type ie;
spec:
  type: ClusterIP

#Used for internal communication like
#For example
#Frontend backend, backend database- kubectl apply -f service.yaml: To create he service.
- kubectl get services: To see whether the service is created or not.

Creating LoadBalancer Service
For LoadBalancer then we will simply change the part of the type ie;
spec:
  type: LoadBalancer

#To access from the outside- kubectl apply -f service.yaml: To create he service.
- kubectl get services: To see whether the service is created or not.

We will explore the concept of service in cloud in detail. This is not all that we can use in service.
NameSpaces
- Used to provide isolation.
- For example we can run the application in different name spaces. If there are different environments for example; production and test. SO the production and test environment should be isolated. SO that we can run in different namespaces.
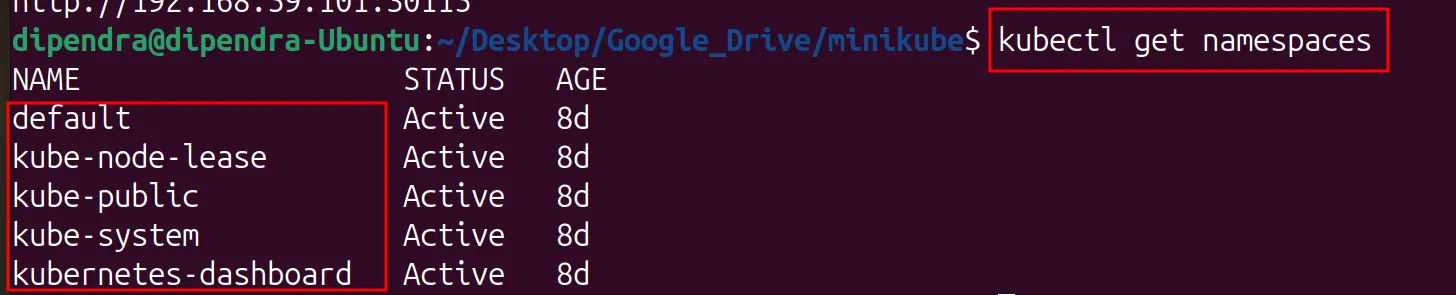
- kubectl get all: To view all the things in current namespace
- kubectl get all -n : To list all the things in that namespace
- kubectl get all –all-namespaces: To get all the things in all namespaces like service, deployments, pods, etc.
- kubectl get services -n <namespace_name>: To list only services in that namespace
Config Map
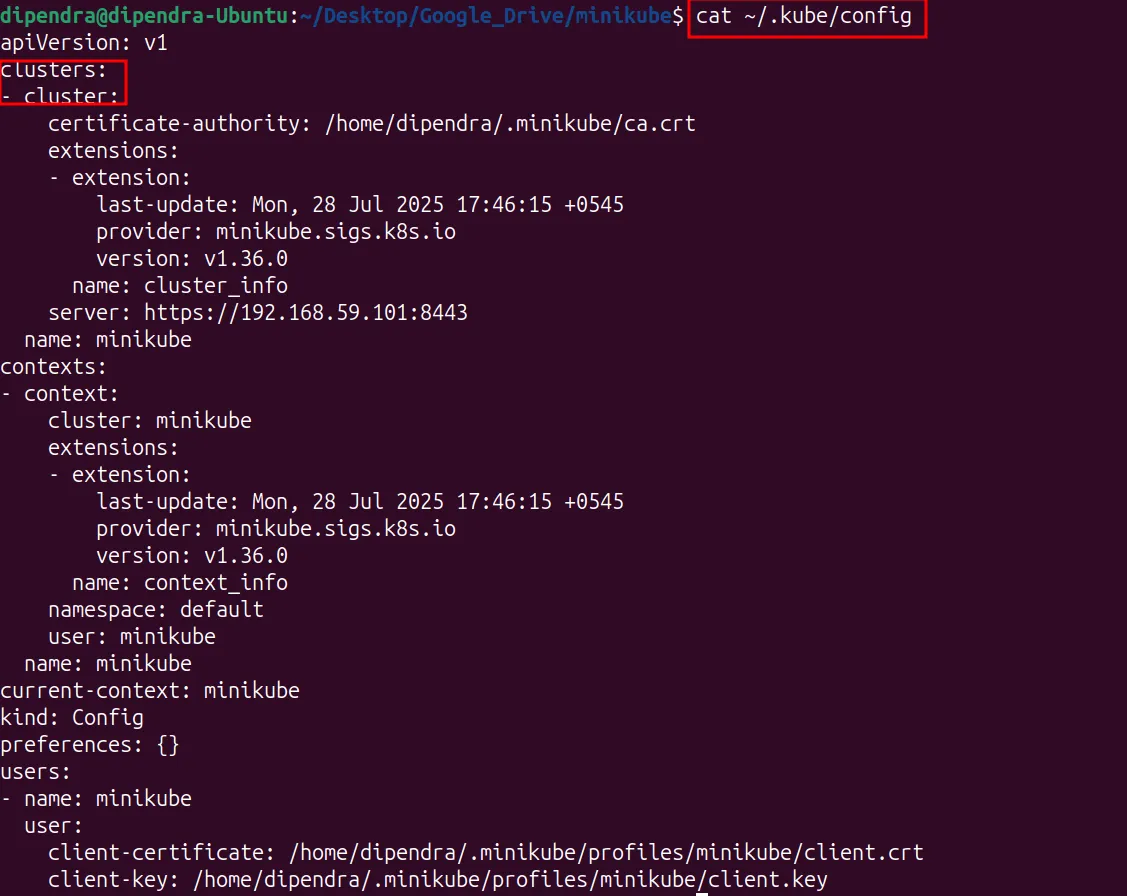
- cat ~/.kube/config
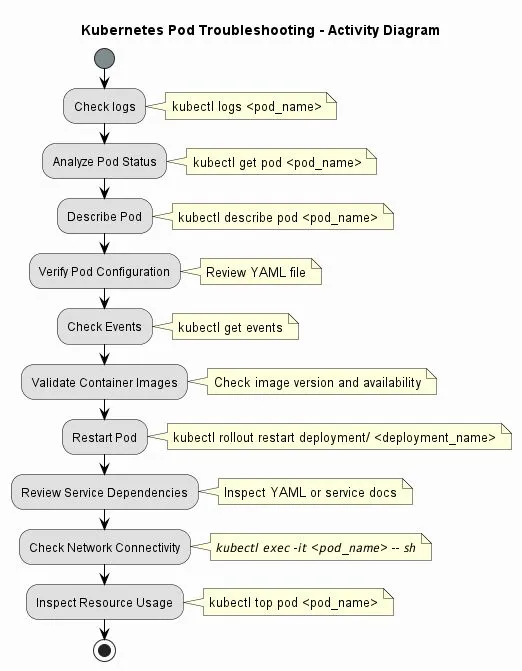
Kubernetes Pod Troubleshooting/Errors
Keep reading
- kubectl Cheat Sheet (With Clear Categories & Uses)
📌 1. Basic Cluster & Node Info Command Use kubectl version –short Check client & server versions kubectl cluster-info Display cluster master & services kubectl get nodes List nodes kubectl describe…
- Kubernetes in AWS
In this topic we will learn how kubeadm is used to used to setup cluster. ECS is not recommended while setting up cluster. We are doing example of EKS in this blog. In complex scenarios, highly…
- KUbernetes
Introduction kubernetes is similar to docker swarm. Kubernetes is also a container orchestration tool. We can run kubernetes in every environment example laptop, dev, production, cloud. So if there…