How ssh works
Ever wondered what actually happens behind the scenes when you open your terminal and type ssh user@server

ON THIS PAGE
🔐 SSH Internals: How SSH Works Behind the Scenes
Ever wondered how SSH works behind the scenes when you open your terminal and type ssh user@server? Most of us know that SSH provides a secure encrypted shell, but the underlying mechanisms involve multiple handshake and exchange steps.
"SSH gives you a secure connection to a remote server."
But what is actually happening between your computer and the server?
- How does the connection get established?
- How does the server prove that it is really the server you intended to connect to?
- How does your password get authenticated?
And how does SSH authentication with a private key work without ever sending your private key to the server?
🧭 The SSH Journey
When you run:
$ ssh user@servera lot more happens than simply "connecting to a server."
At a high level, SSH goes through these stages:
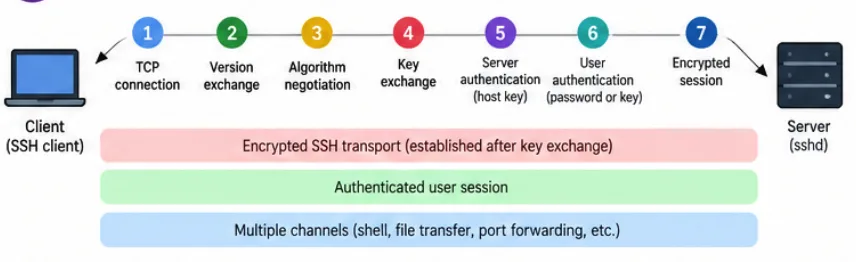
And only after all of this do you finally get your shell:
$ ssh user@server
user@server:~$Let's break down each stage.
1️⃣ TCP Connection: First, We Need a Network Connection
Before SSH can do anything, your computer needs to establish a normal TCP connection with the remote server.
For example:
$ ssh user@192.168.1.100SSH normally connects to: TCP port 22 So the first thing that happens is essentially:
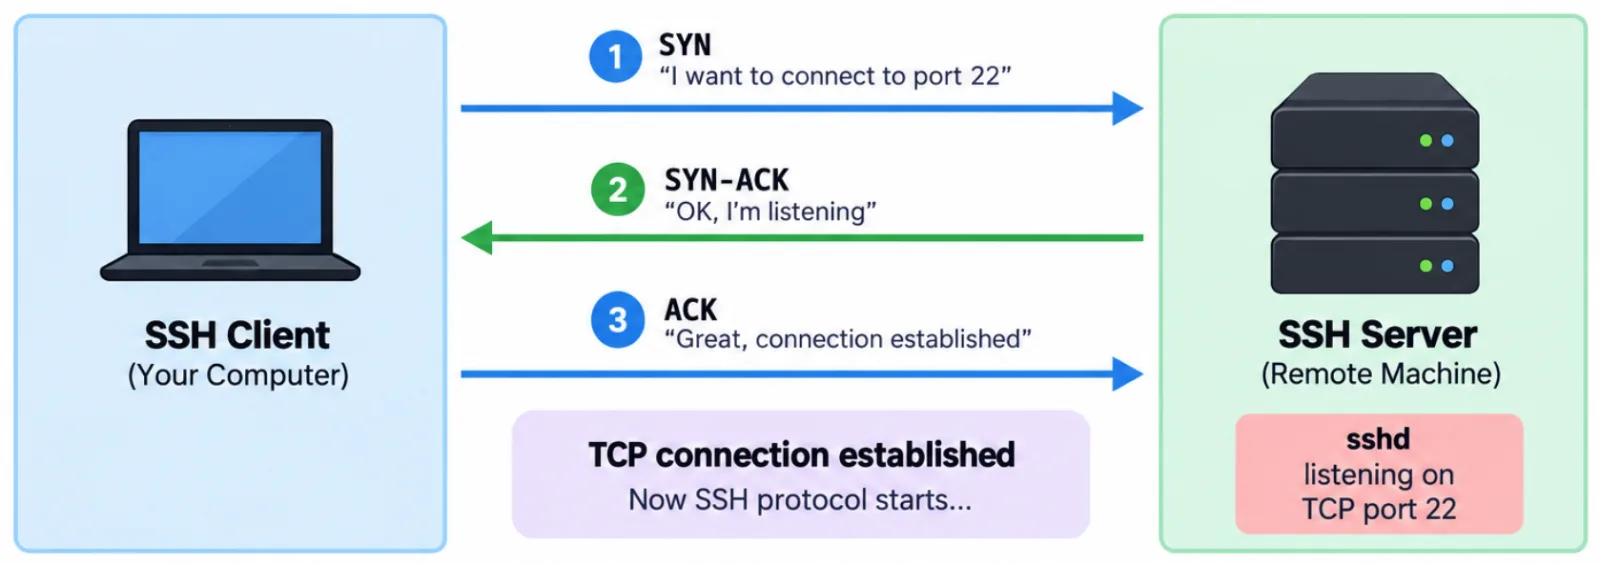
This is simply the TCP three-way handshake.
At this point:
- SSH authentication has not happened.
- SSH encryption has not been established.
- Your user has not been authenticated.
We have only established a network connection between these two machines.
💡 Important
SSH usually uses port 22, but the server can be configured to use another port:
TCP 22
TCP 2222
TCP 2620
...In this case we can connect using -p flag.
$ ssh -p 2620 user@serverIf a firewall blocks the SSH port, the process can fail right here.
2️⃣ SSH Protocol Version Exchange
Now that TCP is established, SSH itself can start communicating. Both sides need to identify themselves as SSH implementations. You may see something conceptually similar to:
Client → Server

SSH-2.0-OpenSSH_9.xand the server responds with its own identification string:
Server → Client

SSH-2.0-OpenSSH_9.xThis allows both sides to establish that they are speaking the SSH protocol and which protocol version they support.
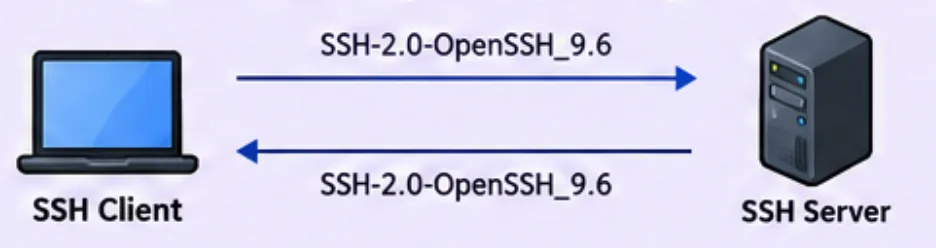
This is still not user authentication. We're basically saying:
"Hello, I'm an SSH client."
"Hello, I'm an SSH server."
3️⃣ Algorithm Negotiation: How Are We Going to Secure This?
Now things start getting interesting. 🔐 SSH needs to decide which cryptographic algorithms will be used for this connection. The client and server each have a list of algorithms they support.
These include things such as:
- Key-exchange algorithms
- Encryption algorithms
- Integrity/authentication algorithms
- Compression algorithms
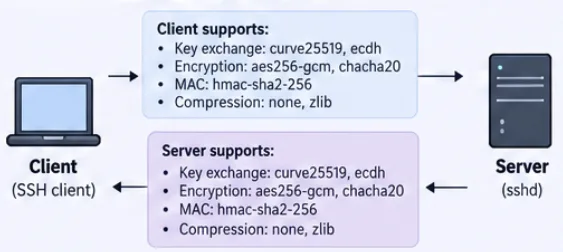
SSH selects a mutually supported combination.
The important point is:
The client and server negotiate the cryptographic algorithms before establishing the final secure session.
4️⃣ Key Exchange: Creating the Shared Secret
This is one of the most important parts of SSH. The client and server now need to establish the cryptographic material that will protect the SSH connection.
SSH commonly uses key-exchange mechanisms based on:
Diffie-Hellman
ECDH
Curve25519The client and server can independently calculate the same shared secret without simply sending that secret across the network.
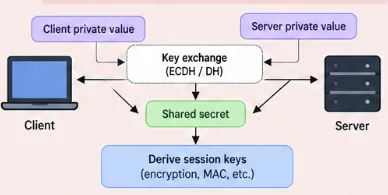
Both sides independently arrive at the same shared secret. That secret is then used as the basis for deriving the keys used to protect the SSH transport.
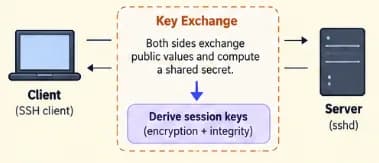
Now SSH has the cryptographic foundation for an encrypted transport.
Note:
This key exchange is not the same thing as your SSH login key. There are different keys involved in SSH. The key exchange establishes the session's cryptographic secrets. Your SSH private key, if you use public-key authentication, is used later to authenticate you.
5️⃣ Server Authentication: "Are You Really My Server?"
Now we need to answer an important question:
How does your computer know that it is actually talking to the correct server?
This is where the SSH host key comes into play. The SSH server has host keys, commonly stored under:
$ /etc/ssh/For example:
$ /etc/ssh/ssh_host_ed25519_keyThe server has a private host key and corresponding public key. During the SSH handshake, the server proves that it possesses its private host key. Your SSH client can compare the server's identity with the information it has previously stored. That information is commonly stored in:
$ ~/.ssh/known_hosts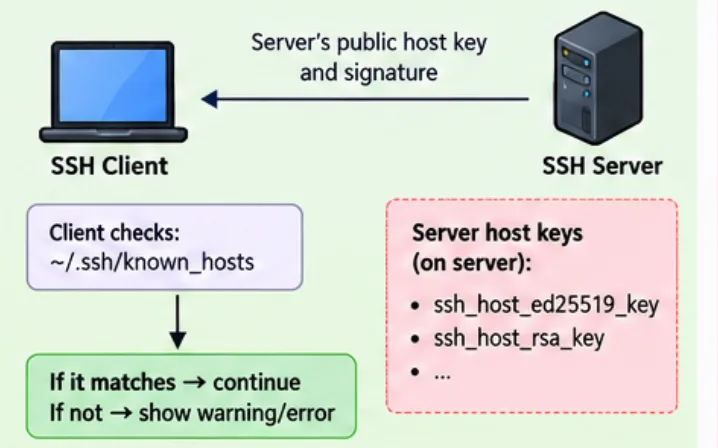
The first time you connect to a server, you may see:
The authenticity of host 'server' can't be established.
Are you sure you want to continue connecting?If you accept it, the host key is normally stored in:
$ ~/.ssh/known_hostsOn future connections, SSH can detect if the server's host-key identity unexpectedly changes. This is why you should not blindly ignore messages such as:
$ WARNING: REMOTE HOST IDENTIFICATION HAS CHANGED!It could be completely legitimate for example, if the server was rebuilt. However, it can also indicate that you're connecting to a different machine than expected.
6️⃣ User Authentication: "Who Are You?"
Now we've reached the part most people think of when they hear "SSH authentication."
The server has verified its own identity. Now the server needs to verify your identity.
Suppose you ran:
$ ssh dipen@serverThe server needs to determine:
"Is this really dipen?"
SSH supports multiple authentication mechanisms.
For this discussion, we'll focus on the two most familiar ones:
- Password authentication
- Public-key authentication
🔑 Option A: Password Authentication
With password authentication, you enter something like:
$ Password: ********The password is transmitted through the already protected SSH transport.
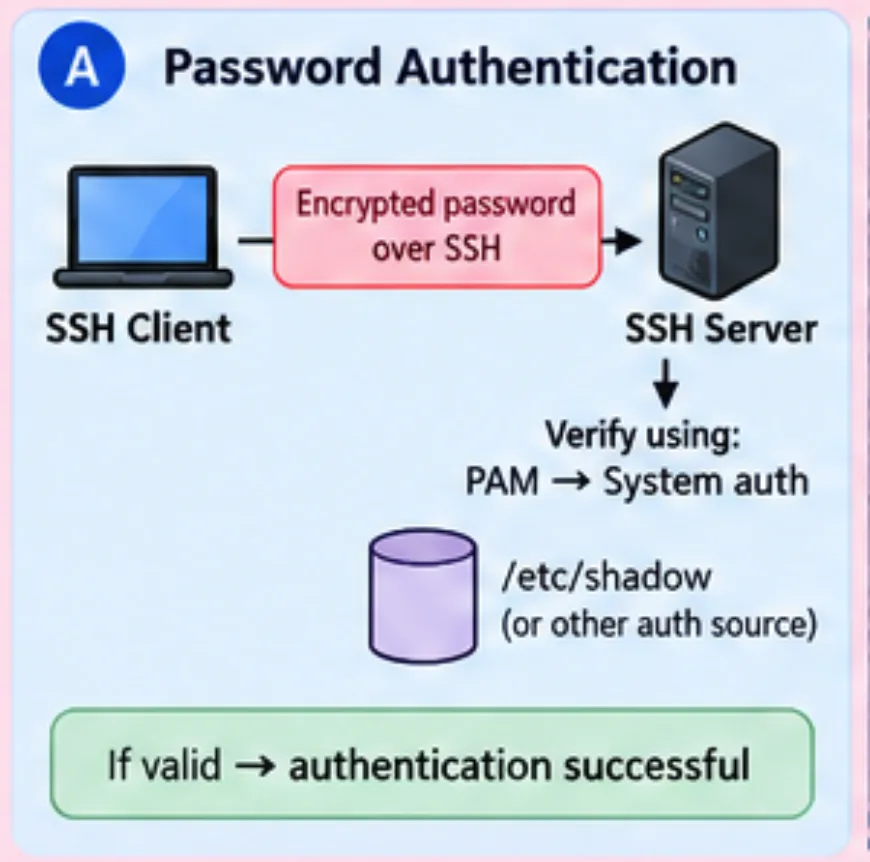
On a typical Linux system, sshd can use PAM (Pluggable Authentication Modules) to perform password authentication. The important thing to understand is:
Your password is protected by the SSH encrypted transport while it is being sent.
A network attacker sniffing the traffic should not see:
$MyPassword123Instead, they see encrypted SSH traffic.
🔐 Option B: Public-Key Authentication
Now let's look at the more interesting method. With SSH public-key authentication, you have a key pair:
Private Key + Public Key
For example:
$ ~/.ssh/id_ed25519
$ ~/.ssh/id_ed25519.pubThe private key stays on your machine. The corresponding public key is installed on the server, commonly in:
$ ~/.ssh/authorized_keysSo we have:
- Your Computer ->Private Key 🔐
- Server -> authorized_keys -> Public Key 🔓
The server does not need your private key. Instead, the server asks you to prove that you possess it.
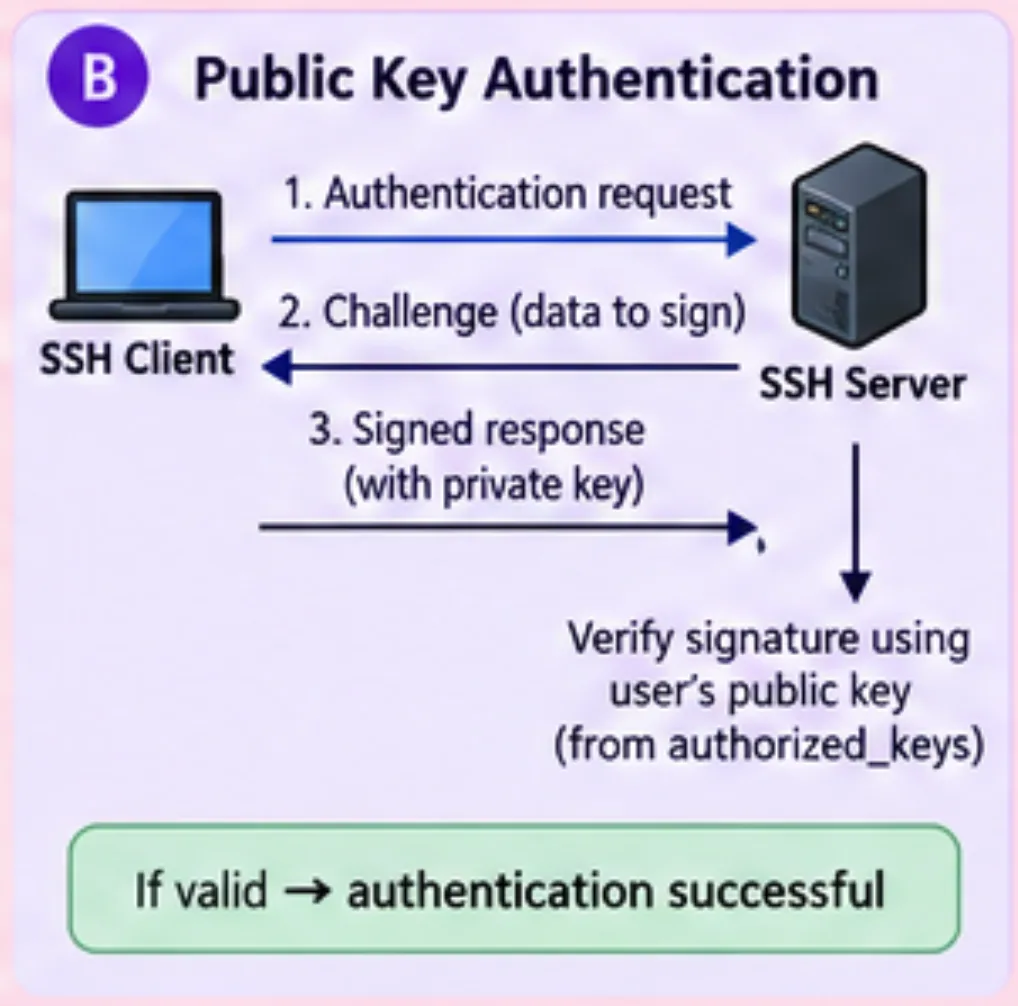
The private key itself is never sent to the server. That's the beauty of public-key authentication.
7️⃣ Encrypted SSH Session
Once user authentication succeeds, we finally have what we wanted:
A secure, authenticated SSH session.Now you can run:
$ ls
$ cd /var/www
$ docker ps
$ systemctl status nginx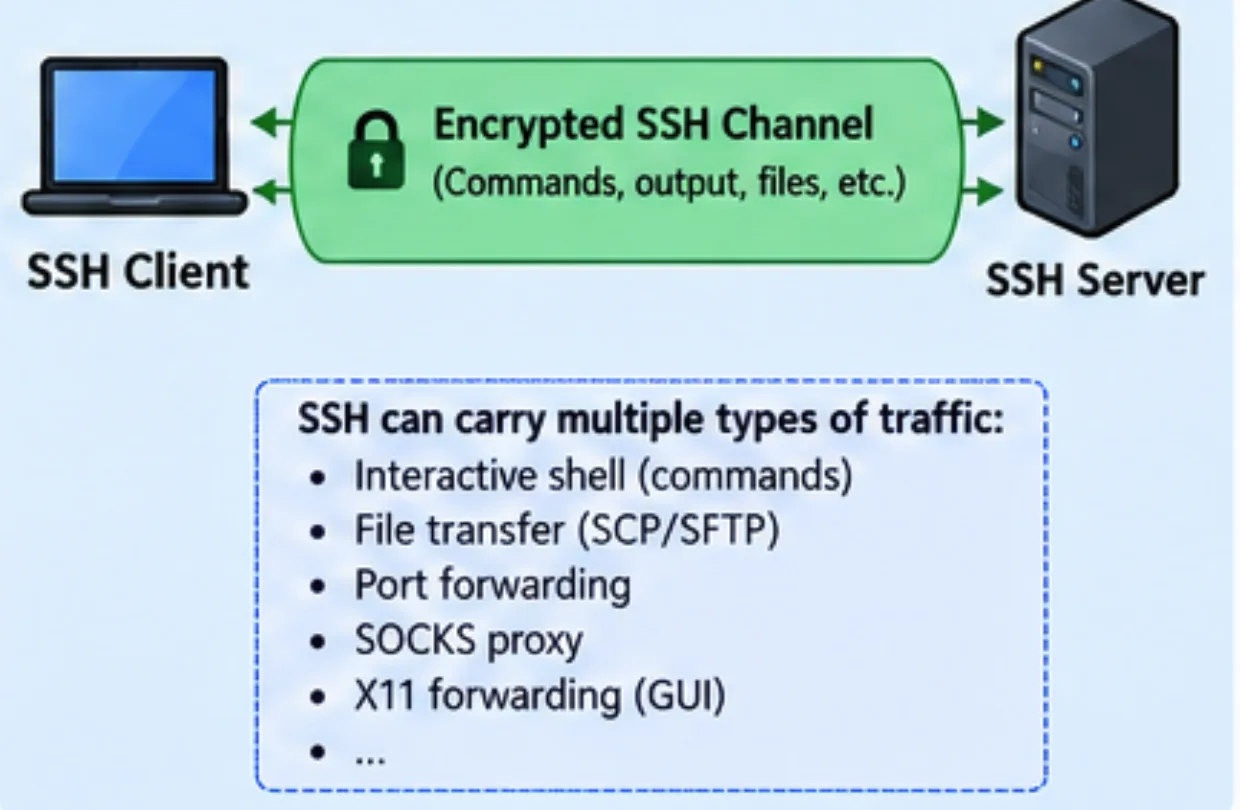
For example:
$ docker psThe server executes:
docker psand sends the output back through the encrypted SSH channel.
8️⃣ SSH Is Not Just a Remote Terminal
This is another important part of SSH.
Once the SSH connection exists, SSH can carry different types of traffic.
For example:
SSH Connection
      │
      ├── Interactive shell
      ├── File transfer
      ├── SCP
      ├── SFTP
      ├── Port forwarding
      ├── SOCKS proxy
└── Other SSH channelsThis is why SSH is so useful in DevOps. You aren't simply creating a terminal. You're establishing a secure transport that can carry different types of communication.
9️⃣ Finally: You Get Your Shell
After all of these steps:
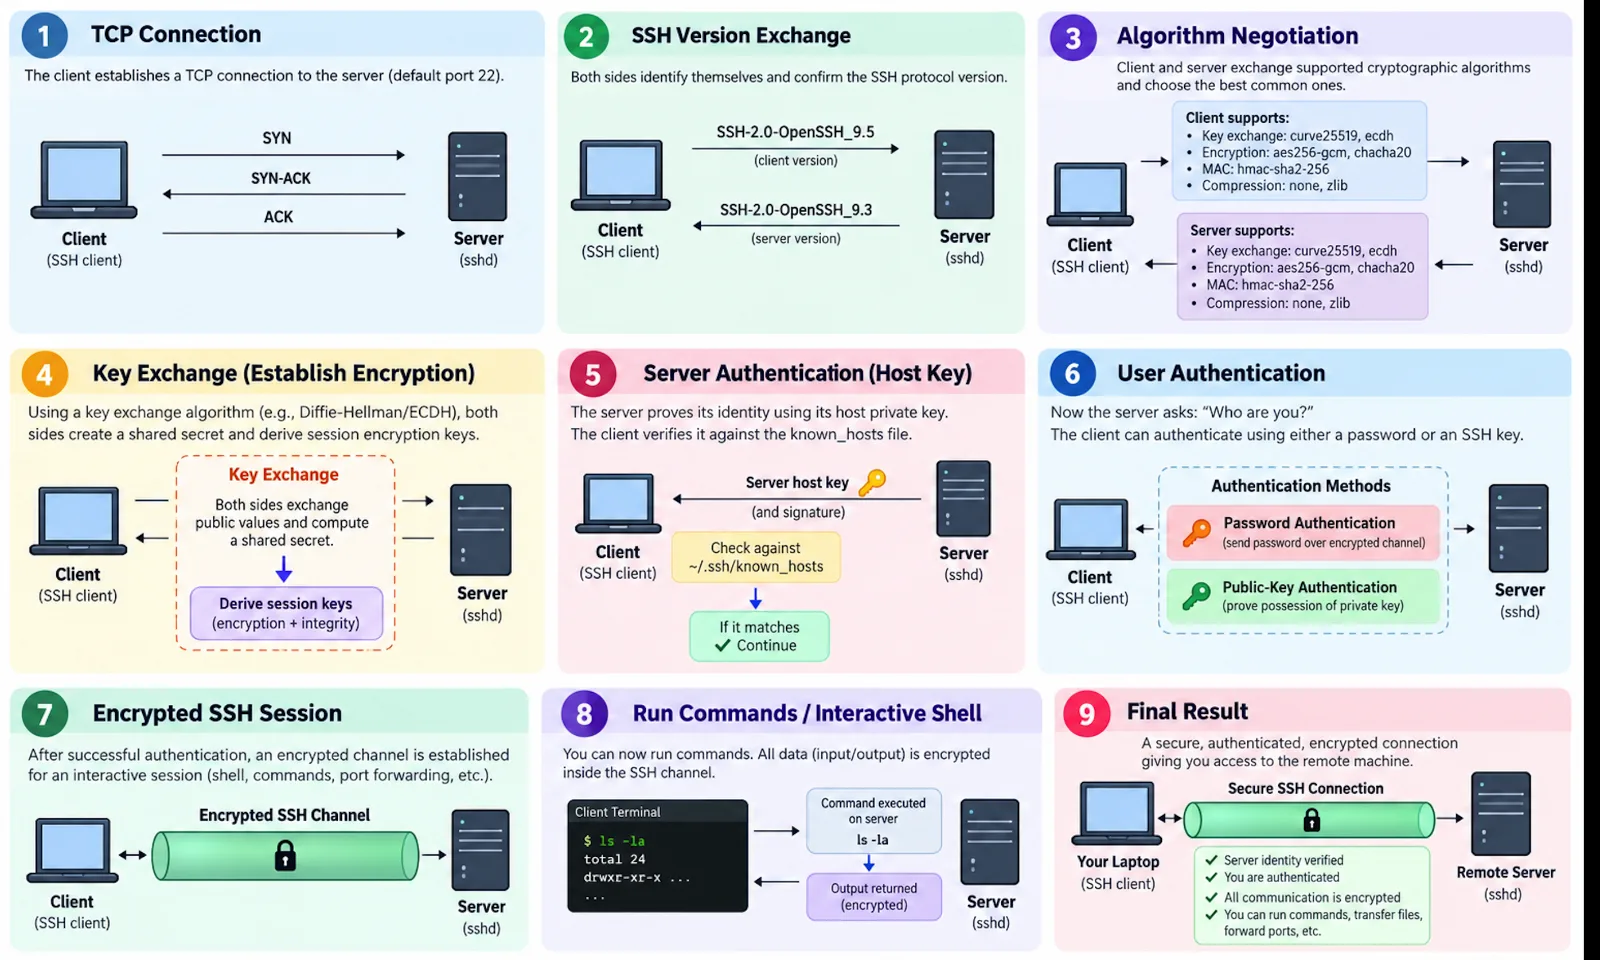
you finally see:
$ dipen@server:~$And now you're operating on the remote machine.
If you want to see a practical demo of setting up a VirtualBox VM and connecting to it step-by-step, check out the Remote login to a VM over SSH guide in our Linux Fundamentals series.
Keep reading
- tmux Cheat Sheet: Sessions, Windows, Panes and Copy Mode
A tmux reference for remote work: sessions that survive SSH drops, windows, split panes, copy mode, synchronized panes, and a minimal tmux.conf.
- Apache Web Server on Ubuntu: Install and Host a Static Site
Install Apache on Ubuntu, learn how /etc/apache2 is organised, and serve a static HTML template from /srv through a dedicated virtual host.
- Linux Users, Permissions and Package Management
Manage users, groups, sudo, file permissions, links, apt packages, archives and processes on Ubuntu, with the commands and the files behind each one.